
Approval Tasks in your APEX workflows have two built-in outcomes, either APPROVED or REJECTED. If your flow needs custom outcomes, use an Action Task with an updateable task parameter instead.
The sample app in this article lets the user assigned to the task click an (X), (Y), or (Z) button to indicate their custom response. Then the workflow uses Switch activities to perform different work depending on the task outcome.
The sample app you can download from here contains a home page that lets you start a workflow, and delete any development workflows you might have created for testing.

Additional Wizard-Created Pages
The sample also contains a My Tasks page I generated with the Create Page wizard by choosing Unified Task List and picking the context of My Tasks. It shows the user open tasks assigned to them. I also created the Workflows page using the same wizard, by picking Workflow Console instead.
In both the My Tasks page and the Workflows page, I made one minor change to the SQL query of the generated page’s Content Row region. I simply uncommented the ,p_application_id => :APP_ID parameter to pass the current application ID to the apex_human_tasks.get_tasks pipelined table function returning the data to display. Otherwise, by default the pages show tasks and workflows from all applications in the workspace.
For example, in My Tasks, in the SQL query of the Content Row region, I deleted the two hyphens that initially appeared in the the line:
--,p_application_id => :APP_ID This two-character deletion made it look like this:
select task_id, task_type, ⋮ badge_state from table ( apex_human_task.get_tasks ( p_context => 'MY_TASKS', p_show_expired_tasks => :P6_SHOW_EXPIRED , p_application_id => :APP_ID /* <- */ ) )
I made the same change to the Workflows page’s Content Row region to the apex_workflow.get_workflows function returning workflow instance data. These two changes make the pages show only the tasks and workflows for the current application.
Overview of the Workflow Definition
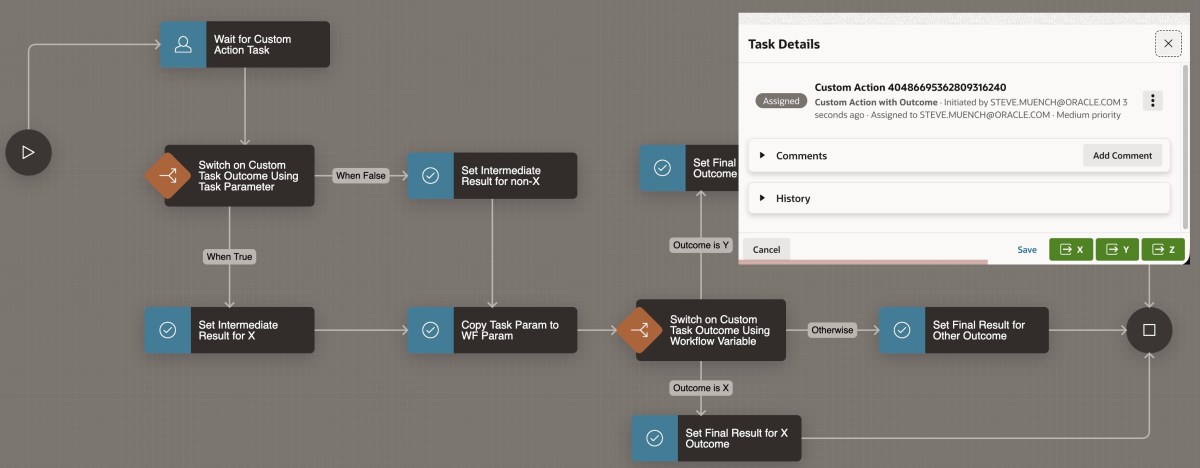
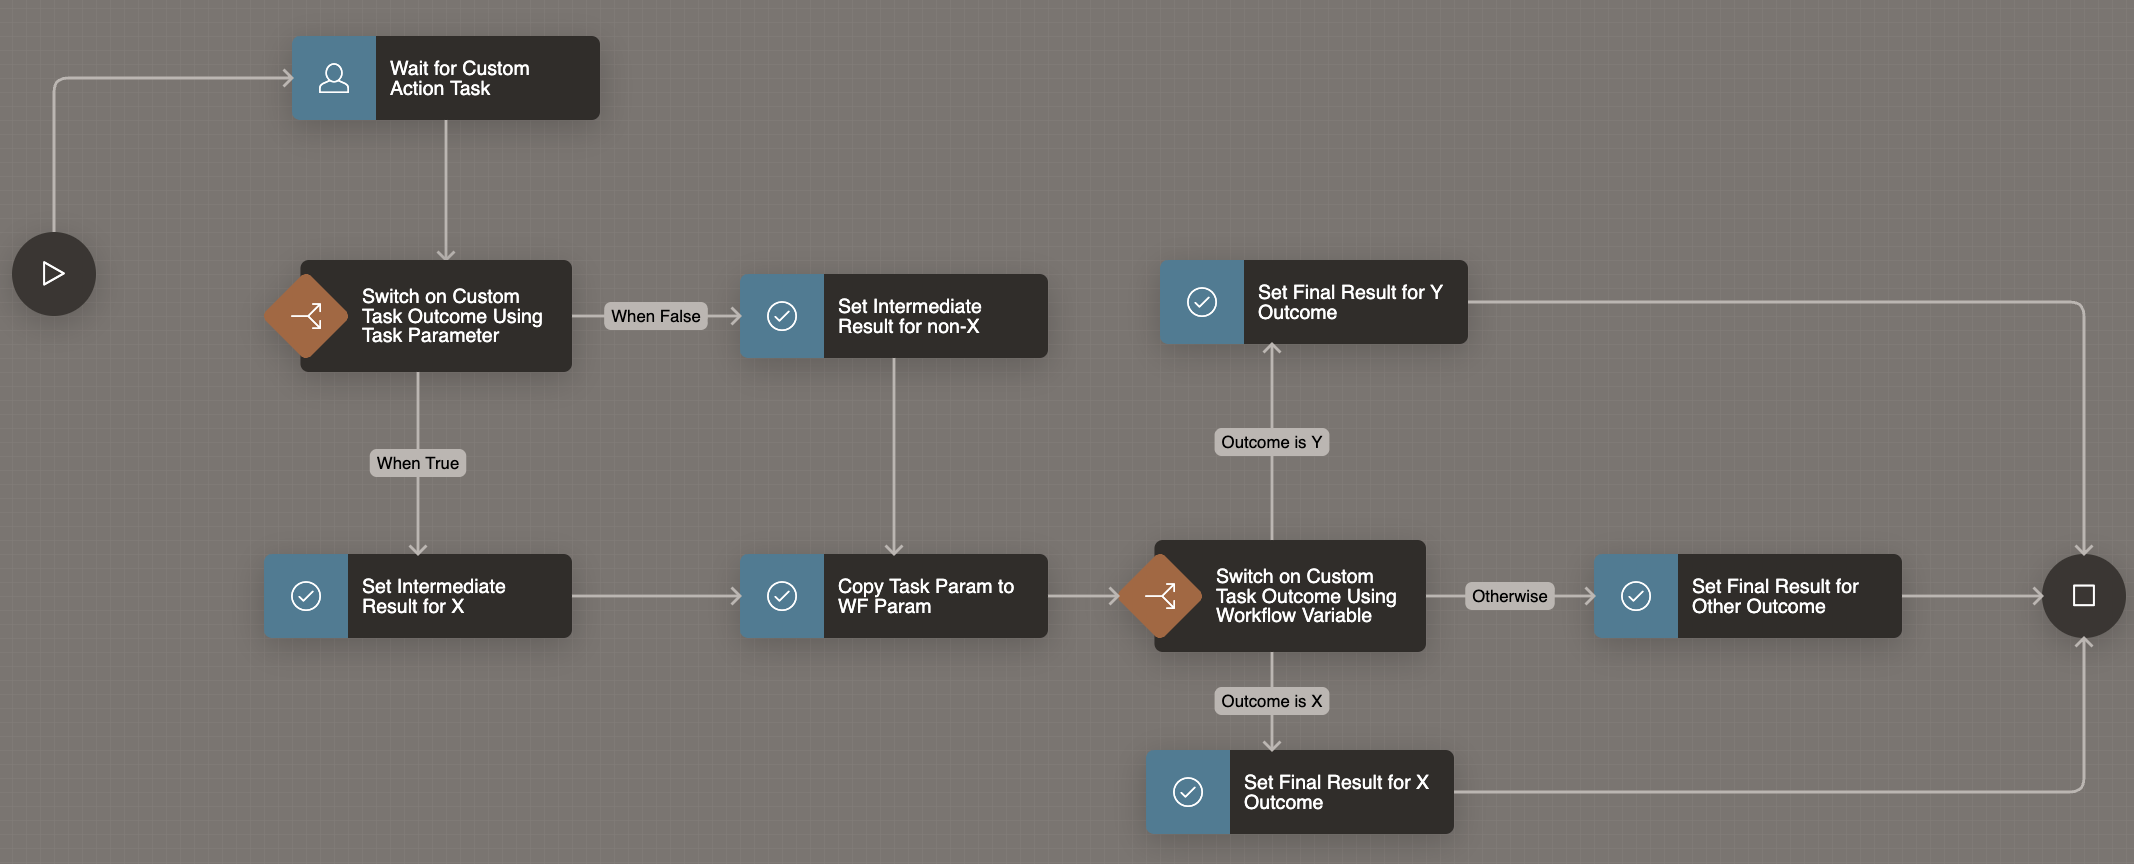
The workflow definition shown below waits for an Action Task, passing the APEX$WORKFLOW_INITIATOR built-in workflow variable value as the Task Initiator. Then the flow uses different Switch activities to take different paths depending on the task’s custom outcome. In this example, the different outcome values simply assign different values to two workflow variables INTERMEDIATE_RESULT and FINAL_RESULT, but in your own workflows the paths can contain any activities you need.
Key Ingredients of the Action Task
When I created the task, I noted that the default task type is Approval Task. You can’t change the task type later, so it’s important to pick Action Task up front.
To keep the example simple and runnable as a single developer, I configured the action task to use the :APEX$TASK_INITIATOR expression as both the Potential Owner and the Business Administrator. Of course, in your own apps you can use any participants that are appropriate.
The task definition also contains one updatable task parameter named OUTCOME as shown below. There is nothing special about choosing this name: in practice, use any name you like.

OUTCOME ParameterCustomizing the Task Details Page
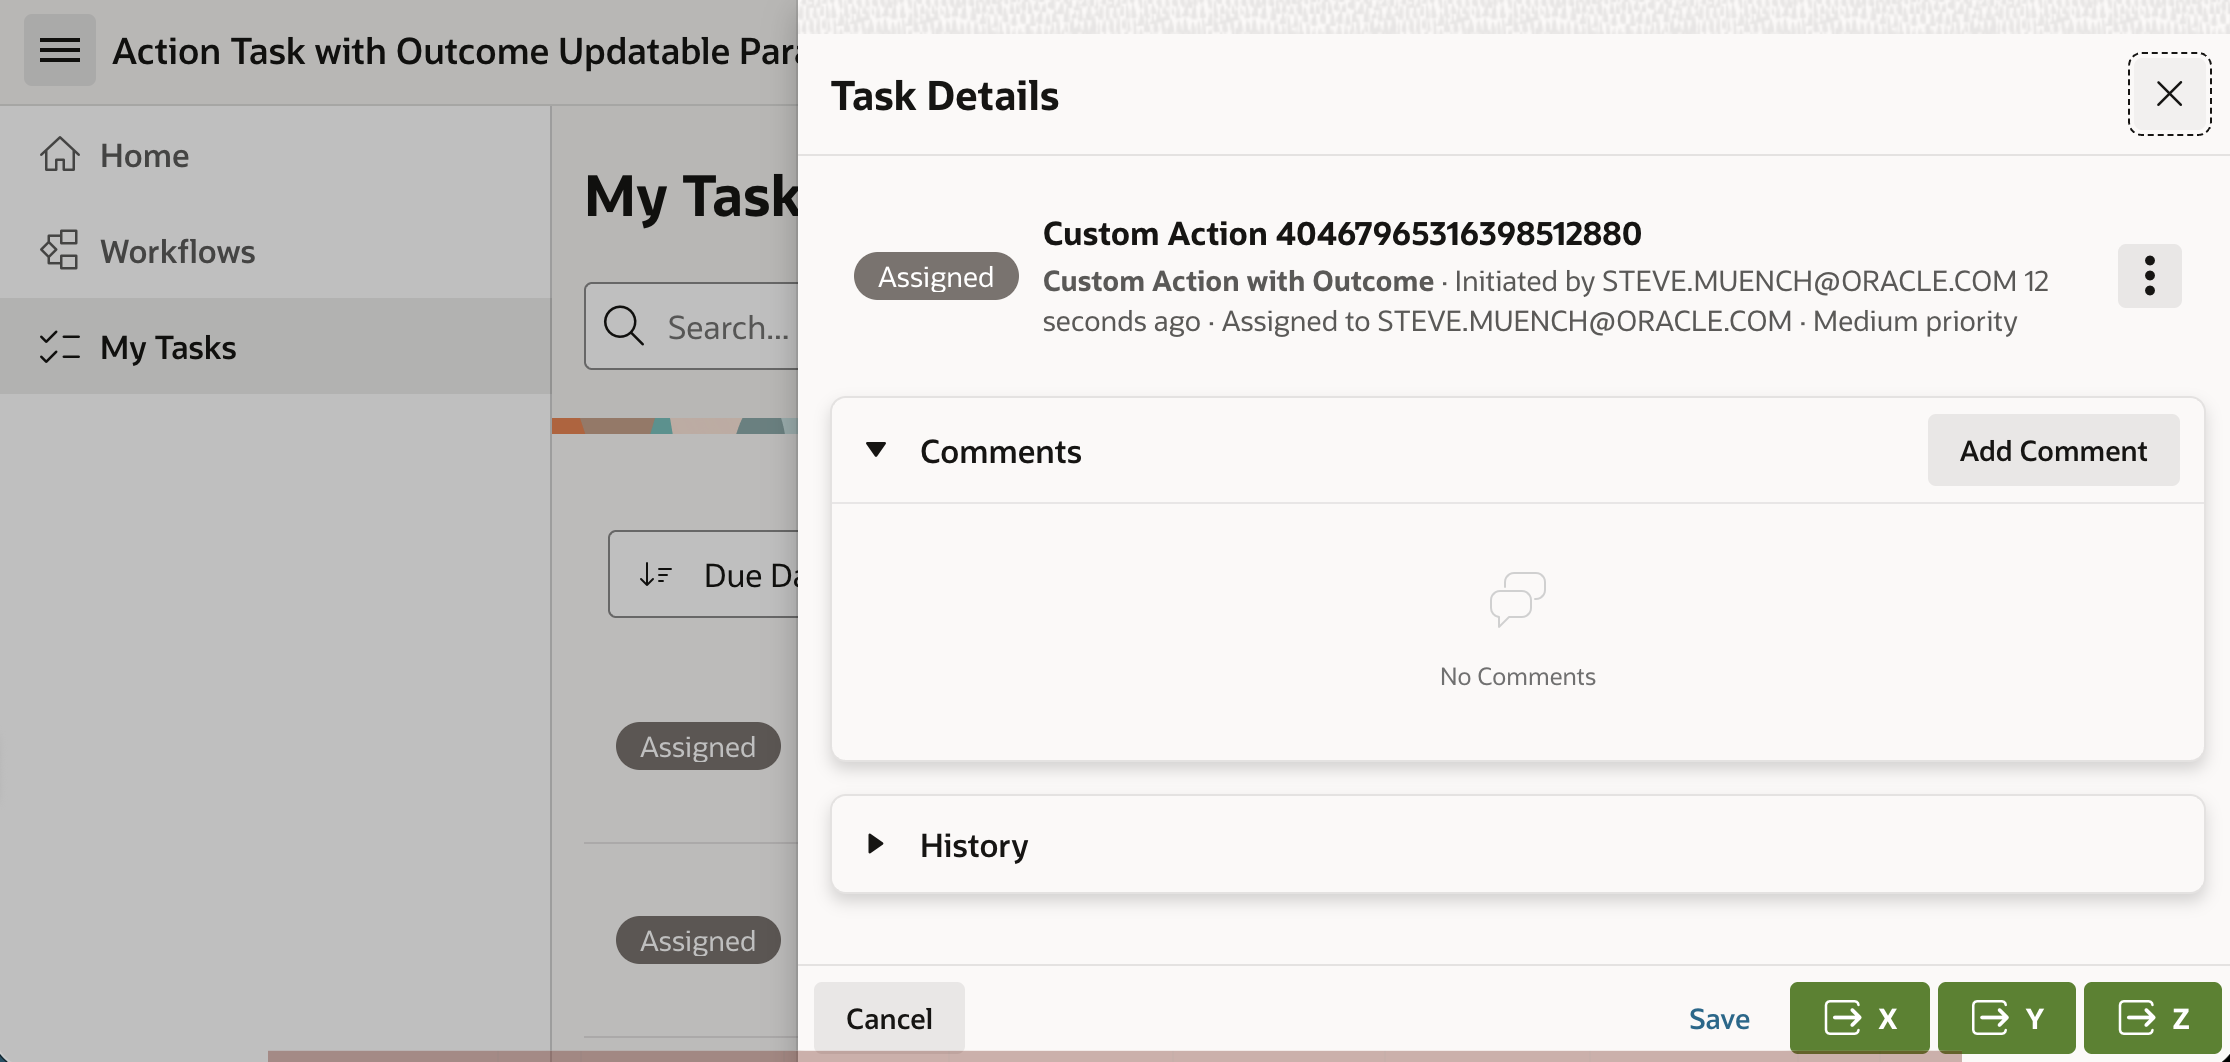
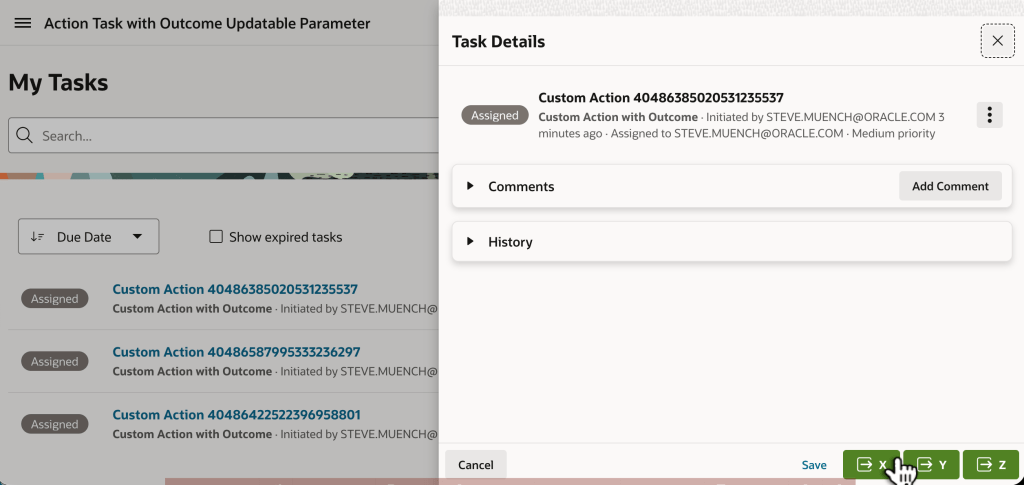
I clicked the appropriate button in the Task Definition edit page to automatically generate a task details page. Then, I modified it in Page Designer to remove the default action task (Complete) button.
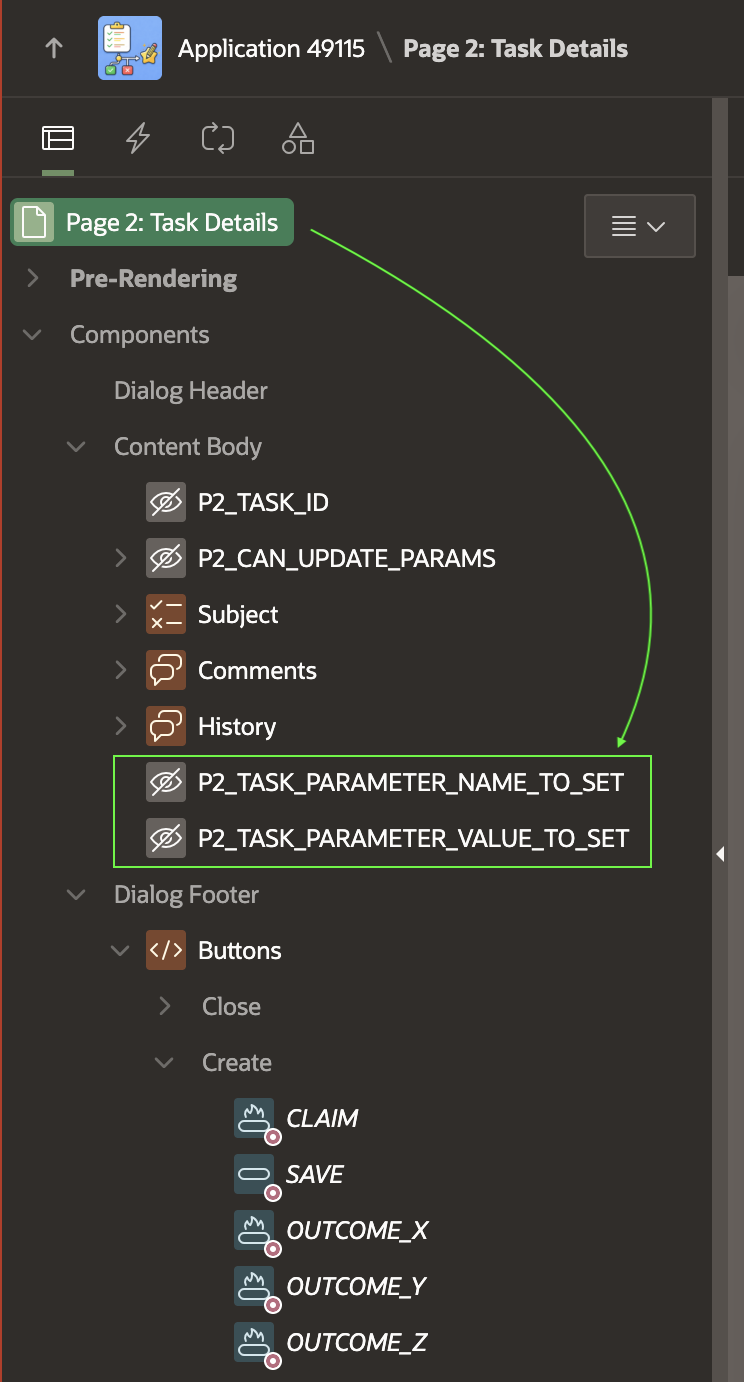
In its place, I added (X), (Y), and (Z) buttons to represent three custom outcomes named X, Y, and Z. They each simply submit the page using button names OUTCOME_X, OUTCOME_Y, and OUTCOME_Z respectively.
Adding Custom Declarative Business Logic
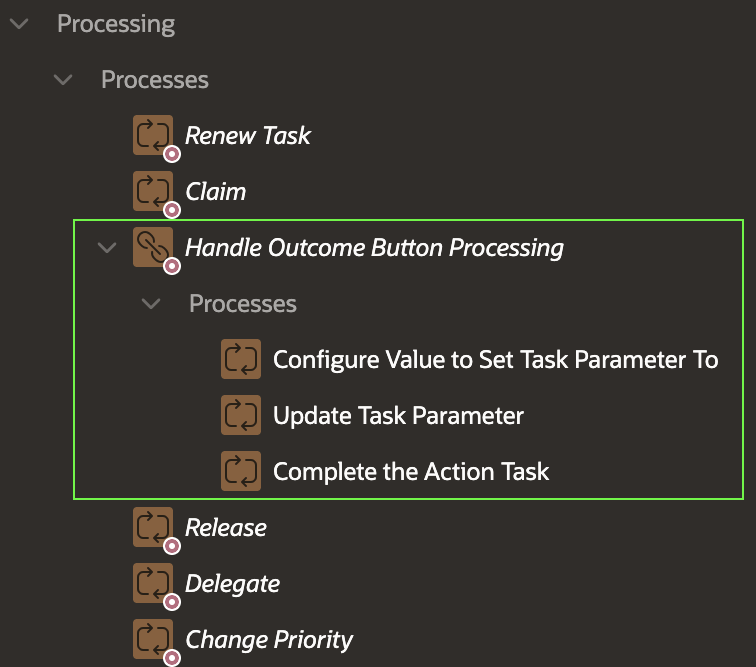
I added a new Execution Chain to the task details page’s Processing section to group the logic that runs when the user presses any of the buttons named OUTCOME_X, OUTCOME_Y, or OUTCOME_Z. It has the Server-side Condition to only run if the REQUEST value –reflecting the submitting button name – is contained in the string:
|OUTCOME_X|OUTCOME_Y|OUTCOME_Z|
This condition ensures the chain’s child processes only run if the user presses one of the custom outcome buttons. The execution chain’s Run in Background switch is off, so when they run, they happen immediately in the current user session during page submit processing.
The Execution Chain contains three child processes shown below that run in order:
- Configure Value to Set Task Parameter To
- Update Task Parameter
- Complete the Action Task
Configuring the Business Logic
The Update Parameter feature of the declarative Human Task – Manage page process expects the name of the task parameter to be stored in a page item. It also expects the parameter value to come from a page item. So, I’ve added two hidden page items shown below for that purpose. I set their Storage to In‑Memory Only so their values don’t persist across page visits:
P2_TASK_PARAMETER_NAME_TO_SETP2_TASK_PARAMETER_VALUE_TO_SET
Since we want to set the task parameter named OUTCOME, the P2_TASK_PARAMETER_NAME_TO_SET has a static default value: OUTCOME
The initial Configure Value to Set Task Parameter To child process in the chain is an Execute Code process that sets the value that we want to assign to the task parameter into the hidden page item:
:P2_TASK_PARAMETER_VALUE_TO_SET := case :REQUEST when 'OUTCOME_X' then 'X' when 'OUTCOME_Y' then 'Y' when 'OUTCOME_Z' then 'Z' end;
The second Update Task Parameter child process in the chain uses the declarative Human Task ‑ Manage page process, with type set to Update Parameter. It updates the parameter whose name is in P2_TASK_PARAMETER_NAME_TO_SET and whose value is in P2_TASK_PARAMETER_VALUE_TO_SET on the task instance whose ID comes from P2_TASK_ID.
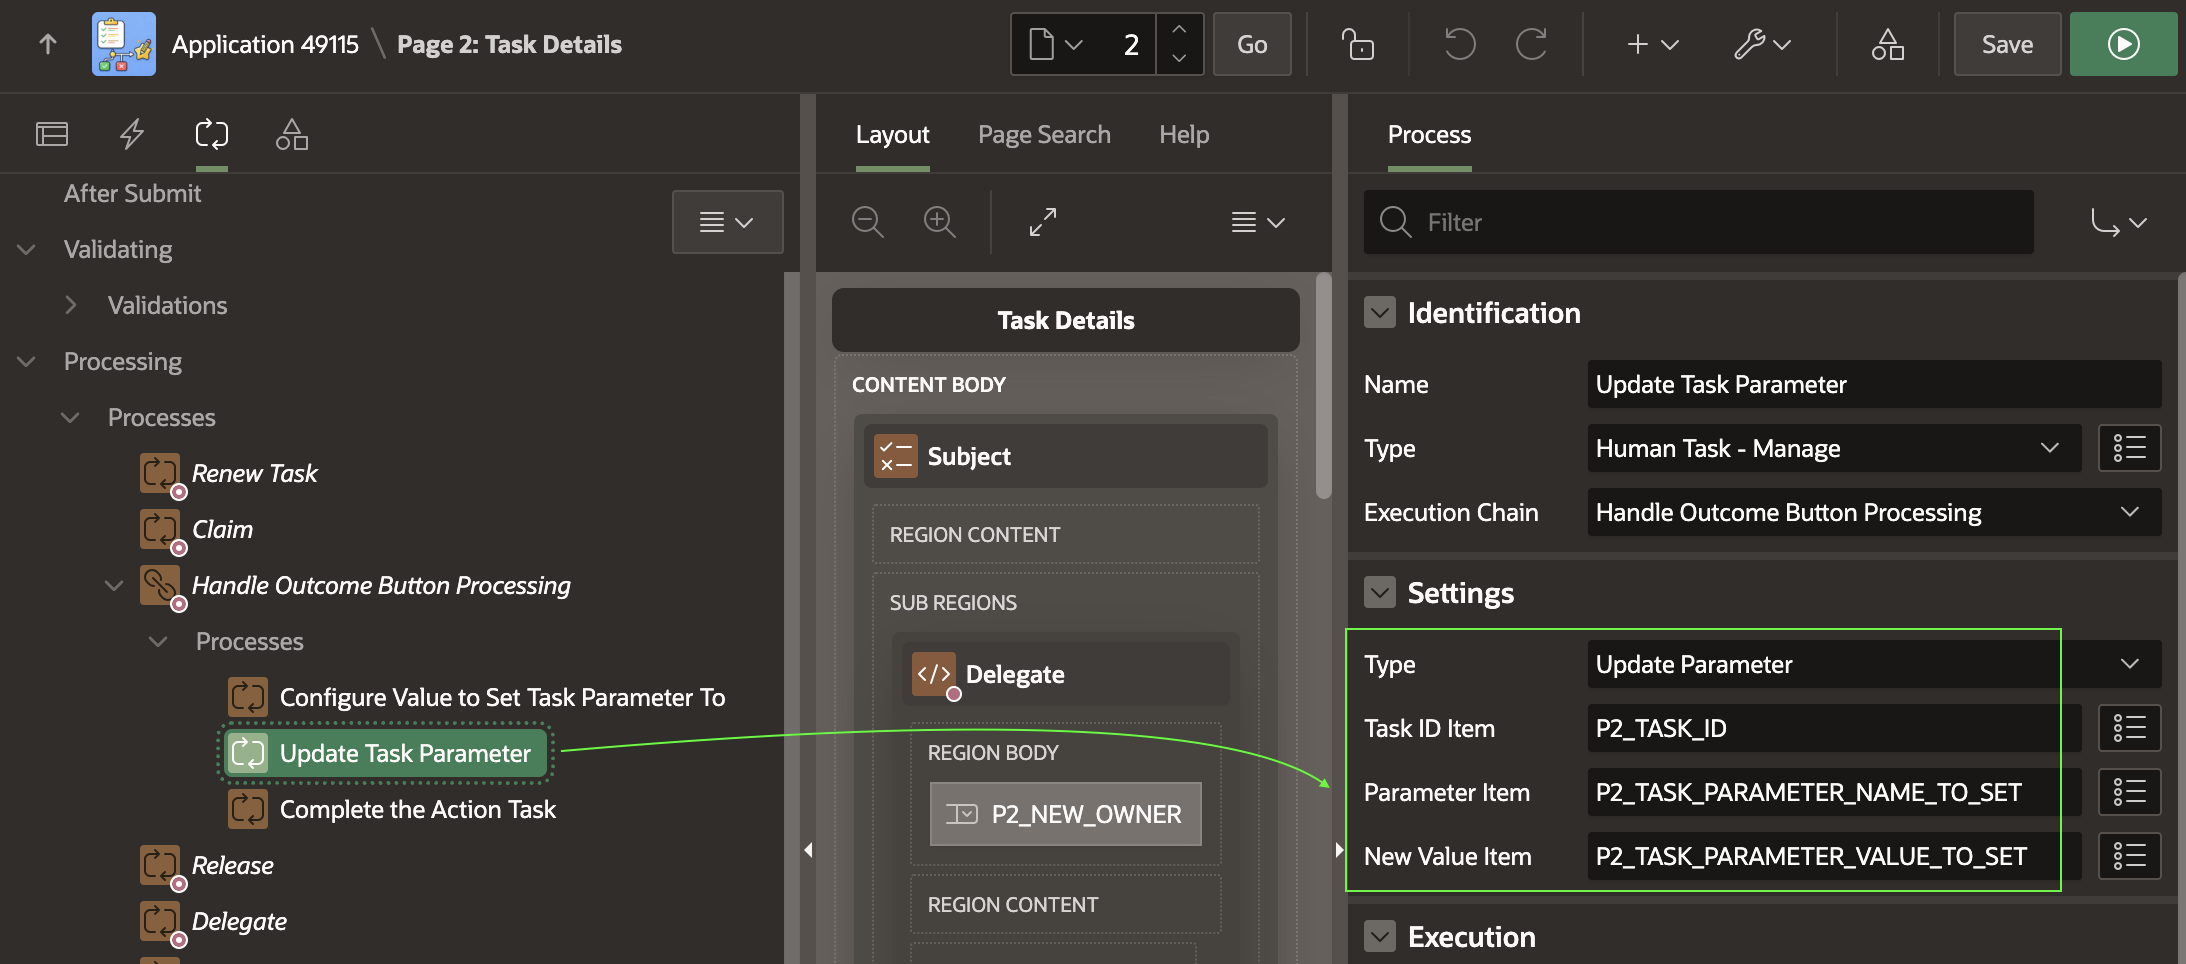
Since the static value OUTCOME is in the name page item, and the dynamically assigned task parameter value is in the value page item, this configuration results in setting the OUTCOME updatable task parameter to either X, Y, or Z as determined by the first step in the execution chain above.
The final Complete the Action Task child process in the chain uses the Human Task ‑ Manage page process with type Complete (without Outcome) to complete the action task.
Switching Paths Based on Custom Outcome
In the workflow, you’ll find two different Switch activities.
One shows how you can reference the value of the task parameter directly using apex_human_task.get_task_parameter_value(:CUSTOM_TASK_ID,'OUTCOME')
I’ve used a “True/False” type switch using the boolean expression:
nvl(apex_human_task.get_task_parameter_value( :CUSTOM_TASK_ID,'OUTCOME'),'@') = 'X'
The different True and False branches from the switch change course depending on whether the user provided an X outcome, or did not provide an X outcome.
Here, the CUSTOM_TASK_ID is a workflow version variable I added and then used as the Human Task ‑ Create activity’s Task ID Item as shown below. This makes it store the task instance ID into the CUSTOM_TASK_ID variable when the task owner completes the task.
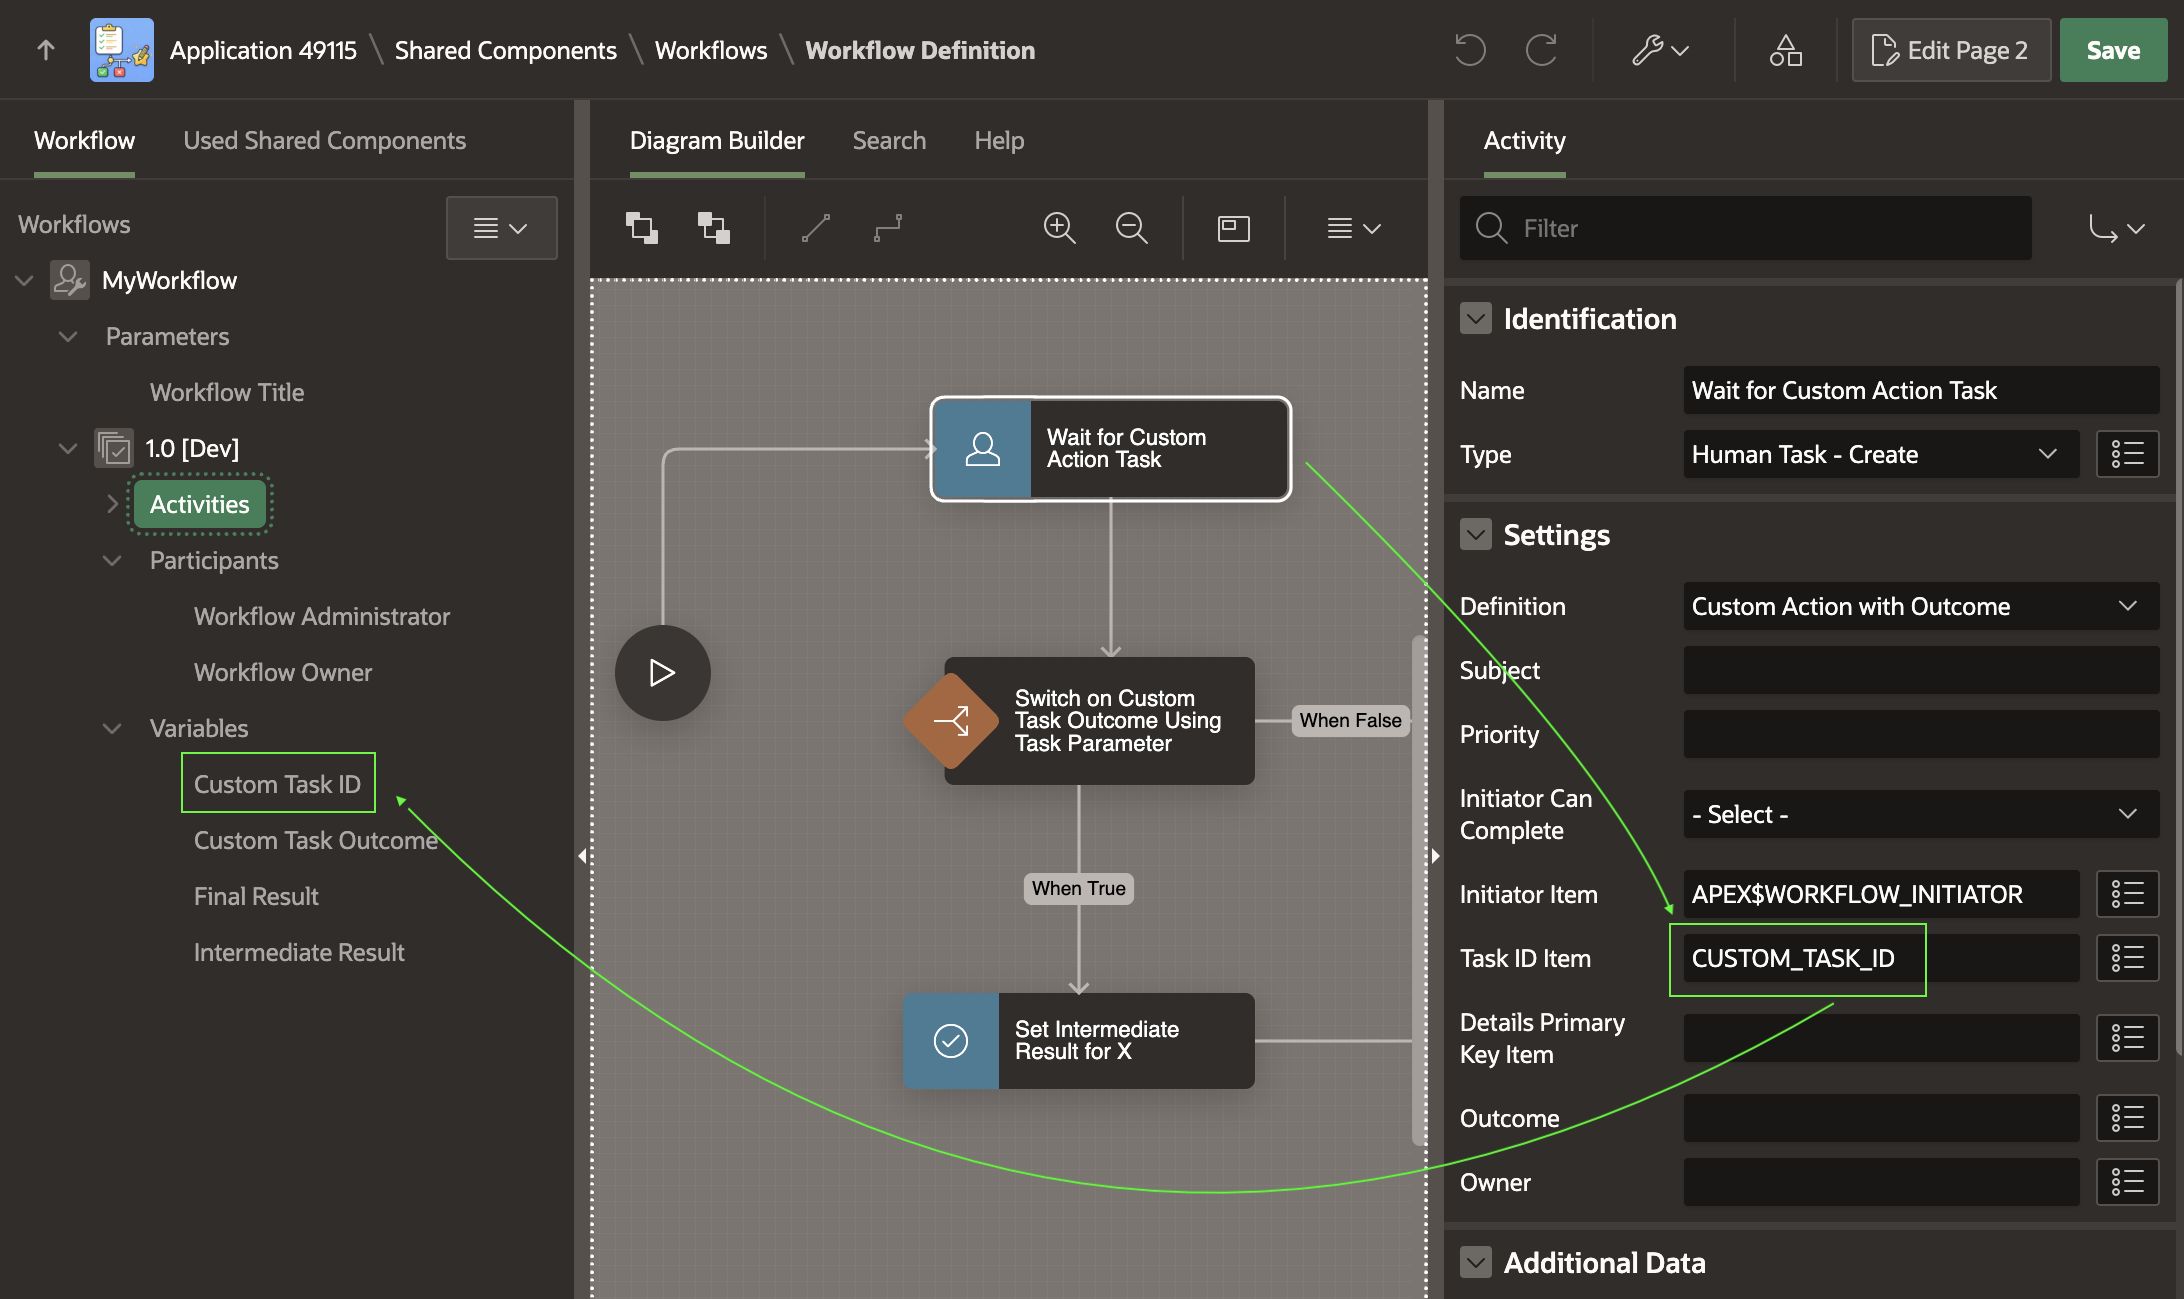
A second switch activity shows how you can switch on a workflow variable value if you first add an Execute Code activity to the workflow that assigns the workflow variable to the value of the OUTCOME task parameter.
Giving the Sample a Spin
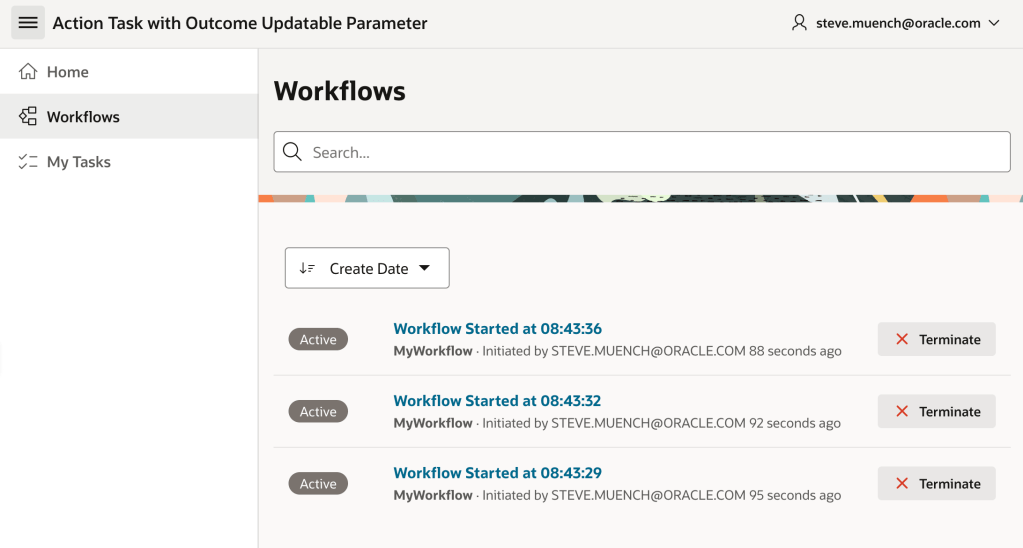
Try running the sample and creating three workflows by clicking three times on the (Start Workflow) button. Since the app configures the workflow title to include the current time, try waiting at least one second between button clicks so your three workflows have distinguishable titles.
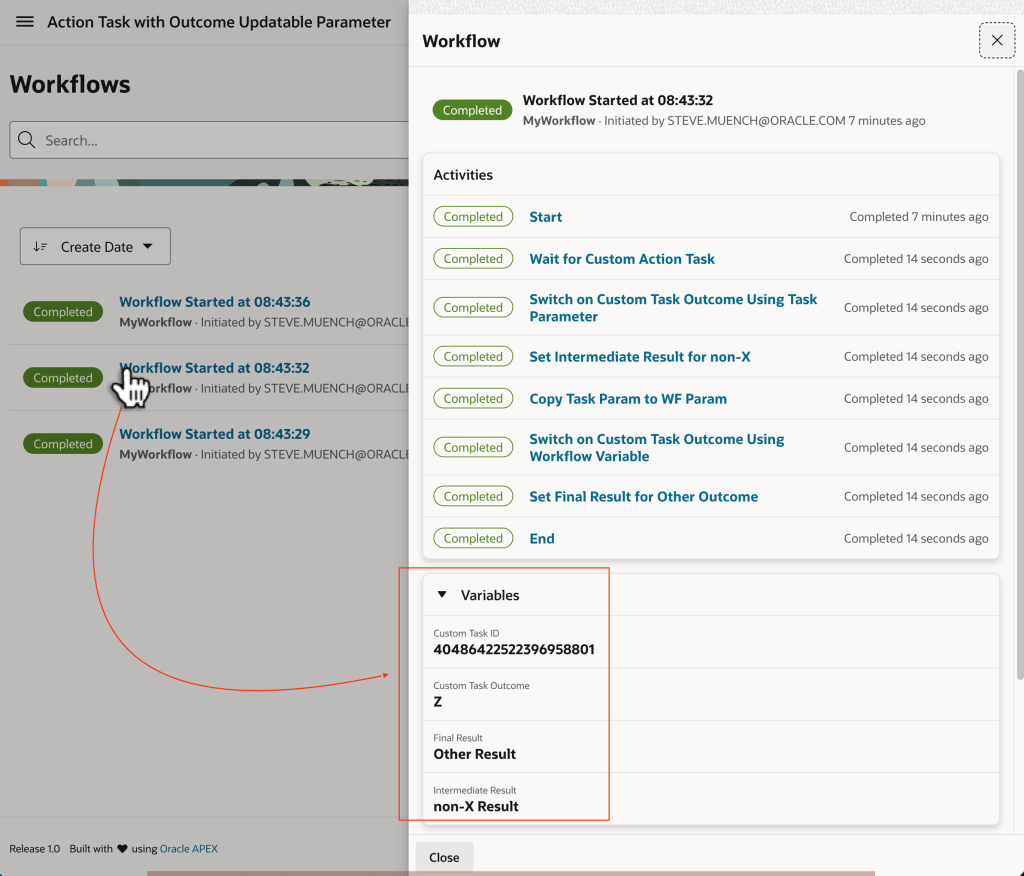
In the Workflows page, you can see the three workflow instances you created.
Next, use the My Tasks page to respond to each of the action tasks assigned to you. In one each, try clicking the (X), (Y), and (Z) button.
Finally, use the Workflows console to inspect the details of each workflow instance. Study the workflow variable values to see how the different switch activities reacted to the custom outcome. For example, in the workflow instance where you indicated a custom Z outcome, the variables shown below are the result of the path the workflow took for that outcome.
Downloading the Sample
You can download the sample app from here.
