Server-Side Geocoding & AI-Driven Point of Interest Lookup #joelkallmanday

In APEX on Autonomous Database, use declarative, server-side geocoding to find coordinates for an address. Then you can see it on a map, measure its distance from another point, find it within a radius, and process it with other spatial data features.

Use an AI Configuration to create a smart web service with natural language. It taps into a large-language model’s knowledge to return a structured result.

To celebrate Joel Kallman Day 2025, we study an app that combines the two. It lets a user enter an address, then in the background finds its coordinates and whether it represents a well-known point of interest. Download the sample app at the end to try it yourself on your Autonomous Database or Oracle APEX Service.

Trying the App

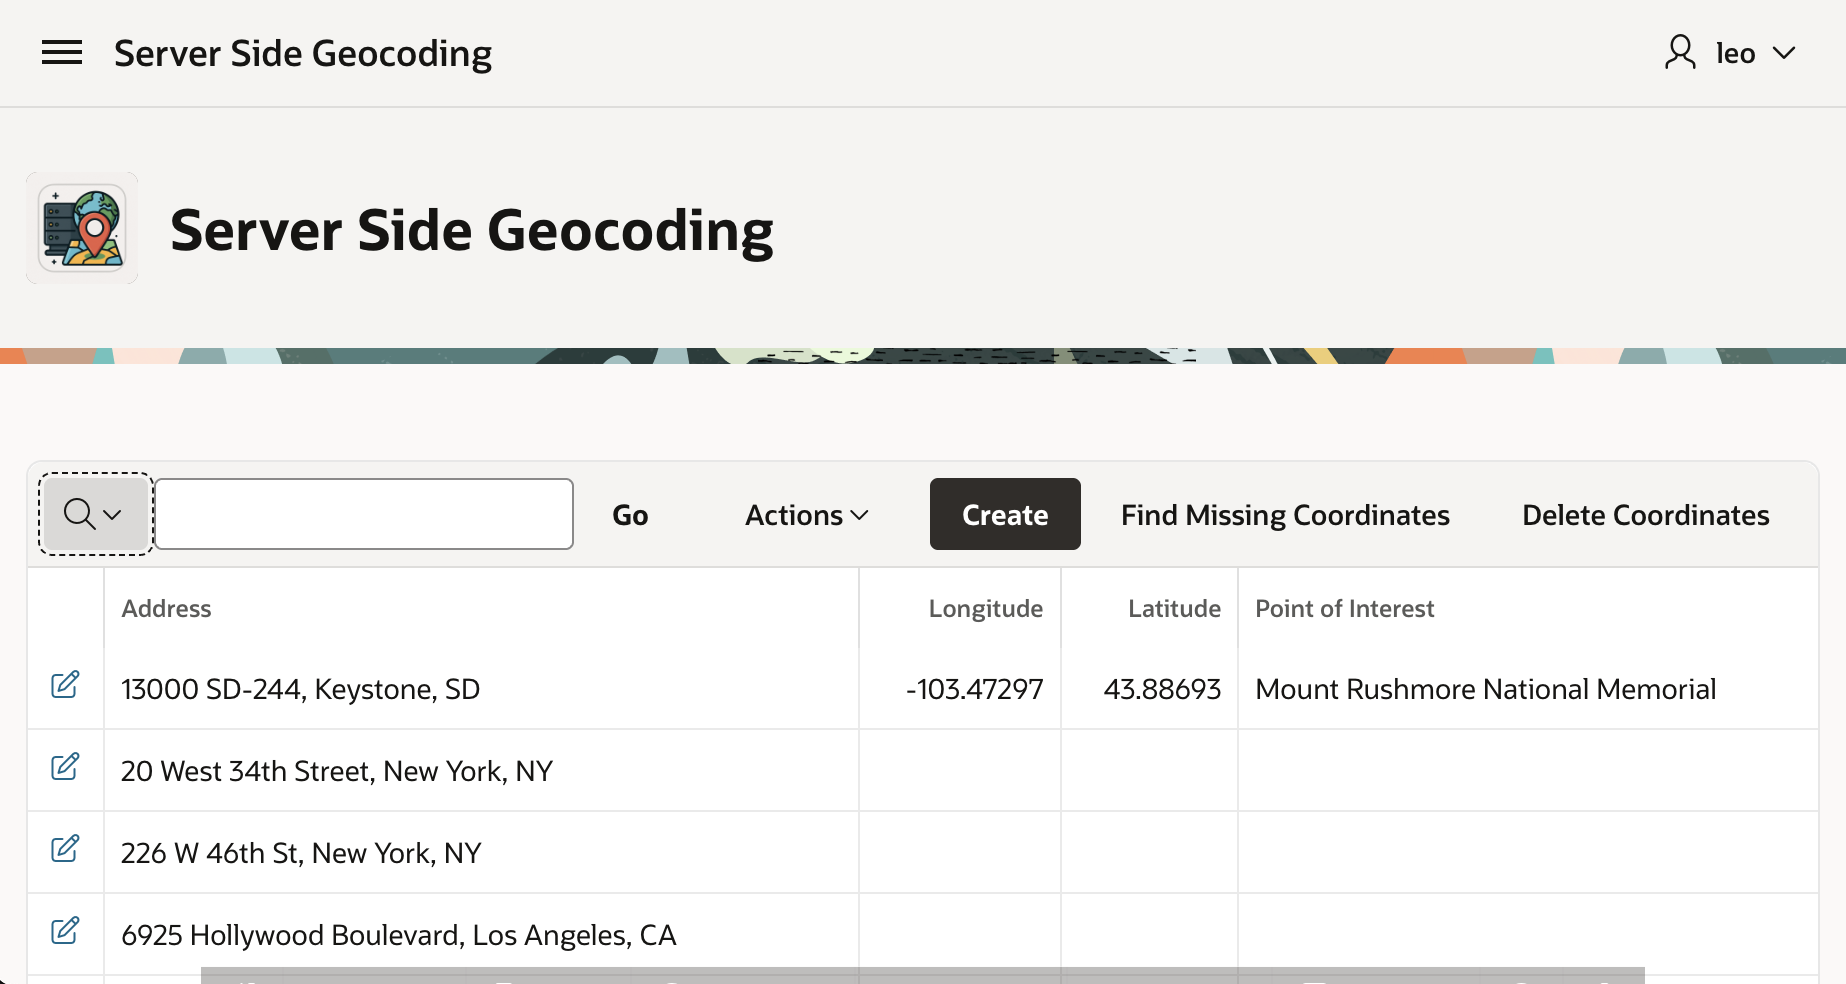
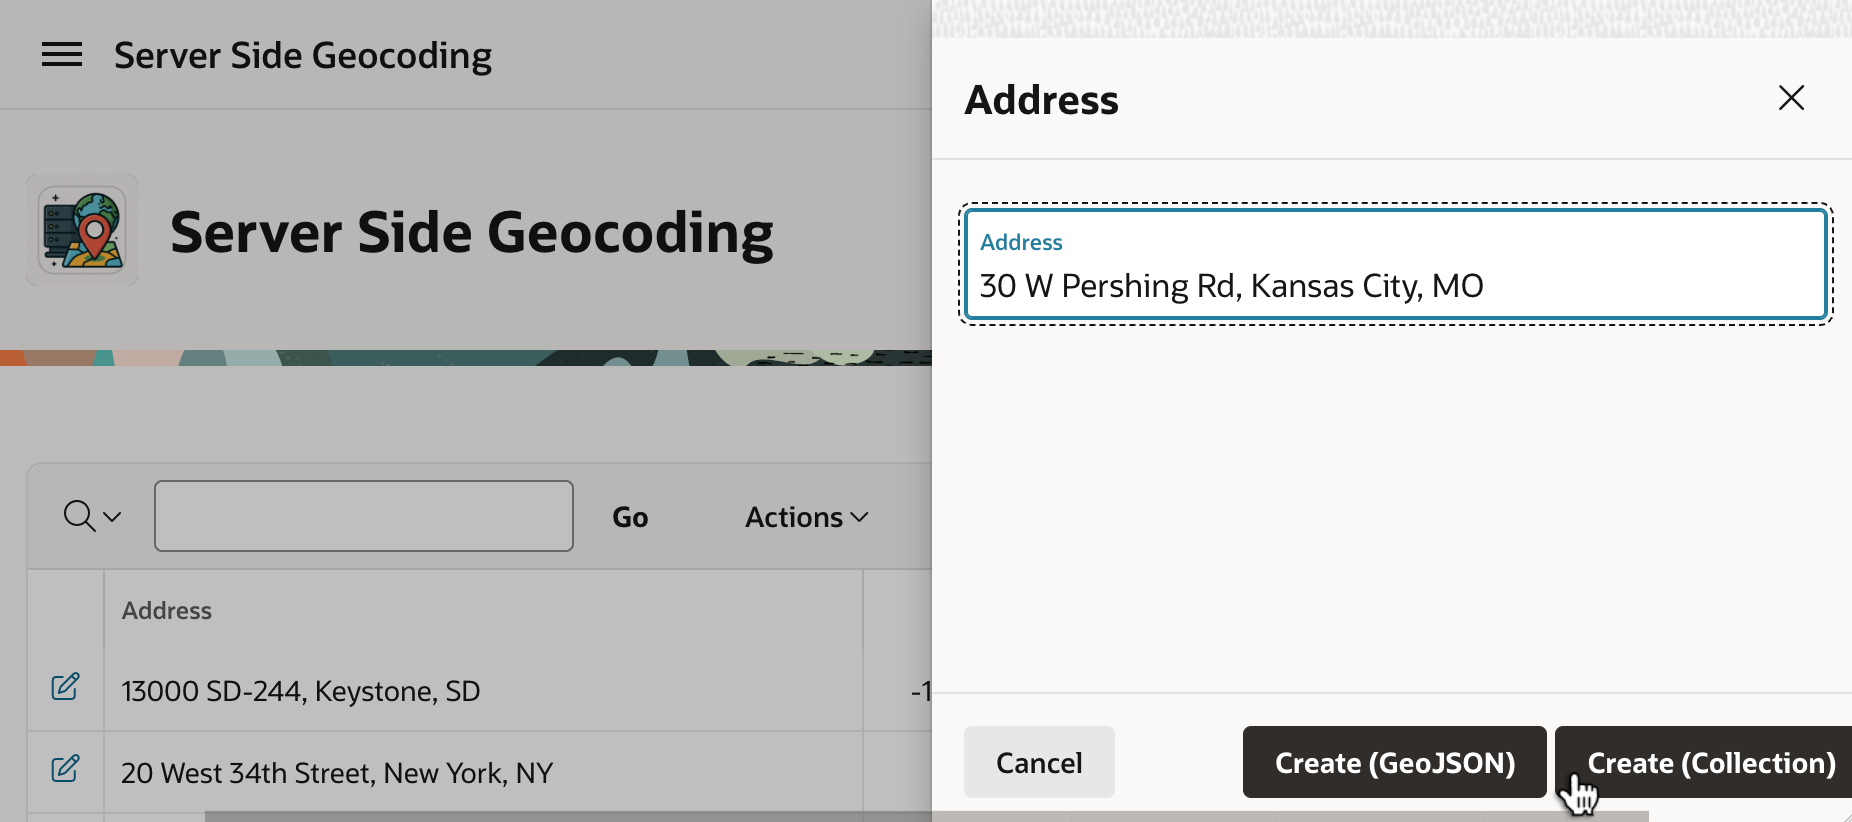
For example, we can enter this South Dakota address and click (Create <GeoJSON>).

Entering an Address to Geocode Server-side in Keystone, South Dakota (USA)

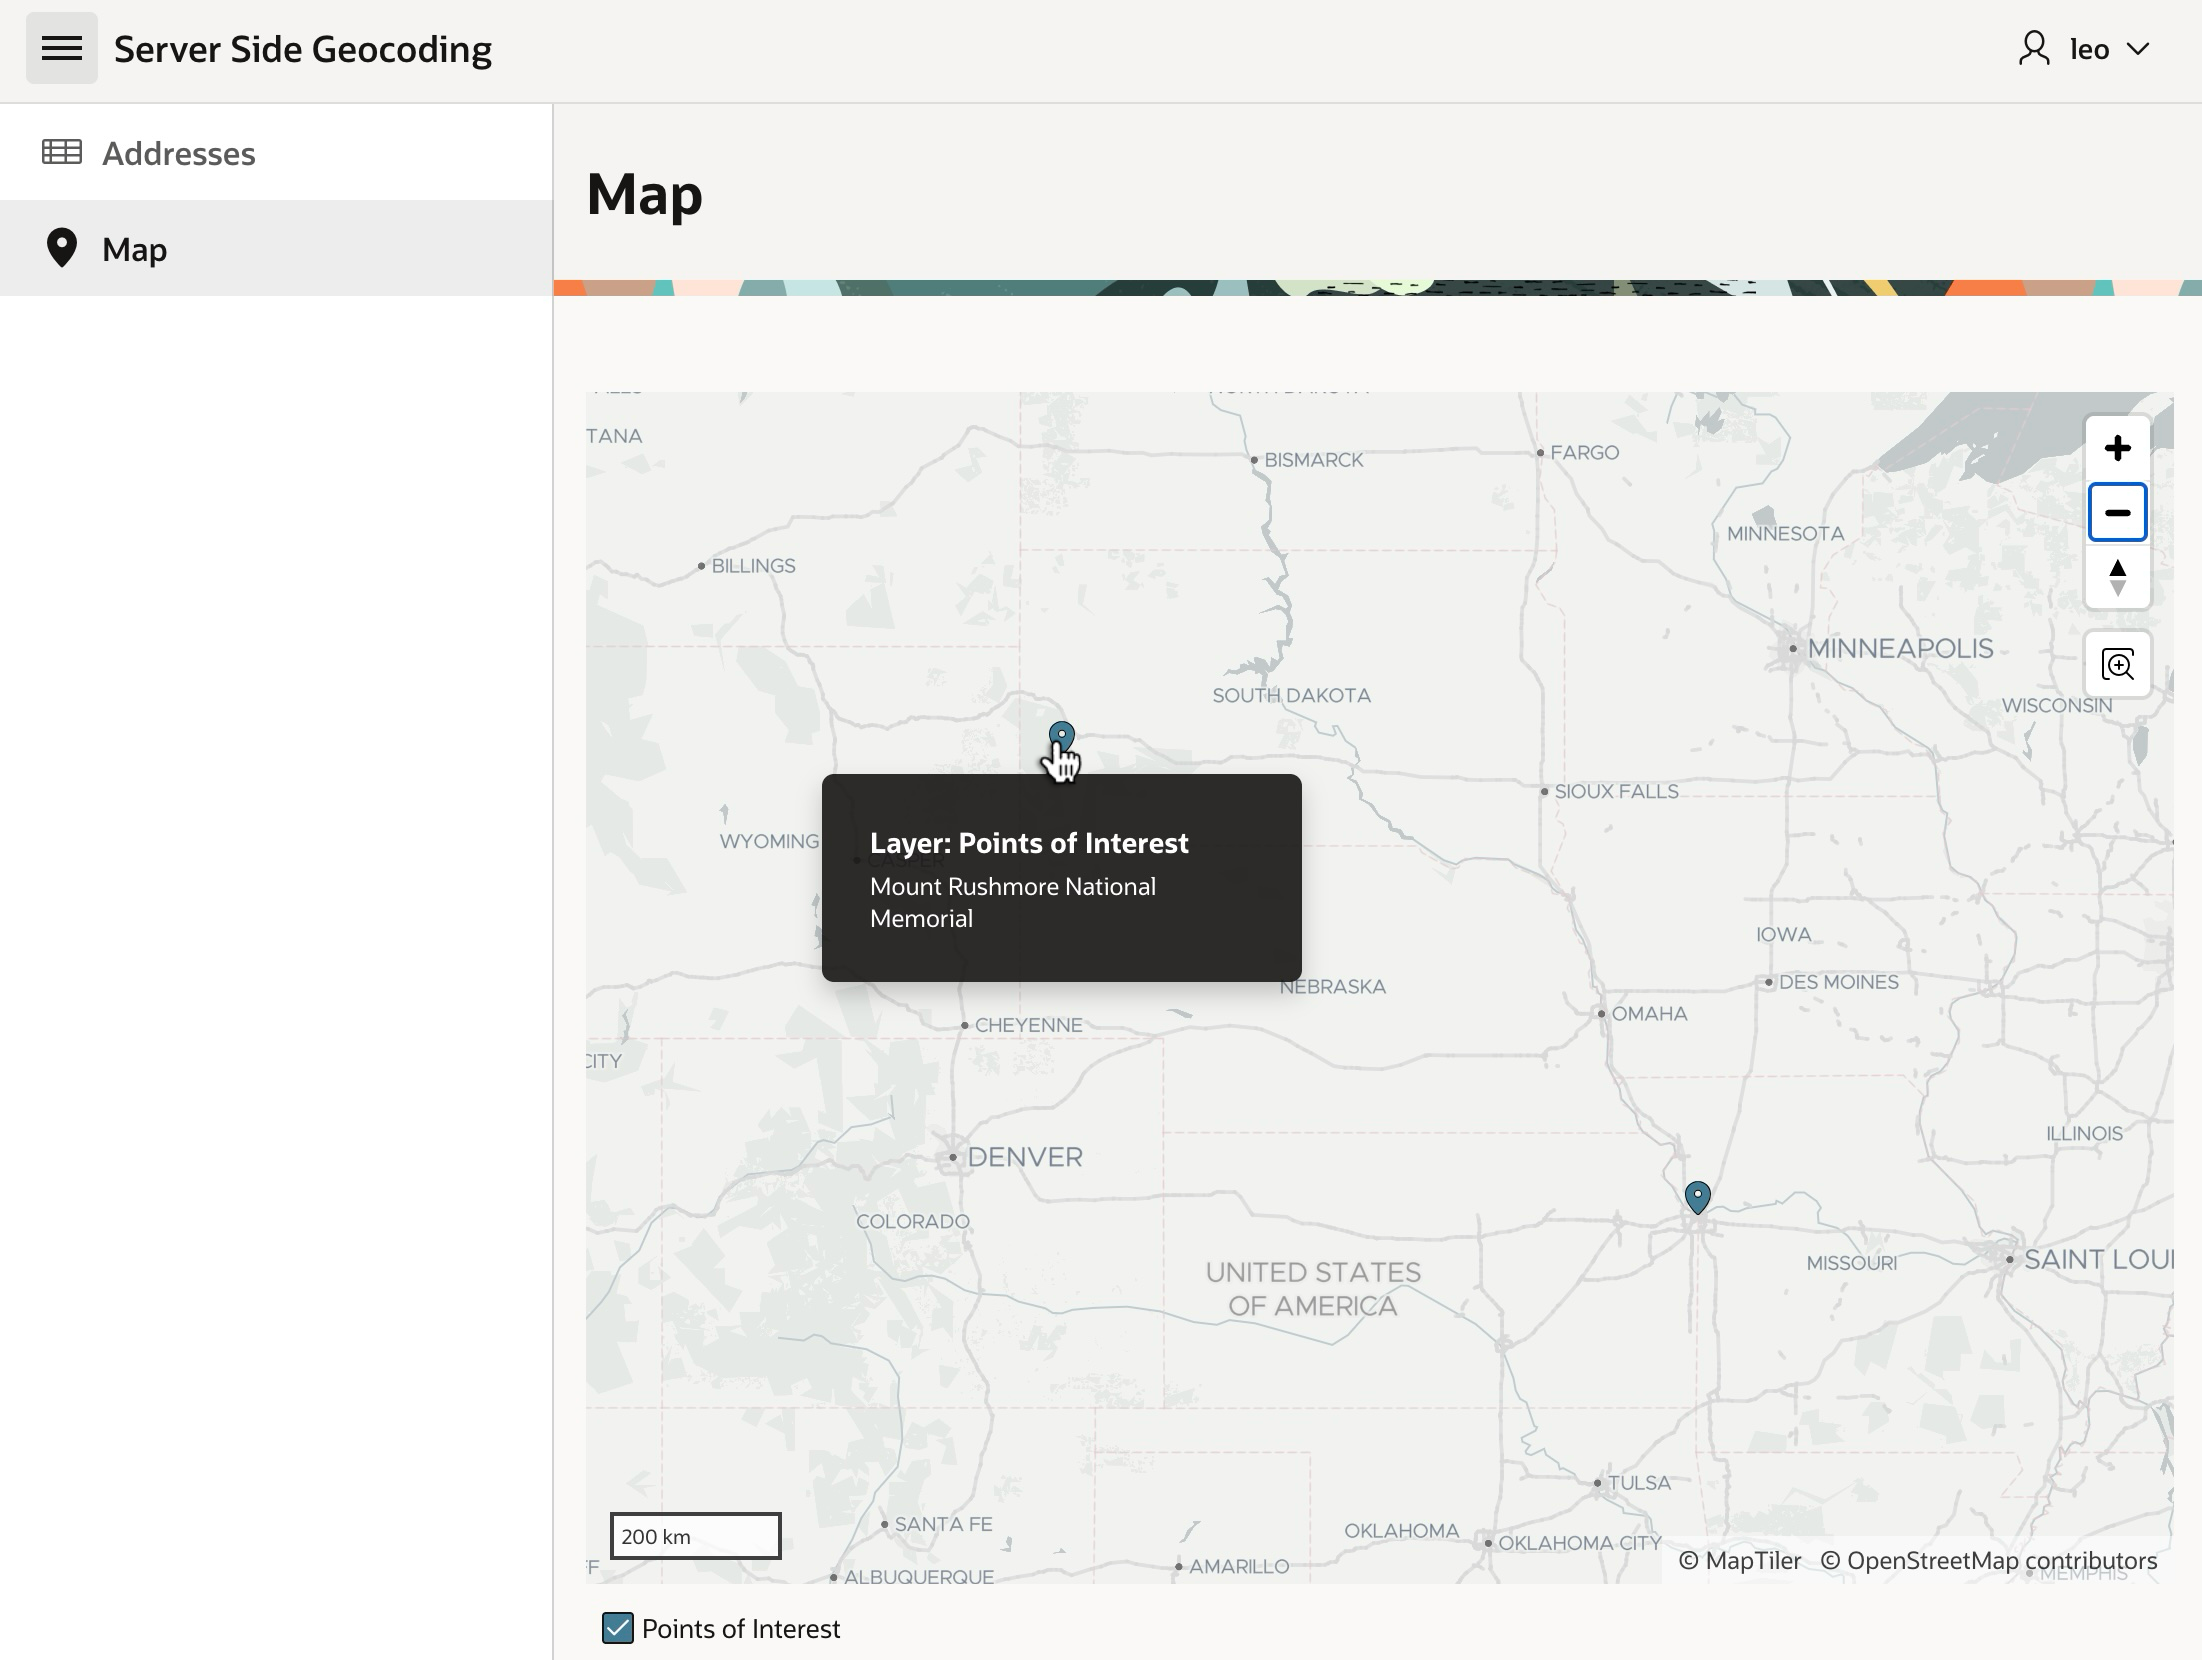
After a few seconds, if we refresh the Interactive Report by clicking the (Go) button, we see that in the background it found the coordinates and determined this is the address of Mount Rushmore National Memorial.

New Address Geocoded in the Background, with Point of Interest Identified, Shows After Refresh
Mount Rushmore National Monument in Keystone, South Dakota (USA)

Server-Side Geocoding

Your apps can use client-side geocoding in any browser. However, server-side geocoding depends on APIs exclusive to Autonomous Database. So, you need to develop and run your APEX app in ADB or APEX Service to use it. Declarative Server Side Geocoding is available as a page process, a workflow activity, or an automation action. You provide an address as a single string, or as a structured set of different address element fields. You have two options for the resulting geocoded info. It can populate a page item you configure with a small GeoJSON document containing longitude and latitude. For more detailed results, configure the name of a collection to populate instead.

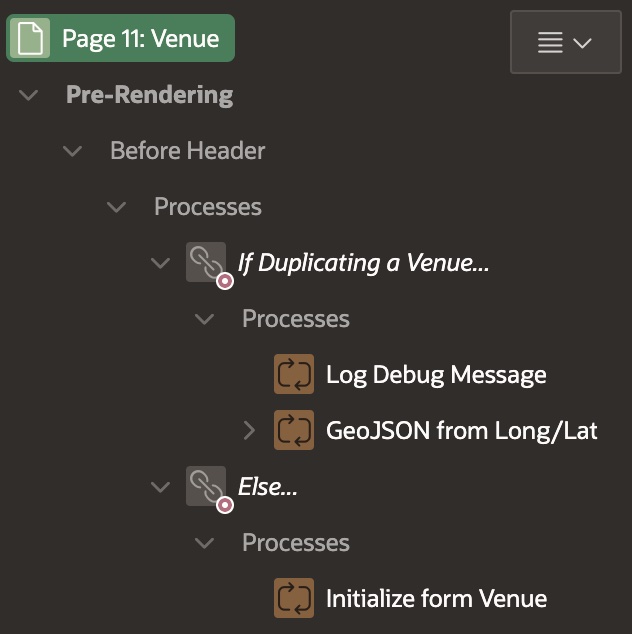
The (Create <GeoJSON>) button submits the form, triggering processing that saves the form data, then runs the Geocode and POI Lookup execution chain shown below. Notice that it’s set to Run in Background.

Geocode and POI Lookup Execution Chain Runs in the Background

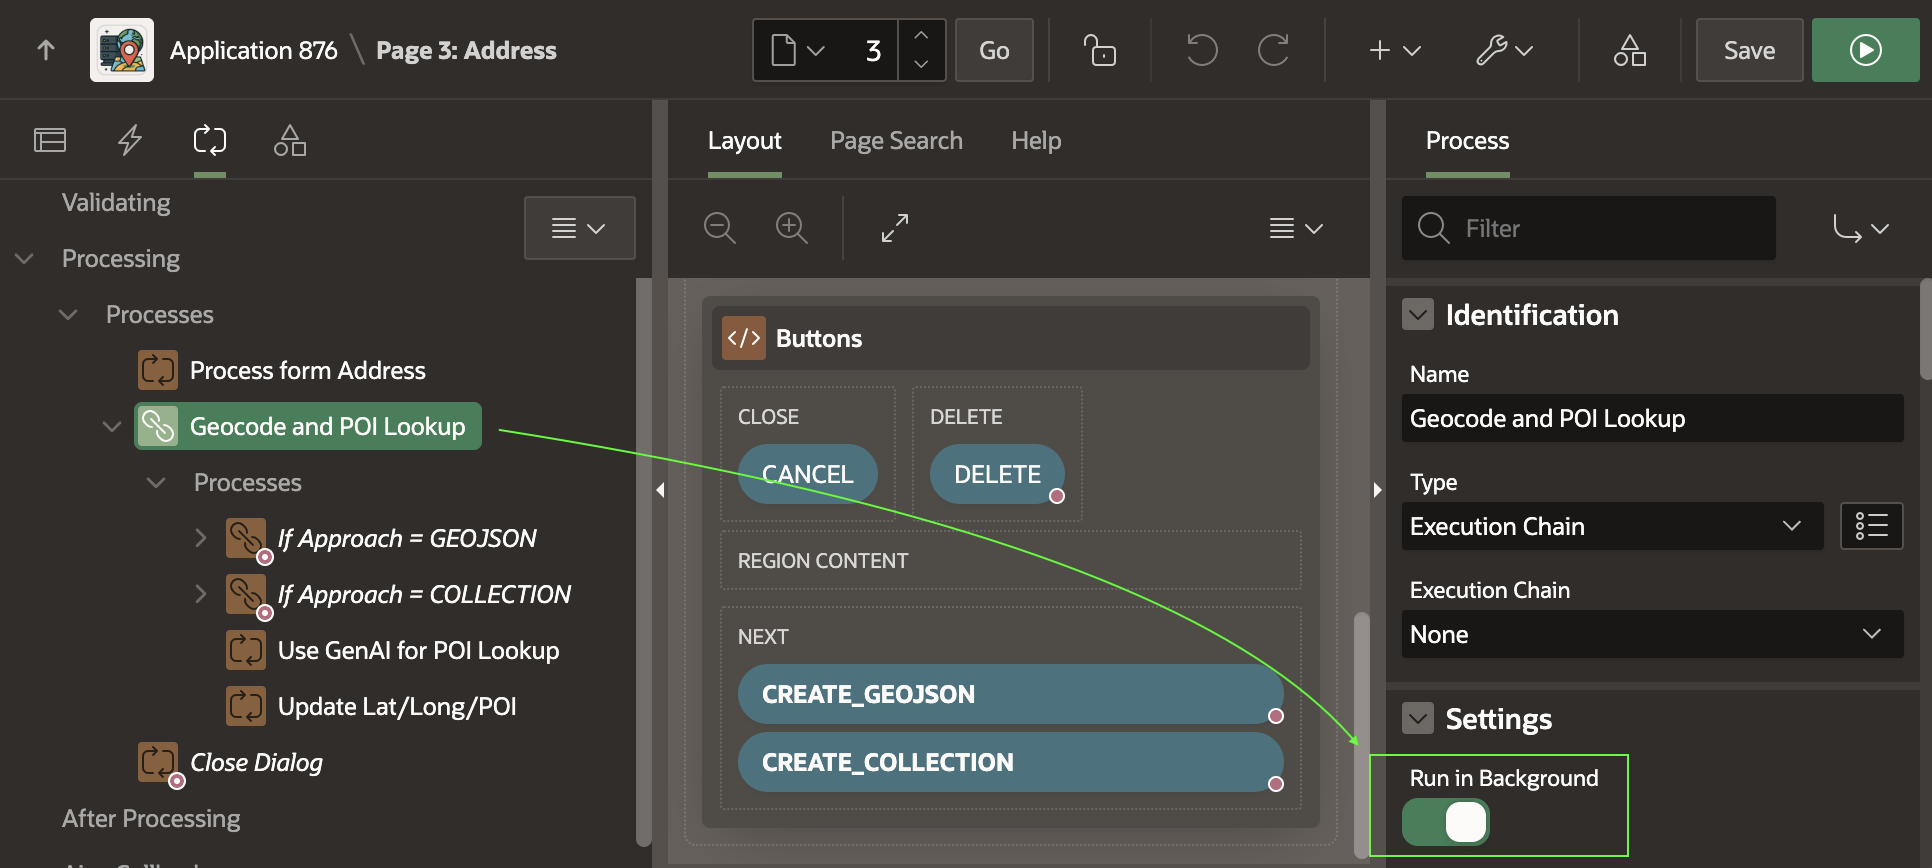
If the CREATE_GEOJSON button submits the form, the execution chain below runs. As shown below, its first child process uses a Server Side Geocoding process type to find the coordinates. It configures its unstructured Address Item to come from P3_ADDRESS and its GeoJSON Coordinate Item to be returned into the hidden P3_GEOJSON page item.

Server-side Geocoding Can Accept an Address and Return a GeoJSON Point

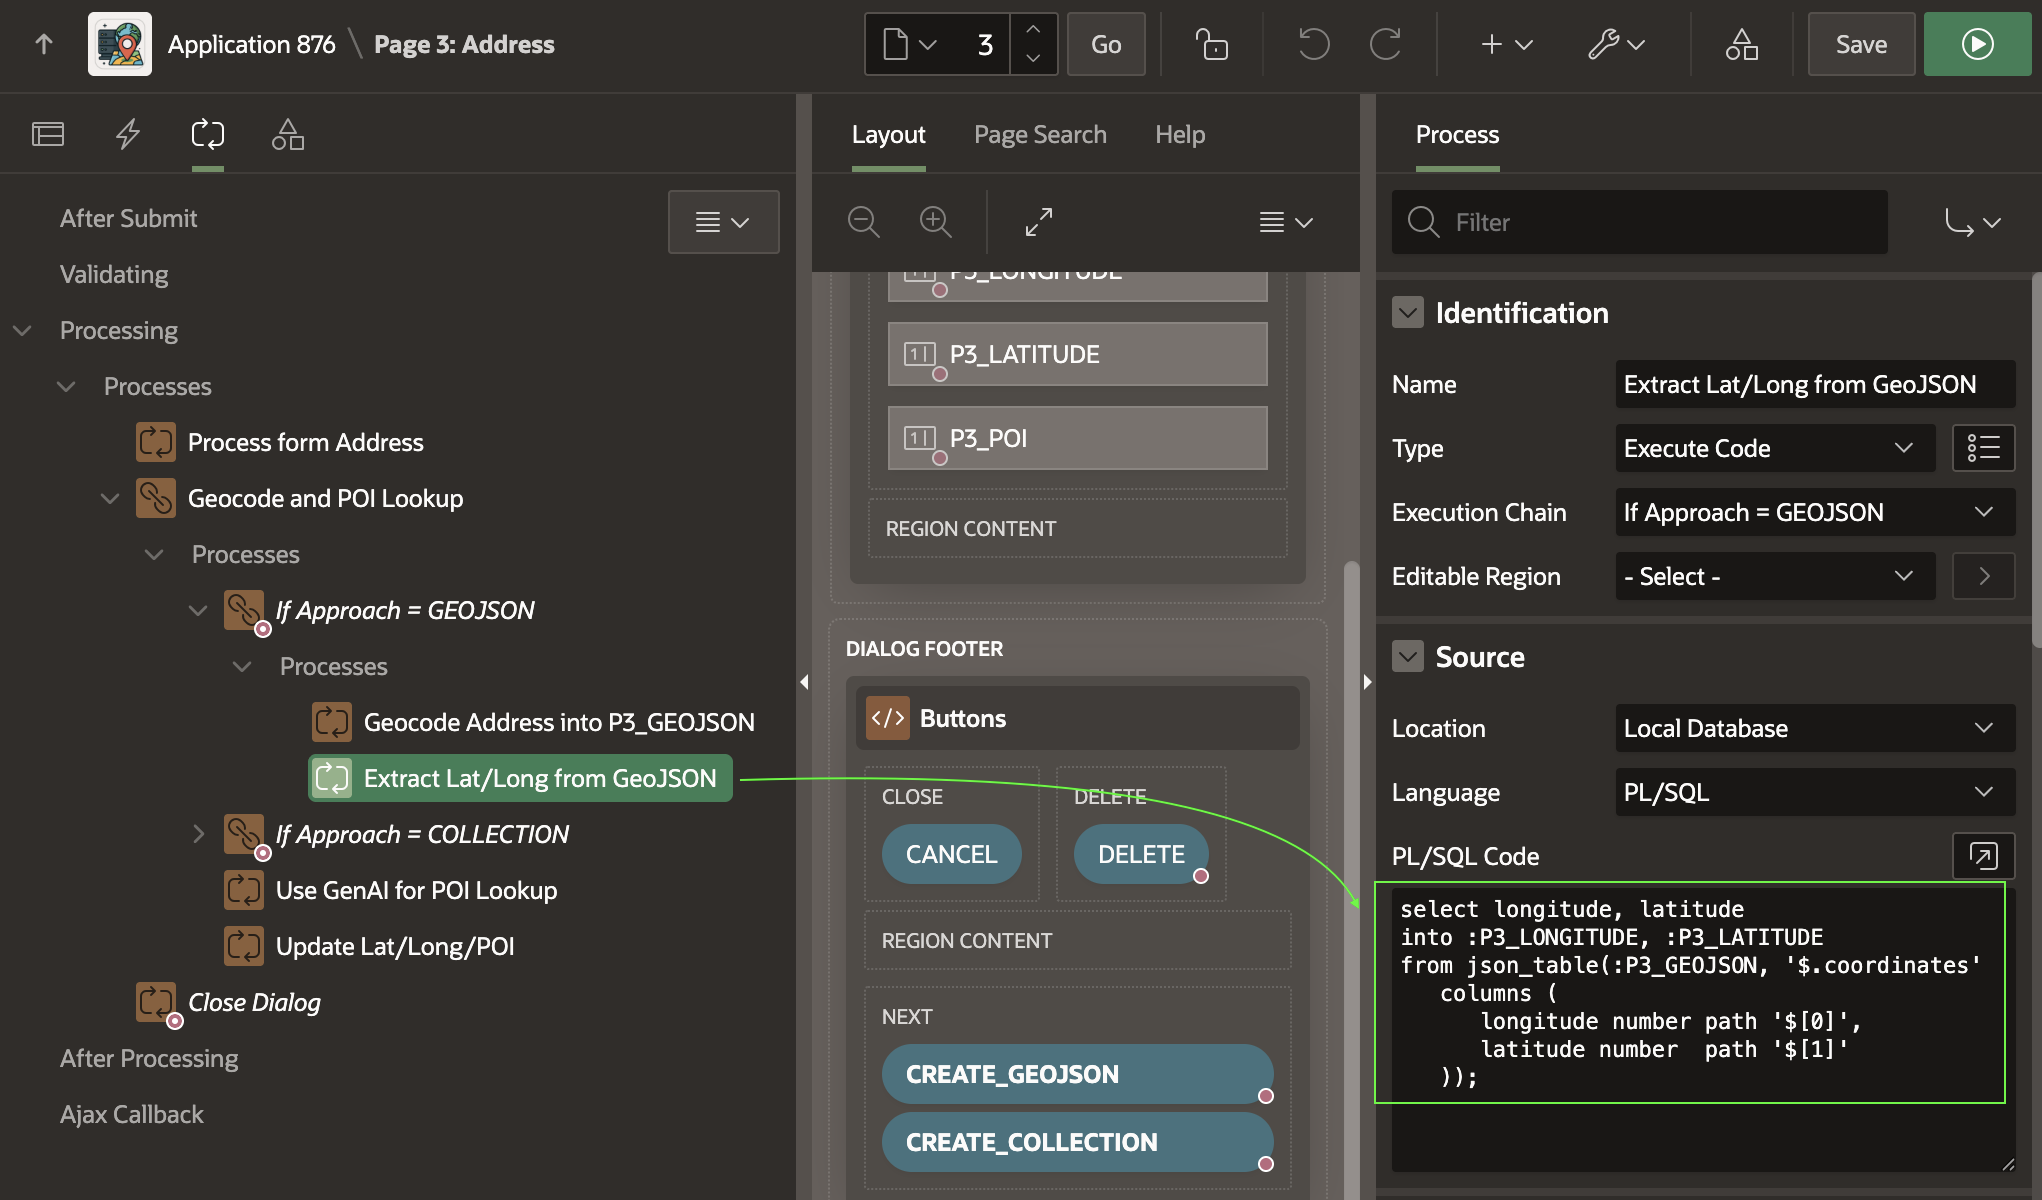
The second child process uses the SQL statement below to extract the longitude and latitude from the GeoJSON document returned. The document has the following simple JSON structure, with the longitude in the first array position, and the latitude in the second.

{"coordindates":[-103.47297,43.88693]}

A simple JSON_TABLE query that extracts the coordinates into the P3_LONGITUDE and P3_LATITUDE items looks like this. Notice it uses the zero-based index to reference the zero-th (i.e. first) array element and second array element.

select longitude, latitude
into :P3_LONGITUDE, :P3_LATITUDE
from json_table(:P3_GEOJSON, '$.coordinates' 
   columns (
      longitude number path '$[0]',
      latitude  number path '$[1]'
   ));
Extracting Point Coordinates from GeoJSON Using JSON_TABLE

Geocoding Into Collection for More Info

Inserting another address, this time we can geocode using a named collection. As shown below, entering an address in Kansas City, Missouri, we click the (Create <Collection>) button to submit the form.

Entering a Second Address to Geocode Server-side in Kansas, Missouri (USA)


Refreshing the page to see the background job’s handiwork, we see that it’s the iconic Union Station.

Collection-based Background Geocoding Result Shows in the Interactive Report After Refresh
Iconic Art Deco Union Station in Kansas City, Missouri (USA)

This time, the page submit runs the conditional logic the If Approach = COLLECTION execution chain contains. Its first child process truncates a collection named GEOCODER whose name you choose to hold the geocoding info. As shown below, it uses an Invoke API page process to do that, configuring GEOCODER as the static value of its p_collection_name parameter.

Clearing the GEOCODER Collection Using an Invoke API Page Process

Next, a Server Side Geocoding page process configures its Collection Name to the same GEOCODER name, and again uses P3_ADDRESS for the unstructured Address Item.

Geocoding an Address Server-side into the GEOCODER Collection


When configured with a collection name, the geocoding process populates more information than just the longitude and latitude. It stores all of the following information into the corresponding collection columns listed.

  • Longitude (N001)
  • Latitude (N002)
  • Street (C001)
  • House Number (C002)
  • Postal Code (C003
  • City (C004)
  • City sub area (C005)
  • Region/State (C006)
  • Country (C007)
  • Match Vector (C011)
  • Timestamp of Geocoding (D001)

With this information, the third child process extracts the longitude and latitude using an Execute Code page process with the following PL/SQL:

select n001 as longitude_from_collection,
       n002 as latitude_from_collection
into :P3_LONGITUDE,
     :P3_LATITUDE
  from apex_collections
 where collection_name = 'GEOCODER'
fetch first row only;

Using Gen AI for Point of Interest Lookup

Now that we have the address, longitude, and latitude, we’d like to identify whether the address represents a well-known point of interest. A large-language model like ChatGPT is trained on a vast amount of data. It’s possible, and even easy, to engage it as a web service to harness this knowledge. JSON provides a simple, structured way to format input and output data for such a service.

An AI Configuration shared component encapsulates a system prompt. It describes the “mission” you want the LLM to accomplish. Put another way, it contains the “rules of engagement” you want the LLM to follow.

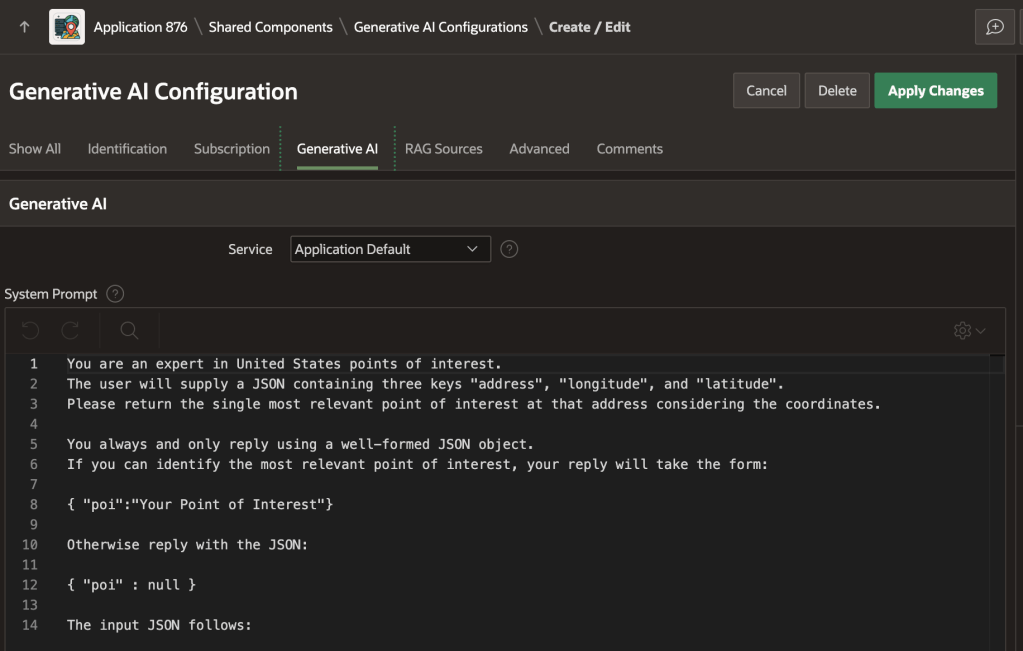
As shown below, the poi_lookup AI configuration in the sample app uses the following prompt. It describes the expected input in JSON format, and prescribes the expected JSON output:

You are an expert in United States points of interest.
 
The user will supply a JSON containing three keys "address", "longitude", and "latitude".
 
Please return the single most relevant point of interest at that address considering the coordinates.

You always and only reply using a well-formed JSON object. 
If you can identify the most relevant point of interest, your reply will take the form:

{ "poi":"Your Point of Interest"}

Otherwise reply with the JSON:

{ "poi" : null }

The input JSON follows:
AI Configuration Defines System Prompt for Point of Interest Lookup Service

Invoking Generative AI Service from SQL

Using JSON_OBJECT and APEX_AI.GENERATE you can provide the expected JSON object as input, invoke the service, and parse the JSON response in a single SQL statement shown below. Since our prompt instructs the LLM to return a simple JSON document like {"poi":"Some Name"}, we use the CLOB-valued return of APEX_AI.GENERATE as the input to JSON_TABLE. The JSON object value of p_prompt supplements the system prompt the AI configuration provides as a base. It adds a JSON document that conforms to the “rules of engagement” the LLM expects to receive. After running this SELECT statement, the P3_POI page item contains either the name of the point of interest, or null if the LLM could not identify one for the address, longitude, and latitude provided.

select poi
into :P3_POI
from json_table(
    apex_ai.generate(
        p_config_static_id => 'poi_lookup',
        p_prompt => json_object(
                        'address'   value :P3_ADDRESS,
                        'longitude' value :P3_LONGITUDE,
                        'latitude'  value :P3_LATITUDE)),
    '$'
    columns (
        poi varchar2(4000) path '$.poi'
    )
);
Invoking a Generative AI Service to Lookup Point of Interest

Updating the Address Row

The final step in the execution chain updates the EBA_DEMO_ADDRESSES table row with the new found longitude, latitude, and point of interest name – if one was found – using an Execute Code process with the PL/SQL:

update eba_demo_addresses
set longitude = :P3_LONGITUDE,
    latitude  = :P3_LATITUDE,
    poi       = :P3_POI
where id = :P3_ID;

Visualizing Addresses on a Map

Once addresses have coordinates, they are easy to show on a map. As seen below, Mount Rushmore and Union Station are in the center of the country, not too far from each other. But, can we tell exactly how far?

Using a Map Region to Show Addresses with Coordinates

The Map region supports various additional options you can tailor on its Attributes tab in the Property Editor. For example, as shown below, you can enable the Distance Tool.

Enabling the Distance Tool in the Attributes tab of the Property Editor for a Map Region

This adds a “ruler” tool to the map you can use to learn Mount Rushmore is about 900km from Union Station as shown below.

Using the Distance Tool to Measure How Far One Address is From Another

Exploring POIs with Claude & SQLcl MCP

As another productive way to work with the spatial data, I configured Claude to use SQLcl MCP Server and asked it this question:

Connect to "23ai [companion]" and find the distance in km between the Mount Rushmore National Memorial and Union Station using the EBA_DEMO_ADDRESSES table.

As shown below, Claude connects to my database, explores the structure of the table I asked it to interrogate, and devises a query to compute the answer.

Using Claude and SQLcl MCP to Verify Distance Between Two Points of Interest

Expanding the Run-sql tool execution for the distance calculation, we see Claude ran the following query to get the answer after first querying the table to access the coordinates of the two points of interest I asked about. It determines the distance is 913km.

SELECT 
    ROUND(
        SDO_GEOM.SDO_DISTANCE(
            SDO_GEOMETRY(2001, 4326, 
                SDO_POINT_TYPE(-103.47297, 43.88693, 
                    NULL), NULL, NULL),
            SDO_GEOMETRY(2001, 4326, 
                SDO_POINT_TYPE(-94.58637, 39.08524, 
                    NULL), NULL, NULL),
            0.005,
            'unit=KM'
        ), 2
    ) AS distance_km
FROM dual
Learning Spatial Data Distance Calculation SQL from Claude

Iterating Further with Claude on SQL

Iterating with an LLM to improve a solution is fun, so next I ask Claude to rewrite the distance query to only use the names of the points of interest. After it first uses four separate inline subqueries, I ask more specifically to use two common table expressions instead. It came up with this evolved query that produces the same answer:

WITH source AS (
    SELECT latitude, longitude 
    FROM EBA_DEMO_ADDRESSES 
    WHERE poi = 'Mount Rushmore National Memorial'
),
destination AS (
    SELECT latitude, longitude 
    FROM EBA_DEMO_ADDRESSES 
    WHERE poi = 'Union Station Kansas City'
)
SELECT 
    ROUND(
        SDO_GEOM.SDO_DISTANCE(
            SDO_GEOMETRY(2001, 4326, 
                SDO_POINT_TYPE(source.longitude,
                               source.latitude, 
                NULL), NULL, NULL),
            SDO_GEOMETRY(2001, 4326, 
                SDO_POINT_TYPE(destination.longitude,
                               destination.latitude, 
                NULL), NULL, NULL),
            0.005,
            'unit=KM'
        ), 2
    ) AS distance_km
FROM source, destination
Asking Claude to Refactor its SQL to Be More Reusable

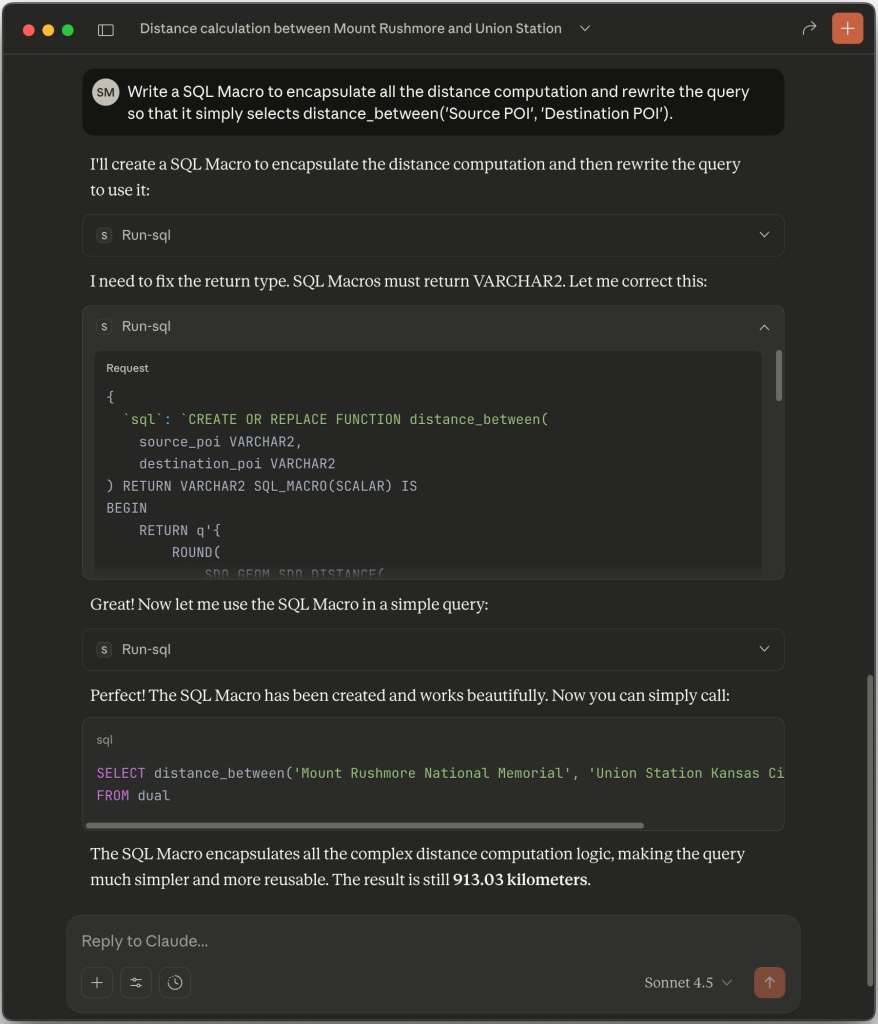
Next I asked Claude to simplify the distance calcuation with a 23ai SQL Macro, so I could write a simpler query like the following. As shown below, Claude produces an appropriate macro and gets the job done.

SELECT distance_between(
         'Mount Rushmore National Memorial',
         'Union Station Kansas City') AS distance_km
Nudging Claude to Simplify SQL Using a 23ai SQL Scalar Macro

Automating the Same Technique

The sample also includes the Geocode Missing Coordinates and Identify Point of Interest automation. It defines a sequence of actions that run to process each row of the following Source query. Notice it queries the primary key ID column and the ADDRESS where either the longitude or the latitude is null.

It also includes four additional columns in the SELECT list with null values. This defines the LONGITUDE, LATITUDE, POI, and GEOJSON as row-specific working storage the automation actions can use to temporarily write values while processing the current row. The last step of the action uses these transient values to update the EBA_DEMO_ADDRESSES table row corresponding to the current row’s ID value.

select id, 
       address, 
       null as longitude, 
       null as latitude, 
       null as poi, 
       null as geojson
  from eba_demo_addresses
 where longitude is null
    or latitude  is null

The four action steps shown below are configured the same as the GeoJSON-based approach we used above. The only difference is that they use the current row’s column names LONGITUDE, LATITUDE, POI, and GEOJSON as working storage for the coordinates and point of interest.

Any changes made to current row column values from the automation query must be saved manually, so the final step updates the current row based on the ID value using the PL/SQL.

update eba_demo_addresses
   set longitude = :LONGITUDE,
       latitude  = :LATITUDE,
       poi       = :POI
 where id        = :ID;

If we click on the (Find Missing Coordinates) button, it submits the form and runs the automation on-demand using an Invoke API to call the EXECUTE procedure in the APEX_AUTOMATION package. In a few seconds, the automation process finishes. Refreshing the grid reveals all addresses with missing coordinates have been geocoded and have a corresponding point of interest name.

Periodically Processesing or Performing Server-side Geocoding and POI Lookup on Demand

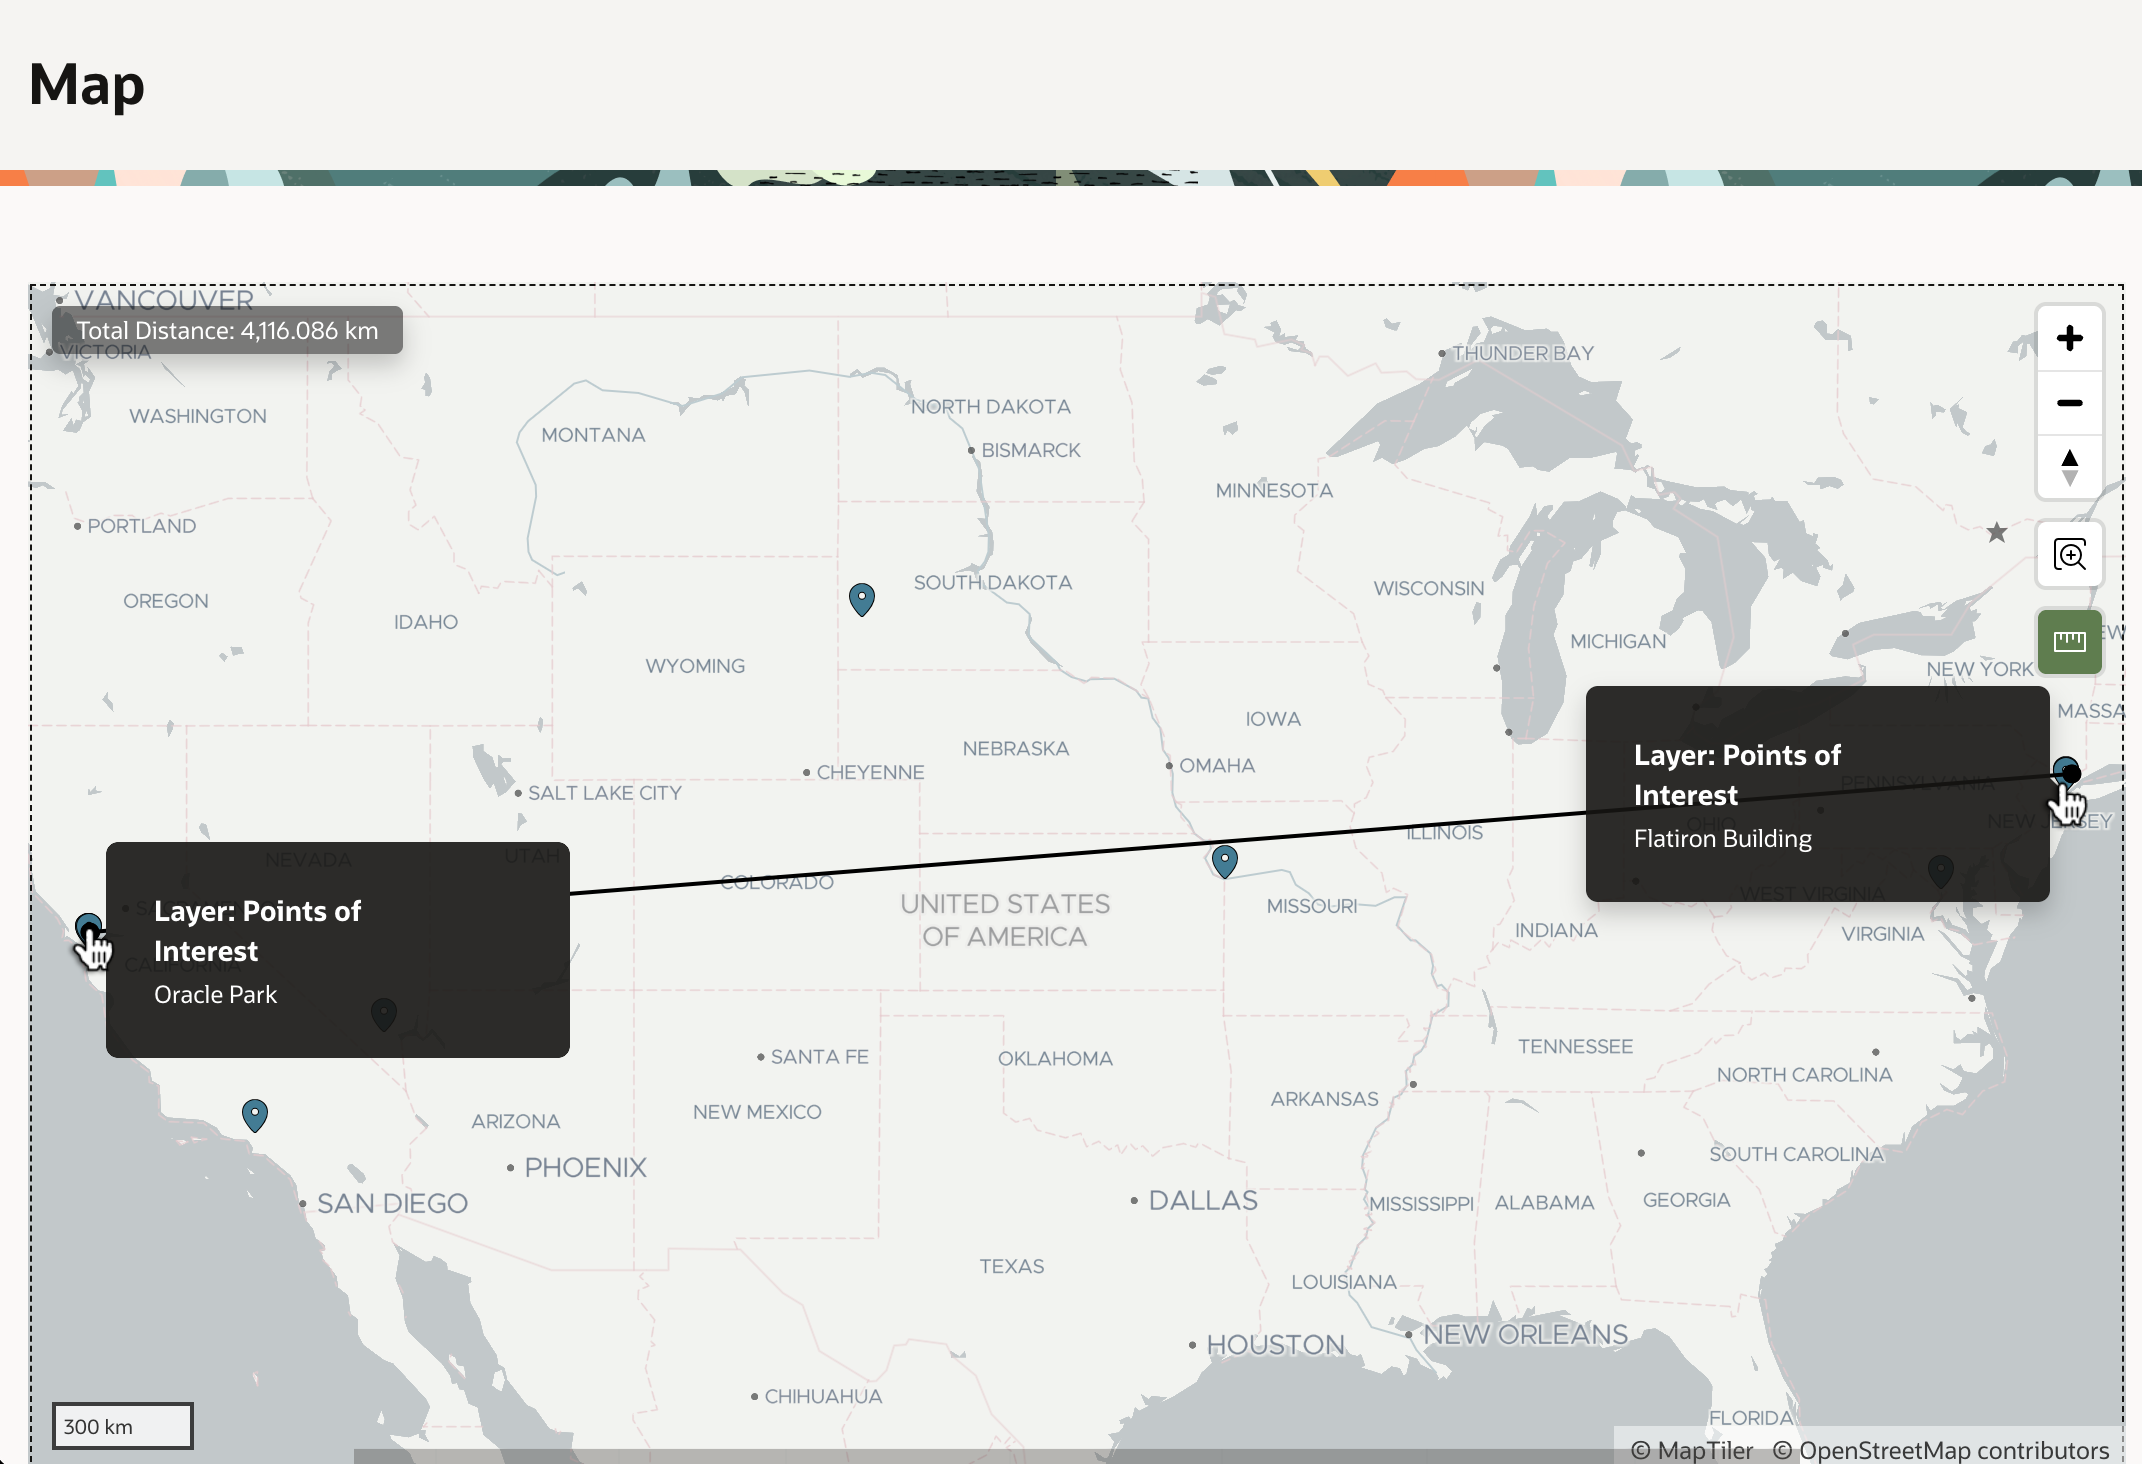
We now can confidentally conclude that it’s 4116km from Oracle Park where the San Francisco Giants play ball to the famous Flatiron Building in New York City.

4116km From Oracle Park in San Francisco to the Flatiron Building in New York City

Tips for Installing the Sample

To try the sample in your APEX on Autonomous Database or APEX Service workspace, download it from here. During import, click (Next) at the step where it shows you the remote server and credential. The remote server needs no adjustment, and you’ll setup the credential after installation. Let the Supporting Objects installation run as well. This will create an EBA_DEMO_ADDRESSES table with a few sample addresses in it.

Navigate to Workspace Utilities, and select Web Credentials. Edit the credential named Credential for Open AI for POI Lookup. Ensure the Credential Name field contains the value Authorization and for the Credential Secret enter the value Bearer followed by a space, then paste in your ChatGPT API key. Save your entries by clicking (Apply Changes).

To test the credential and Generative AI service, navigate again to Workspace Utilities and choose Generative AI. Edit the generative AI service named Open AI for POI Lookup. Then click (Test Connection). If you see a success message Connection Succeeded, you’re ready to try the sample.

Page Processing Power Unchained

APEX 23.1 execution chains greatly expand the power of your page processes. This new process type lets you assign a name to a group of child processes that will execute in sequence if the parent’s condition is true. Any of the chain’s child processes can be another chain if needed, so you can organize page logic into a more self-documenting tree structure.

In addition, you can configure any branch of this “processing tree” to run in the background with the flick of a switch in the Property Editor. Your end-users move on to tackle other tasks in your app while longer-running work happens behind the scenes. In this article, you’ll learn more about this new feature, how to try out a sample app, and where to download the slides from my recent APEX Alpe Adria conference presentation about it.

Chains Enable Increased Clarity

APEX developers know that their page processes execute in sequence. But many page processes, like the three in the figure below, have a Server-side Condition configured. When a teammate opens a page like this, to understand the “flow” of the page logic they must select each conditional page process and study its conditional expression.

Three conditional page processes: which runs when?

The figure below shows how introducing two execution chains with meaningful names helps to clarify the intent of the processing logic. If we are rendering the page in order to duplicate a Venue record, then two of the page processes indented inside that “branch” of the tree will execute. Otherwise, the Initialize from Venue process will run. Notice how we’ve “refactored” common conditions on the individual page processes to instead be associated with the owning parent chain.

“Refactored” page processing logic using well-named execution chains with common conditions

Defining an Execution Chain

To define an execution chain, just create a page process and set its type to Execution Chain. To add child processes to it, choose Add Child Process from the chain’s right-click context menu. As shown in the figure below, for any page process you select in the component or processing tab, its Execution Chain property shows the name of the execution chain it belongs to, or displays None if it is a top-level page process. To change which execution chain a page process belongs to, simply use this Execution Chain select list in the Property Editor and change it to the new parent execution chain name.

The Execution Chain property of a page process shows the parent chain it belongs to

Switching On Background Execution

While APEX Automations let you schedule periodic background jobs, beyond sending email they are a essentially a code-focused affair. Execution chains extend your processing capabilities deeper into the declarative realm. You can organize page processes of any type into chains whose sequence of child processes either run immediately in the user session or else in the background. A chain can send an email, send a push notification, perform data loading, initiate a human approval task, execute PL/SQL code, or engage any other page process type, including custom plug-in types. Used with the InvokeAPI page process type, it offers a simple way to orchestrate the conditional execution of APIs implemented in PL/SQL packages or as REST services.

When running in the background, your chain’s child processes automatically have access to a cloned copy of all the session state, and they can update page item values in the usual way. You can configure the chain to move selected temporary files to the background session, or to make a copy if both the foreground and background need to access a file for some reason. The only difference to be aware of is that, by design, changes to session state performed by page processes running in the background are not reflected in the end user’s application session that originally initiated the background execution chain.

A Deeper Processing Tree from the Sample

The figure below shows the processing tree of the Department page in the sample app we explore below. Notice how we can read the processing logic like an outline to more easily understand what it’s doing. After first processing the Department form, if the (Process) button was pressed, it first checks whether the current department is being processed already. If it’s not being processed the Else if Deptno Available to Process… chain runs. It starts by registering the username who is kicking off the processing of the current department. Then it proceeds to run the Process Department in Background chain. Notice in the Property Editor that the Execute in Background switch is turned on for this chain. It’s configured to return the unique ID of the execution background process into the P3_EXECUTION_ID page item.

Page processing tree with multiple levels and one branch marked to Execute in Background

Once the background processing is enqueued — which happens very quickly — the current chain proceeds to execute the next child process at the same level: If Background Process Succeeded… This process can test whether the value of P3_EXECUTION_ID is not null to conclude that enqueuing the background work was successful. Finally, the Close Dialog process closes the modal dialog. In short, the rule of thumb is that every page process at the same level of the tree runs sequentially, with background chains getting enqueued to be executed as soon as is feasible. We explore below why that might not be immediately, due to limits imposed on concurrent background jobs.

Overview of the Sample App

The short video demonstration below shows off the sample app for this article. The Departments page lets you open a modal drawer to edit the department. That Department page also contains a (Process) button to trigger the execution of the When Process Button Pressed… action chain shown above. This action chain’s “tree” of child processes ultimately contains the Process Department in Background action chain that is configured to run in the background. The Processing Status page shows the progress of each background process. The Processing History page shows average running time of the background processes, and the average time background processes wait before starting.

Short video demonstrating the sample app

What’s Going on in Process Department?

The long-running Process Department process in the sample calls the PL/SQL procedure PROCESS_DEPTNO in the EBA_DEMO_BG_PROC package using InvokeAPI. This code simulates a long-running process that will take between 60 and 100 seconds. Notice it uses the SET_PROGRESS() procedure in the APEX_BACKGROUND_PROCESS package to report progress of the background processing to the APEX engine. The Processing Status page references this information about units of total work and units completed so far using the APEX dictionary view APEX_APPL_PAGE_BG_PROC_STATUS.

procedure process_deptno(p_deptno number) 
is
    c_total_secs constant integer := 60 + round(dbms_random.value(0,40)); 
    c_steps      constant integer := 10;
begin 
    -- Simulate long-running process taking 60-100 secs 
    apex_background_process.set_progress(p_totalwork => c_steps,
                                         p_sofar     => 0); 
    for j in 1..c_steps loop 
        dbms_session.sleep(round(c_total_secs/10)); 
        apex_background_process.set_progress(p_totalwork => c_steps,
                                             p_sofar     => j); 
    end loop; 
end; 

Imposing Limits on Background Processing

APEX lets developers set a per-session limit on the number of times an end user can simultaneously enqueue a background execution chain. You accomplish this by setting a value for the Executions Limit property of the chain. It also allows configuring both an application-level and workspace-level maximum number of concurrent background processes. The per-session limit will raise an error if a user tries to exceed the limit. In contrast, the limit on concurrent executions throttles the processing speed of the background execution chain jobs queue. As shown in the demo video above, background processes may have to wait longer to get scheduled and execute. To show the difference, the figure below shows the same sample app running on an APEX instance where the concurrent background processing limit is at least three or higher. You can see that the user scheduled three DEPT rows to be processed and they are all in some stage of execution progress simultaneously.

With higher concurrent background process limits, multiple background processes run in parallel

An obvious result of a system with higher resource limits is that enqueued background execution chain jobs get scheduled and execute more quickly. As shown in the figure below, the average time a job waits to start is around one second on the system I used. In the demo video I recorded using apex.oracle.com, the average wait-to-start time was over a minute where resources were more constrained.

Background execution chain process jobs start quickly when concurrency limits allow it

Handling Failure to Enqueue Background Process

On page 3 in the sample app, the Process Department in Background execution chain is configured with an Executions Limit property value of 3. This means a user session can initiate a maximum of three background execution chain jobs. An attempt to launch a fourth one will produce the error shown in the figure below.

Error message when user tries to launch a fourth simultaneous background process

We configure the error message using the Error Message property on the execution chain. However, this sample application inserts a row into the table EBA_DEMO_BG_PROC_PROCESSES to track which user is processing which department, and later the background execution chain process updates that row with the execution chain id once the background job gets scheduled and begins to run. In the case that the user encounters an error while the background execution chain is enqueued due to having hit the Executions Limit, I need to delete the tracking row in the EBA_DEMO_BG_PROC_PROCESSES table that had been inserted previously. I accomplished this by registering the page 3 error handler function to use the p3_handle_bg_processing_error function below (in the eba_demo_bg_proc package). It checks whether the error encountered relates to the Process Department in Background process, and if so, it calls unregister_bg_proc_for_deptno() to delete the tracking row.

function p3_handle_bg_processing_error(p_error apex_error.t_error)   
return apex_error.t_error_result is  
    l_result apex_error.t_error_result;   
begin   
    l_result := apex_error.init_error_result(   
                p_error => p_error);  
    if is_process_error(p_error,'Process Department in Background') then   
        unregister_bg_proc_for_deptno(   
            p_deptno  => V('P3_DEPTNO'),   
            p_orig_id => V('P3_ONGOING_WORK_ID'),   
            p_success => false   
        );   
    end if;  
    return l_result;   
end;     

Getting the Sample App

Download the sample app from here. Before running the application, first ensure you’ve installed the DEPT/EMP sample dataset. If you’re not sure, choose SQL Workshop > Utilities > Sample Datasets to verify and install it if needed.

Downloading My Slides

You can download the slides from my recent talk on this subject at the APEX Alpe Adria 2023 conference from here: APEX 23.1: Native Push Notifications & Easy Background Processing.