Watch this webinar to see the broad set of Oracle APEX features you can use to quickly deliver and maintain beautiful, functional solutions that add immediate business value. Enjoy end-to-end or expand the YouTube description for a detailed topic timeline to view just a segment. See below for a list of what you’ll learn…
Studying an app for a fictional medical clinic, you’ll see & learn about:
Productive Development
Using Generative AI help for SQL, PL/SQL, app creation, and more
Creating Gen AI chatbots and using AI services to save users time
Modeling data visually using the Quick SQL ER Diagram
Automating business processes with workflow and approvals
Laying out responsive web pages with minimal effort
Easy User Interfaces and Reporting
Visualizing business process status for end users in a diagram
Exploring data interactively with filters, aggregates, and charts
Saving reports and downloading/emailing/scheduling results
Generating pixel-perfect PDF reports from Word templates
Presenting data with Maps, Cards, Calendars, and Charts
Filtering data with Faceted Search and Smart Filters
Searching application-wide with unified results display
Reacting to end-user interactions with dynamic behavior
Incorporating community plug-ins like a Kanban Board
Handling parent/child lists, regions, and conditional display
Geocoding addresses
Creating reusable UI components with only HTML markup skills
Reusing repeating layouts consistently with configurable slots
Installing Progressive Web Apps that launch like native ones
Uploading images from a mobile device’s camera
Capturing GPS location of a mobile user
Simple Business Processes, App Logic, and Integration
Orchestrating app logic with workflows that react to data changes
Sending Emails and push notifications
Integrating data from MySQL, OData, Fusion Apps, and REST APIs
Synchronizing remote data periodically to a local cache
Querying based on spatial distances
Predicting outcomes from historical data with machine learning
Validating parent/child data using simple SQL checks
Using semantic similarity searching with 23ai vector search
Improving Gen AI results with Retrieval-Augmented Generation
Offloading longer-running processing to the background
Loading CSV, Excel, or JSON data in foreground or background
Enriching remote data with local joins and computations
Exposing application data as REST APIs using JSON Duality Views
Producing reusable REST API catalogs from OpenAPI documents
Hassle-free Dev Ops and Application Lifecycle
Tracking issues and tackling tickets in teams with working copies
Merging changes from a separate working copy back to main
Testing apps and deploying to test and prod environments
Valuing APEX scalability, extensibility, security, and governance
End-users find multivalue page items intuitive for quick data entry, and APEX devs have many kinds to choose from. However, using multivalue items in the simplest way means storing data in a single column as a delimited string. While easy to do, this could complicate other aspects of your app processing. For a row in a book table, for example, often the multiple tags applied to the book are stored in an intersection table. Imagine a book_tag_xref table with foreign key values recording which tag ids are paired with which book ids. In this article, you’ll learn how to manage intersection rows using a multivalue page item.
We start with an approach to edit the tags applied to a book using a combobox. Then we generalize the technique to easily configure this support for any data model and any kind of multivalue page item. The sample app contains an intersection_multival helper package you can use in your own apps.
NOTE: The APEX 24.1 downloadable sample app installs a trycombo ORDS REST Service module used later in the article, so before installing the sample please ensure your workspace parsing schema is enabled for ORDS REST Services. You can check that (and enable it if needed) on the SQL Workshop > RESTFul Services page of the APEX Builder.
Sample Data Model
When you import the sample app, its Supporting Objects scripts install the following simple three-table data model and insert initial sample data for two books, six tags, and rows in the intersection table that record three tags applied to each book. For ease of discussion, we’ll refer to the tables in this article without their prefix simply as book, tag, and book_tag_xref, but the code and pages we’ll study use the full names shown below.
Three tables in the sample app’s data model
Books Manual Cards + Smart Filters Page
Running the app opens the home page Books Manual(page 8) displaying books in a cards region as shown below. We’ll study this page first, along with its modal form page Book Manual (page 11).
Books Manual home page (8) with a cards region showing books and applied tag names
The card region’s SQL query includes an appropriate LISTAGG() select list expression to retrieve a colon-delimited string of applied tag names from the tag table based on the corresponding tag_id foreign key values it finds in the intersection book_tag_xref table for the current book:
select b.id,
b.name,
(select listagg(t.name,':')
from eba_demo_trycombo_tag t
where t.id in (select btx.tag_id
from eba_demo_trycombo_book_tag_xref btx
where btx.book_id = b.id)) as tags
from eba_demo_trycombo_book b
order by b.name
On the card region’s Attributes tab in the property editor, the card Body uses Advanced Formatting with an HTML Expression containing the {loop/} template directive to iterate over the colon-separated tag names it finds in the current row’s TAGS column value. This loop formats each tag name using the a-Chip CSS class. This makes the tag names look like little “chips”:
The Full Card action is configured to open page 11 (Book Manual), passing in the value of the book ID column for the P11_ID page item. Clicking on the card for the Building Oracle XML Applications book opens the modal drawer page we explore next.
Book Manual Modal Form Page
When we edit a book, the page opens to show the name of the book and the currently applied tags in a combobox as shown below:
Book Manual page (11) showing a book’s name and currently applied tags in a combobox
The P11_TAGS combobox page item uses the shared component List of Values LOV_TAGS to provide the list of existing tag names to choose from. The Value HTML Expression uses the following HTML markup to format each entry in the combobox dropdown list using the same a‑Chip CSS class we used in the Books Manual cards page:
<span class="a-Chip">&NAME.</span>
Notice we are referencing a NAME column from the List of Values data source using the &NAME. notation in the combobox’s Value HTML Expression. For this to work, the columns must be configured in the List of Values component definition as Additional Display Columns as shown below:
LOV_TAGS List of Values component with Additional Display Columns configured
This produces the following look and feel when the end-user clicks into the combobox field to show the dropdown list:
P11_TAGS combobox with custom styling to make tag names look like “chips”
While it’s not required for this simple sample app, know that the Value HTML Expression can also make use of HTML Template Directives to perform sophisticated conditional output for each item in the list whenever that could prove useful in your own apps.
Unified Config for Multivalue Items
The Combobox page item lets end-users pick multiple options from a flexibly-styled, type-to-autoreduce list of values. Users can also key in new entries manually. This works perfectly for an app like this sample where users can invent their own tags to classify books, or pick from a set of existing tags. APEX 24.1 adds the Select Many item that works similarly, but in that case users can only choose from the listed options. These two new multivalued item types join the ranks of the Select List, Shuttle, List Manager, and Popup LOV that all handle displaying and editing multiple values from a list. In the APEX 24.1 Builder, you configure all of their multivalue behavior in a consistent way in a new Multiple Values section of the property editor.
As shown in the figure below, the P11_TAGS combobox in the Book Manual page (11) has Delimited List for its Multiple Values > Type property with the colon character (:) as the delimiter.
Configure all multivalue page items in a uniform way
Reading Multivalue from Intersection Table
The P11_TAGS combobox item expects a colon-delimited list of tag ids, but in our data model the tag ids applied to the book being edited are saved in the book_tag_xref table. So, in our page’s Pre-Rendering section, in the Before Header subsection we use an Invoke API page process to call the READ_APPLIED_TAG_LIST() function in the EBA_DEMO_TRYCOMBO package. This is declaratively configured to pass in the value of the P11_ID page item with the book’s primary key and to return the function result into the hidden P11_TAGS_BEFORE page item. In the After Header subsection, we use a computation to copy the value of P11_TAGS_BEFORE into the P11_TAGS combobox. We do this so we can later compare the “before” value of the applied tags with the submitted value of the P11_TAGS combobox to notice if the user has effectively made any changes or not. There’s no need to process the list of tag ids if nothing has changed.
The code of the READ_APPLIED_TAG_LIST() function is straightforward. It uses the listagg() function to produce the colon-separated list of tag id’s from the book_tag_xref intersection table corresponding to the p_book_id passed in using a SQL query as shown below:
-- In Package Body EBA_DEMO_TRYCOMBO
function read_applied_tag_list(
p_book_id in number)
return varchar2
is
l_ret varchar2(4000);
begin
select listagg(tag_id,':')
into l_ret
from eba_demo_trycombo_book_tag_xref
where book_id = p_book_id
order by tag_id;
return l_ret;
exception
when no_data_found then
return null;
end read_applied_tag_list;
This setup is all we need to retrieve the multivalue string of tag ids during page load so the combobox can show the list of applied tags in the edit form.
Simplifying Processing of Manual Entries
The value of the P11_TAGS combobox is a colon-separated list of tag ids. These correspond to values of the “return column” of the LOV_TAGS list of values shared component. It defines the tag’s ID as return column and tag NAME as display column. However, recall that the “combo” in combobox means it combines the selection of pre-defined entries with manually-typed-in entries.
The combobox simplifies our job of processing the manually-typed entries by partitioning them into a separate (typically hidden) page item. The Book Manual page (11) has the P11_NEW_MANUAL_TAG_NAMES hidden page item for this purpose. The P11_TAGS combobox references P11_NEW_MANUAL_TAG_NAMES as its Manual Entries Item.
When the page is submitted, we need to process any manual entries in P11_NEW_MANUAL_TAG_NAMES and save any other changes made to P11_TAGS to the intersection table. We’ll do that next.
Before we move on, let’s take a moment to study the Session State > Storage property of the P11_NEW_MANUAL_TAG_NAMES hidden page item. Since it is not related to the form region or a database column, by default it will be created in Page Designer with a value of Per Session (Persistent) for this property. It is super-important to change this to Per Request (Memory Only). Failing to do this means the same manually entered items will appear to be present the next time you visit the edit form. By setting this property to Per Request (Memory Only), its value is submitted to be processed but then will not “hang around” for longer than that.
Saving Applied Tags to Intersection Table
The Book Manual page (11) configures another Invoke API page process in the Processing section of the Processing tab. It declaratively invokes the SAVE_APPLIED_TAG_LIST() procedure in the EBA_DEMO_TRYCOMBO package that has the following API. We pass in P11_ID for the p_book_id, P11_TAGS for the p_delimited_tags, and P11_NEW_MANUAL_TAG_NAMES for the p_new_manual_entries parameters.
procedure save_applied_tag_list(
p_book_id in number,
p_delimited_tags in varchar2,
p_new_manual_entries in varchar2);
This Invoke API page process uses the following server-side condition expression to execute only if necessary. Specifically, we only want this “save applied tags” logic to run if the P11_TAGS is different from P11_TAGS_BEFORE or if there are any new manual tag names to process. The nvl() expressions are a compact way of correctly handling the situations where the tag ids value changed from null to non-null or vice versa.
nvl(:P11_TAGS_BEFORE,':') != nvl(:P11_TAGS,':')
or :P11_NEW_MANUAL_TAG_NAMES IS NOT NULL
Pseudocode for Saving Applied Tags List
The SAVE_APPLIED_TAG_LIST() procedure performs the following pseudocode steps to track two lists of tag ids: l_add and l_delete. These lists are the tag ids we need to add to and delete from the intersection table for the current book id.
l_old := list of applied tag ids from book_tag_xref for current book
l_new := list of submitted tag ids
l_manuals := list of manual entries (if any)
loop over l_manuals to…
insert new row for each into tag table, and
add each’s new system-assigned primary key to l_add list
loop over tag ids in l_old list to…
detect if any is missing from l_new list, and if so…
add intersection row primary key for missing tag id to l_delete list
loop over tag ids inl_new list to…
detect if any is missing from l_old list, and if so…
add missing tag id to l_add list
Delete any rows in l_delete from book_tag_xref by primary key
Insert any tag ids for this book id in l_add to book_tag_xref
The result is a pair of Books Manual and Book Manual pages (8 & 11) that let us edit the applied tags of any book. For example, as shown below we’re adding to manually-typed tag names PL/SQL and XSLT to the Building Oracle XML Applications book:
Adding two new manual entries to the Tags combobox for a book
Then we can see they are shown in the Books Manual page on the card for the book just edited, and the new tags also show up as existing tags in the next book that gets edited as shown below:
New tags show up in list of predefined tags and as applied tags to a book
When using the combobox page item, keep in mind that a manually-entered tag value can contain spaces in the name, too. So a new tag value could be Dynamic Action and when you type the [Enter] key, the combobox turns the two-word tag name “Dynamic Action” into a new chip to differentiate between one chip for “Dynamic” and another chip for “Action”.
Generalizing Read_List() + Save_List()
The code explained earlier for READ_APPLIED_TAGS_LIST() and the approach outlined in pseudocode above for the SAVE_APPLIED_TAGS_LIST() procedure implement one particular example of a more general pattern. The APEX_EXEC package is a general-purpose API for data retrieval and manipulation, and we can use it to generalize the approach to work for any use case. Imagine a generic READ_LIST() function and SAVE_LIST() procedure that accept as parameters all the appropriate information required that make each use case distinct. Our generic routines would need to accept as parameters details like the names of the:
other reference table’s primary key column name (e.g. ID)
other reference table’s description column (e.g. NAME)
While we are at it, we can imagine supporting both theDELIMITED_LIST style of APEX multivalue string, with developer-configured delimiter, as well as the JSON_ARRAYtype of multivalue string.
And since APEX_EXEC provides APIs for working both with local database data sources as well as REST Data Sources, why not also let the generic APIs work with both common types of intersection and other reference sources: DB or REST?
This leads us to create two APIs like the following you will find in the INTERSECTION_MULTIVAL package in the sample app:
function read_list(
p_multival_type in t_multival_type,
p_intersection_source_type in t_source_type,
p_intersection_source_name in varchar2,
p_other_ref_foreign_key_col in varchar2,
p_parent_foreign_key_col in varchar2,
p_parent_foreign_key_val in varchar2,
p_delimiter in varchar2 default ':',
p_parent_param_name in varchar2 default null)
return varchar2;
Similarly, for the SAVE_LIST() procedure, we have the following API:
procedure save_list(
p_multival_list in varchar2,
p_multival_type in t_multival_type,
p_intersection_source_type in t_source_type,
p_intersection_source_name in varchar2,
p_intersection_source_pk_col in varchar2,
p_parent_foreign_key_col in varchar2,
p_parent_foreign_key_val in varchar2,
p_other_ref_foreign_key_col in varchar2,
p_delimiter in varchar2 default ':',
p_new_manual_entries in varchar2 default null,
p_other_ref_source_name in varchar2 default null,
p_other_ref_primary_key_col in varchar2 default null,
p_other_ref_description_col in varchar2 default null,
p_parent_param_name in varchar2 default null);
The sample app contains the following pairs of pages that illustrate using the generic READ_LIST() and SAVE_LIST() helper package routines against DB and REST sources and using Delimited List and JSON Array types of multivalue page items. Each corresponding Book edit page uses a pair of Invoke API page processes to declaratively configure the call to READ_LIST() and SAVE_LIST() in the INTERSECTION_MULTIVAL package to get the job done:
DB, Colon-Delimited: Books Delimited (2) + Book Delimited (3)
REST, Colon-Delimited: Books REST (9) + Book REST (10)
Getting the REST Data Sources Working
The sample app contains three REST Data Sources based on a trycombo ORDS module that the sample app installs using its Supporting Objects scripts. As shown below, in my own environment the ORDS services have a particular endpoint URL that will be different when you install the sample into your APEX workspace. So getting the REST Data Sources working in your environment involves adjusting the Remote Server definition to match the base URL of your environment’s ORDS REST service modules.
REST Data Sources in the sample require adjusting remote server base URL to work
To adjust the Remote Server definition appropriately, follow these steps:
Visit the RESTFul Services editor
SQL Workshop > RESTFul Services
Expand the Modules Node in the RESTFul Data Services tree
Select the trycombo module node in the tree
Copy the value to the clipboard of the Full URL shown in the panel on the right
For example, it might look like https://apex.oracle.com/pls/apex/workspace_alias/trycombo/
Edit the remote server with name apex-oraclecorp-com-pls-apex-stevemuench
In the Endpoint URL field, paste the value you copied to the clipboard in step 4
Remove the trailing /trycombo/ from this value, and click (Apply Changes)
Run the sample, visit the “Setup” page, and click the (Setup REST Tags Synchronization) button
If you have done everything correctly, you should see the success message:
“REST Synchronization Setup for REST Tags“
Trying Different Generic Combinations
You can now try out any of the pages in the sample app. They all edit the same book, tag, and book_tag_xref data, including the REST-based option. Experiment searching for books by title or tag using the smart filters search bar at the top of each cards page. In addition, notice the multivalue page item selector menu options under the logged-in username shown below. They let you change the APEX multivalue page item used by the Books Delimited, Books JSON Array, and Books REST page pairs. It does not affect the Books Manual page which only has the combobox we studied above.
Menu option to change which multivalue page item to use
To achieve this effect, the menu options set an application item named MULTIVAL_PAGE_ITEM_TYPE to one of the values COMBOBOX, SELECTMANY, or POPUPLOV and the pages reference this value in a server-side condition to conditionally display the appropriate multivalue page item, conditionally execute a computation to copy the “before” tag ids to the appropriate multivalue page item, and conditionally execute page processes for the saving of the tag id multivalue string and new manual entries (if applicable).
Downloading the Sample App
Hopefully this sample helps you better understand what’s possible using the various kinds of APEX multivalue page items and gives you a head start on creating APEX pages in the future that use multivalue page items with intersection row data.
You can download the APEX 24.1 sample app from here.
I enjoyed returning to the APEX Alpe Adria conference to chat with and learn from members of the APEX community. If you joined me in Maribor, thanks for your interest in extending Fusion Applications with Oracle APEX. You can download the slides from my session here. In a nutshell, using Fusion Apps business objects in APEX is now as easy as working with local tables.
Fusion Apps (FA) business object REST APIs support filtering using SQL-like predicates and sorting using object attribute names. APEX delegates all searching and sorting to the FA service by automatically using these features. In addition, APEX requests only the data for attributes the current region is using to keep payloads small and fast. These optimizations help you deliver a great user experience. This article explains how to use these features in APEX pages, List of Values, and in PL/SQL business logic.
Setting the Stage
Each Fusion Apps pillar – HCM, ERP, CX, SCM, etc. – has a set of standard business objects. It also lets admins with appropriate privilege extend the app data model. To manage data specific to a company’s unique requirements, an FA customer admin can add new custom attributes to standard objects. In some pillars, they can also create new custom business objects and relate them to other objects.
Each standard or custom object has a corresponding REST API. All share a common set of features and include custom attributes automatically. An FA business object REST service can describe itself, retrieve filtered data, and handle create, update, and delete operations. It also supports bulk operations, where a batch of changes can be done in a single transaction.
Whenever a client uses an FA REST API to create or change data, the service evaluates all appropriate business object validation rules and executes any processing logic. These include behaviors defined by the FA developers at the Oracle “factory”as well as ones added by FA admins as customizations. If the requested operation fails, the response includes one or more error messages to help the end-user understand what requires attention before submitting again. APEX automatically presents these messages to the end-user in a familiar way.
Lead Tracking for an Art Gallery
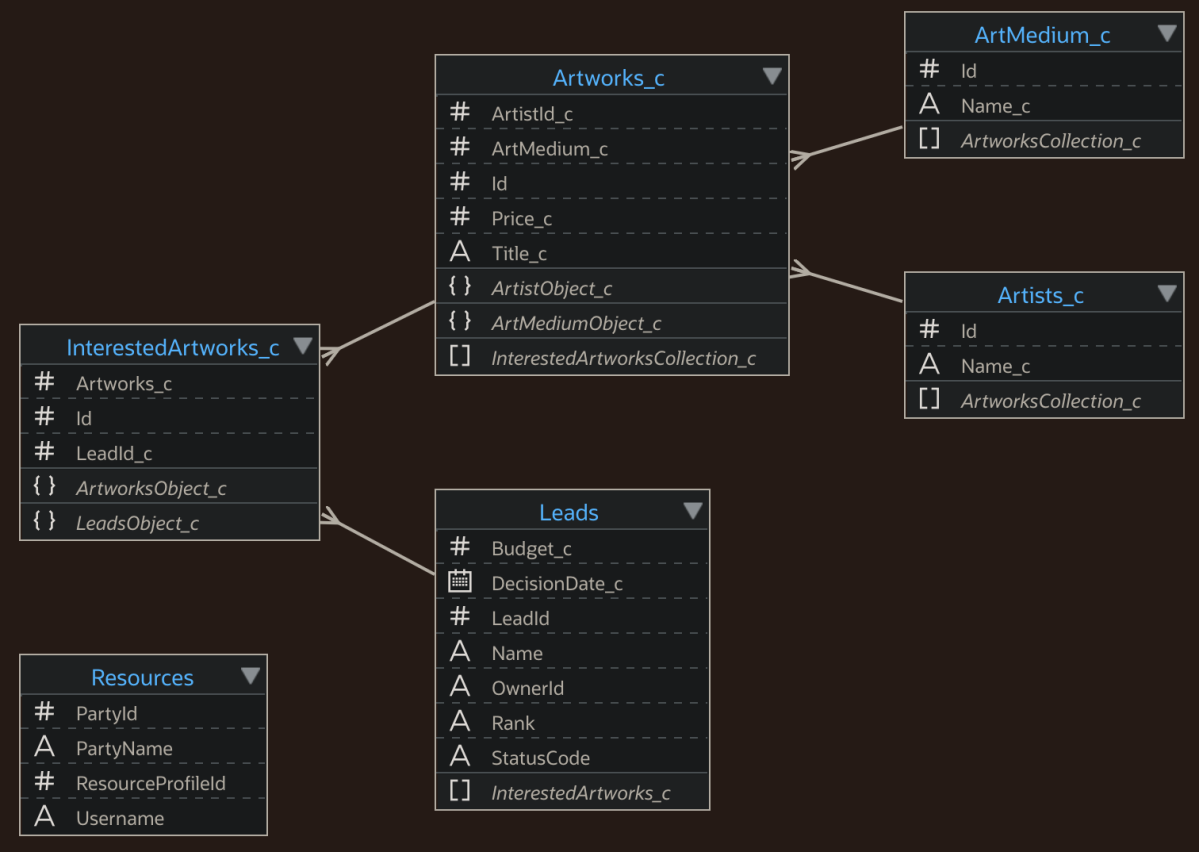
An art gallery using the Fusion CX suite might use the standard Leads object to track potential customers who have shown interest in purchasing art, together with custom objects like Artwork_c, ArtMedium_c, Artist_c, and InterestedArtworks_c to track the artworks, media, artists, and pieces a particular lead is interested in purchasing. The Resources standard object stores the staff members (a.k.a. human resources) working at the gallery who follow-up after taking ownership of a lead. The following diagram shows a simplified version of the business object model. Notice the convention that the names of custom objects and custom attributes have the _c suffix to distinguish them from the names of the standard objects and attributes.
Two Fusion Apps standard objects (Leads, Resources) and four custom objects
FA REST Filter Predicates
Fusion Apps business objects REST APIs support SQL-like filter predicates. You phrase them in terms of the case-sensitive business object attribute names. For example, to retrieve leads with a budget greater than or equal to 10000, you would use the following filter expression with the leads endpoint:
Budget_c >= 10000
You can combine conditions using conjunctions and group conditions using parentheses. So, to find leads with names that start with ‘A’ or ‘Z’ in addition to having the above budget, you can write:
Budget_c >= 10000 and (Name like 'A%' or Name like 'Z%')
For case-insensitive comparisons, use the upper() function around the attribute name on the left-hand-side of the expression. To find leads containing a letter a or z somewhere in the name, you can use:
Budget_c >= 10000 and (upper(Name) like '%A%' or upper(Name) like '%Z%')
Each filter predicate has the name of an attribute on the left hand side –optionally surrounded by upper() – followed by an operator, and finally a literal operand value on the right hand side. When using the between operator, you provide two literal values as in this example:
(Budget_c between 7000 and 1000) and (Name like '%A%' or Name like '%Z%')
When filtering on date or timestamp values, the literal values must be strings in the ISO8601 format, so to find leads created any time on December 31st, 2023 you use the following filter. It references one of the common audit attributes that include CreationDate, CreatedBy, LastUpdateDate, and LastUpdatedBy:
CreationDate between '2023-12-31T00:00:00' and '2023-12-31T23:59:59'
To filter on a date field having no time component, leave off the time portion of the literal date string. For example, to find leads whose decision date is before May 1st, 2024, use:
DecisionDate_c < '2024-05-01'
To find leads with qualified status having a rank of warm or hot, you can write a filter like:
StatusCode = 'QUALIFIED' and Rank in ('WARM','HOT')
To find leads that have specified some decision date, you can use:
DecisionDate_c is not null
Conversely, to check for leads with no decision date provided, use:
DecisionDate_c is null
When an FA REST service exposes so-called accessor attributes to related objects, you can reference them in a filter predicate. For example, to find any leads who have shown interest in artwork whose price is between 500 and 1000, you can write the filter:
InterestedArtworks_c.ArtworksObject_c.Price_c between 500 and 1000
Using an External Filter on a Page
After defining a REST Data Source of type Oracle Cloud Applications (SaaS) REST Service for a particular FA REST API, you can use it in any APEX region. Whenever a region uses a REST Data Source, the Property Editor shows the External Filter and Order By section with an Enable switch. After flipping it to the on position, you can enter an external filter clause and/or external order by clause. The syntax of both is specific to the type of the REST data source. One created for an FA REST API using the Oracle Cloud Applications (SaaS) REST Service type lets you specify any legal filter predicate we saw above.
When writing the one or more predicate expressions in your external filter, you can use a literal value for the right-hand-side operand. Alternatively, you can reference a value from APEX session state using substitution syntax like this:
(DecisionDate_c < &P3_DECISION_DATE.) and
(InterestedArtworks_c.ArtworksObject_c.Price_c
between &P3_LOW_PRICE. and &P3_HIGH_PRICE.)
and Budget_c > 5000
The value of the page items you reference in the external where clause can be computed by page processes or computations in the Pre-Rendering section of the page. This would come in handy if, for example, the operand for filtering on the lead’s DecisionDate_c field needed to be a function of the current date (formatted in ISO8601 format).
If the region type where you’ve configured an external filter allows end-user filtering operations as well, then any filters added by the end user are combined with the external filter using the and conjunction in the filter expression that APEX sends to the FA REST endpoint.
Using an External Order By on a Page
To configure a particular sort order for a region based on an FA REST API, use an external order by clause. The syntax is simple. Just provide a comma-separated list of case-sensitive attribute names. For example, to sort on the lead name, just mention the attribute name like this:
Name
To sort descending by budget amount, you can use the additional descqualifier:
Budget_c:desc
If you do not provide a sort direction qualifier, then an ascending sort is assumed, but you can always explicitly specify the asc qualifier, too. For example to sort descending by budget and then ascending by name, you can configure the external order by to be:
Budget_c:desc,Name:asc
External Filter & Order By for LOVs
When editing a List of Values on a Fusion Apps REST Data Source, you can use the same external where clause and external order by clause features explained above. Just look for the appropriate fields in the LOV’s Advanced REST Data Source Attributes section.
If your LOV is based on an FA REST data source with infrequently-changing lookup data, you can markedly improve performance by enabling the Use Synchronization Table switch. This will appear after you’ve configured REST Synchronization for the FA REST data source in question. Flipping this switch to the on position causes the LOV to use the locally synchronized data instead of making a REST call on each access. In this case, the External Filter and External Order By fields are no longer applicable.
If you need to apply an external filter to the REST synchronization process itself, you can do that using the p_sync_external_filter_expr parameter of the dynamic_synchronize_data() procedure in the apex_rest_source_sync package. By combining this with a scheduled automation, you can perform the REST synchronization on an appropriate schedule using your custom external filter whenever the synchronization runs against the Fusion Apps REST APIs to which the data source is related.
Using Fusion Apps REST APIs in PL/SQL
Using the procedures and functions in the apex_exec package, you can work programmatically with any REST Data Source. When working with Fusion Apps REST data sources, I like to work with the data using the business object attribute names instead of having to remember the corresponding data profile column names that apex_exec uses. The sample download at the end includes a helper package I created named oca_ds, which is short for Oracle Cloud Applications Data Source. It complements the apex_exec package to simplify working with Fusion Apps REST Data Sources programmatically.
Assuming that leads is the static id of a REST Data Source for working with the Fusion Apps leads endpoint, we can query the top 5 qualified leads with a rank of warm or hot having both a budget and decision date specified like this:
declare
l_ctx apex_exec.t_context;
type t_lead is record (
name varchar(255),
budget number,
created timestamp with time zone);
type t_leads is table of t_lead index by pls_integer;
l_leads t_leads;
begin
l_ctx := oca_ds.open_query(
p_select => 'Name,Budget_c,CreationDate',
p_from => 'leads',
p_where => q'~
StatusCode = 'QUALIFIED' and
Rank in ('WARM','HOT') and
Budget_c is not null and
DecisionDate_c is not null
~',
p_order_by => 'Budget_c:desc',
p_max_rows => 5);
while apex_exec.next_row(l_ctx) loop
l_leads(l_leads.count+1) :=
t_lead(oca_ds.get_varchar2(l_ctx,'Name'),
oca_ds.get_number(l_ctx,'Budget_c'),
oca_ds.get_timestamp_tz(l_ctx,'CreationDate'));
end loop;
oca_ds.close(l_ctx);
-- Work with top 5 leads in l_leads here...
exception
when others then
oca_ds.close(l_ctx);
raise;
end;
Inserting New Leads in PL/SQL
Of course you can use a Form or Interactive Grid region to easily insert, update, or delete data from the Leads REST data source without writing any code, but should you need to do so programmatically, it’s easy. To insert data using an FA REST data source, use the oca_ds.open_dml function to create an apex_exec.t_context object that works like a temporary rowset. Then for each new row you want to add, call oca_ds.insert_row() and then use oca_ds.set_value() to set the value of each attribute necessary. Finally, to process the pending changes call apex_exec.execute_dml().
For example, you can write the following code to insert two new leads:
Updating data using an FA REST data source follows a similar pattern. Use the oca_ds.open_dml function to create an apex_exec.t_context object. Then for each row you want to update, call oca_ds.update_row() and then use oca_ds.set_value() to set the value of each attribute necessary. Finally, to process the pending changes call apex_exec.execute_dml(). Often you will start by querying the row first to consider its existing values first, before updating some of them. In that case you can call apex_exec.set_values() to copy all the row values from the queried row into the row to be updated.
For example, to update a lead named ‘Anton Ego’ to increase his budget by 20% and adjust his decision date to be a week (7 days) farther in the future, you can write the following code. Notice that we include the APEX$ResourceKey attribute in the list since it’s the unique identifier of the row that’s needed to perform the update.
declare
l_ctx apex_exec.t_context;
l_dml_ctx apex_exec.t_context;
-- other declarations here
begin
-- Retrieve and update opportunity with resource key 98765
-- to increase its amount by 20% and close date by one week
-- Copy the values of the fetched lead into the update row
apex_exec.set_values(
p_context => l_dml_ctx,
p_source_context => l_ctx );
-- Adjust the budget and decision date appropriately
oca_ds.set_value(l_dml_ctx,'Budget_c',
oca_ds.get_number(l_dml_ctx,'Budget_c') * 1.2);
oca_ds.set_value(l_dml_ctx,'DecisionDate_c',
oca_ds.get_date(l_dml_ctx,'DecisionDate_c') + 7);
-- Save the changes
apex_exec.execute_dml(l_dml_ctx);
oca_ds.close(l_dml_ctx);
oca_ds.close(l_ctx);
exception
when others then
oca_ds.close(l_dml_ctx);
oca_ds.close(l_ctx);
raise;
end;
Deleting a Lead in PL/SQL
Deleting data using an FA REST data source is a bit simpler. As before, use the oca_ds.open_dml function to create an apex_exec.t_context object. Then for each row you want to delete, call oca_ds.delete_row() and then use oca_ds.set_value() to set the value of the resource key APEX$ResourceKey. Finally, to process the pending changes call apex_exec.execute_dml().
Assuming the system-assigned resource key for the Anton Ego lead is 4, the following code deletes this lead:
As a final use case to explore, let’s imagine we are an art gallery salesperson logging in to the APEX app to work our leads for the day. Fusion Apps represents each art gallery staff member – i.e. human resource – as a Resource object in the system. When a staff member is associated with other business objects, that resource’s PartyId attribute value is used as a foreign key.
For example, a lead gets assigned to an “owner” to contact the potential customer to qualify if there is a real opportunity to sell some art. To find the list of leads owned by a particular salesperson like “Matt Hooper”, we need to know the value of Matt’s PartyId and then query the leads REST API to filter for leads where OwnerId equals the logged-in user’s PartyId value.
To simplify using the current APEX user’s PartyId in external filters on various pages of the app, we can look it up using their Username from the resources REST API after authentication and store that PartyId value in APEX session state for the duration of the user’s session. Assume we’ve created a REST Data Source of type Oracle Cloud Applications (SaaS) REST Service for the Fusion Apps resources endpoint and assigned it a static id of resources. Furthermore, assume we’ve created shared component application items named APP_USER_PARTYID and APP_USER_FULLNAME. You can write the following code in a shared component Application Process with the After Authentication process point to lookup the current user’s PartyId and PartyName from the resources REST data source and store those values in the application items:
After setting this up, other pages in the app can reference the value of APP_USER_PARTYID in external filters using substitution syntax as we saw earlier in this article. For example, in a region based on the Leads REST data source, to filter the leads to show only ones owned by the logged-in user, we could use an external filter of:
OwnerId = &APP_USER_PARTYID.
Can Any Attribute Appear in a Filter?
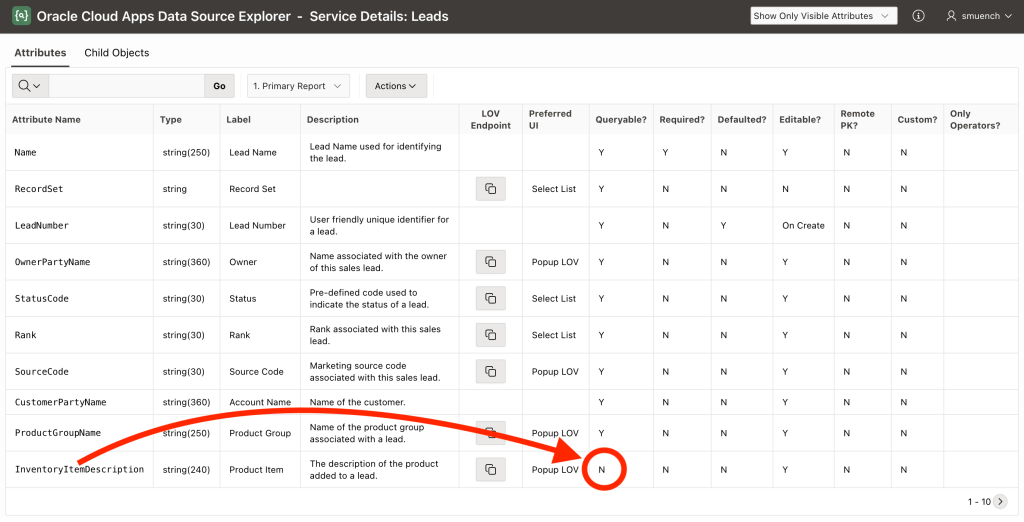
A last consideration worth mentioning is that not all business object attributes can be used in a filter predicate. To discover which attributes you can use, consult the Oracle Cloud Apps Data Source Explorer utility app. There you can see if the attribute has a Y or an N in the Queryable? column. The adjective “queryable” is a bit of a misnomer. An attribute with an N in the Queryable? column can still participate in the query in the select list. However, it cannot appear in a filter predicate. For example, as shown below, the InventoryItemDescription attribute in the Leads object is not queryable.
Reviewing which attributes are Queryable in the Oracle Cloud Apps Data Source Explorer
An attempt to reference InventoryItemDescription in a filter predicate results in the error:
Search filter includes a non-queryable column or unsupported operator
To install the Oracle Cloud Apps Data Source Explorer app visit the Gallery > Utility Apps tab and click the Install button like you’ve done for other sample apps. It helps you explore interesting information about all the Fusion Apps REST APIs your applications use.
Downloading the Helper Package
Hopefully, this information about Fusion Apps REST API filters and how to use them will come in handy the next time you create an APEX application that works with these powerful business object APIs. You can download the source of my oca_ds helper package here. For more information, see the Working with REST Data Sources for Oracle Cloud SaaS Applications section of the APEX developer documentation. It explains all the features for working easily with Fusion Applications REST APIs.
When writing your APEX apps, it’s best to put business logic in packages. This practice eases maintenance, improves performance, and favors reuse. I set out to combine an Oracle 23c JSON Relational Duality View with my business logic package to simplify building REST APIs for my APEX apps. Read on to learn what I discovered. If you’re already using Oracle 23c Free, download the sample app at the end to try on your own system.
As we’ll see, the duality of JSON and relational interaction is a superpower. You get equally functional read and write access to the same data from both JSON and relational points of view. This packed a productivity punch for the use case I tried. It lets tools that work best with relational data keep doing so, while simultaneously offering easy access to the same data for JSON use cases like external systems integrations. The best of both worlds!
NOTE: The sample app uses APEX 23.2 and Oracle 23c Free (23.3).
(Technical Note: to see a larger version of any figure, right click on it and choose Open Image in New Tab from the context menu…)
Overview of the Data Model
The sample app uses the simple data model shown below, tracking things organized into categories and stocked in certain quantities in warehouses.
Data Model for a simple app tracking categorized things with stock in warehouses
APEX App and Business Logic
The APEX pages in the sample app include an interactive report of things with a companion form-and-grid page to create or edit a thing and its related warehouse stock entries. Two additional grid pages let users edit the warehouses and categories reference data. We’ll focus on the Thing form-and-grid page since that’s where users create and modify data, and where interesting business logic gets enforced.
APEX app is an Interactive Report with Form + Grid page to edit a thing and its stock
The eba_demo_thing package has functions and procedures that implement the app’s business logic. The table lists their names and describes what they do.
Program Unit
Description
validate_warehouse
Check warehouse is valid
validate_category
Check category is valid
validate_quantity
Check stock quantity is natural number
validate_available
Check available date is no older than a year
validate_price
Check price is between 0.01 & 100,000.00
consolidate_thing_warehouses
Consolidate thing stock for same warehouse
closest_ninety_nine_cent
Return closest price that ends with 0.99
check_thing_required_fields
Check thing required fields are provided
check_stock_required_fields
Check stock required fields are provided
Overview of application business logic program units in eba_demo_thing package
As we saw earlier, the Thing page lets users create and edit a thing and its warehouse stock quantities. As shown below in Page Designer, we engage the business logic functions and procedures using validations and page processes in the Processing tab. Each validation is a one-line call to a function in the eba_demo_thing package that returns a boolean, passing in a page item value to be checked as an argument. Multiple Invoke API-type processes call a procedure in the same package to:
Adjust the price to a more user-enticing *.99 cent amount
Consolidate stock quantities from the same warehouse, if any
Default stock entries with zero quantity for any missing warehouses
Validations and Page Processes use business logic in eba_demo_thing package
We can see the business logic in action in the APEX app’s Thing page. Let’s create a new thing in the BOOKS category as shown below. Notice I’ve entered a price of 36.50 that does not end with *.99, and entered two separate stock entries for the same LAS VEGAS warehouse.
Entering a new thing in the BOOKS category with stock in LAS VEGAS warehouse
After clicking the (Create) button to dismiss the dialog, we can edit the new thing to see the page processes adjusted the price to 35.99, consolidated the 12 & 13 quantities in the LAS VEGAS warehouse, and created zero-quantity stock entries for the missing SEATTLE and BALTIMORE warehouses. So everything is working great in the APEX app.
Observing the effects of the application business logic in the web user interface
Letting External Apps Work With Things
In addition to the APEX web app for end users, let’s suppose that external systems need to create, update, and delete things, too. This requires a set of appropriate APIs, and the de facto standard approach involves REST services with JSON data payloads. The external system will use HTTP requests to a well-known “endpoint” URL like:
http://phoenix:9094/ords/diveintoapex/thing/
on our system, using standard “verbs” like:
GET – to retrieve things
GET – with a unique identifer added to the URL to access a particular thing
POST – to create a new thing (i.e. insert)
PUT – to replace an existing thing with a modified version (i.e. update)
DELETE – to remove an existing thing
All of the requests involve sending and/or receiving thing data in JSON format. So we need a strategy to represent a thing and its related warehouse stock quantities as a JSON document. As we’ll see next, the JSON Relational Duality View can help!
Add JSON Access with a Duality View
An Oracle 23c JSON Relational Duality View is a database view with a single JSON column named data that you can use to read and write information from one or more underlying tables. You define the view using a syntax that mirrors the structure of the JSON you want it to work with. I created a things_dv duality view using the DDL statement below. Starting with the Oracle 23.4 database release, all duality views will require the specially named attribute _id to uniformly act as their unique identifier. Even though I’m working with database release 23.3, I followed that best-practice in my things_dv definition.
Notice how I’ve mentioned my table names eba_demo_things, eba_demo_thing_categories, eba_demo_thing_stock, and eba_demo_warehouse and provided annotations like @insert, @update, @delete to indicate what DML operations I want to allow on each table. The duality view uses the foreign key constraints to understand how the tables relate. For each property, I indicate the JSON attribute name on the left side of the colon and then the appropriate database column name on the right side. When no annotations are present – as is the case for eba_demo_thing_categories and eba_demo_warehouse – then the duality view only allows referencing existing categories and warehouses, respectively.
create or replace json relational duality view things_dv as
I used the @unnest annotation to pull properties like categoryId and category up to the same level in the JSON as name, price, and available. I’ve also used it to pull the warehouseId and warehouse properties up to the same level as quantity. Without using this annotation, the properties from a related object will appear as a “nested” JSON object with an appropriate property name. The choice is up to the developer.
After creating the duality view, we can use our favorite tool like SQLcl or the SQL Developer extension for VS Code to query one of the things to see what it looks like in JSON. Let’s retrieve the one whose unique id is 2. The json_serialize() function takes the JSON data column name, and the returning clob pretty option lets the database know the JSON might exceed 4000 characters and should be formatted with nice indentation. We’ll see the powerful json_value() function multiple times throughout this article. It lets you easily access the value of any part of the JSON document you pass in, based on the flexible JSON Path expression language. Here we’re using the simplest possible expression to refer to the _id property at the “top” or root of the JSON document:
set pagesize 999
set long 2000
select json_serialize(data returning clob pretty) as data
from things_dv
where json_value(data,'$._id') = 2
/
The result shows data from all four tables in our data model in a single JSON document reflecting the structure we defined using the DDL duality view definition above. It includes some additional “bookkeeping” info in a _metadata property as well that is automatically added.
"description" : "A compilation of live performances from the renowned
jazz festival, capturing the essence of contemporary jazz.",
"price" : 22.99,
"available" : "2024-05-20T00:00:00",
"categoryId" : 2,
"category" : "MUSIC",
"stock" :
[
{
"thingStockId" : 4,
"quantity" : 7,
"warehouseId" : 3,
"warehouse" : "BALTIMORE"
},
{
"thingStockId" : 5,
"quantity" : 2,
"warehouseId" : 2,
"warehouse" : "SEATTLE"
},
{
"thingStockId" : 6,
"quantity" : 6,
"warehouseId" : 1,
"warehouse" : "LAS VEGAS"
}
]
}
A duality view is not just for querying data. It supports insert, update, and delete operations, too, if your duality view definition includes annotations allowing those. For example, we can insert a new thing in the BOOKS category with a quantity of 25 in the LAS VEGAS warehouse using the INSERT statement below:
Even before committing the inserted data, we can immediately wield the power of JSON/relational duality by querying the same data back from the underlying relational tables. The figure below shows the result of using SQL Developer in VS Code to run a familiar, relational query in the same pending transaction where we just inserted the JSON document using the duality view. I wanted to find all things with a particular name, a category name of BOOKS, and 25 or more quantity in stock in the LAS VEGAS warehouse. Our newly inserted book shows up in the results! Also notice the joins with my category and warehouse tables work because the duality view used the unique indexes on the category name (BOOKS) and warehouse name (LAS VEGAS) to lookup the respective primary key values. Of course, at this point we can commit the transaction to make the new thing permanent, or rollback to abandon the inserted data.
After inserting thing in JSON via duality view, we can requery it from the tables
With the things_dv duality view in place, we have part of the solution sorted. And we’ve seen we can work with the duality view using SQL operations directly. Next, let’s focus on letting an external app access the JSON from the duality view using an ORDS REST service.
When using REST services in production, you will of course secure their access using one of the robust ways ORDS supports for doing that. But since here we’re in a learning mode, I’m creating services with no authentication for simplicity.
ORDS AutoREST for Duality Views
The easiest way to expose a duality view to REST clients is to enable AutoREST access. We can do this from SQL Developer (Web), by calling the ords.enable_object procedure, or by going to SQL Workshop > RESTful Services in the APEX Builder. By selecting the Enabled Objects in the RESTful Data Services tree, you’ll see a list of all AutoREST enabled objects. I clicked (Create AutoREST Object) and chose the THINGS_DV view from the list to enable it. I left the Object Alias the same as the name of the duality view, but as shown in the figure below you can adjust the name if you prefer. This alias is what appears in the URL that REST clients will use, as reflected in the Full URL field below.
After enabling the THINGS_DV Duality View for AutoREST access
Once we’ve AutoREST-enabled the duality view, we can create a dog_days.json file containing the following example JSON document:
 {
    "name"        : "David Hockney's Dog Days",
    "description" : "Colourful portraits of Stanley and Boodgie",
    "price"       : 32.99,
    "available"   : "2023-09-01",
    "category"    : "BOOKS",
    "stock"       : [
        {
            "warehouse" : "LAS VEGAS",
            "quantity"  : 6
        }
    ]
 }
Then, we can use a command-line utility like curl to insert the Dog Days book as a thing into our database using the AutoREST-enabled duality view.
% curl -X POST \
-H "Content-Type: application/json" \
-d @dog_days.json \
http://phoenix:9094/ords/diveintoapex/things_dv/
The REST service responds with the JSON document that now contains the system-assigned _id property, an additional _metadata section, and a links array with multiple URLs related to the thing we just inserted. For brevity, I’ve replaced the actual links array entries with “…” below.
{"_id":22,"name":"David Hockney's Dog Days",
"description":"Colourful portraits of Stanley and Boodgie",
An AutoREST-enabled duality view is useful to quickly setup REST access for the same set of apps that you would trust to perform SELECT, INSERT, UPDATE, and DELETE operations against your duality view directly. The database will enforce basic datatype checking, not null columns, as well as ensure all check constraints, unique constraints, and referential integrity constraints are valid. However, the database is not aware of the business logic that you’ve implemented in your APEX application. For example, suppose we update the contents of the dog_days.json file as follows:
{
"name" : "David Hockney's Dog Days",
"description" : "Colourful portraits of Stanley and Boodgie",
"price" : 32.85,
"available" : "2000-09-01",
"stock" : [
{
"warehouse" : 'LAS VEGAS'
"quantity" : 6
},
{
"warehouse" : 'LAS VEGAS'
"quantity" : 5
}
]
}
After repeating the curl command above to POST the document to the AutoREST-enabled duality view endpoint, we see that the JSON document returned looks like this:
{"_id":23,"name":"David Hockney's Dog Days",
"description":"Colourful portraits of Stanley and Boodgie",
Understandably, the price of the thing was not adjusted to the nearest 99-cent price. The two quantities related to the LAS VEGAS warehouse were not consolidated, the stock entries for the missing warehouses were not defaulted, and the available date from the year 2000 was allowed even though the application requires it to be within the last year or in the future.
Some kinds of business logic can be written as database table triggers, but more complex use cases like the warehouse quantity consolidation or ones involving querying and changing multiple related tables can run into mutating table errors using that approach. In many cases, developers find it best to represent their business logic in an application layer of PL/SQL packages as we’ve done here with the eba_demo_thing package documented above.
If we know ahead of time that the AutoREST API will be used by an app we trust to always insert and update valid data, or if we have enforced everything we need as table constraints or in table triggers, then the AutoREST-enabled duality view alone is all we’d need. However, if we want to enforce all the same business logic that you implement in your APEX application, then instead of the AutoREST approach, we need to use ORDS REST services that call our own PL/SQL APIs . We’ll explore that option next.
Creating External API with Business Logic
I started by creating a second eba_demo_thing_json package to handle the JSON-specific operations that we’ll surface as web services using ORDS. Doing this makes it possible to write unit tests that exercise the JSON API without involving HTTP requests. As shown below, there are functions to get multiple things; get, post, or put a thing and return it; and a procedure to delete a thing. Notice that I’ve used the new json type instead of json_object_t so I can easily use JSON path expressions on the contents. We’ll see multiple examples below.
create or replace package eba_demo_thing_json as
-- Get Things with optional search
-------------------------------------------------
function get_things(
p_offset in number default null,
p_limit in number default null,
p_search in varchar2 default null)
return json;
-- Get a Thing by id
-------------------------------------------------
function get_thing(p_id in number)
return json;
-- POST (Insert) a new Thing
-------------------------------------------------
function post_thing(p_json in json)
return json;
-- PUT (Update & Replace) an existing Thing by id
-------------------------------------------------
function put_thing(p_id in number, p_json in json)
return json;
-- DELETE an existing Thing by id
-------------------------------------------------
procedure delete_thing(p_id in number);
end eba_demo_thing_json;
If you’ve used json_object_t in the past, no worries. The key difference is that values of json type can also participate in SQL statements directly, while ones of json_object_t type are useful in PL/SQL only. It is straightforward to work with the same JSON document in PL/SQL as either json or json_object_t as necessary. You can pass a json value to the json_object_t constructor to work with it using that interface, and calling the to_json method on a json_object_t value returns it as a json value instead. I prefer using the simpler-looking json type in my APIs to more easily involve its values in json_value and json_transform expressions in my code explained later.
A third package eba_demo_thing_ords encapsulates the ORDS-specific aspects of the service implementation, like writing out the HTTP response payload. Its procedures are a thin wrapper around the JSON API package program units, and accept the incoming payload as CLOB arguments, since that is how ORDS makes it available to us as we’ll see in the next step.
create or replace package eba_demo_thing_ords as
-- GET Things with optional search
-------------------------------------------------
procedure get_things(
p_offset in number default null,
p_limit in number default null,
p_search in varchar2 default null);
-- GET a Thing by id
--------------------------------------------
procedure get_thing(p_id number);
-- POST (Insert) a new Thing
--------------------------------------------
procedure post_thing(p_json clob);
-- PUT (Update & Replace) an existing Thing
--------------------------------------------
procedure put_thing(p_id number, p_json clob);
-- DELETE an existing Thing by id
--------------------------------------------
procedure delete_thing(p_id number);
end eba_demo_thing_ords;
With these two packages in place, I used the APEX RESTful Services editor to define a thing module with templates for / and :id, and added appropriate one-line PL/SQL block handlers for each one. The figure below shows what the POST handler for /thing/ looks like. It’s a one-line call to eba_demo_thing_ords.post_thing passing in the special ORDS :body_text bind variable that contains the incoming request payload as a CLOB.
Handler for /thing/ template’s POST operation, passing request payload with :body_text
The complete set of operations I configured includes:
Now, if we use the endpoint URL for our PL/SQL-based ORDS REST service to post the Dog Days JSON document from the command line:
% curl -X POST \
-H "Content-Type: application/json" \
-d @dog_days.json \
http://phoenix:9094/ords/diveintoapex/thing/
We get back an error that the category is missing, which I had not noticed before.
{"$error":"Required field missing: Category"}
After updating dog_days.json to have a category property and trying again to post the file using curl…
{
"name" : "David Hockney's Dog Days",
"description" : "Colourful portraits of Stanley and Boodgie",
"price" : 32.85,
"category" : "BOOKS",
"available" : "2000-09-01",
"stock" : [
{
"warehouse" : "LAS VEGAS",
"quantity" : 12
},
{
"warehouse" : "LAS VEGAS",
"quantity" : 13
}
]
}
We get an error that the available date is too far in the past:
{"$error":"A new thing's available date must be in the past year or the future"}
Hoping the third time’s the charm, after correcting the dog_days.json available date value to be 2023-09-01 and trying the curl command again… It works and we get the following response below. Notice the price got adjusted to 31.99 and the categoryId & warehouseId got filled in appropriately. The stock quantities for the two LAS VEGAS warehouse rows got consolidated, and the missing warehouse entries were defaulted to have a zero stock.
{ "_id":21,
"name":"David Hockney's Dog Days",
"description":"Colourful portraits of Stanley and Boodgie",
Next let’s try an update. If we change our dog_days.json file to contain the contents returned by our most recent curl command above, we can then edit it to adjust the values of the price, available, and quantity values for the three warehouses as shown below:
{ "_id":21,
"name":"David Hockney's Dog Days",
"description":"Colourful portraits of Stanley and Boodgie",
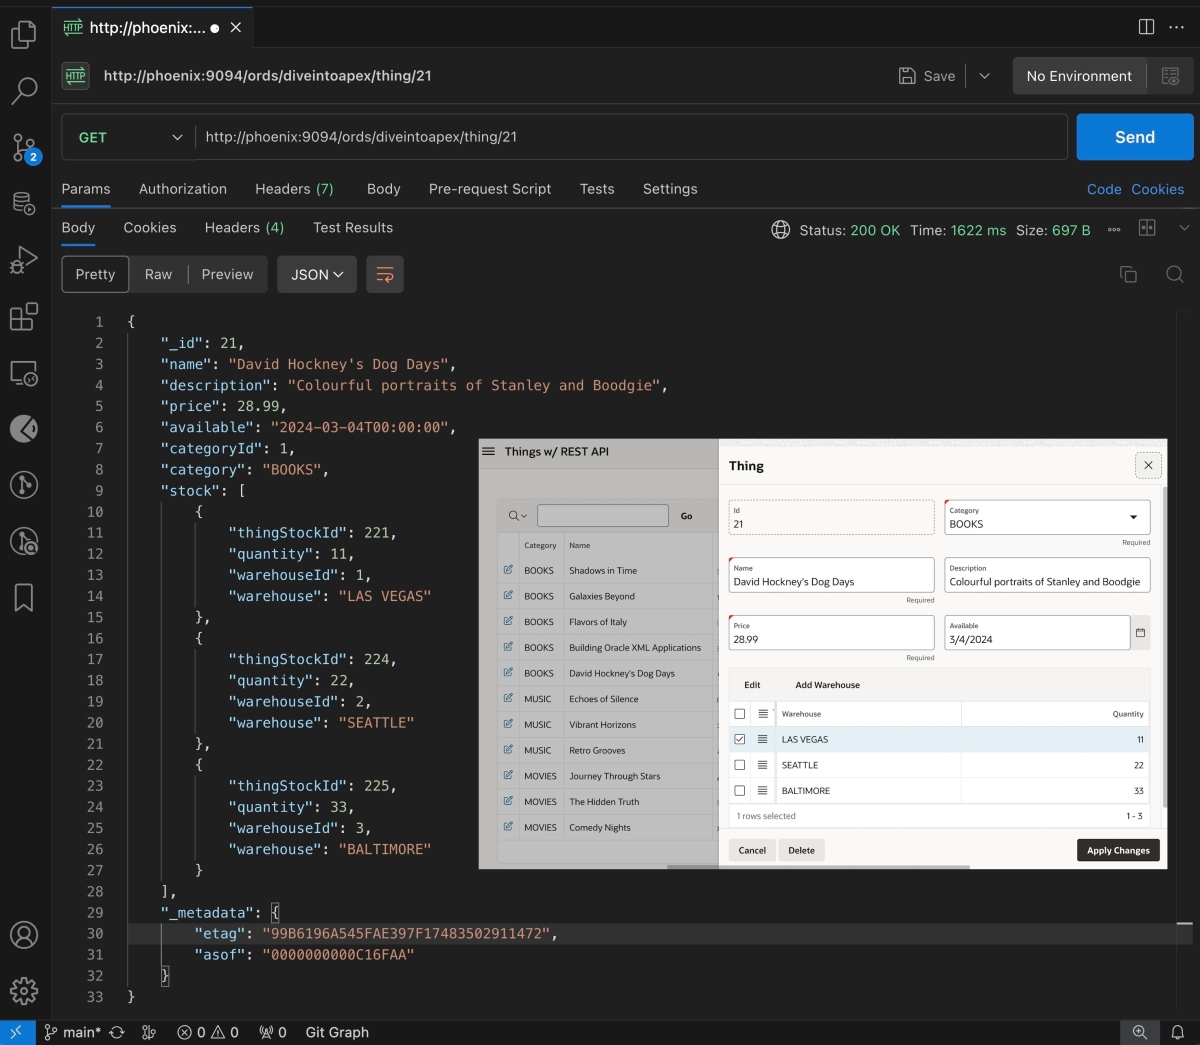
After saving the edits to this file, we can try updating the thing business object by using curl to PUT the document back at its specific URL that includes the 21 value as its resource key at the end of the URL:
% curl -X PUT \
-H "Content-Type: application/json" \
-d @dog_days.json \
http://phoenix:9094/ords/diveintoapex/thing/21
Notice in the response that the price was adjusted to the nearest ninety-nine cents, the warehouse quantities were updated, and the etag value changed.
{ "_id":21,
"name":"David Hockney's Dog Days",
"description":"Colourful portraits of Stanley and Boodgie",
By leveraging the power of a duality view and ORDS REST services, and combining them with our business logic in a PL/SQL package, we achieved the goal we set out to accomplish. We now have the same application logic shared by both our APEX app and JSON-based REST APIs. Now let’s learn a bit more about the implementation details.
Flexing Our JSON/Relational Duality
If we switch back to the APEX application, we can edit the new thing we were just working with using JSON to see the latest information about David Hockney’s Dog Days book in the web UI.
Editing the thing in APEX that was just updated through the JSON REST API
Let’s see what happens if we use the APEX application to edit something about this thing, for example the quantity available of David Hockney’s Dog Days book in the SEATTLE warehouse. After adjusting the amount from 22 to 99 and clicking (Apply Changes), let’s repeat the curl command to update the same thing from the command line.
% curl -X PUT \
-H "Content-Type: application/json" \
-d @dog_days.json \
http://phoenix:9094/ords/diveintoapex/thing/21
This time the update fails and we see the error that the thing was changed by another user.
{"$error":"Thing changed by another user. Get the thing again and retry."}
The duality view automatically computes the etag as a checksum of the thing object’s data, including data of its nested stock information. The act of updating the SEATTLE warehouse quantity above changed data that was intrinsic to the David Hockney’s Dog Days thing object, so that caused its etag checksum to change. The value of the etag present in the dog_days.json file we are trying to PUT back to the JSON REST API no longer matches and the duality view automatically fails the update. By default the etag checksum takes all object properties into account, but the developer can use the @nocheck annotation when defining the duality view on properties that she doesn’t want to be included in the checksum calculation.
Exploring JSON Service API Implementation
The implementation of the post_thing function in the eba_demo_thing_json package performs four basic steps:
Performs before insert or update processing
Inserts JSON payload into things_dv duality view, returning _id value
Executes after insert or update processing
Returns the latest version of thing object from the duality view by id
The put_thing function is nearly identical. It does an update statement on the things_dv duality view instead of an insert and passes the constant c_operation_update to the before and after processing procedures.
Take another look at the elegant simplicity of the code above. By incorporating the duality view, we reduce a huge amount of coding work to a single line of declarative SQL. The INSERT statement does the “magic” to create a new JSON-based thing, and the UPDATE statement handles changing an existing thing.
This saves us from writing any code related to saving the initial or modified JSON document to the underlying tables, performing the lookups related to the category and warehouse, as well as detecting whether the row has been changed by another user. We don’t have to detect what has changed, figure out which underlying tables to involve, or anything really. We just supplement the simple SQL INSERT or UPDATE operation with the additional business logic before and after that is unique to our application.
Dissecting Before Insert/Update Logic
The before_insert_or_update procedure is below. It receives the JSON document as an in out nocopy parameter that it can reason over, pass around to other procedures, and modify as necessary before the resulting document will be inserted into or updated in the duality view. We’ve organized the code to make it easy to understand. We perform required fields checks, ensure there’s at least one warehouse, and adjust any missing or null warehouse quantities to be zero. Then we validate the available date if we’re performing an insert, and then validate the price, category, and warehouse and quantity values. Finally we adjust the price to the nearest 99-cent value.
The helper procedures are all part of the sample app you can download and study, so we won’t analyze every line here. However, we’ll focus on three that taught me interesting techniques I discovered while building the demo.
In adjust_price_to_99_cents, notice how we can use json_value to access the value of any property in the JSON document using an appropriate JSON path expression. Here we’re accessing the price to pass it to another function that computes the closest 99-cent price. If the l_new_price is different from the l_price then we use the json_transform function to update the value of the price property.
In the adjust_missing_or_null_qty procedure we’re using a slightly more complex JSON path expression to update any stock array entries with a null or missing quantity property to set their quantity = 0. These examples only scratch the surface of what json_transform can do. Please see the documentation to learn more about its abilities to easily make multiple changes to a JSON document with a compact, familiar syntax.
procedure adjust_missing_or_null_qty(p_json in out nocopy json)
is
begin
select json_transform(p_json,
set '$.stock[*]?(@.quantity == null ||
!exists(@.quantity)).quantity' = 0)
into p_json;
end adjust_missing_or_null_qty;
The last interesting thing I’ll highlight is the ability for json_path to return values into user-defined types, including collection types. This makes processing JSON data a lot more natural for PL/SQL developers. In the validate_warehouse_and_qty procedure, notice I’ve defined a t_stock record type and a t_stock_tab type that’s a table of t_stock records. With the new support in 23c we can use the returning t_stock_tab clause of the json_value function to easily assign the array of stock objects to the l_stock_tab variable of the same t_stock_tab type. Then, we can use a familiar PL/SQL loop to process the results. Here I’m using it to validate the quantity and warehouse values of each stock array entry.
procedure validate_warehouse_and_qty(p_json in json)
is
type t_stock is record(
warehouse eba_demo_warehouse.name%type,
warehouseId eba_demo_thing_stock.warehouse%type,
quantity eba_demo_thing_stock.quantity%type
);
type t_stock_tab is table of t_stock;
l_stock_tab t_stock_tab;
begin
l_stock_tab := json_value(p_json,'$.stock'
returning t_stock_tab error on error);
for j in 1..l_stock_tab.count loop
if not eba_demo_thing.validate_quantity(
l_stock_tab(j).quantity) then
error('INVALID_QUANTITY');
end if;
if not eba_demo_thing.validate_warehouse(
l_stock_tab(j).warehouse,
l_stock_tab(j).warehouseid) then
error('INVALID_WAREHOUSE');
end if;
end loop;
end validate_warehouse_and_qty;
Examining After Insert/Update Logic
In the after_insert_or_update procedure, we consolidate the warehouses and if we’re performing an insert operation, default any missing warehouses. Here again I took advantage of the JSON/Relational duality since I’m reusing shared business logic from the eba_demo_thing package that I wrote using familiar relational table processing code.
For example, in default_missing_warehouses I found it easiest to get the job done using a merge into statement with a when not matched clause. With JSON/Relational duality, you can use the right tool for the job without worrying about keeping the JSON and relational worlds in sync.
procedure default_missing_warehouses(p_id in number)
is
begin
merge into eba_demo_thing_stock tgt
using (select id from eba_demo_warehouse) src
on (src.id = tgt.warehouse and tgt.thing_id = p_id)
when not matched then
insert (thing_id,warehouse,quantity)
values (p_id,src.id,0);
end default_missing_warehouses;
Sharing Both Logic and Error Messages
As shown below, the APEX application defines translatable error messages as Shared Component text messages.
Translatable text messages used to inform end-users about business logic errors
In the context of the Thing page in the APEX app, the validations reference these messages using the built-in substitution variable syntax &APP_TEXT$MESSAGE_KEY. with the prefix APP_TEXT$ followed by the name of the translatable text. For example, as shown below the Validate Category validation references &APP_TEXT$INVALID_CATEGORY. in the Error Message setting.
Using APEX_TEXT$ substitution string to reference INVALID_CATEGORY text message
I wanted all the JSON API business logic to use the same text messages, so I implemented the error() function below to let the eba_demo_thing_json package code get the job done. By setting the name of the workspace, it sets the the right context to reference any error message by key for a given app id using the apex_lang.message function.
For my last “trick”, I found I needed to implement pagination and searching functionality for the GET /thing/ endpoint. My first instinct was to define the GET /thing/ handler as an ORDS Collection Query type handler with the query:
select data
from things_dv
However, this setup returned the data in a way that was different from the AutoREST-enabled duality view’s GET /things_dv/ endpoint we saw earlier. In particular, each JSON document is understandably presented as the value of the data column in the query result like this:
{
"items" : [
{"data":{"_id":1, ... }},
{"data":{"_id":2, ... }},
{"data":{"_id":3, ... }}
],
"links" : [
:
]
}
After checking with colleagues on the ORDS team to ask if there was some declarative way to suppress the data column’s appearance in the results, I learned there wasn’t currently a way to achieve that. This makes sense, since AutoREST is optimized for ease of use. When you enable a table, view, or duality view for AutoREST access, you instantly get a rich set of filtering, pagination, and CRUD capabilities. However, once I needed to route the the POST, PUT, and DELETE operations through my own PL/SQL package API to enforce app-specific business logic, I learned it wasn’t yet possible to take advantage of the AutoREST functionality only for the GET operation.
In the end, I found a SQL-only solution to achieve a simple set of pagination and filtering features for my GET handler that I implement in the get_things procedure of the eba_demo_thing_json package:
---------------------------------------
-- Get Things with optional search
---------------------------------------
function get_things(
p_offset in number default null,
p_limit in number default null,
p_search in varchar2 default null)
return json;
After creating the thin wrapper procedure in eba_demo_thing_ords, I defined the GET /thing/ handler as shown below, with skip, pageSize, and search parameters defined as shown.
Configuring the GET /thing/ handler
The get_things function body is below. It returns the JSON document created by a SQL statement whose three parts include:
Common table expression x to select thing ids based on an optional p_search string (matching on name and description properties) and compute total rows
Common table expression y to select up to p_limit rows from things_dv using the ids x identifies and also determine has_more status (true/false)
Main query that constructs JSON document with an items array of thing duality view documents from y, adding in skip, pageSize, hasMore, and totalRows properties.
"description": "Documentary uncovering the mysteries of the ancient world, narrated by acclaimed historian Dr. Emily Santos.",
"price": 9.99,
"available": "2024-07-22T00:00:00",
"categoryId": 3,
"category": "MOVIES",
"stock": [ ... ],
"_metadata": {
"etag": "7674537EF60C2FB955256B1B3A1AA824",
"asof": "0000000000C68D4B"
}
},
{
"_id": 6,
"name": "Comedy Nights",
"description": "Box set of the most hilarious stand-up comedy specials from the decade, featuring top comedians worldwide.",
"price": 19.99,
"available": "2024-08-05T00:00:00",
"categoryId": 3,
"category": "MOVIES",
"stock": [ ... ],
"_metadata": {
"etag": "B6CBA70E784BFA0810D87A0E4CF83A72",
"asof": "0000000000C68D4B"
}
}
],
"pageSize": 2,
"skip": 0,
"hasMore": false,
"totalRows": 2
}
Installing the Sample
Since the JSON Relational Duality View feature is new in Oracle 23c, running the sample app yourself requires your downloading and using Oracle 23c Free. The APEX sample app is from version APEX 23.2, so you will also have to download the latest APEX release and install it into your Oracle 23c database. Using the latest available ORDS release is always recommended as well. This is the combination I’ve tested and documented here. Then, you can download the sample app from here and import it into your APEX 23.2 workspace.
In addition to these prerequisites, the only other installation step is to edit the source of the eba_demo_thing_json package to update the value of the two constants c_workspace and c_app_id to reflect the name of the workspace into which you install the sample and the application id the sample gets assigned in your workspace:
create or replace package body eba_demo_thing_json as
As I’ve been getting up to speed with ORDS REST services over the last couple weeks, Tim Hall’s Oracle-Base tutorial about REST services basics proved very helpful. I started by experimenting with ORDS’ support for automatic handling of different built-in datatypes to and from JSON. In many cases, this lets you focus on your core PL/SQL logic without having to work directly with JSON.
However, to make sure I was understanding all the moving parts, I set myself the task of creating a service that could process an arbitrary JSON document as the request and return back an arbitrary JSON document in response (possibly created programmatically or by doing a JSON SQL query or some combination of the two). After reading another of Tim’s articles RESTful Web Services Handling Complex JSON Payloads, I set out to try my own example. The Oracle reference docs on PL/SQL JSON datatypes also came in handy while doing this.
In my head, what made the most sense to represent a PL/SQL procedure that accepted a JSON request and returned a JSON response was a procedure specification like this:
procedure generic_service(p_request in json_object_t,
                          p_response out json_object_t)
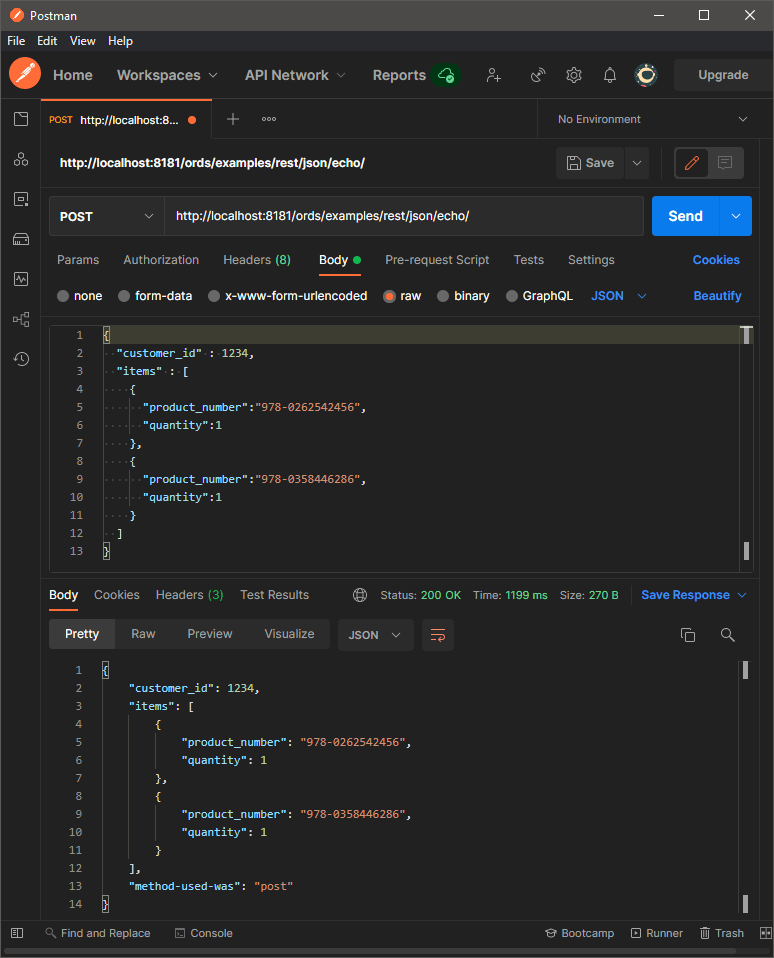
The simplest version of such a service would be an “echo” service that just returned the JSON document passed in as the response:
procedure generic_service(p_request in json_object_t,
                          p_response out json_object_t) is
begin
    -- Start by just echoing the request as the response
    p_response := p_request;
end;
I knew that once I got this “echo” service working I could modify the internals of the generic_service() procedure to do whatever I needed to do to process the incoming JSON and return a custom output JSON.
Let’s assume the JSON payload we need to process looks like this:
In an EXAMPLES schema I’d previously enabled for ORDS access, I ran the following PL/SQL block to define the module, template, and two handlers (one for the POST verb and another for the PATCH verb). Notice that I’m passing the BLOB-valued :body bind variable to the json_object_t() constructor in order to pass the resulting JSON object as the value of the p_request parameter in the call to generic_service(). This results in parsing the incoming JSON payload into a form that’s easy to work with in PL/SQL.
begin
  ords.define_module(
    p_module_name    => 'rest-jsonecho',
    p_base_path      => 'rest/json/',
    p_items_per_page => 0);

  ords.define_template(
   p_module_name    => 'rest-jsonecho',
   p_pattern        => 'echo/');

  ords.define_handler(
    p_module_name    => 'rest-jsonecho',
    p_pattern        => 'echo/',
    p_method         => 'POST',
    p_source_type    => ORDS.source_type_plsql,
    p_source         => q'[
    declare
        l_response json_object_t;
    begin
        generic_service(p_request  => json_object_t(:body),
                        p_response => l_response);
        owa_util.mime_header ('application/json', true);
        -- Show example of modifying the response from the invoked
        -- json-in-json-out method before returning.
        l_response.put('method-used-was','post');
        htp.p(l_response.stringify);
    END;
    ]',
    p_items_per_page => 0);

  ords.define_handler(
    p_module_name    => 'rest-jsonecho',
    p_pattern        => 'echo/',
    p_method         => 'PATCH',
    p_source_type    => ords.source_type_plsql,
    p_source         => q'[
    declare
        l_response json_object_t;
    begin
        generic_service(p_request  => json_object_t(:body),
                        p_response => l_response);
        owa_util.mime_header ('application/json', true);
        -- Show example of modifying the response from the invoked
        -- json-in-json-out method before returning.
        l_response.put('method-used-was','patch');
        htp.p(l_response.stringify);
    END;
    ]',
    p_items_per_page => 0);
  commit;
end;
When the procedure call to generic_service() returns, the l_response variable contains the JSON object returned in the p_response out parameter. The handler’s PL/SQL code can then perform any post-processing if necessary. In the two example handlers above, notice that I’m simply setting one additional JSON property named method-used-was so you can see a difference between sending the sample payload using the POST or PATCH verb.
In order to write out the JSON response, we start by using owa_util.mime_header() to add the appropriate HTTP response header that signals to the caller that the response is a JSON document. Then we use the venerable htp.p() procedure to write the “stringified” version of the JSON object out to the response. The json_object_t object’s stringify() function prints out the contents of the JSON data structure using the right combination of curly braces, colons, quotes, and brackets as needed to produce the expected text representation of the data.
To test out the result, I sent a POST and a PATCH request to my local ORDS server with the URL http://localhost:8181/ords/examples/rest/json/echo/
After my first attempts were failing to work, I learned from colleagues that ORDS is very exacting when matching the URL for the defined template handlers. My PL/SQL that defined the template handlers used "rest/json/" for the module base path and used "echo/" for the template pattern, so sending my request to the URL http://localhost:8181/ords/examples/rest/json/echo(without the trailing slash) was not matching any defined template handler. Good lesson learned!
Here’s what my Postman window looked like when testing the POST request:
With this basic skeleton in place, I aim to create a number of custom JSON-in, JSON-out services for a sample app I’m working on that will follow this pattern. If you notice something I could be doing even better, please let me know on Twitter. I’m always happy to learn ways to improve my code, and of course still consider myself an ORDS newbie, so I’m sure there is plenty more to learn.