Approval Tasks in your APEX workflows have two built-in outcomes, either APPROVED or REJECTED. If your flow needs custom outcomes, use an Action Task with an updateable task parameter instead.
The sample app in this article lets the user assigned to the task click an (X), (Y), or (Z) button to indicate their custom response. Then the workflow uses Switch activities to perform different work depending on the task outcome.
The sample app you can download from here contains a home page that lets you start a workflow, and delete any development workflows you might have created for testing.
Sample App Home Page Lets You Start and Delete Workflow Instances
Additional Wizard-Created Pages
The sample also contains a My Tasks page I generated with the Create Page wizard by choosing Unified Task List and picking the context of My Tasks. It shows the user open tasks assigned to them. I also created the Workflows page using the same wizard, by picking Workflow Console instead.
In both the My Tasks page and the Workflows page, I made one minor change to the SQL query of the generated page’s Content Row region. I simply uncommented the ,p_application_id => :APP_ID parameter to pass the current application ID to the apex_human_tasks.get_tasks pipelined table function returning the data to display. Otherwise, by default the pages show tasks and workflows from all applications in the workspace.
For example, in My Tasks, in the SQL query of the Content Row region, I deleted the two hyphens that initially appeared in the the line:
--,p_application_id => :APP_ID
This two-character deletion made it look like this:
select task_id,
task_type,
⋮
badge_state
from table ( apex_human_task.get_tasks (
p_context => 'MY_TASKS',
p_show_expired_tasks => :P6_SHOW_EXPIRED
, p_application_id => :APP_ID /* <- */
) )
I made the same change to the Workflows page’s Content Row region to the apex_workflow.get_workflows function returning workflow instance data. These two changes make the pages show only the tasks and workflows for the current application.
Overview of the Workflow Definition
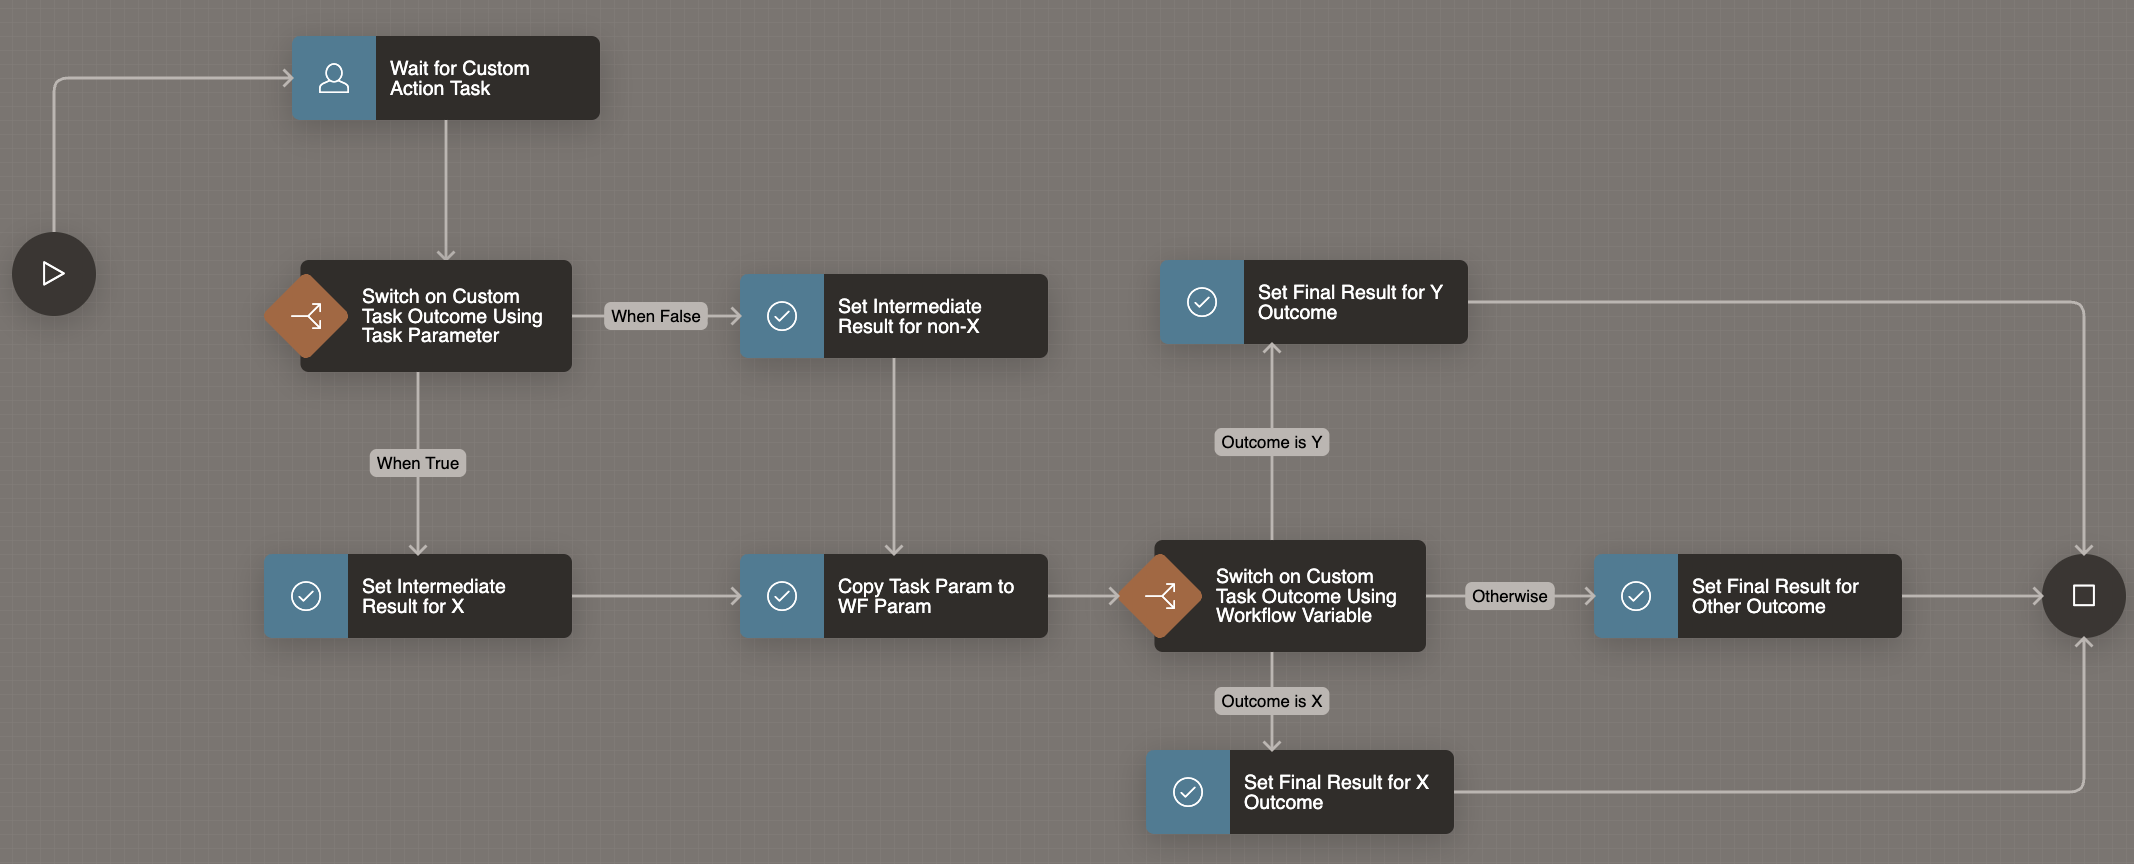
The workflow definition shown below waits for an Action Task, passing the APEX$WORKFLOW_INITIATOR built-in workflow variable value as the Task Initiator. Then the flow uses different Switch activities to take different paths depending on the task’s custom outcome. In this example, the different outcome values simply assign different values to two workflow variables INTERMEDIATE_RESULT and FINAL_RESULT, but in your own workflows the paths can contain any activities you need.
Workflow Waits for Action Task, then Uses Switch Activites to React to Custom Outcome Value
Key Ingredients of the Action Task
When I created the task, I noted that the default task type is Approval Task. You can’t change the task type later, so it’s important to pick Action Task up front.
To keep the example simple and runnable as a single developer, I configured the action task to use the :APEX$TASK_INITIATOR expression as both the Potential Owner and the Business Administrator. Of course, in your own apps you can use any participants that are appropriate.
The task definition also contains one updatable task parameter named OUTCOME as shown below. There is nothing special about choosing this name: in practice, use any name you like.
Action Task Definition Uses Expression-type Participants and an Updatable OUTCOME Parameter
Customizing the Task Details Page
I clicked the appropriate button in the Task Definition edit page to automatically generate a task details page. Then, I modified it in Page Designer to remove the default action task (Complete) button.
In its place, I added (X), (Y), and (Z) buttons to represent three custom outcomes named X, Y, and Z. They each simply submit the page using button names OUTCOME_X, OUTCOME_Y, and OUTCOME_Z respectively.
Customized Task Details Page Has (X), (Y), and (Z) Buttons That Submit the Page
Adding Custom Declarative Business Logic
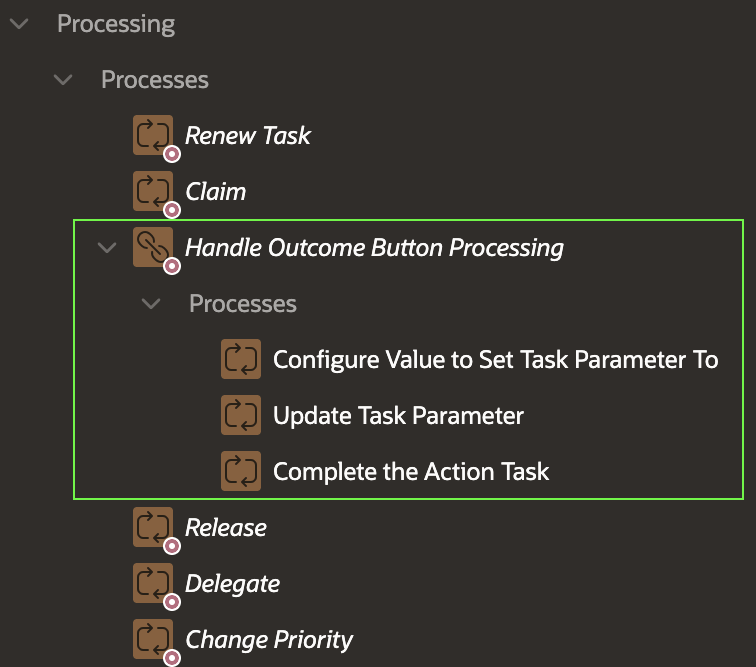
I added a new Execution Chain to the task details page’s Processing section to group the logic that runs when the user presses any of the buttons named OUTCOME_X, OUTCOME_Y, or OUTCOME_Z. It has the Server-side Condition to only run if the REQUEST value –reflecting the submitting button name – is contained in the string:
|OUTCOME_X|OUTCOME_Y|OUTCOME_Z|
This condition ensures the chain’s child processes only run if the user presses one of the custom outcome buttons. The execution chain’s Run in Background switch is off, so when they run, they happen immediately in the current user session during page submit processing.
The Execution Chain contains three child processes shown below that run in order:
Configure Value to Set Task Parameter To
Update Task Parameter
Complete the Action Task
Execution Chain Groups Conditional Business Logic with a Common Condition
Configuring the Business Logic
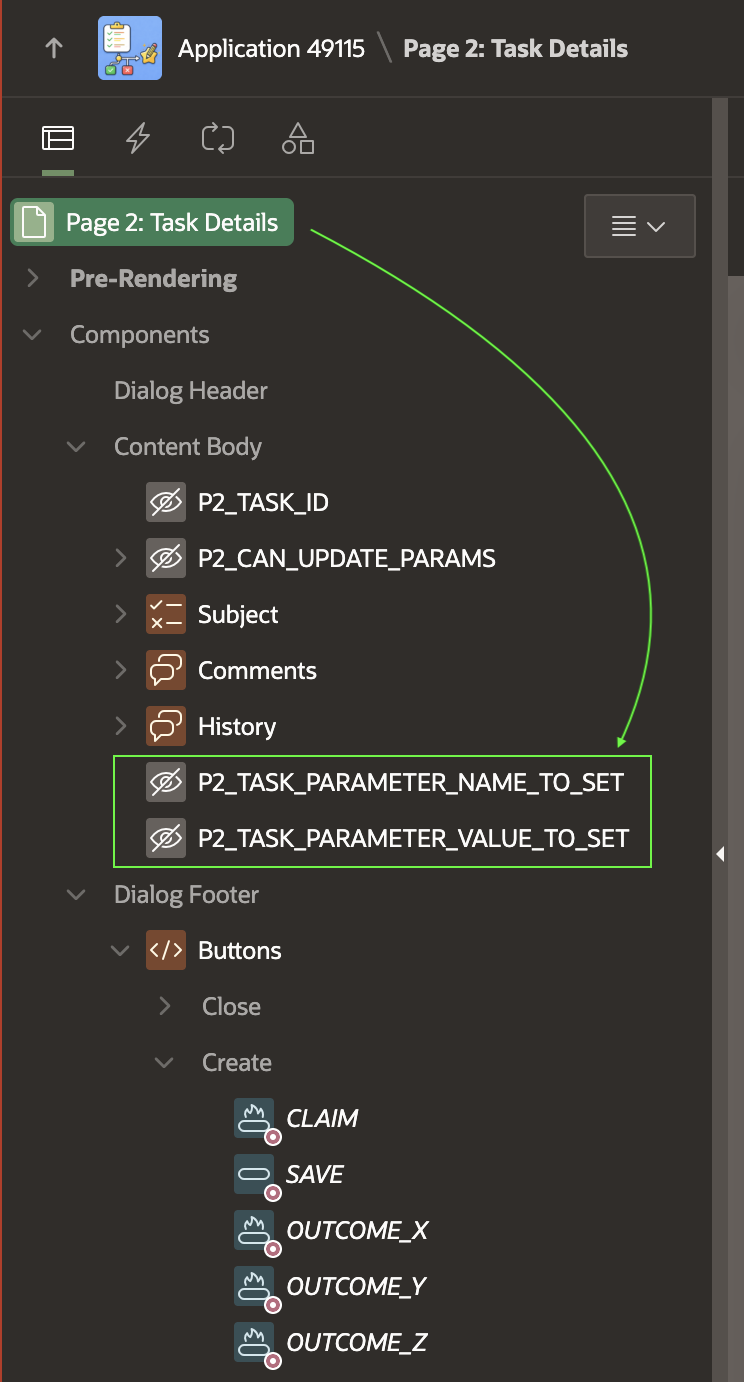
The Update Parameter feature of the declarative Human Task – Manage page process expects the name of the task parameter to be stored in a page item. It also expects the parameter value to come from a page item. So, I’ve added two hidden page items shown below for that purpose. I set their Storage to In‑Memory Only so their values don’t persist across page visits:
P2_TASK_PARAMETER_NAME_TO_SET
P2_TASK_PARAMETER_VALUE_TO_SET
Hidden Page Items Provide Update Parameter Name and Value
Since we want to set the task parameter named OUTCOME, the P2_TASK_PARAMETER_NAME_TO_SET has a static default value: OUTCOME
The initial Configure Value to Set Task Parameter To child process in the chain is an Execute Code process that sets the value that we want to assign to the task parameter into the hidden page item:
:P2_TASK_PARAMETER_VALUE_TO_SET :=
case :REQUEST
when 'OUTCOME_X' then 'X'
when 'OUTCOME_Y' then 'Y'
when 'OUTCOME_Z' then 'Z'
end;
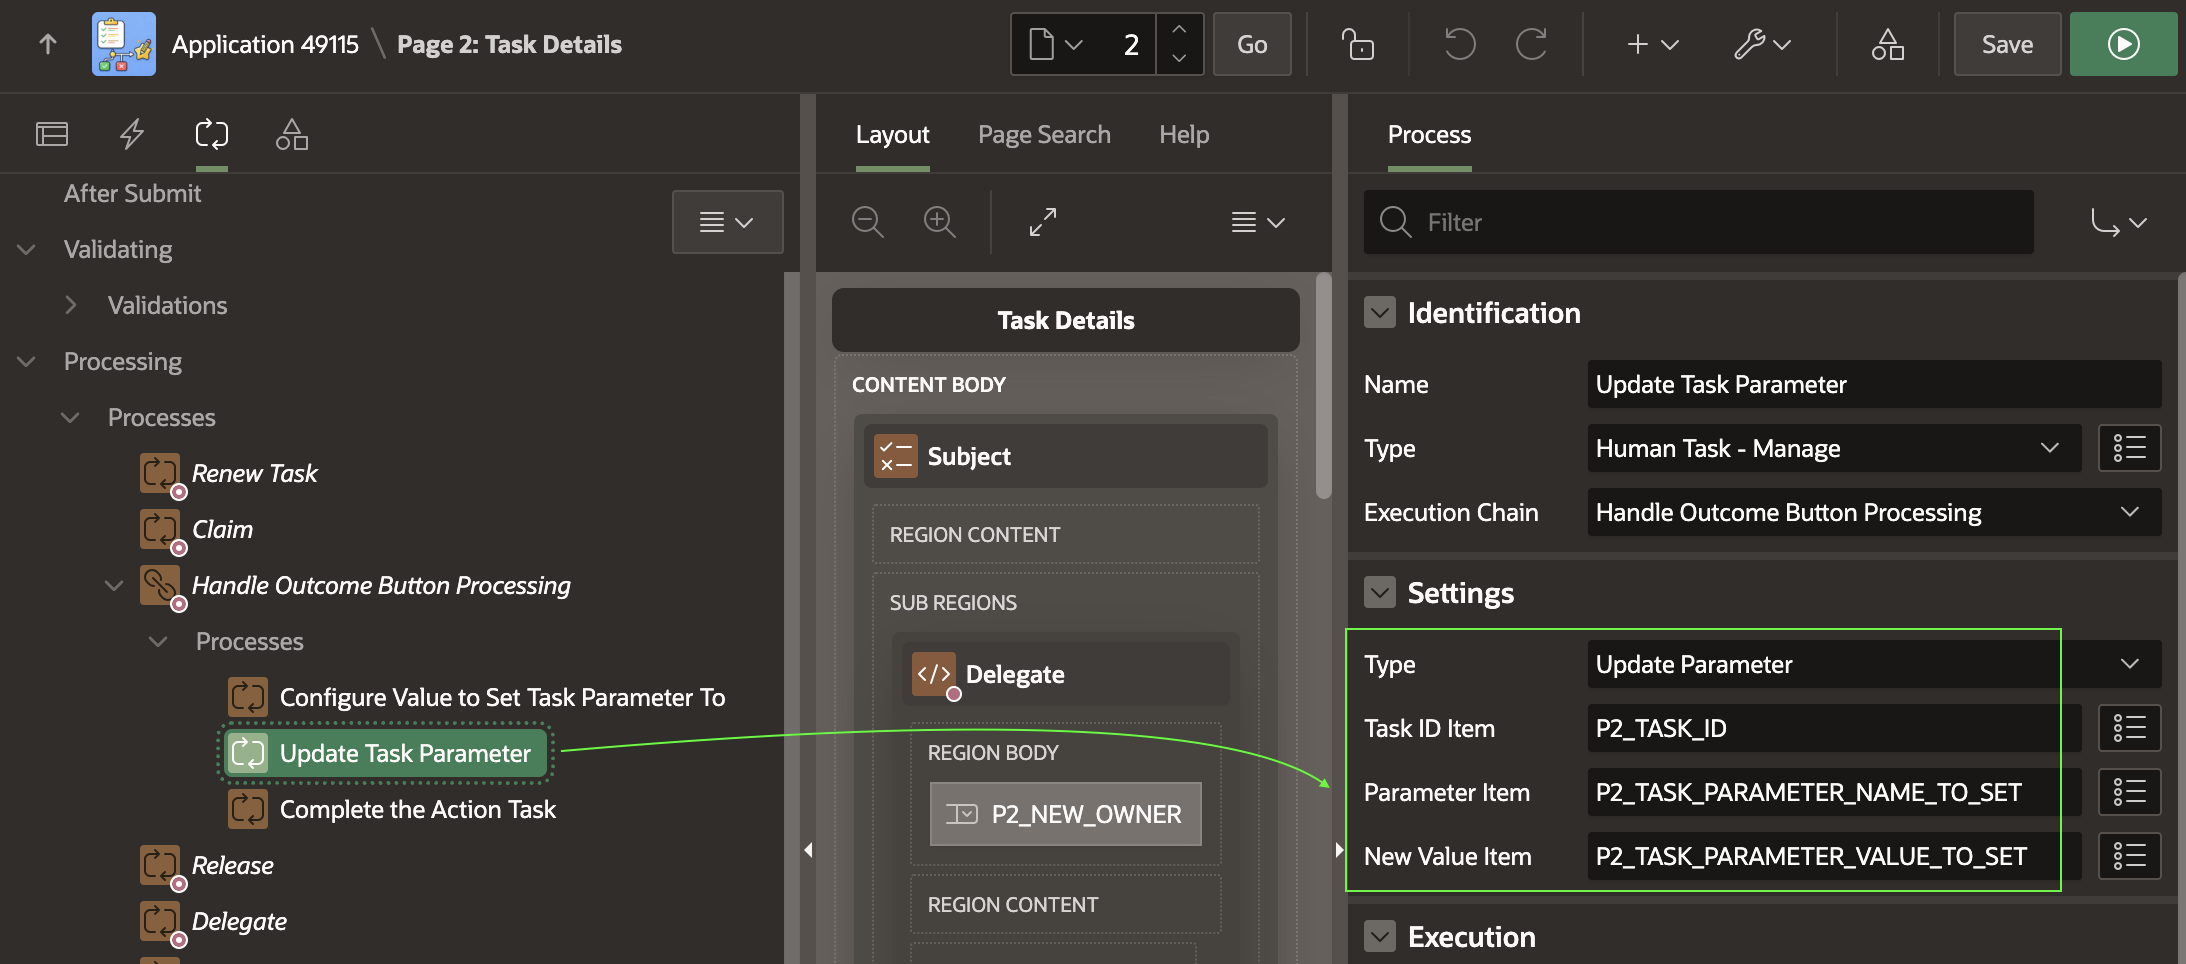
The second Update Task Parameter child process in the chain uses the declarative Human Task ‑ Manage page process, with type set to Update Parameter. It updates the parameter whose name is in P2_TASK_PARAMETER_NAME_TO_SET and whose value is in P2_TASK_PARAMETER_VALUE_TO_SET on the task instance whose ID comes from P2_TASK_ID.
Configuring the Update Task Parameter Page Process
Since the static value OUTCOME is in the name page item, and the dynamically assigned task parameter value is in the value page item, this configuration results in setting the OUTCOME updatable task parameter to either X, Y, or Z as determined by the first step in the execution chain above.
The final Complete the Action Task child process in the chain uses the Human Task ‑ Manage page process with type Complete (without Outcome) to complete the action task.
Switching Paths Based on Custom Outcome
In the workflow, you’ll find two different Switch activities.
One shows how you can reference the value of the task parameter directly using apex_human_task.get_task_parameter_value(:CUSTOM_TASK_ID,'OUTCOME')
I’ve used a “True/False” type switch using the boolean expression:
nvl(apex_human_task.get_task_parameter_value(
:CUSTOM_TASK_ID,'OUTCOME'),'@') = 'X'
The different True and False branches from the switch change course depending on whether the user provided an X outcome, or did not provide an X outcome.
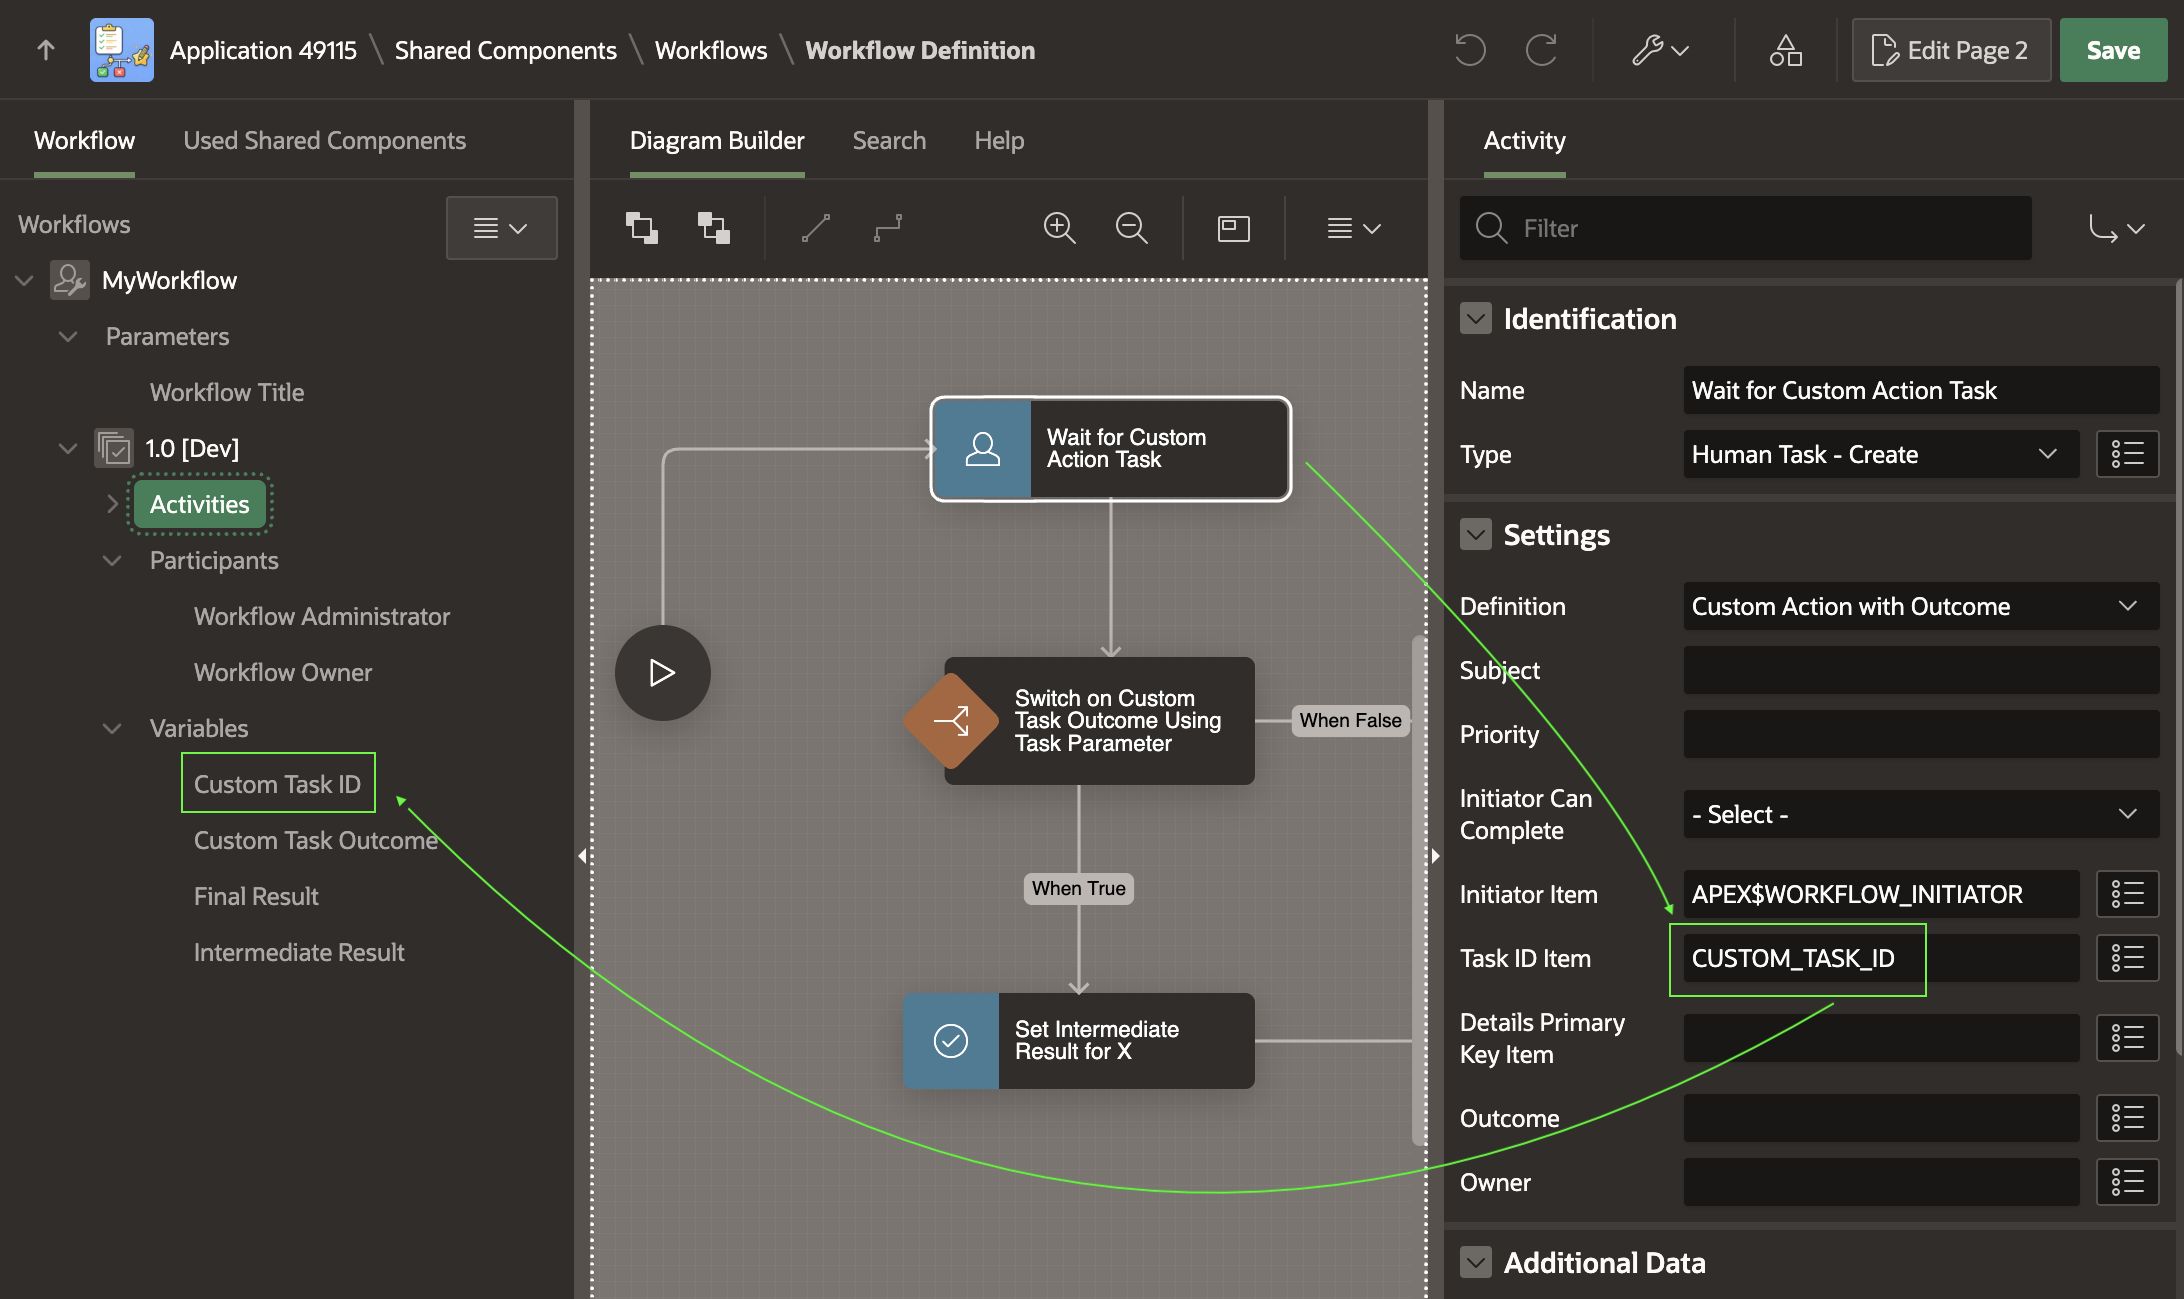
Here, the CUSTOM_TASK_ID is a workflow version variable I added and then used as the Human Task ‑ Create activity’s Task ID Item as shown below. This makes it store the task instance ID into the CUSTOM_TASK_ID variable when the task owner completes the task.
Configuring the Human Task – Create Activity to Store Task ID in a Variable
A second switch activity shows how you can switch on a workflow variable value if you first add an Execute Code activity to the workflow that assigns the workflow variable to the value of the OUTCOME task parameter.
Giving the Sample a Spin
Try running the sample and creating three workflows by clicking three times on the (Start Workflow) button. Since the app configures the workflow title to include the current time, try waiting at least one second between button clicks so your three workflows have distinguishable titles.
In the Workflows page, you can see the three workflow instances you created.
Reviewing the Three Workflows You Created in the Workflows Console Page
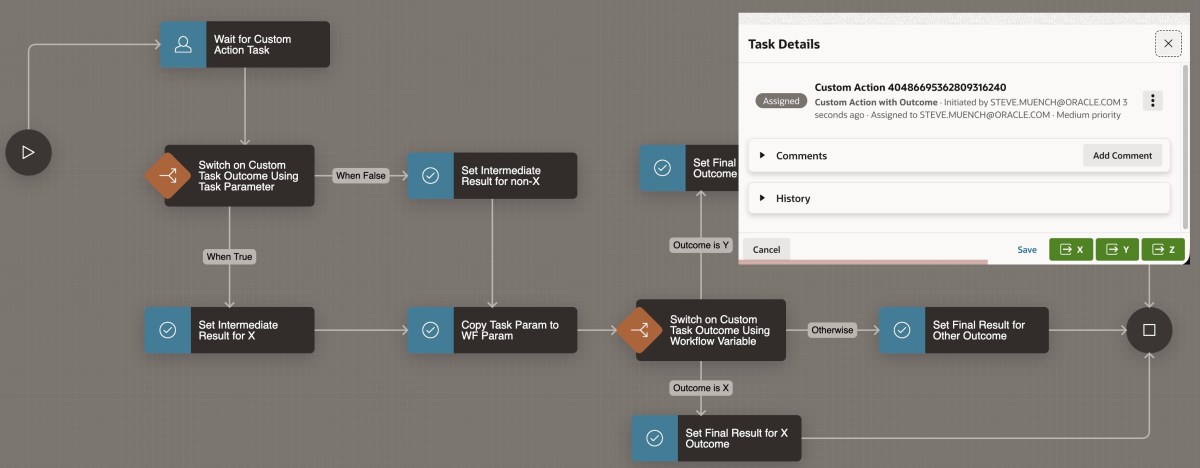
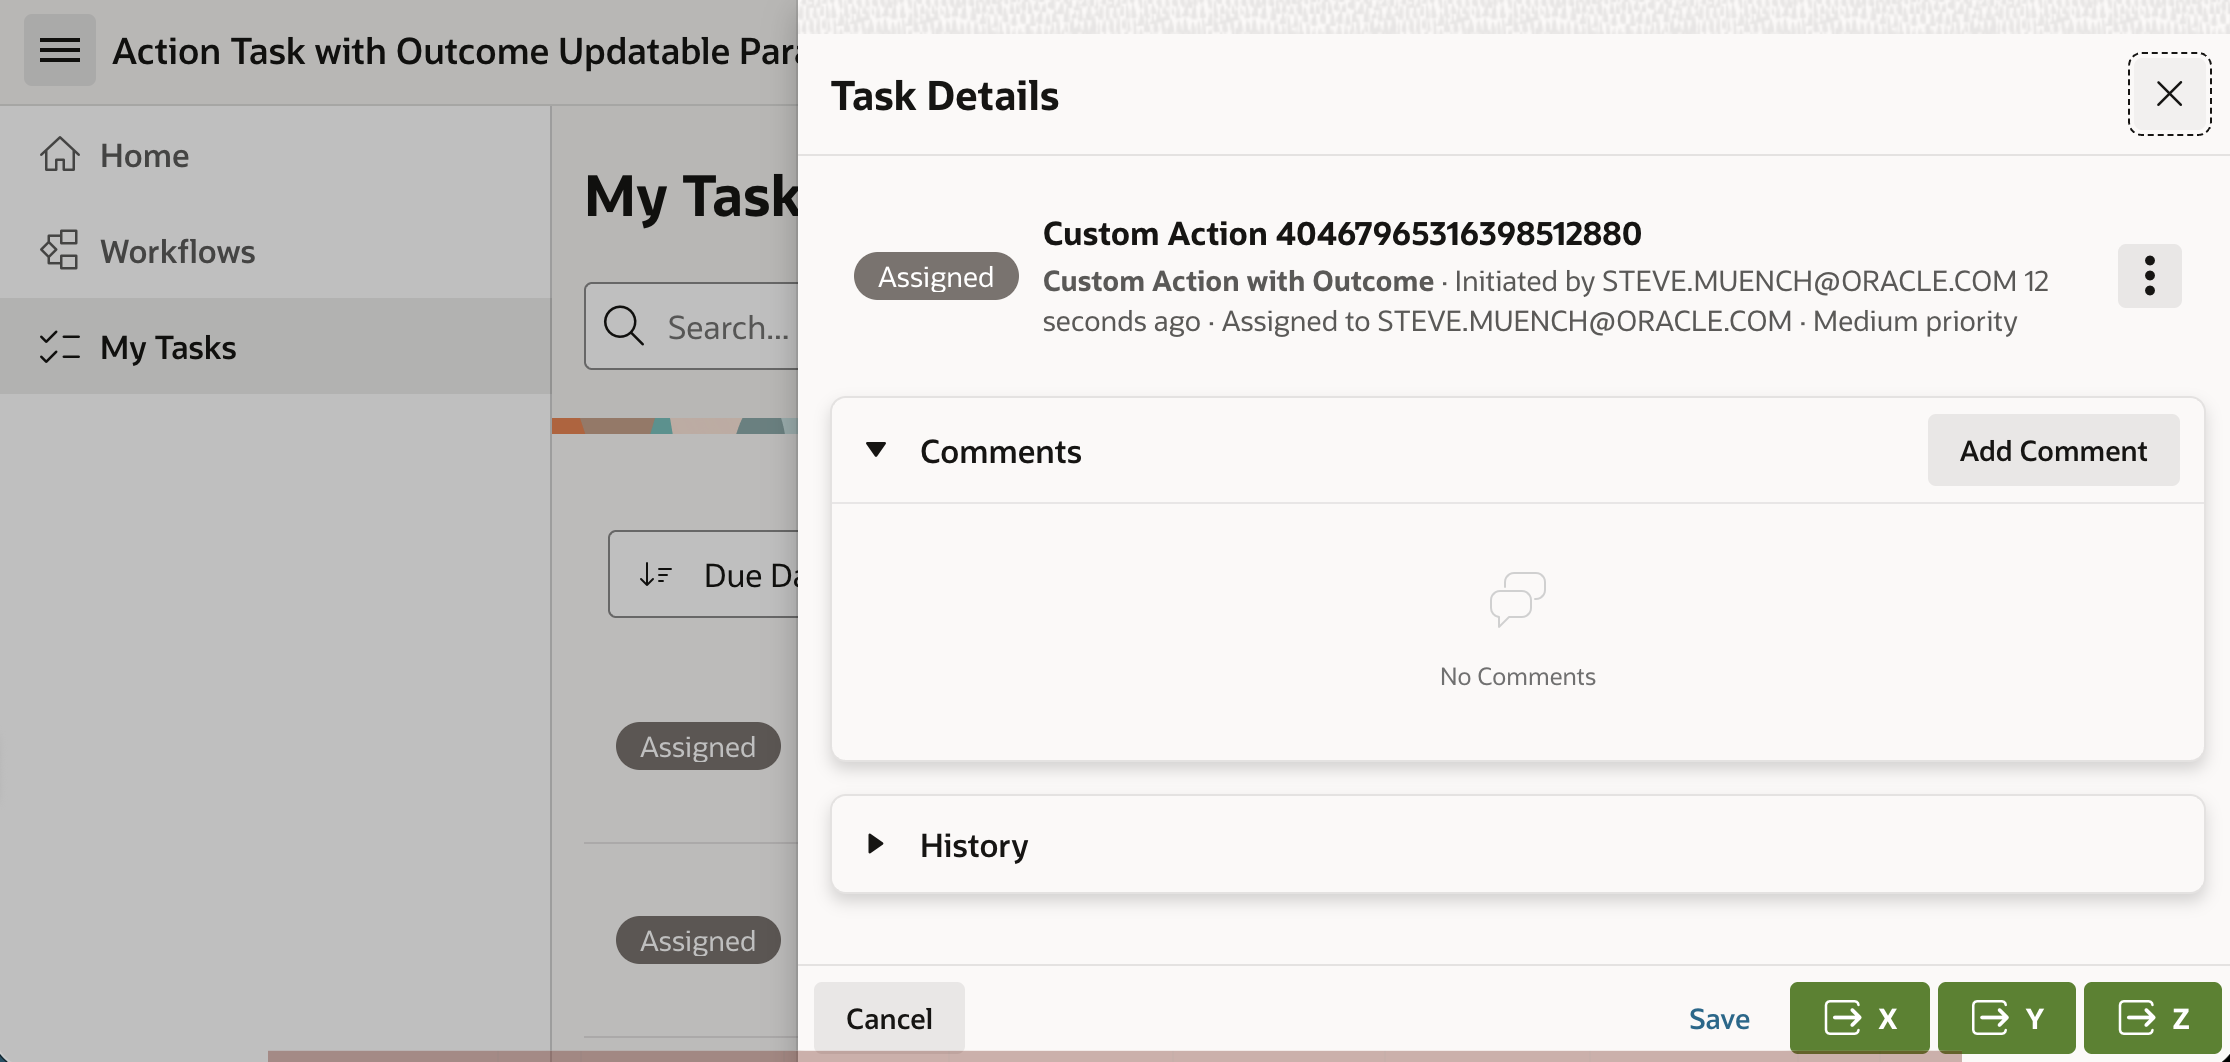
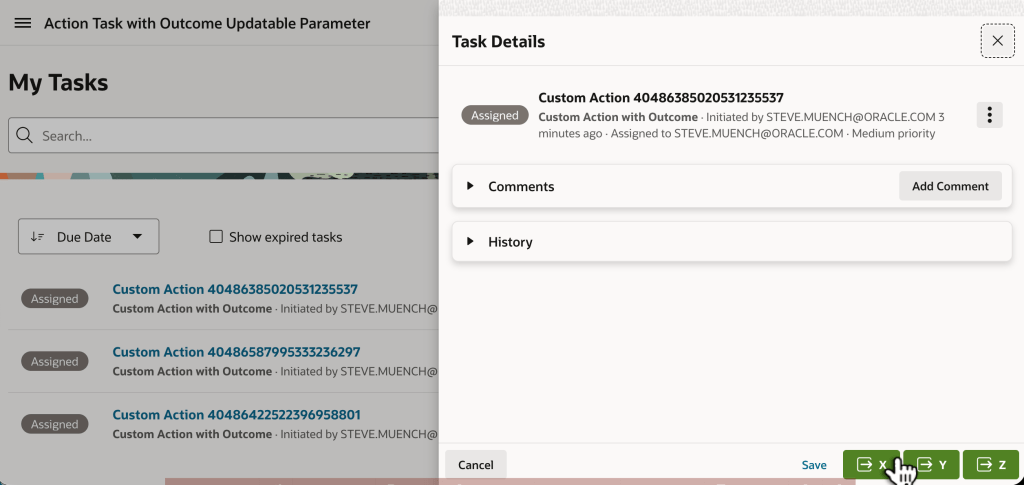
Next, use the My Tasks page to respond to each of the action tasks assigned to you. In one each, try clicking the (X), (Y), and (Z) button.
Using the Task Details Page to Indicate Different Custom Outcomes for Each Assigned Task
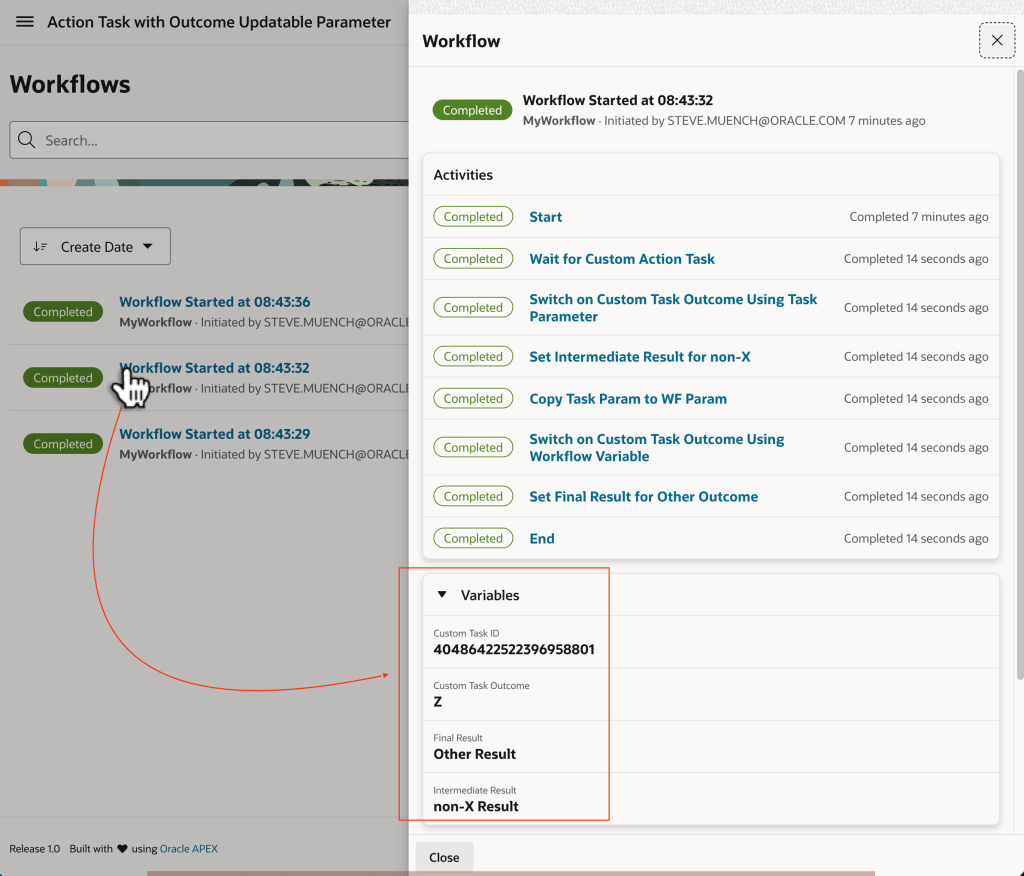
Finally, use the Workflows console to inspect the details of each workflow instance. Study the workflow variable values to see how the different switch activities reacted to the custom outcome. For example, in the workflow instance where you indicated a custom Z outcome, the variables shown below are the result of the path the workflow took for that outcome.
Studying the Variable Values to See How Workflow Reacts to Different Outcomes
When an APEX workflow assigns a human task to one or more potential owners, it shows up in their “Universal Task List” page of “todo” items. Sometimes an action task or an approval task requires the task owner to input additional data to inform the business process the workflow is orchestrating. The task detail page that you generate from the task definition edit page is the page end-users will navigate to when they act on a task in their “inbox”. This page is your starting point for exposing as much or as little of the built-in APEX human task functionality as you want to. You can also customize the page to capture additional data.
I created a small sample app illustrating several different techniques for collecting data from the task owner using customized task detail pages. In the video below, I explain some important APEX Workflow and Human Task concepts in the process of demoing the app and showing how I built it. The sample app imagines a simple business process of a shipping company for a shipped package being tracked in their system through several steps involving human tasks:
An associate determines the Value Added Tax due on the package
A customer service agent assigns a certain number of loyalty points
A marketing rep assesses whether to apply a discount to the shipment fees
A customs agent clears the package and adds any clearance fees
It was quickest for me to record an impromptu live webinar explaining the sample, so I include that video explaining the sample below. You can download the APEX 24.2 sample application from here, and follow along with the video that explains how the sample works.
One required setup step is editing the five app settings under Shared Components > Application Settings to change the SMUENCH username to the username you’d like the sample to use as the workflow and task owner instead. Nota Bene: please enter your username in UPPERCASE.
After you’ve adjusted these settings to reflect your own username in UPPERCASE, then you’re ready to run and follow along with the video explanation below. Hope it helps understand the various options available to you as you develop your business processes in your APEX apps.
Thanks to everyone who came out to see my talk at APEX Alpe Adria in Zagreb. Here are the slides I presented. Hope to see you next year!
All of the sample apps I showed during the talk require an Oracle 23ai database, although the Books Against JSON Collection can work fine against a table containing a JSON CLOB/BLOB column in 19c. The two Books-related sample apps require a couple of APEX fixes that are in the APEX 24.2.5 patch set. You can download the three sample apps from here:
Watch this webinar to see the broad set of Oracle APEX features you can use to quickly deliver and maintain beautiful, functional solutions that add immediate business value. Enjoy end-to-end or expand the YouTube description for a detailed topic timeline to view just a segment. See below for a list of what you’ll learn…
Studying an app for a fictional medical clinic, you’ll see & learn about:
Productive Development
Using Generative AI help for SQL, PL/SQL, app creation, and more
Creating Gen AI chatbots and using AI services to save users time
Modeling data visually using the Quick SQL ER Diagram
Automating business processes with workflow and approvals
Laying out responsive web pages with minimal effort
Easy User Interfaces and Reporting
Visualizing business process status for end users in a diagram
Exploring data interactively with filters, aggregates, and charts
Saving reports and downloading/emailing/scheduling results
Generating pixel-perfect PDF reports from Word templates
Presenting data with Maps, Cards, Calendars, and Charts
Filtering data with Faceted Search and Smart Filters
Searching application-wide with unified results display
Reacting to end-user interactions with dynamic behavior
Incorporating community plug-ins like a Kanban Board
Handling parent/child lists, regions, and conditional display
Geocoding addresses
Creating reusable UI components with only HTML markup skills
Reusing repeating layouts consistently with configurable slots
Installing Progressive Web Apps that launch like native ones
Uploading images from a mobile device’s camera
Capturing GPS location of a mobile user
Simple Business Processes, App Logic, and Integration
Orchestrating app logic with workflows that react to data changes
Sending Emails and push notifications
Integrating data from MySQL, OData, Fusion Apps, and REST APIs
Synchronizing remote data periodically to a local cache
Querying based on spatial distances
Predicting outcomes from historical data with machine learning
Validating parent/child data using simple SQL checks
Using semantic similarity searching with 23ai vector search
Improving Gen AI results with Retrieval-Augmented Generation
Offloading longer-running processing to the background
Loading CSV, Excel, or JSON data in foreground or background
Enriching remote data with local joins and computations
Exposing application data as REST APIs using JSON Duality Views
Producing reusable REST API catalogs from OpenAPI documents
Hassle-free Dev Ops and Application Lifecycle
Tracking issues and tackling tickets in teams with working copies
Merging changes from a separate working copy back to main
Testing apps and deploying to test and prod environments
Valuing APEX scalability, extensibility, security, and governance
APEX workflow is a new feature I was keen to experiment with. In a familiar visual designer, you automate a business process with a flow diagram. Its sequence of activities can include business logic, conditional branching, local or remote API calls, time delays, email, and push notifications. It’s also easy to wait for approvals or action tasks end users need to complete. Should your needs go beyond the core activity set, you can develop custom ones or use community-created activities using process plug-ins. I’m eager to share my initial experiences to offer insights I gathered along the way. You’ll find links at the end to download the sample app and to read additional APEX Workflow articles of interest by my colleagues.
(Technical Note: to see a larger version of any figure, right click on it and choose Open Image in New Tab from the context menu…)
Calculated Simplicity
To learn APEX workflow, I thought of the simplest process a math major’s mind could muster: adding two numbers. “Hey!That’s not a business process!” you rightly note, but humor me. This approach helped me understand all the “moving parts” first before embellishing my simple calculator workflow to include decisions and notifications. I decided to start small.
I created an eba_demo_simplecalc package and wrote the following compute() function to represent some parameterized business logic that my app needs to perform. It accepts two number operands and the operation to perform on them (plus, minus, multiplication, or division):
-- In package eba_demo_simplecalc
function compute(
p_operand1 in number,
p_operation in varchar2,
p_operand2 in number)
return number
is
begin
return case p_operation
when '+' then p_operand1 + p_operand2
when '-' then p_operand1 - p_operand2
when '*' then p_operand1 * p_operand2
when '/' then p_operand1 / p_operand2
end;
end compute;
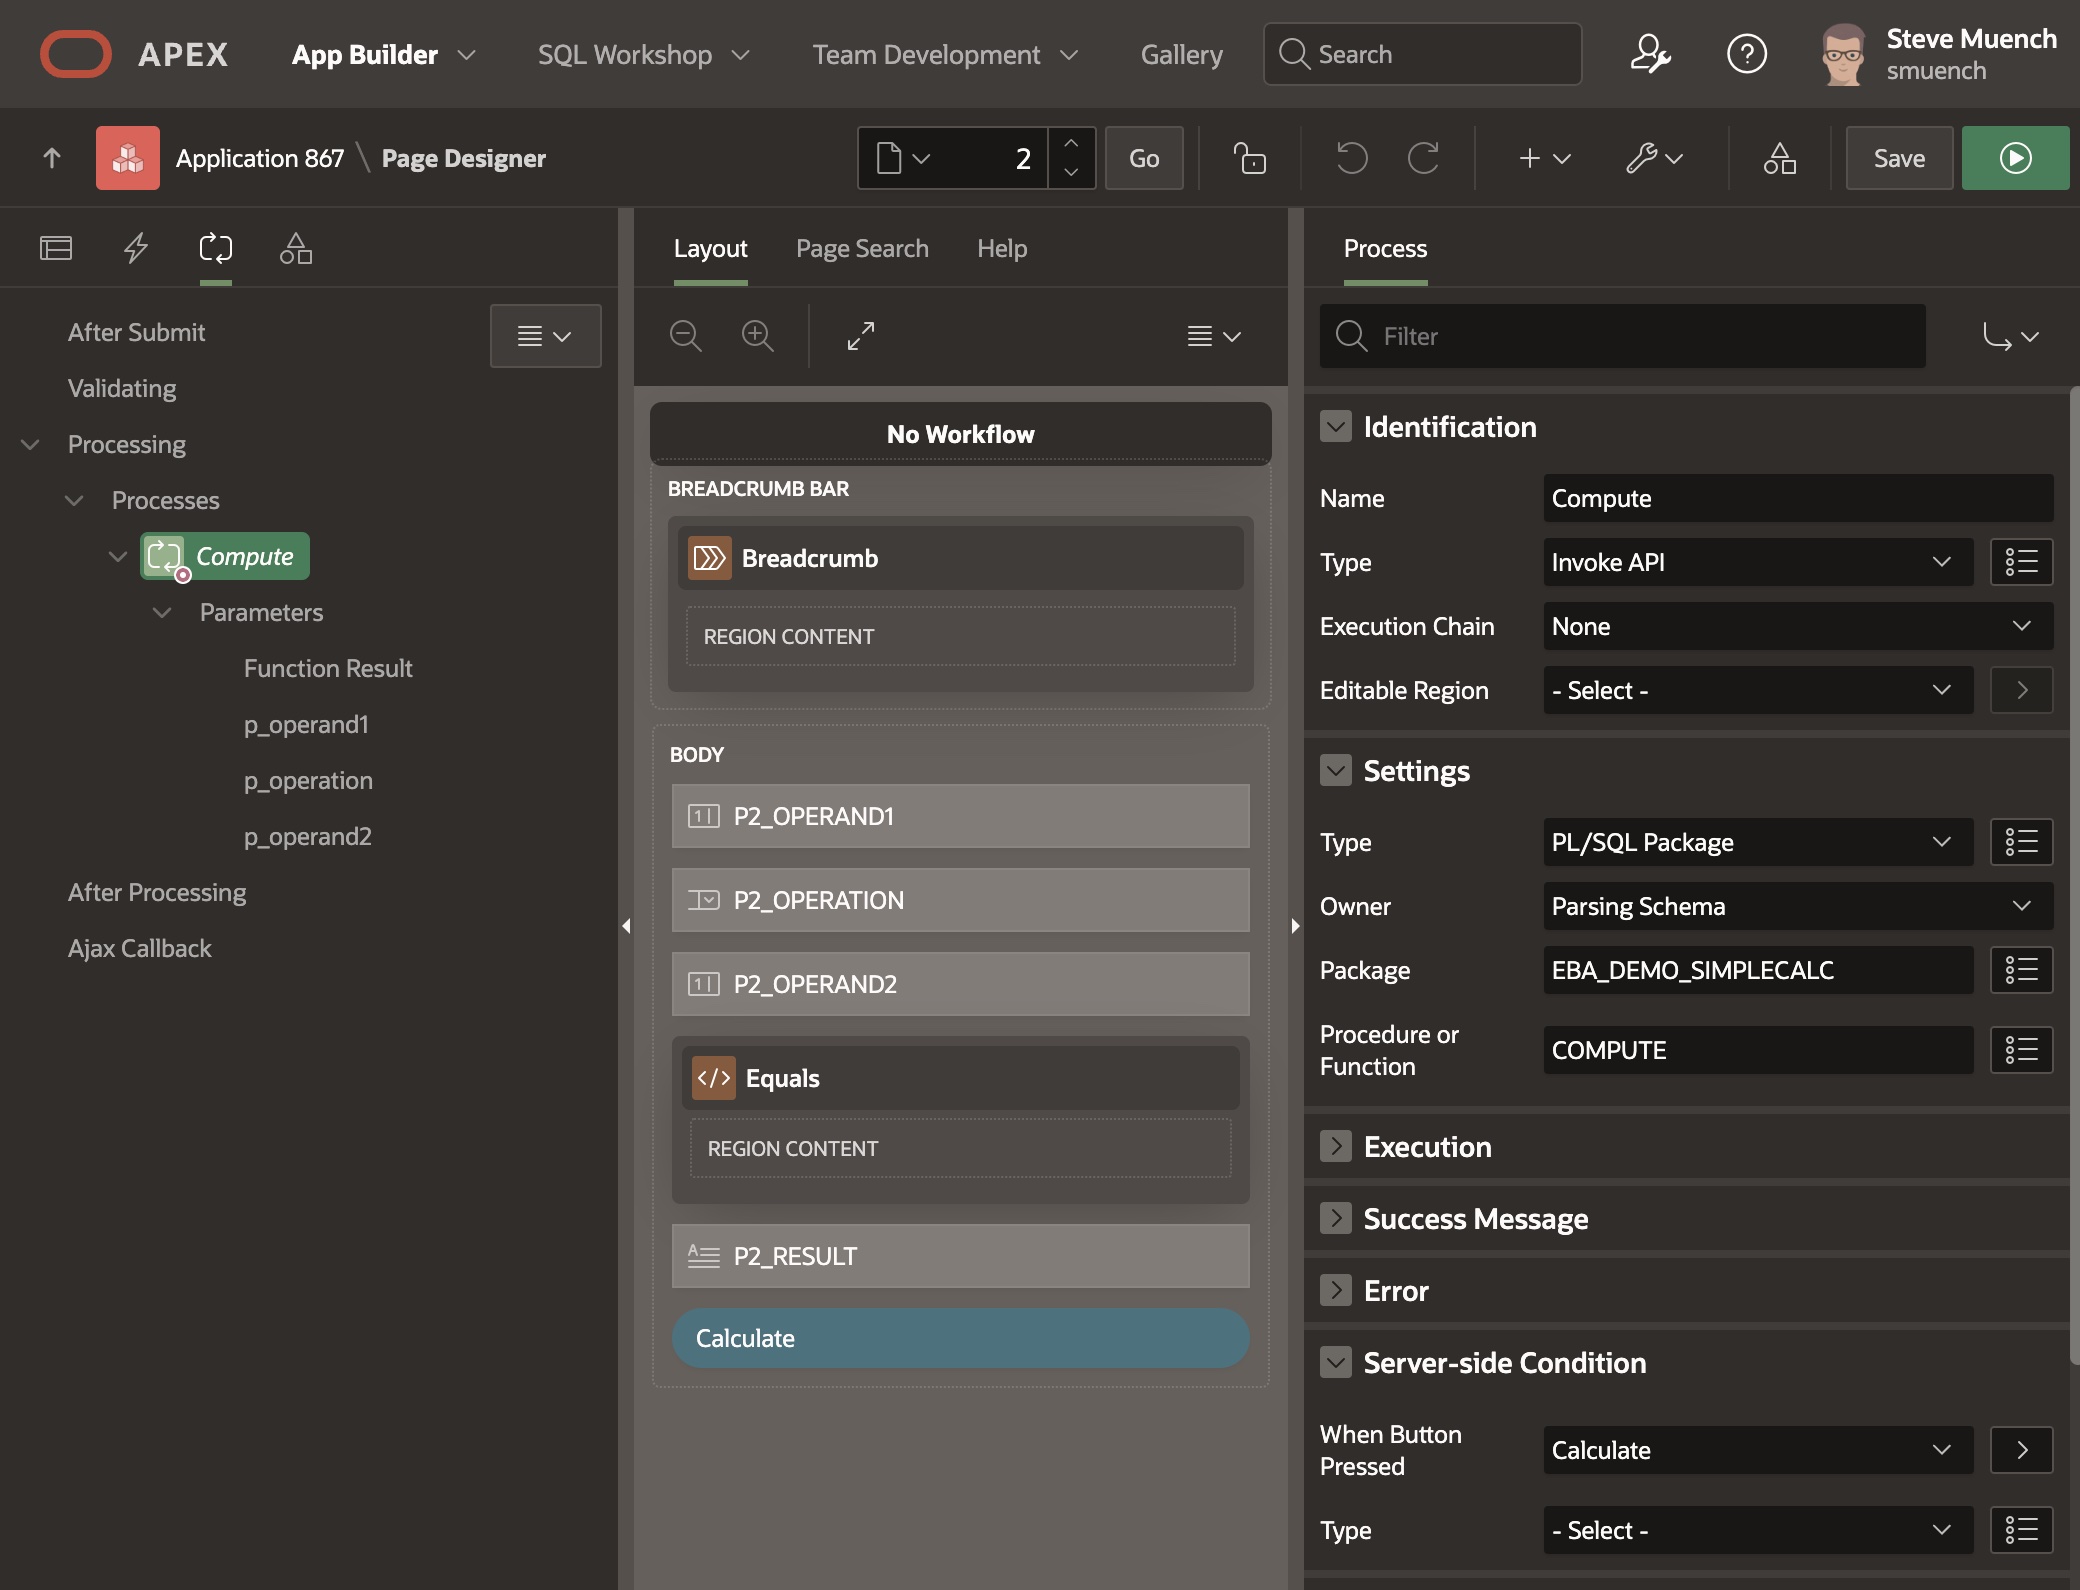
Then I built the simple Calculate Without Workflow page below to start with a baseline calculator page that did not use workflow at all. It lets a user enter two number values and has a select list with the four available operations. A display-only page item shows the computed result after the user clicks the (Calculate) button.
Calculate Without Workflow page invokes parameterized business logic and shows the result
As shown below, this simple page has a single entry in the Processing section that invokes the compute() function using an Invoke API page process. It has a Server-side Condition to run when the Calculate button is pressed, and I configured its three parameters to get their values from the corresponding page items and return the function result into the display only page item. I quickly had a working calculator page that let a user add, subtract, multiply, or divide any two numbers. In this baseline page, no data is stored in any table. The operands, operation, and computed result only live in APEX session state.
Invoke API page process calls the COMPUTE() function, passing page item values as parameters
Reusing Logic in a Business Process
Next, I learned how to reuse my compute() business logic from a workflow. Under Shared Components > Workflows, I clicked (Create) to get started. I was already familiar with the Invoke API page process, so using the Property Editor I instinctively changed the type of the default activity in the visual designer from Execute Code to an Invoke API type activity instead. The Workflow Designer looks and works like Page Designer, so I already knew how to use it. Next, I needed to configure the compute() function’s inbound parameters and its function return, so that made me think, “Where will these values come from and where will the computed result go?”
Workflow with three input parameters, one result variable, and a Calculate Result activity
A workflow is a “headless” process that the APEX engine runs in the background using a session that’s distinct from those of end users accessing pages. So, the workflow has no access to pages or page items. Instead, it accepts initial values at start time using parameters. These values are read-only. While the workflow is running – which can last for a few seconds or many weeks depending on the business process – APEX automatically manages the storage and retrieval of workflow variable values you can change over time. As shown in the figure above, my Simple Calc (Only Params) workflow accepts three parameters to let the workflow initiator pass in two number operands and the operation. It also has one variable to store the computed result of the calculation. Both parameters and variables have a static ID that you use to reference their value as substitution strings or bind variables. They also have a display label that shows in the navigator tree to improve readability. Here, I opted for parameter static IDs of P_OPERAND1, P_OPERATION, and P_OPERAND2 and a variable static ID of V_RESULT. The P_ and V_ prefixes are not mandatory, but they helped me remember which names were parameters and which were variables.
The workflow Title property – which determines how end-users will see the workflow instance in the console – can reference parameters as substitution strings to include dynamic info. Therefore, I set my Title to the string below:
Calculate &P_OPERAND1. &P_OPERATION. &P_OPERAND2. (Using Only Params)
Workflow Versions
As business requirements change, a process can evolve over time. APEX supports this using workflow versions. When you create a new workflow the Workflow Designer also creates the first version for you. While the name can be anything meaningful, I just named mine “1.0“. Notice it shows in the workflow navigator tree as “1.0 [Dev]” to indicate this version is in development mode.
Very observant readers may have noticed my workflow’s Result variable is actually indented under the “1.0 [Dev]” version node in the navigator tree. Since the set of variables can change over time as well, they are part of the workflow definition that’s included in the workflow version. This is why they’re called “version variables.”
While building your app, you can use your workflow in development mode when running from the APEX Builder. However, to run the app outside of the APEX Builder or to deploy it another environment, you will need to activate the development version of all workflows in use before end-users can use them. For simplicity, in this article we’ll just keep all the workflows to a single development-mode version and always run the app from the builder.
Workflow Definition Versus Instance
The workflow version diagram represents the definition of a business process. It starts with a start activity and shows how to continue on to other activities until eventually concluding in an end activity. It will always have a single starting point, but may allow multiple possible paths to reach an end activity. Think of it like a recipe, blueprint, or template that describes how each particular concrete example of the workflow will behave.
A workflow instance is a particular example of the workflow definition that your application starts, usually by passing in one or more parameter values that provide the context information that makes this example unique. The APEX workflow designer lets you specify the definition and the Workflow page process (or APEX_WORKFLOW PL/SQL API) lets your application start a new workflow instance that will follow the activities you laid out in the designer. Now let’s put these abstract ideas into practice in this example. To perform a calculation using my Simple Calc (Only Params) workflow definition, I needed to create a page that uses the Workflow page process to start a new instance of the workflow to perform a specific calculation.
Calculating Using the Workflow
I copied my original No Workflow page to a new Workflow Params Only page and changed the page process type from Invoke API to be type Workflow instead as shown below. In the Settings section of the Property Editor, I set the Type of workflow action to Start since clicking the (Calculate Using Workflow) button should start the workflow. I chose the Definition of Simple Calc (Only Params), the name of the workflow I created above. Finally, I configured each of the three workflow parameters to get its value from the corresponding page item.
Using a Workflow page process of type Start to start a workflow
Running the page, after entering two operands and an operation and clicking the (Calculate Using Workflow) button, as shown below, it appears that nothing happens. However, behind the scenes the workflow has started. The result is not immediately visible in the page as it was in my original No Workflow page. The workflow is now responsible for computing the result and it is doing that in the background. So we need a different way to see the value of the result, since it lives inside the workflow version variable V_RESULT with display label Result. In the next section we’ll create a workflow console page to inspect the workflow instance and see the result of the calculation in the Result variable value.
After submitting the calculation for 4587 x 4 using a workflow to compute the result
Reviewing Results in the Console
A Workflow Console page lets you see the progress of workflows. You create one using the Create Page wizard by choosing the Workflow Console page type. The wizard will create two pages: one lists the workflows, and the other shows the details of a selected workflow in the list. As shown below, I named the list page Workflows Started and the form page Workflow Detail. The Report Context setting determines whether the list page shows the current user the workflows they initiated, those in which they are a participant, or the ones they can administer. I chose “Initiated by Me” so it will show all the workflow instances I start.
Creating a workflow console list and details page to show workflows the current user initiated
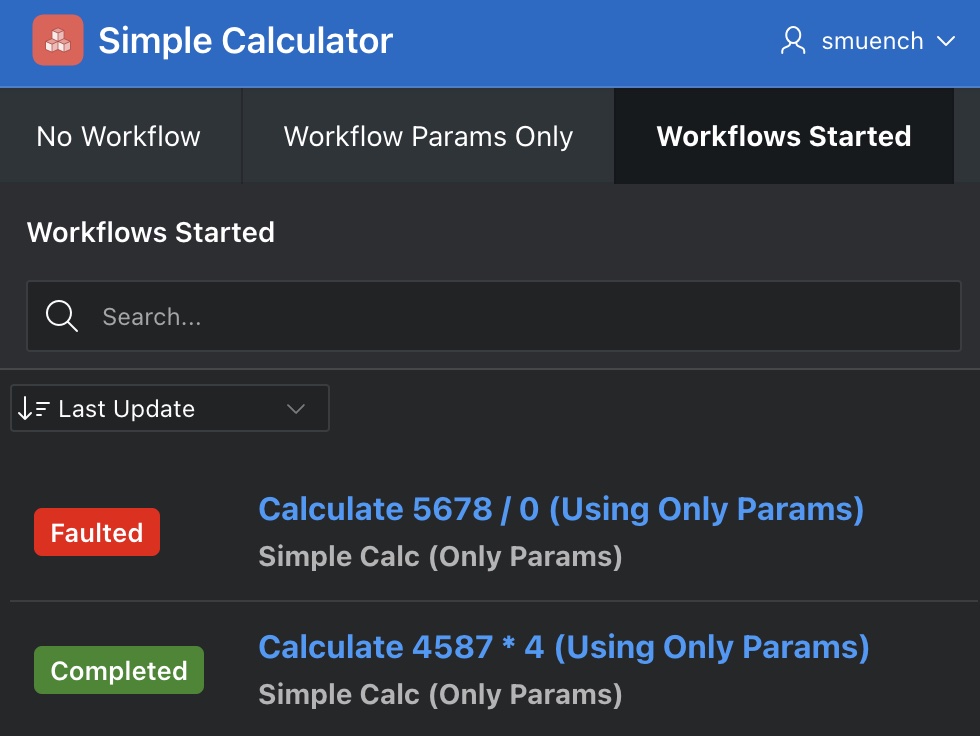
Refreshing the browser and navigating to this new Workflows Started page, I see the list below containing the one workflow instance I have started so far. We can see from the badge that it has already completed. To see the workflow instance’s details, we just click on the title whose text we notice was computed using our Titleproperty we configured above that used substitution strings.
Console page showing Simple Calc (Only Params) workflow we started by clicking (Calculate)
As shown below, the Workflow Detail modal drawer page appears showing the workflow activities completed and the value of the Result variable.
Inspecting the result of the calculation in the workflow details page
Seeing Workflows for One App or All?
One small change I made to the default Workflows Started page was to adjust the SQL query of its Initiated by Me region of type Content Row so that it only showed the workflow instances related to the current application. By default it shows workflows from all apps in the workspace, but that’s not what I needed for this simple learning app, so I tweaked the query to look like the following to pass the :APP_ID bind variable as the value of the p_application_id parameter to the pipelined table function that returns the workflow instance information:
select ...,
title,
initiator,
...
from table ( apex_workflow.get_workflows (
p_context => 'INITIATED_BY_ME',
-- Leave out this param to show workflows
-- from all apps in the workspace
p_application_id => :APP_ID
) )
Exploring a Faulted Workflow
There’s not much that can go wrong when performing a simple math calculation, but there is one thing: dividing by zero! I wanted to explore what would happen if I asked my simple workflow-based calculator to perform a calculation that would generate an error. I also wanted to learn how the workflow administrator could fix a faulted workflow in the console by editing a problematic variable value involved and retrying the faulted activity. Recall from above that the value of a workflow parameter like P_OPERAND2 is read-only. So I needed to slightly change the workflow to:
Add a second version variable V_OPERAND2 of type NUMBER,
Initialize its default value from the value of the parameter P_OPERAND2, and
Adjust the Invoke API activity to pass V_OPERAND2 to the compute() function
After doing this, I entered the values you see below to compute 5678 divided by zero (0) and clicked (Calculate Using Workflow).
Starting the workflow to generate an error by calculating 5678 divided by zero (0).
Again, it appears that nothing has happens in the page, but as shown below the Workflows Started console page shows us what’s happened. The workflow started and faulted due to the divide by zero error.
Workflows Started page showing faulted workflow
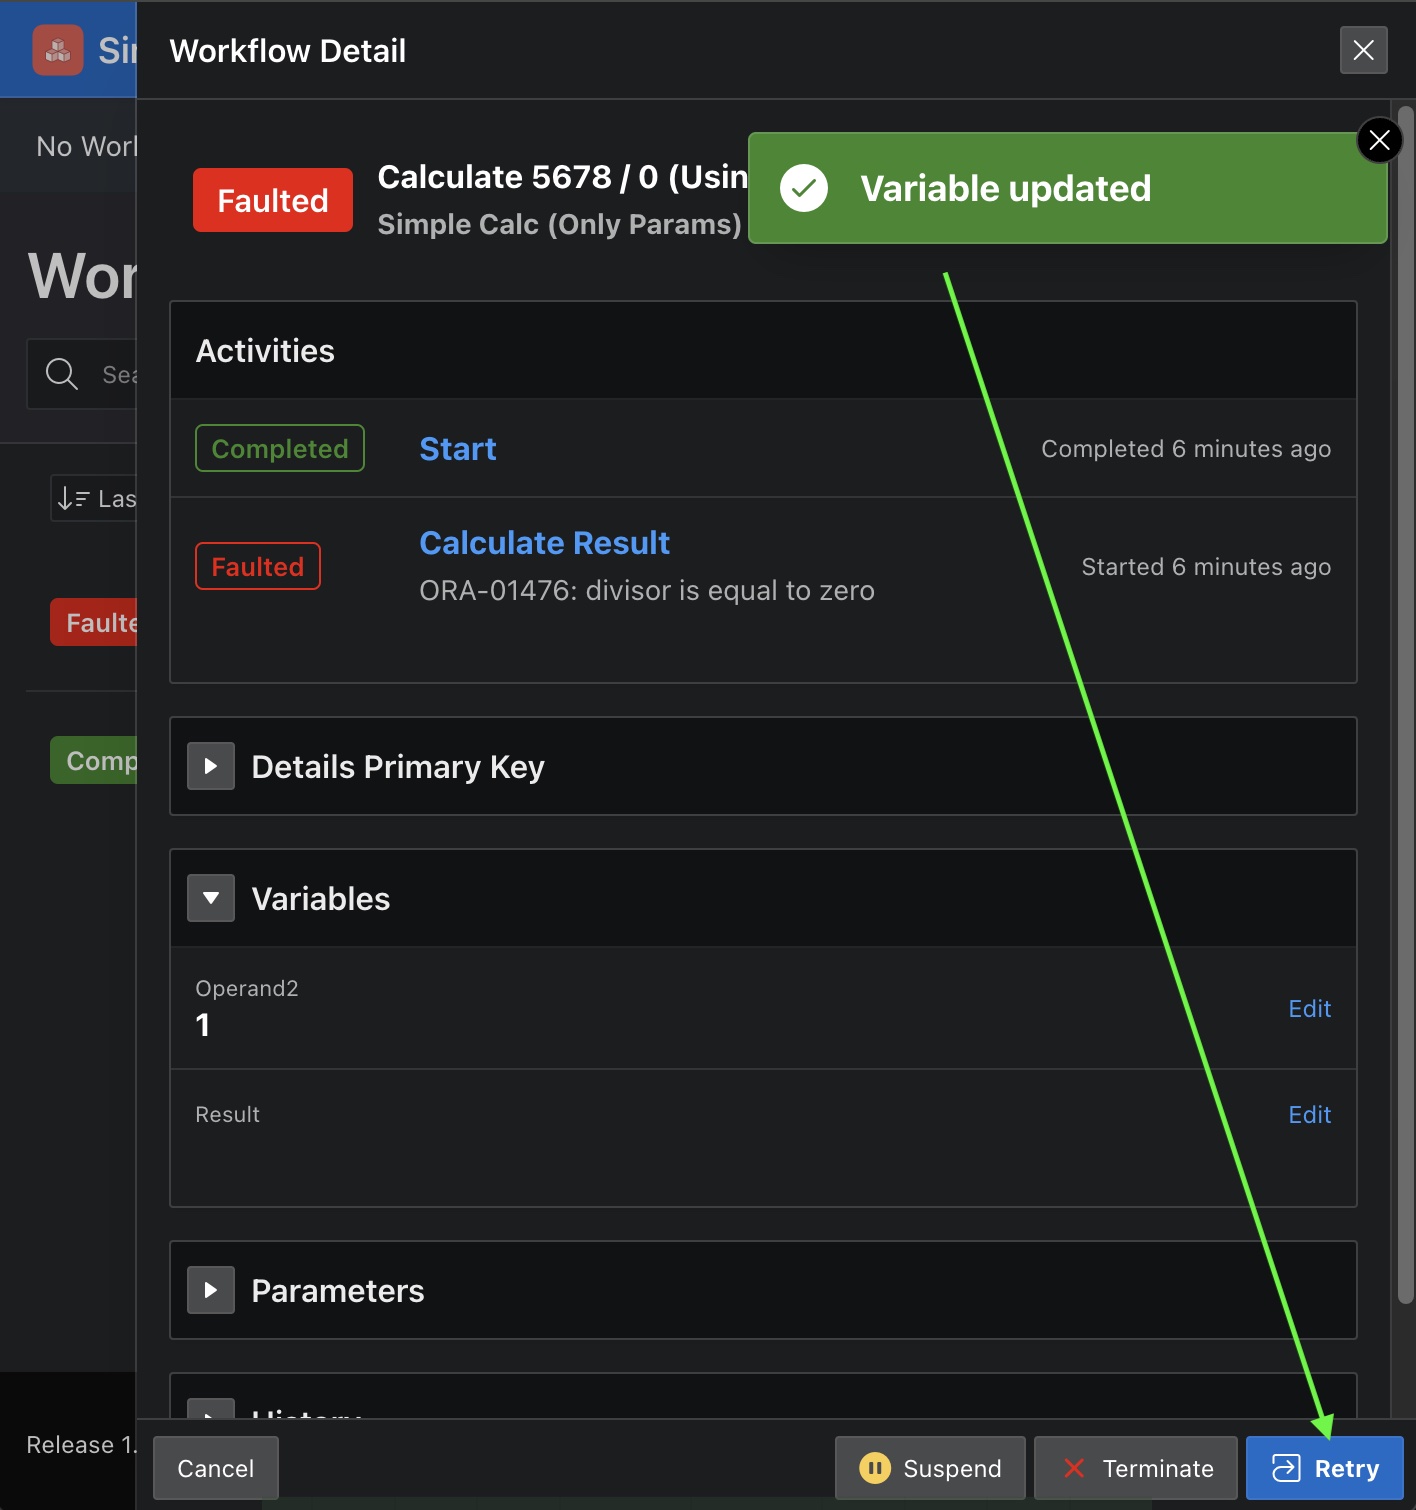
Clicking on the title of the faulted workflow shows the details you see in the figure below. We see the error that caused the fault, and can edit the value of the V_OPERAND2 variable (with label Operand2) by clicking the Edit link to the right of the variable.
Workflow details for a faulted workflow due to divide by zero error
We can fix the error by entering a corrected value for the workflow version variable. For example, let’s enter the value 1 instead and click (Apply Changes) as shown below…
Fixing a faulted workflow by editing the value of a version variable
Lastly, we can click (Retry) as shown below to have the APEX engine try processing the faulted activity again…
Retrying a faulted workflow after correcting a version variable value
The workflow now completes successfully and we can see the result by clicking on the workflow title in the Workflows Started page as shown below.
Workflow completed successfully after retry
Associating a Workflow to a Row by PK
In the previous workflow, we passed in all of the initial information required using parameters. However, very often the information a workflow needs is already contained in the columns of a table in your app schema. In those cases, the only parameter value you may need to pass is a primary key from the table in question so it’s clear to which row the new workflow instance is associated.
In fact, this use case is so common that you don’t even need to create your own workflow parameter to handle it. Every APEX workflow has an optional, predefined parameter named APEX$WORKFLOW_DETAIL_PK whose display label is Details Primary Key. I set out next to investigate using this feature with my simple calculator workflow.
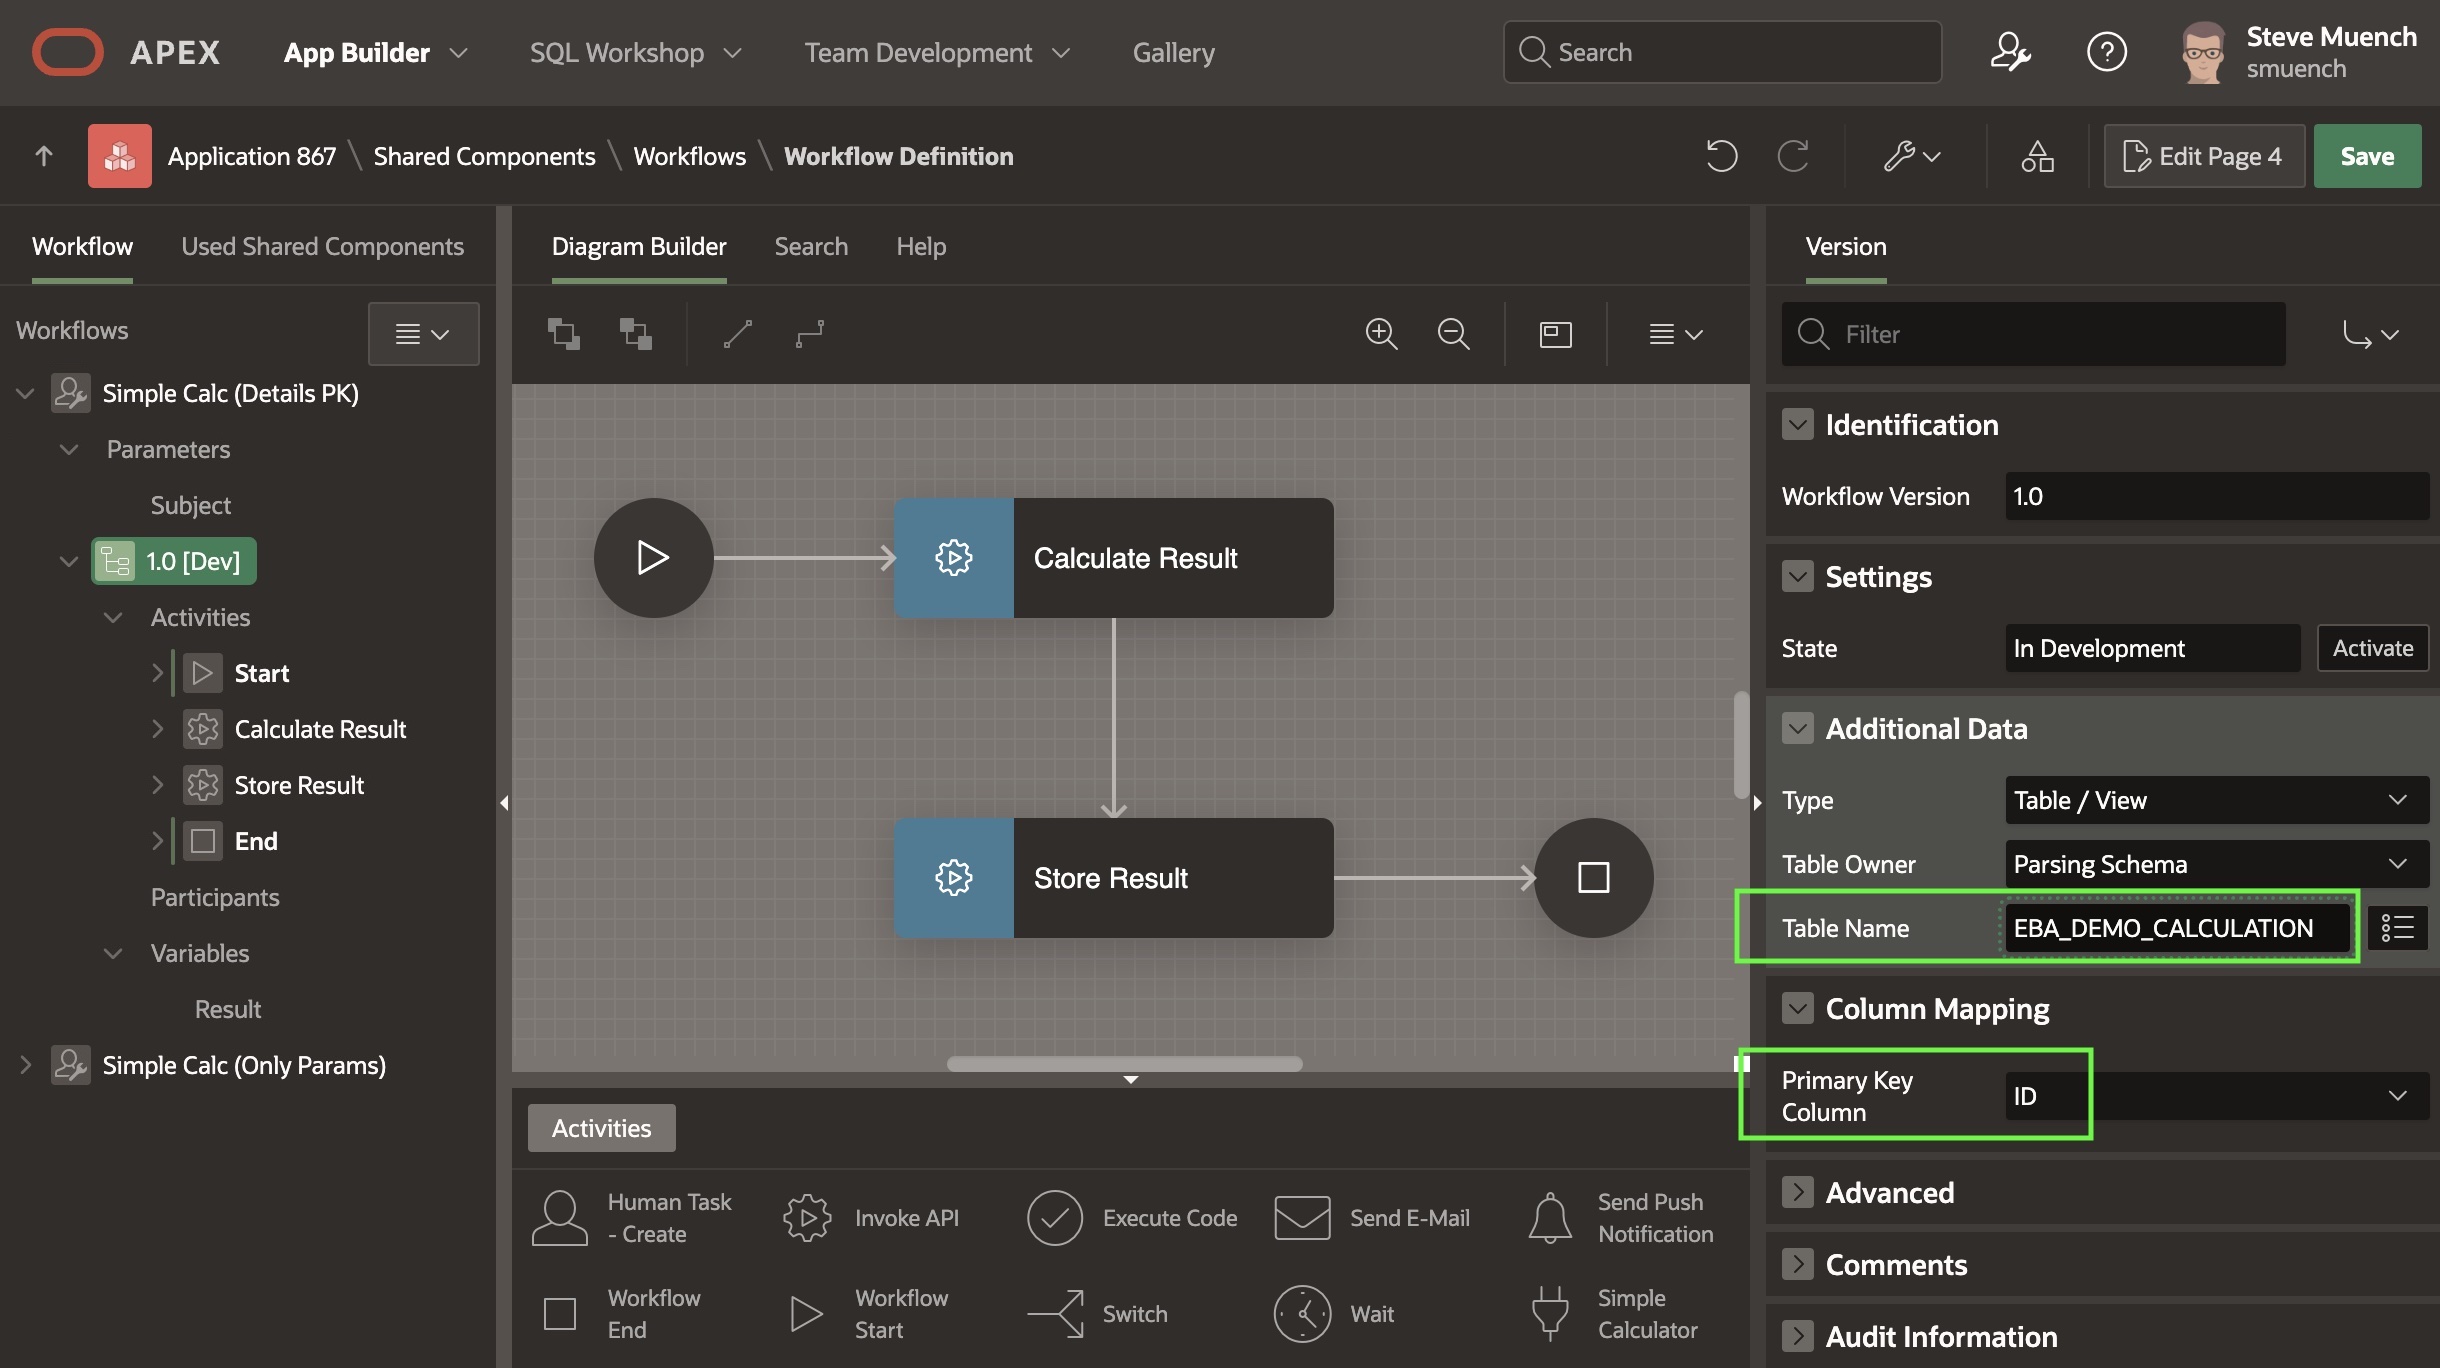
The first step was creating an EBA_DEMO_CALCULATION table shown below to store the calculation rows to which each workflow instance will be associated by primary key. The table has a primary key (ID) and then columns for the two operands, the operation, and the result of the calculation.
APEX Quick SQL diagram of the EBA_DEMO_CALCULATION table
Next I created a Calculations Interactive Report page with an associated form page named Calculation. These pages let me quickly list, create, edit, and delete calculation rows. Then I created the Simple Calc (Details PK) workflow you see below. To associate it with the EBA_DEMO_CALCULATION table, as shown below I clicked on the “1.0 [Dev]” version node in the navigator tree on the left, and then in the Additional Data section of the Property Editor, set the table name and configured the primary key column (ID) to use.
Configuring Simple Calc (Details PK) to associate it with EBA_DEMO_CALCULATION table
This table name configuration is one of the two required ingredients to make a table-associated workflow function correctly. The other important step occurs in the configuration of the page process that starts this workflow.
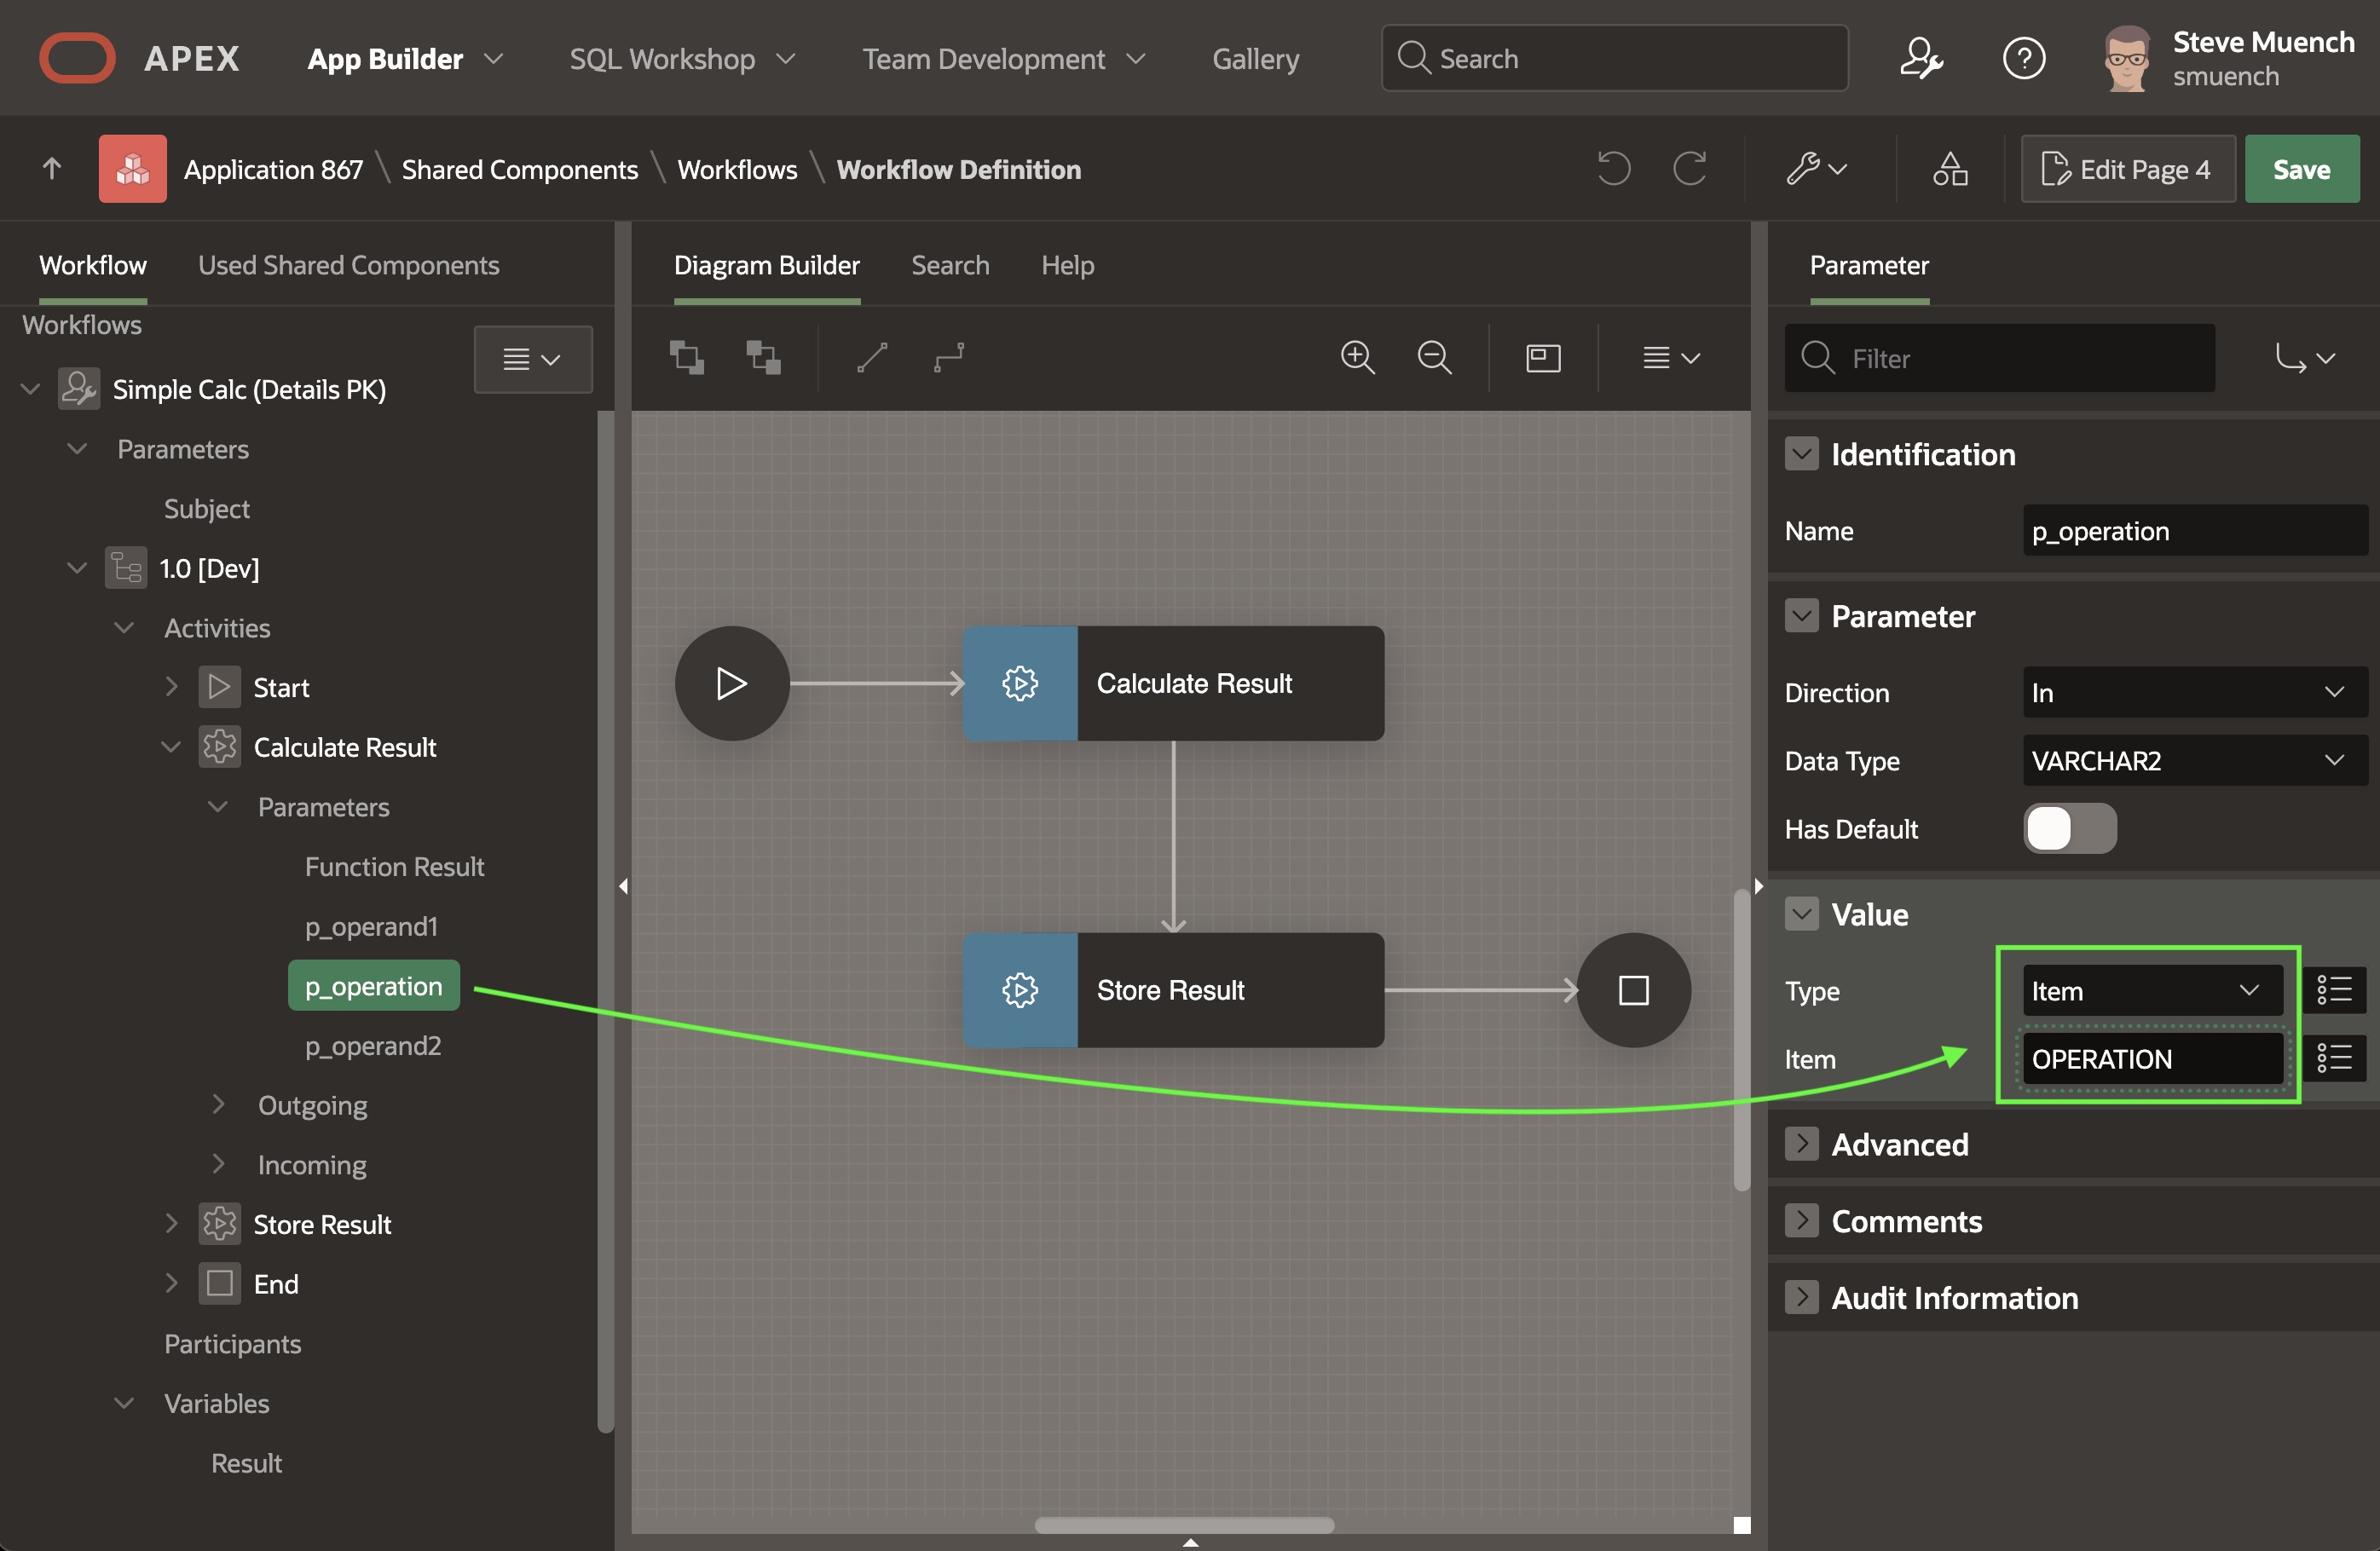
In the Calculation form page, the wizard has already created a page process of type Form – Automatic Row Processing (DML) to save the calculation row, and a Close Dialog page process to dismiss the dialog and return to the calling page. I added a new Workflow page process just between these two. As shown below, I configured it to start workflow Simple Calc (Details PK), but this time I’ve added one additional configuration value that makes a big difference. I set the Details Primary Key Item to P4_ID. This is the name of the page item that will provide the primary key value of the EBA_DEMO_CALCULATION table row to which the new workflow instance will be associated. The P4_ID page item is the primary key in the form region that creates, edits, or deletes a row in the EBA_DEMO_CALCULATION table. However, since its item type is Hidden it does not appear on the visual layout.
Set Details Primary Key Item to provide a value at workflow start time for APEX$WORKFLOW_DETAIL_PK
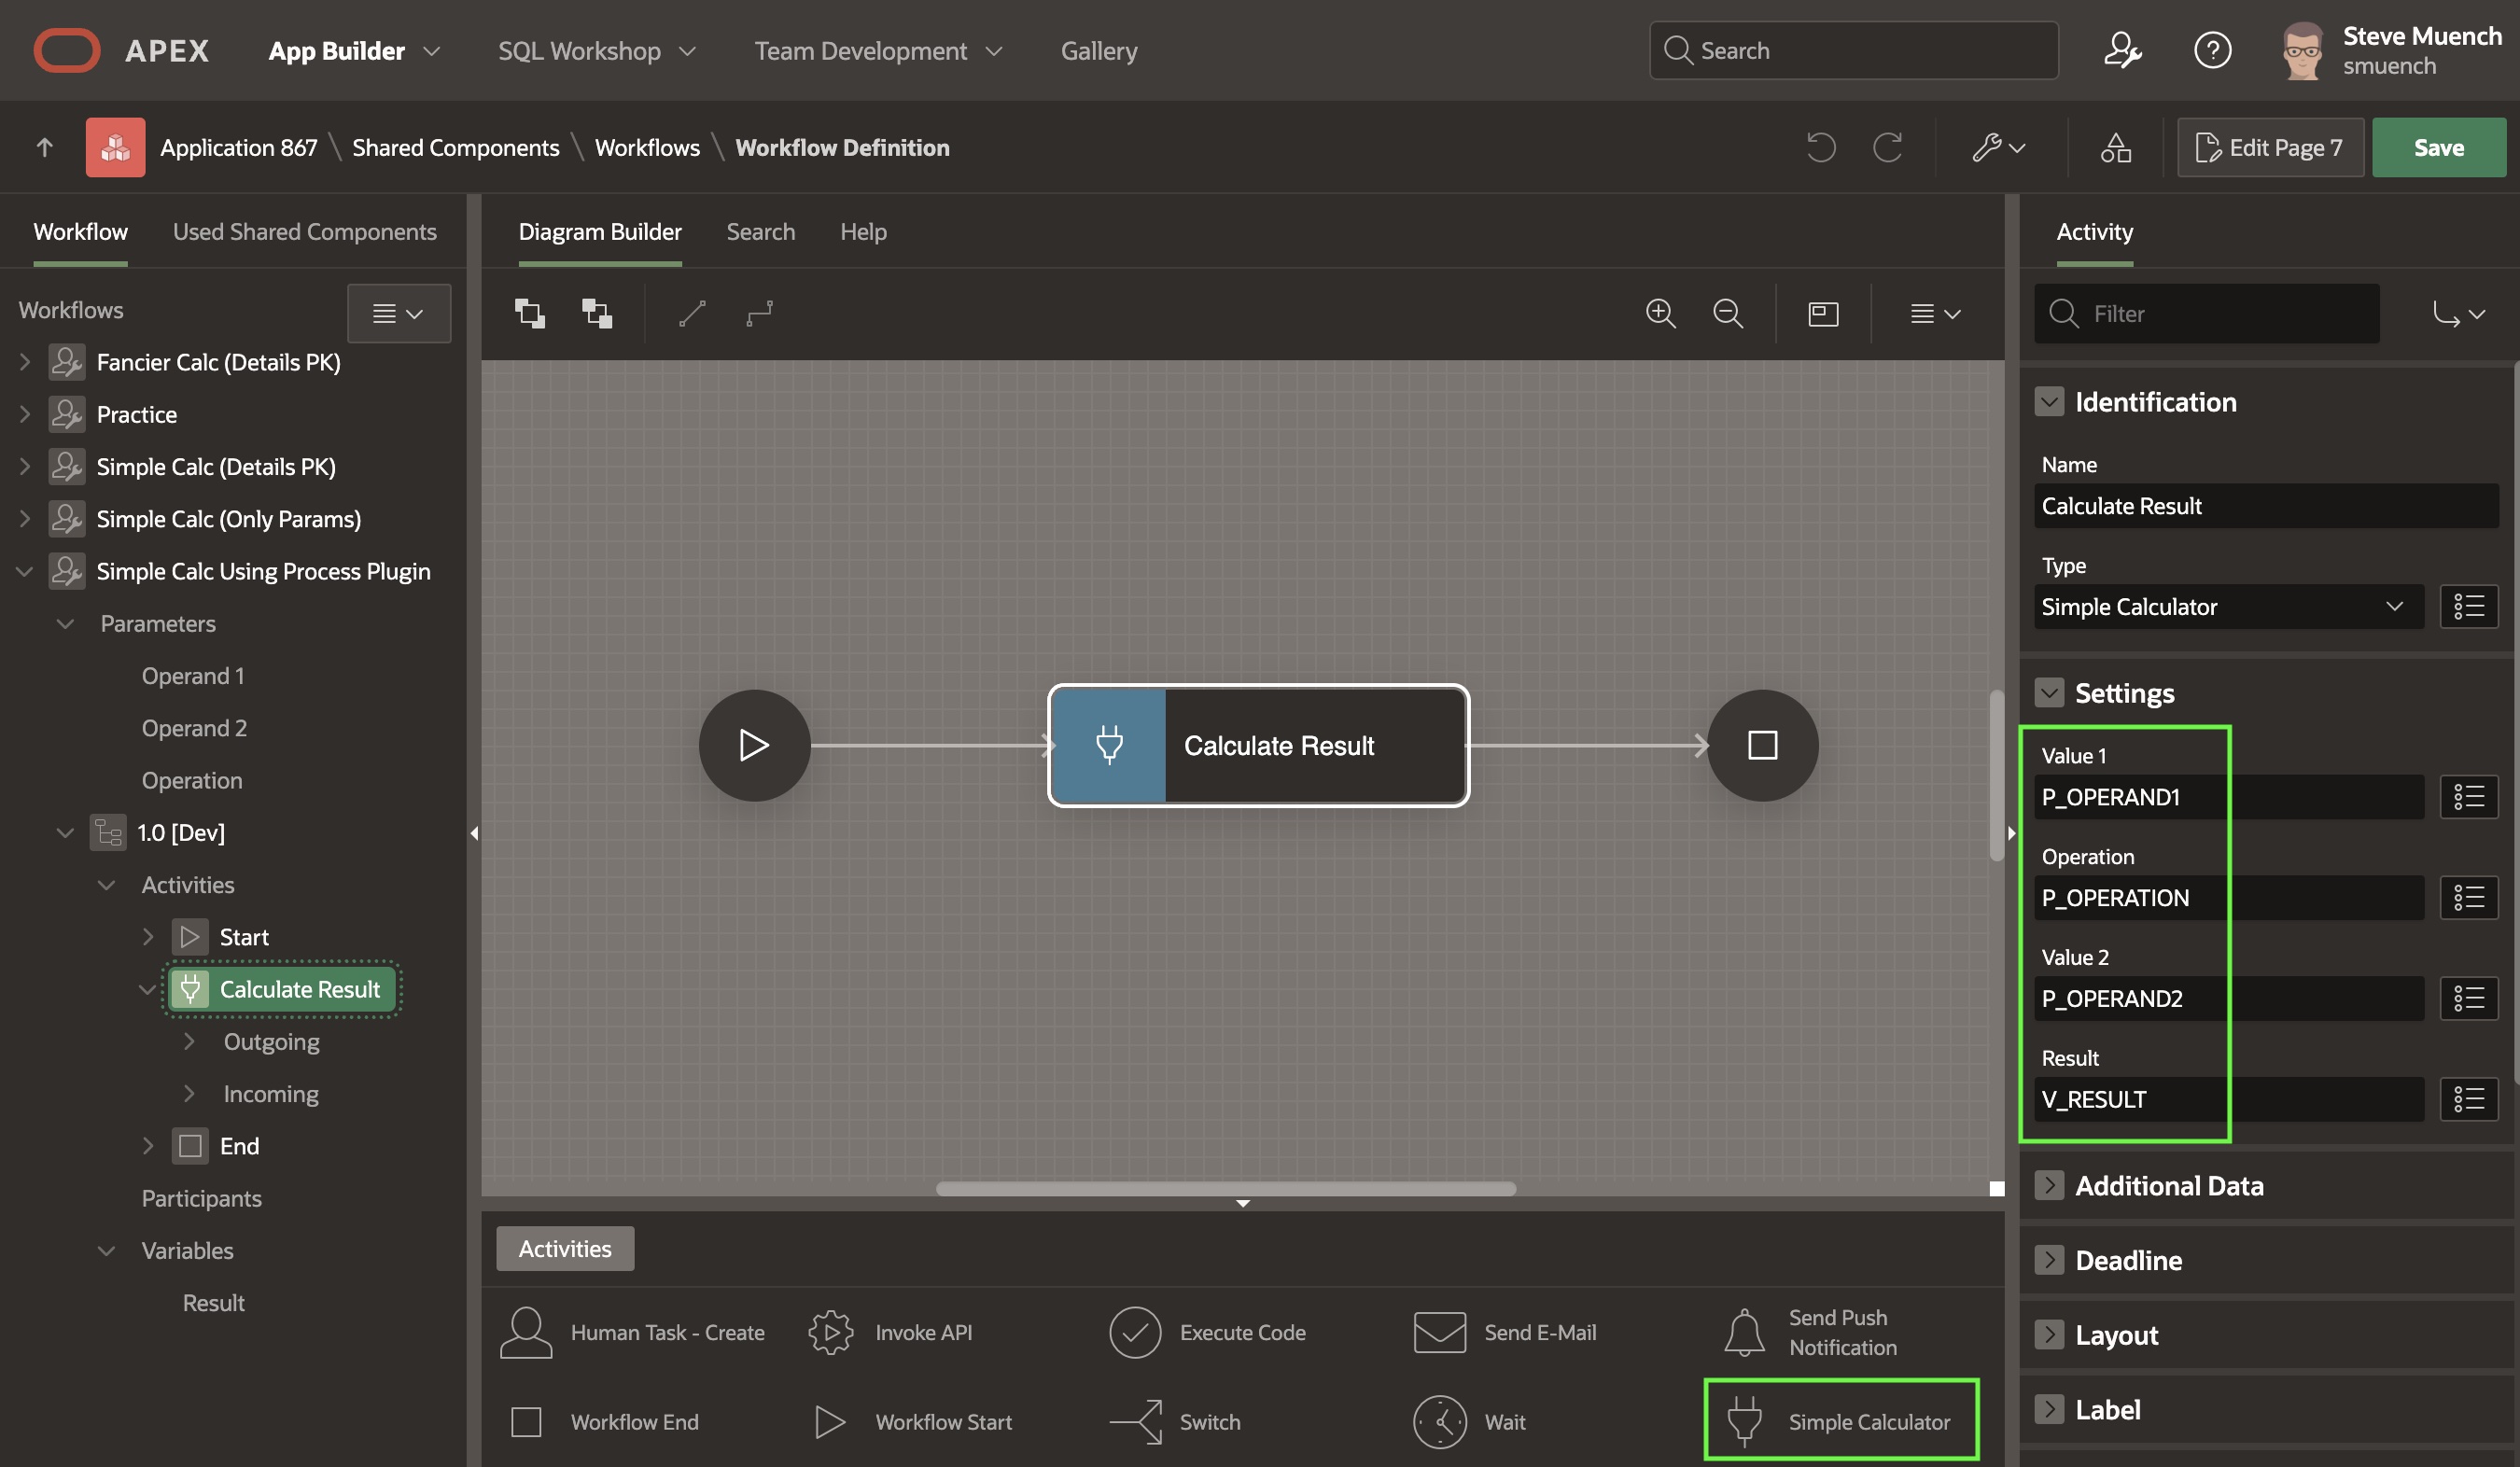
Now we have a workflow with a Details Primary Key Item value being passed in for the built-in APEX$WORKFLOW_DETAIL_PK parameter, and we’ve configured the Additional Data on the workflow version so APEX knows to which column in what table this primary key parameter value applies. This combination produces an interesting benefit. The APEX engine will automatically make all column values available by name for the appropriate EBA_DEMO_CALCULATION table row for the duration of the workflow. This lets us easily refer to the value of the first operand using its OPERAND1 column name, the second operand using OPERAND2 and the operation to perform using the column name OPERATION. As shown below, I’ve configured the parameters of the Calculate Result Invoke API activity in the workflow using these column name values.
Using details table column names for EBA_DEMO_CALCULATION row associated with the workflow
The second activity Store Result is another Invoke API activity that calls the UPDATE_RESULT procedure in the EBA_DEMO_SIMPLECALC package to store the computed result in V_RESULT back into the RESULT column of the appropriate EBA_DEMO_CALCULATION table row. For procedure parameter p_calculation_id it passes the item value APEX$WORKFLOW_DETAIL_PK and for parameter p_result it uses the V_RESULT item’s value.
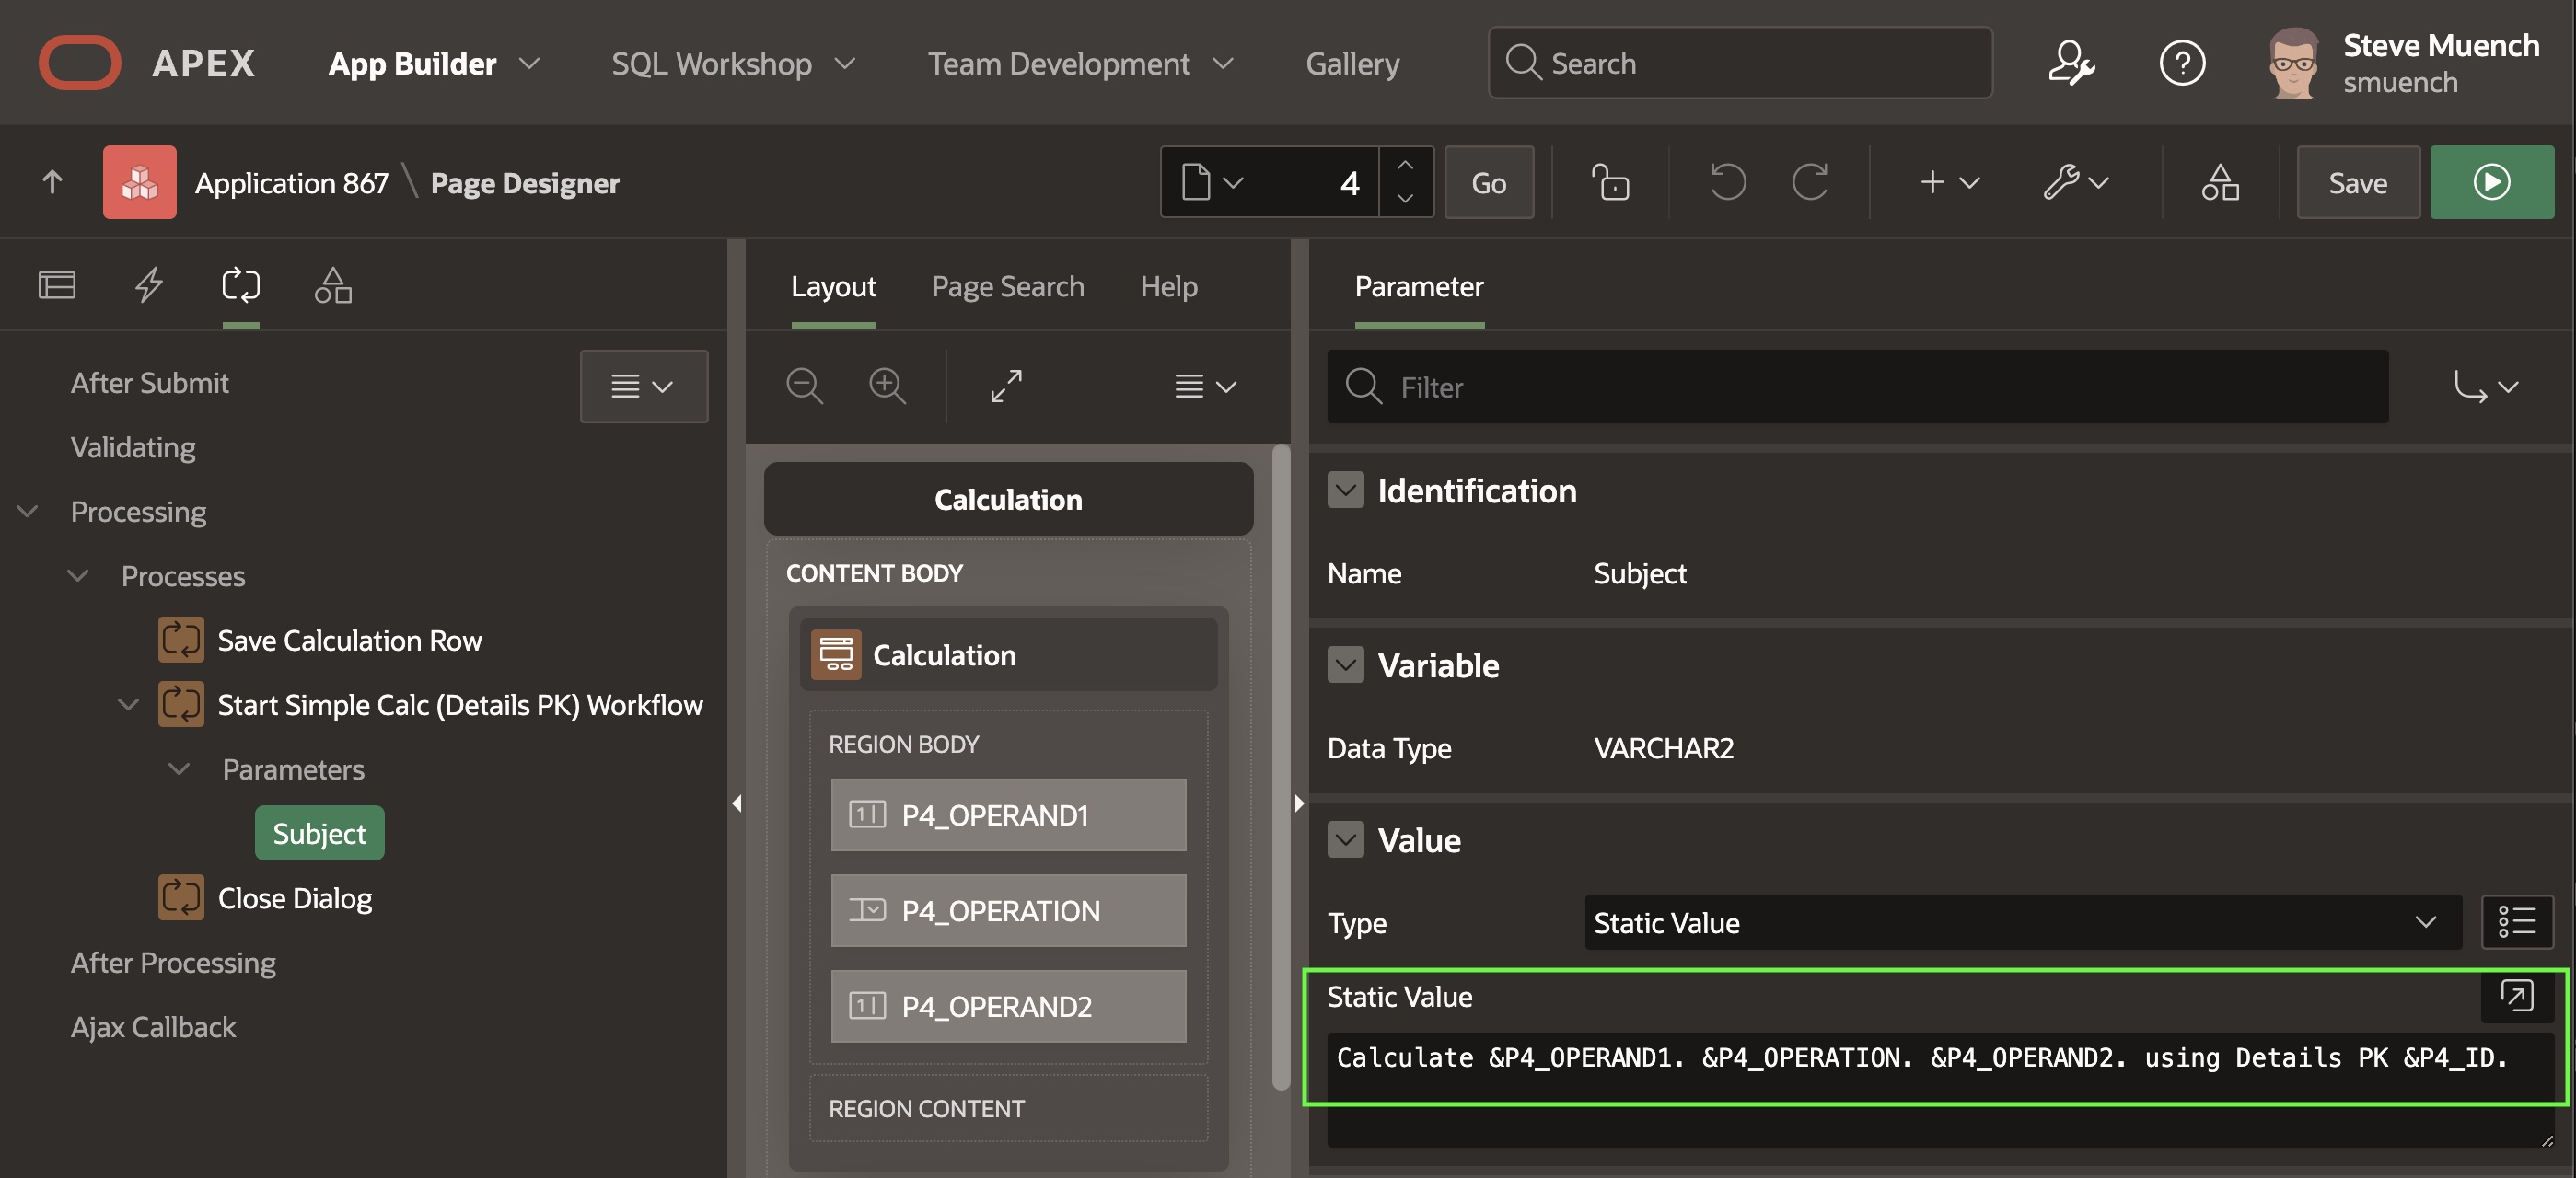
Also notice that I introduced a single P_SUBJECT parameter (with label Subject) to let the page that starts the workflow pass in the entire subject line value. I did this since the workflow title cannot reference the workflow version-level values like variables or details table column names as substitution variables. By introducing the P_SUBJECT parameter and configuring the workflow title to be &P_WORKFLOW. I can easily set the workflow instance subject line to a useful value including dynamic contents in the page that starts the workflow instance to perform the calculation.
The figure below shows how the value of the P_SUBJECT parameter is set in the Calculation page’s workflow start page process. It includes the values of page items to achieve an appropriate subject, which the new workflow instance uses as its title.
Configuring dynamic content of the workflow P_SUBJECT parameter using page items values
I then used the new Calculations interactive report page and clicked (Create) to open the Calculation form to add a new calculation row. I entered the values shown below and clicked (Calculate Using Workflow). This inserted the new EBA_DEMO_CALCULATION row, started the workflow passing in the system-assigned primary key in P4_ID as the details primary key value, and closed the dialog.
Creating a new calculation row, with result computed by a working using a Details PK
When the dialog closes, I saw the page below. The workflow ran so quickly that it had already computed the result of 80 and stored it in the EBA_DEMO_CALCULATION row’s RESULT column using the details primary key value to identify which calculation row to update.
Calculations interactive report page after first Calculation row got created
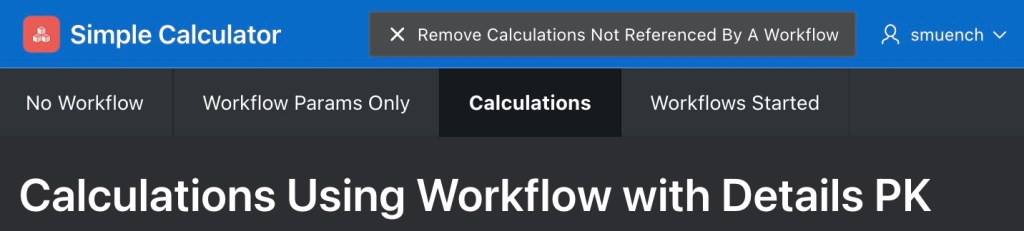
Checking the Workflows Started page, I could also inspect the details of the workflow instance using that approach as shown below. I added the Details Primary Key collapsible region to the Workflow Details page to make it easier to see which details primary key value is associated to the current workflow instance being shown. As we see, the system assigned a primary key value of 1 to the first EBA_DEMO_CALCULATION row created. Our page passed it into the APEX$WORKFLOW_DETAIL_PK built-in parameter at workflow start time. It also passed in the workflow’s P_SUBJECT parameter, whose value included the substitution variable &P4_ID. so the primary key value 1 also reflects in the title of the workflow instance.
Viewing the completed workflow instance that used a details primary key for the calculation
Adding Some Fancier Features
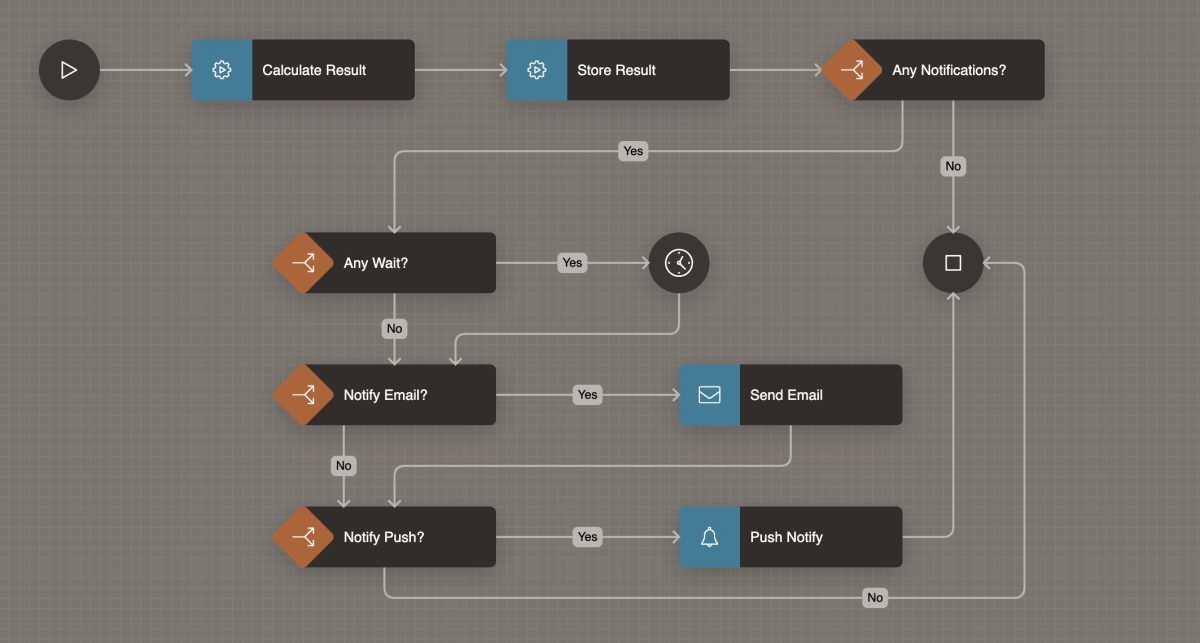
With these basic examples under my belt, I spent some time to create a fancier version of the details-primary-key-using workflow above. In the sample app it’s called Fancier Calc (Details PK) and it appears below. It expands on the previous example by adding conditional notification of the result by email and/or by push notification. This required adding a few new parameters to let the page starting the workflow pass in: the current username, an email address to notify, a number of minutes to delay before notifying, and a boolean parameter to control whether to notify the current user using push notification.
Gettin’ fancy wit it: adding conditional email, push notification, and wait to a workflow
It uses several new Switch activities to change the route of the workflow depending on various conditional evaluations. The Any Notifications? switch uses a PL/SQL expression to test whether :p_email_to_notify is not null or whether :p_push_notify_current_user is equal to ‘Y‘. The Any Wait? switch checks if :p_minutes_delay_before_notify is non-null and greater than zero (0). The Notify Email? switch tests if :p_email_to_notify is not null, and the Notify Push? switch evaluates if :p_current_username is not null and :p_push_notify_current_user equals ‘Y‘.
Notice that even though this last parameter is defined to be of type BOOLEAN, when referencing its value in PL/SQL or as a substitution parameter it will use the implicit or explicitly configured True Value and False Value as text. I chose to explicitly configure these values to ‘Y‘ and ‘N‘ respectively in the Property Editor for the Push Notify Current User parameter. I configured the Send Email activity using the &P_EMAIL_TO_NOTIFY. email address as the recipient, and the Push Notify activity using the &P_CURRENT_USERNAME. as the user to notify. Also notice the transition lines that emerge from the Switch activities have names on them. I chose to use “Yes” and “No” for the names of all of them, but of course you can use any descriptive names that make your workflow easier to maintain.
Consequently, I also enhanced the Calculation page to let the user choose between the simple or fancier workflow, as well as providing additional values if they choose to use the fancier version as shown below. Hopefully if you try out sample app, you can experiment using the fancier option to send yourself email and push notifications.
Enhanced Calculation page allowing either simple or fancier workflow choice
NOTE: If you install the sample app and try it yourself, make sure to (1) regenerate the Push Notification Credentials after importing the app and (2) opt-in to receive push notifications in the user settings page of the runtime application. You’ll find the (Regenerate Credentials) button in APEX Builder’s Shared Components > Progressive Web App page. The push notification opt-in is in the Settings page you can access in the dropdown menu under the logged-in username at runtime.
Why Pass in Current Username?
You may ask yourself why I needed to pass in the value of the current username as a workflow parameter, and that would be an excellent question! I originally tried to get the Push Notification activity working by simply referencing the familiar &APP_USER. substitution variable. But I frustratingly found it would never deliver the notification as expected. After reaching out to colleagues for advice, they reminded me the workflow is happening in the background and is always operating as the nobody user, which is the value of &APP_USER. when no user is logged in.
Therefore, my experiments to send a push notification to the nobody user were ignored since no user named nobody was enrolled in receiving push notifications. By passing in the p_current_username parameter value from the Calculation page, its value at workflow start time gets evaluated in the context of the page starting the workflow. This gives the workflow parameter the correct value of the end-user logged in using the page. Subsequently, the Push Notification activity’s use of &P_CURRENT_USERNAME. as the recipient of the push notification ensures it gets delivered to the logged-in user accessing the page that starts with workflow if they have opted-in to receive notifications.
NOTE: I subsequently realized I could have avoided passing in the current username in my simple example app by instead using the built-in workflow substitution string APEX$WORKFLOW_INITIATOR as the push notification recipient username. However, I decided to leave the sample they way it is in case the user to be notified by push notification is not the same username that starts the workflow in the application. Just be aware that APEX already keeps track of the username of the workflow initiator using this special item name.
Using SQL Query for Additional Data
In the Simple Calc (Details PK) workflow discussed earlier, we configured the Additional Data section of the workflow version to name the EBA_DEMO_CALCULATION table and its ID primary key column. This let the automatic row lookup work based on the Details Primary Key Item value passed in the APEX$WORKFLOW_DETAIL_PK parameter by the Workflow page process that started the flow. In turn, that allowed us to reference any of the columns of the EBA_DEMO_CALCULATION table by name anywhere in the workflow as needed. The Fancier Calc (Details PK) workflow shows off another useful alternative: using a SQL Query instead of a table name for Additional Data.
It specifies the following query that references the value of the :apex$workflow_detail_pk in its WHERE clause. Since the automatic lookup by primary key is not happening in this situation, the developer is responsible to perform the primary key lookup in their query using this built-in bind variable.
select id,
operand1,
operation,
operand2,
case operation
when '+' then '+'
when '-' then '-'
when '*' then '×'
when '/' then '÷'
end as operation_translated
from eba_demo_calculation
where id = :apex$workflow_detail_pk
Just like what happened when using the table name and primary key column approach, all of the SELECT list column names in the Additional Data query are made available to reference throughout the workflow wherever needed. In the sample app, the Send Email activity references the value of the OPERATION_TRANSLATED column above by using &OPERATION_TRANSLATED. This lets your workflow perform a join or use the power of SQL to bring in whatever useful data might be relevant to every activity in the workflow. Each activity in the workflow also has an optional Additional Data query you can use to retrieve information that’s only relevant to a single activity.
NOTE: When using the SQL Query style Additional Data, if your query inadvertently retrieves no rows, then your workflow will fault with a “user-defined error” message, so be aware that this is what that error means. One way I encountered this error while creating the sample app was by accidentally using a bind variable named :apex$workflow_details_pk (with a plural “details” in the name when it needed to use the singular “detail”). Since no bind variable by this name-with-a-typo exists, its value evaluated to null and that caused my Additional Data SQL query to return no rows.
Cleaning Up Dev-Mode Workflow Instances
The apex_workflow package comes with a handy procedure called remove_development_instances() that lets you delete workflow instances you created during your development. It accepts an optional p_application_id parameter to provide the ID of the app whose dev-mode workflow instances you want to delete. If you don’t pass an app id, it cleans up the dev-mode workflow instances for all applications in the workspace. I added a button shown below to the Workflows Started page in the sample app that invokes this new procedure, passing in the :app_id bind variable to affect only the workflow instances for the current sample application.
Handy button in the sample to clear development-mode workflow instances for the current app
On the Calculations list page, as shown below I added another button that deletes the rows from the EBA_DEMO_CALCULATION table that are not referenced by a workflow.
Useful button to remove calculation rows not referenced by a workflow
Using the combination of these two buttons, you can first delete the dev-mode workflow instances you have accumulated while trying out the sample. Then you can click the other button to remove the calculation rows that no longer reference a workflow (since you just deleted them in the step before!).
NOTE: While the simple example workflows in this article are not using approval or action tasks, one interesting corollary of the new remove_development_instances() procedure is that it will also clean up any approval or action task instances that were initiated by the deleted dev-mode workflows.
Tips on Moving & Connecting Activities
While exploring the workflow capabilities to prepare this article, I gradually became more confident in how to achieve a nice-looking diagram with neatly aligned activities and transition lines that looked how I wanted them to. It took time to discover the way that felt most productive, so I wanted to share what I learned here in case it could save you some time. The video below puts the following tips into action, showing how to:
Drag and drop an activity from the palette
Grab the arrowhead to reattach a transition
Use anchor dots to position a line
Add and remove “elbow” points to bend lines
Create and connect activities in one gesture
Multi-select to move groups of activities
Drop a new activity between two others
Video with tips to achieve clean layouts with Oracle APEX Workflow Diagram Builder
Creating a Custom Activity
As a last exercise, I wanted to try extending the core set of APEX workflow activities to add a custom one into the mix. Sticking with the simple calculator theme, my goal was to create a Simple Calculator activity that any APEX Workflow could use. I started by creating a process type plug-in, and made sure to check the Workflow Activity checkbox in the Supported for section. I defined four plug-in attributes to capture the (page or workflow version) item names to provide Value1, Operation, Value2, and Result. To make it self-contained, I copied the source of the compute() function from the beginning of this article into the plug-in’s PL/SQL code area, and also added the following function whose name I configured as the plug-in’s Execution Function Name:
The code uses the v() and nv() functions to retrieves the string and number values of the items named by the first three custom attributes. From the fourth custom attribute, it gets the name of the item into which the result should be set. Finally it uses the set_value() function in the apex_session_state package to set the value of the result item to the result returned from the compute() function.
With this simple custom activity plug-in ready, next I created the Simple Calc Using Process Plugin workflow you see below. Notice how the custom activity Simple Calculator automatically appears in the Activities Palette. To configure it, I used the Property Editor to assign the names of the workflow parameters to use for Value 1, Operation, and Value 2 attributes, and the name of the version variable to use to hold the result.
Workflow using a custom Simple Calculator activity we created above
A new Workflow Process Plugin page is a slight modification of the Workflow Params Only page we created earlier, but its Workflow page process starts the new Simple Calc Using Process Plugin workflow instead.
Sample page to create new workflow instance using the Simple Calc Using Process Plugin workflow
After trying out the new page, a quick check of the Workflows Started console page shows the results of all of our tests during this article.
Workflows Started page showing all workflows we tried in this article
Summary
Of course, you’d never really use APEX workflow to just add two numbers, but hopefully this simple exercise that I found helpful to learn the basics will also prove useful to you as you think about real-world business processes you can now automate with ease.
I encourage you to download the sample app from here and give it a spin. After importing the app, there are two additional setup steps to perform before the push notification will work. First, regenerate the Push Notification Credentials. In addition, ensure you have opted-in to receive push notifications in the user settings page of the runtime application. You’ll find the (Regenerate Credentials) button in APEX Builder’s Shared Components > Progressive Web App page. The push notification opt-in is in the Settings page you can access in the dropdown menu under the logged-in username at runtime. Also check that your mobile device or desktop is not set in “do not disturb” mode that suppresses delivery of push notifications. If it was in this mode, you’ll find your push notifications have quietly accumulated in the “notification center” on your device.😊