Approval Tasks in your APEX workflows have two built-in outcomes, either APPROVED or REJECTED. If your flow needs custom outcomes, use an Action Task with an updateable task parameter instead.
The sample app in this article lets the user assigned to the task click an (X), (Y), or (Z) button to indicate their custom response. Then the workflow uses Switch activities to perform different work depending on the task outcome.
The sample app you can download from here contains a home page that lets you start a workflow, and delete any development workflows you might have created for testing.
Sample App Home Page Lets You Start and Delete Workflow Instances
Additional Wizard-Created Pages
The sample also contains a My Tasks page I generated with the Create Page wizard by choosing Unified Task List and picking the context of My Tasks. It shows the user open tasks assigned to them. I also created the Workflows page using the same wizard, by picking Workflow Console instead.
In both the My Tasks page and the Workflows page, I made one minor change to the SQL query of the generated page’s Content Row region. I simply uncommented the ,p_application_id => :APP_ID parameter to pass the current application ID to the apex_human_tasks.get_tasks pipelined table function returning the data to display. Otherwise, by default the pages show tasks and workflows from all applications in the workspace.
For example, in My Tasks, in the SQL query of the Content Row region, I deleted the two hyphens that initially appeared in the the line:
--,p_application_id => :APP_ID
This two-character deletion made it look like this:
select task_id,
task_type,
⋮
badge_state
from table ( apex_human_task.get_tasks (
p_context => 'MY_TASKS',
p_show_expired_tasks => :P6_SHOW_EXPIRED
, p_application_id => :APP_ID /* <- */
) )
I made the same change to the Workflows page’s Content Row region to the apex_workflow.get_workflows function returning workflow instance data. These two changes make the pages show only the tasks and workflows for the current application.
Overview of the Workflow Definition
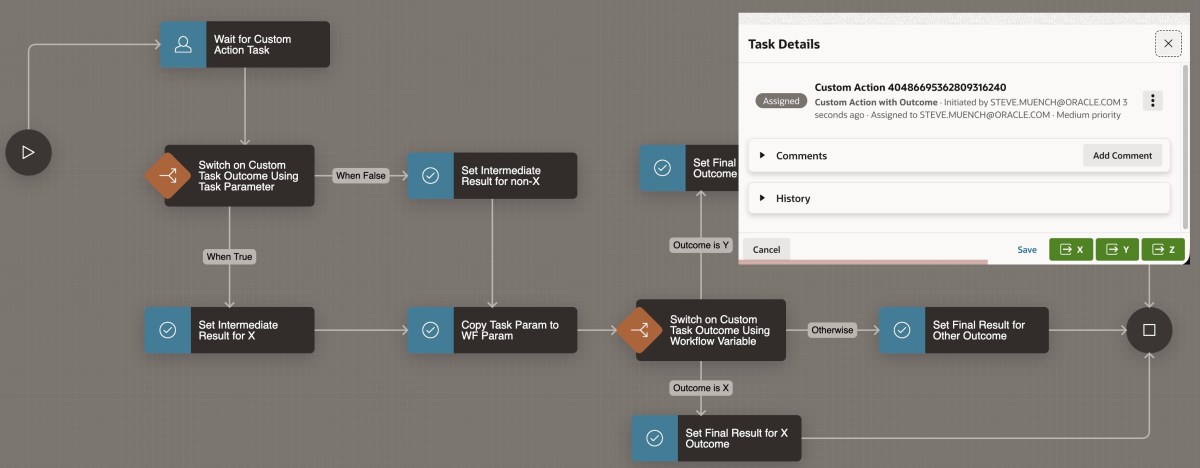
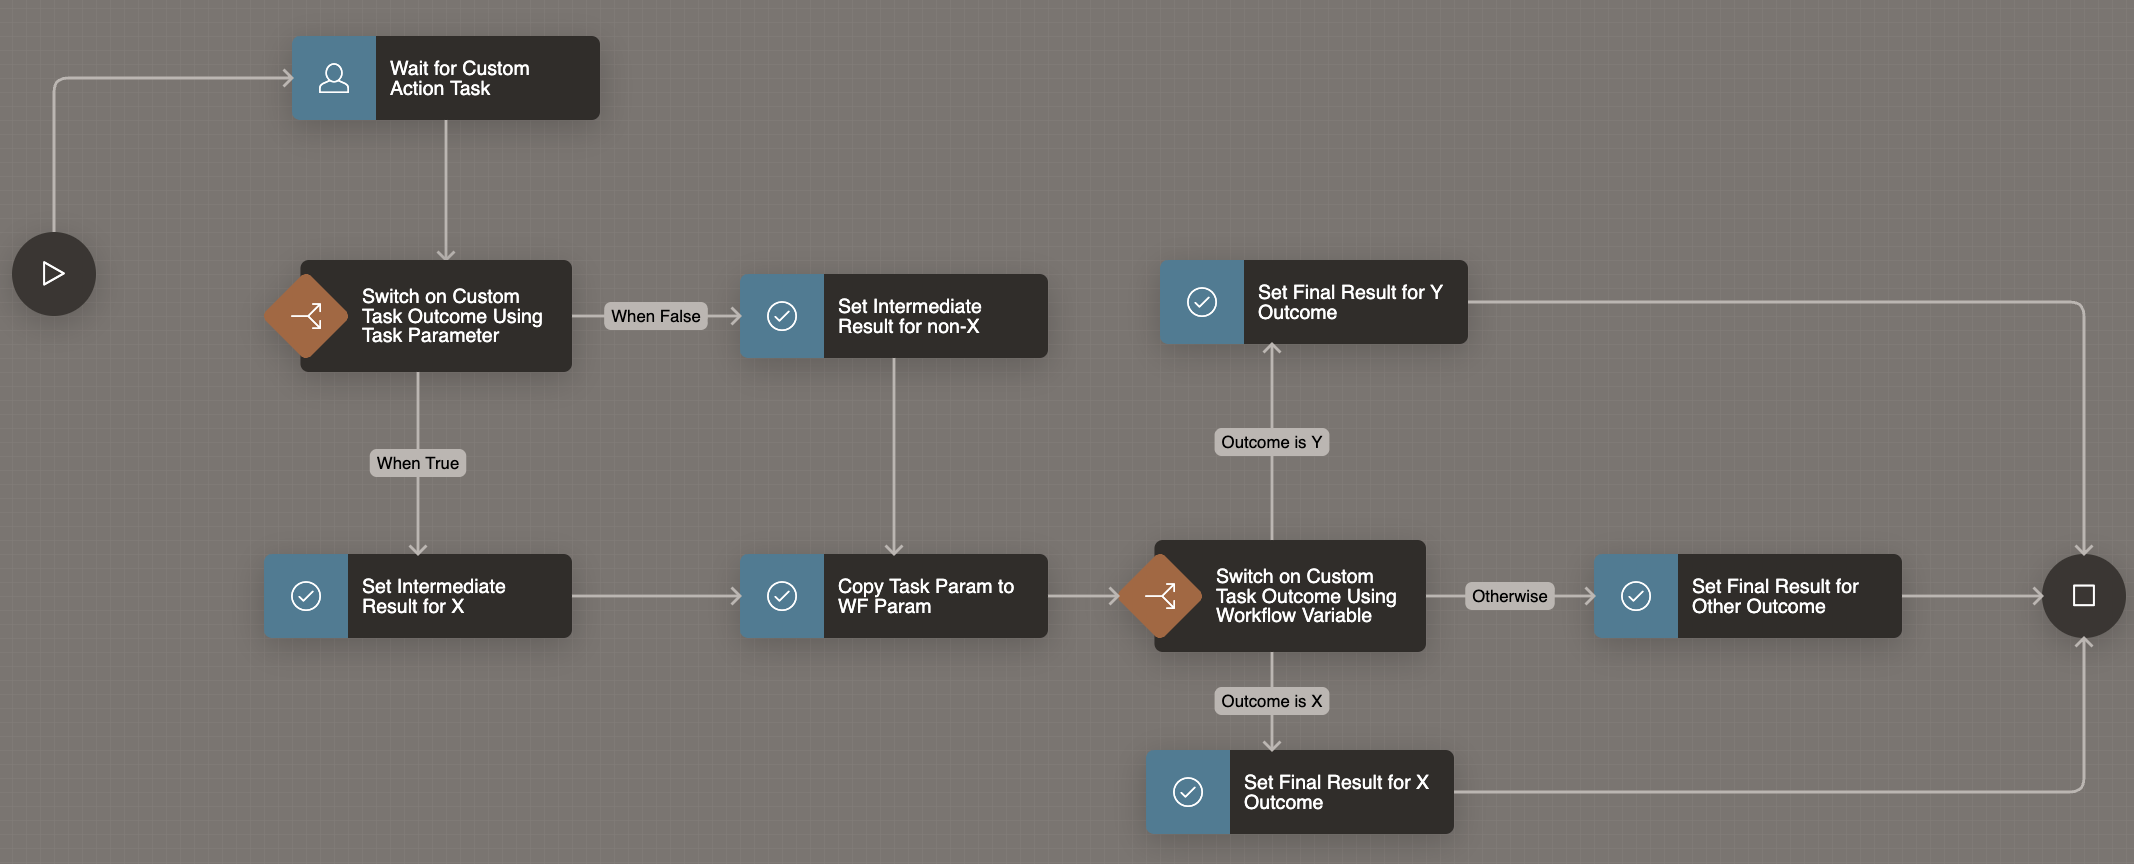
The workflow definition shown below waits for an Action Task, passing the APEX$WORKFLOW_INITIATOR built-in workflow variable value as the Task Initiator. Then the flow uses different Switch activities to take different paths depending on the task’s custom outcome. In this example, the different outcome values simply assign different values to two workflow variables INTERMEDIATE_RESULT and FINAL_RESULT, but in your own workflows the paths can contain any activities you need.
Workflow Waits for Action Task, then Uses Switch Activites to React to Custom Outcome Value
Key Ingredients of the Action Task
When I created the task, I noted that the default task type is Approval Task. You can’t change the task type later, so it’s important to pick Action Task up front.
To keep the example simple and runnable as a single developer, I configured the action task to use the :APEX$TASK_INITIATOR expression as both the Potential Owner and the Business Administrator. Of course, in your own apps you can use any participants that are appropriate.
The task definition also contains one updatable task parameter named OUTCOME as shown below. There is nothing special about choosing this name: in practice, use any name you like.
Action Task Definition Uses Expression-type Participants and an Updatable OUTCOME Parameter
Customizing the Task Details Page
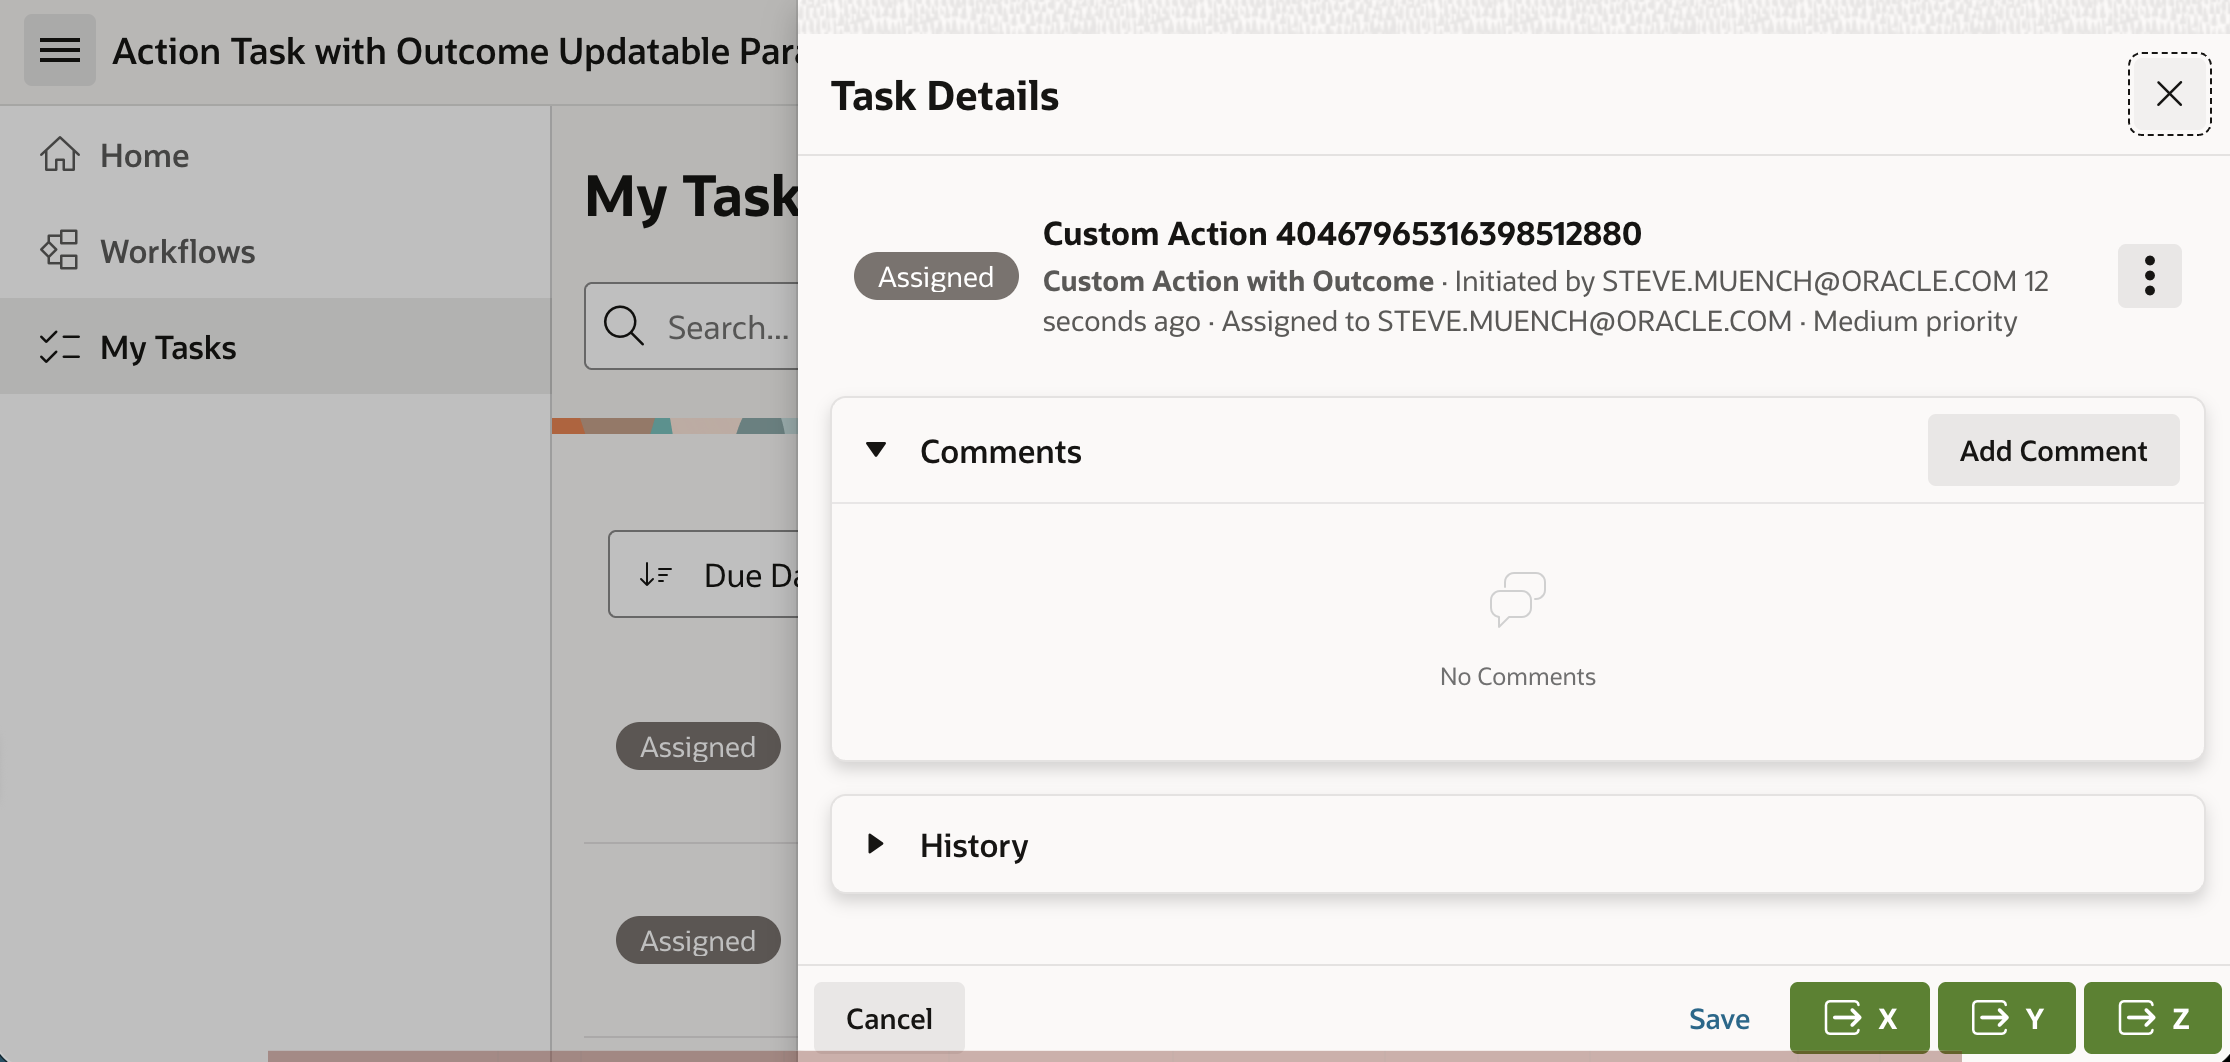
I clicked the appropriate button in the Task Definition edit page to automatically generate a task details page. Then, I modified it in Page Designer to remove the default action task (Complete) button.
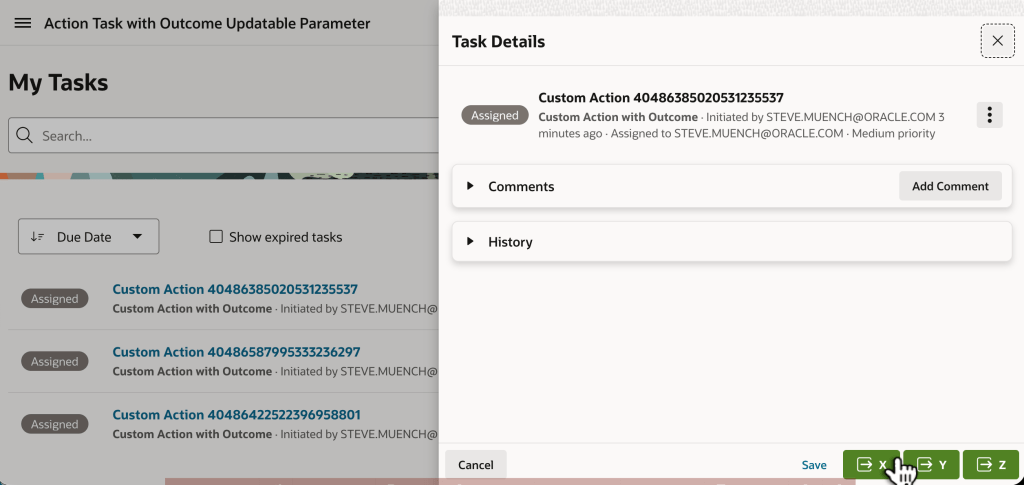
In its place, I added (X), (Y), and (Z) buttons to represent three custom outcomes named X, Y, and Z. They each simply submit the page using button names OUTCOME_X, OUTCOME_Y, and OUTCOME_Z respectively.
Customized Task Details Page Has (X), (Y), and (Z) Buttons That Submit the Page
Adding Custom Declarative Business Logic
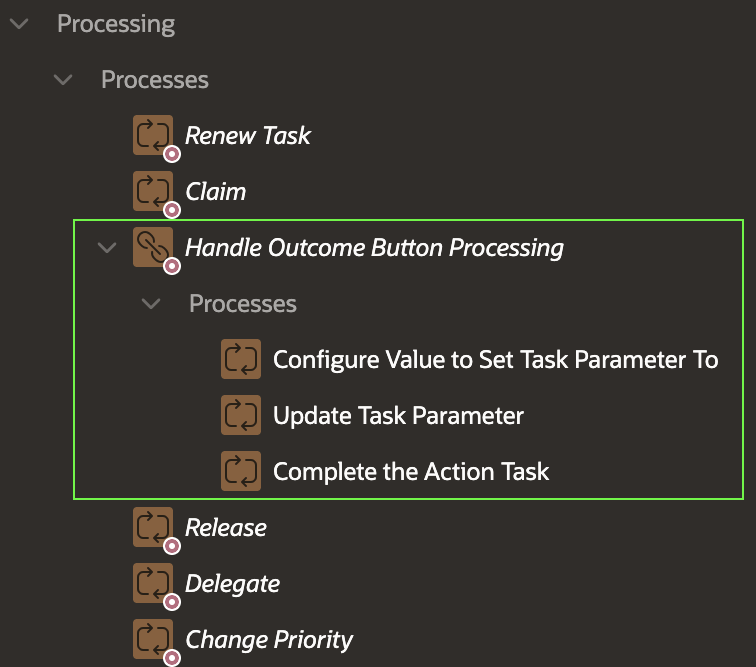
I added a new Execution Chain to the task details page’s Processing section to group the logic that runs when the user presses any of the buttons named OUTCOME_X, OUTCOME_Y, or OUTCOME_Z. It has the Server-side Condition to only run if the REQUEST value –reflecting the submitting button name – is contained in the string:
|OUTCOME_X|OUTCOME_Y|OUTCOME_Z|
This condition ensures the chain’s child processes only run if the user presses one of the custom outcome buttons. The execution chain’s Run in Background switch is off, so when they run, they happen immediately in the current user session during page submit processing.
The Execution Chain contains three child processes shown below that run in order:
Configure Value to Set Task Parameter To
Update Task Parameter
Complete the Action Task
Execution Chain Groups Conditional Business Logic with a Common Condition
Configuring the Business Logic
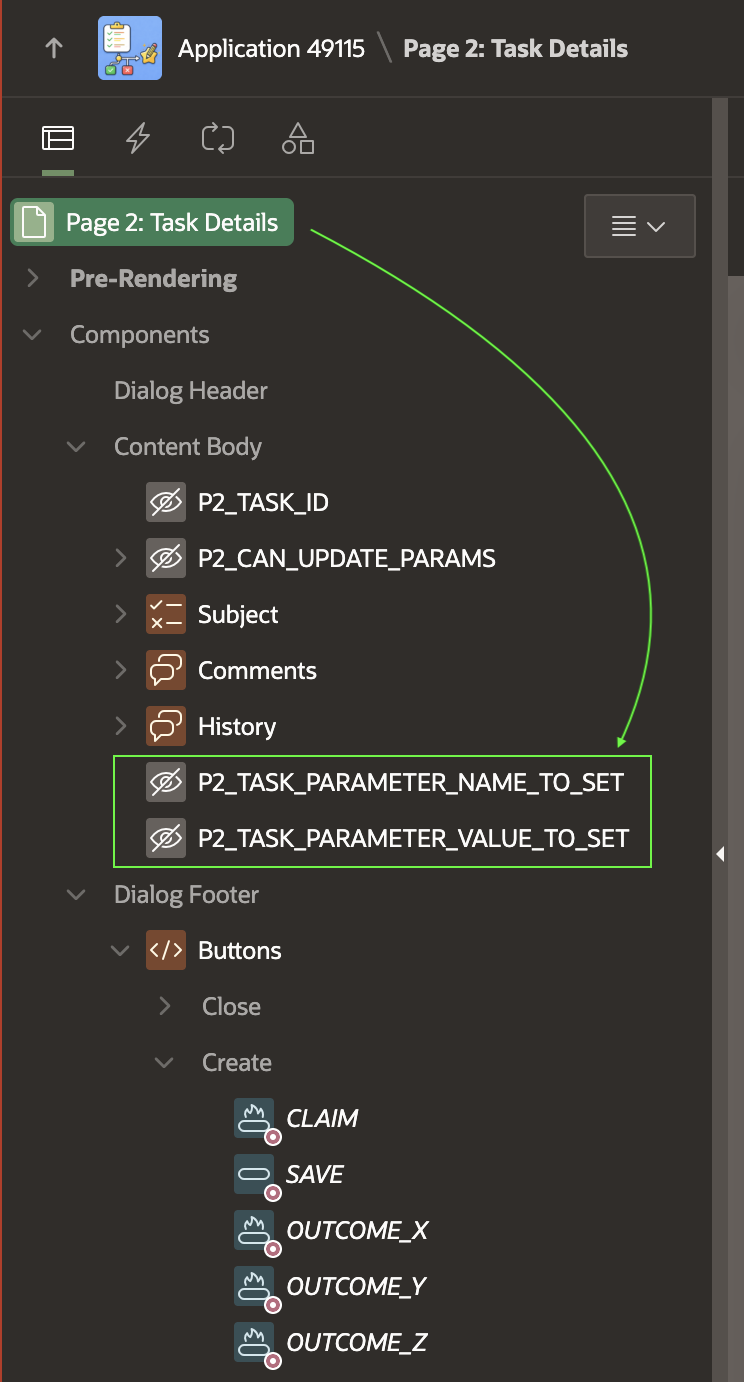
The Update Parameter feature of the declarative Human Task – Manage page process expects the name of the task parameter to be stored in a page item. It also expects the parameter value to come from a page item. So, I’ve added two hidden page items shown below for that purpose. I set their Storage to In‑Memory Only so their values don’t persist across page visits:
P2_TASK_PARAMETER_NAME_TO_SET
P2_TASK_PARAMETER_VALUE_TO_SET
Hidden Page Items Provide Update Parameter Name and Value
Since we want to set the task parameter named OUTCOME, the P2_TASK_PARAMETER_NAME_TO_SET has a static default value: OUTCOME
The initial Configure Value to Set Task Parameter To child process in the chain is an Execute Code process that sets the value that we want to assign to the task parameter into the hidden page item:
:P2_TASK_PARAMETER_VALUE_TO_SET :=
case :REQUEST
when 'OUTCOME_X' then 'X'
when 'OUTCOME_Y' then 'Y'
when 'OUTCOME_Z' then 'Z'
end;
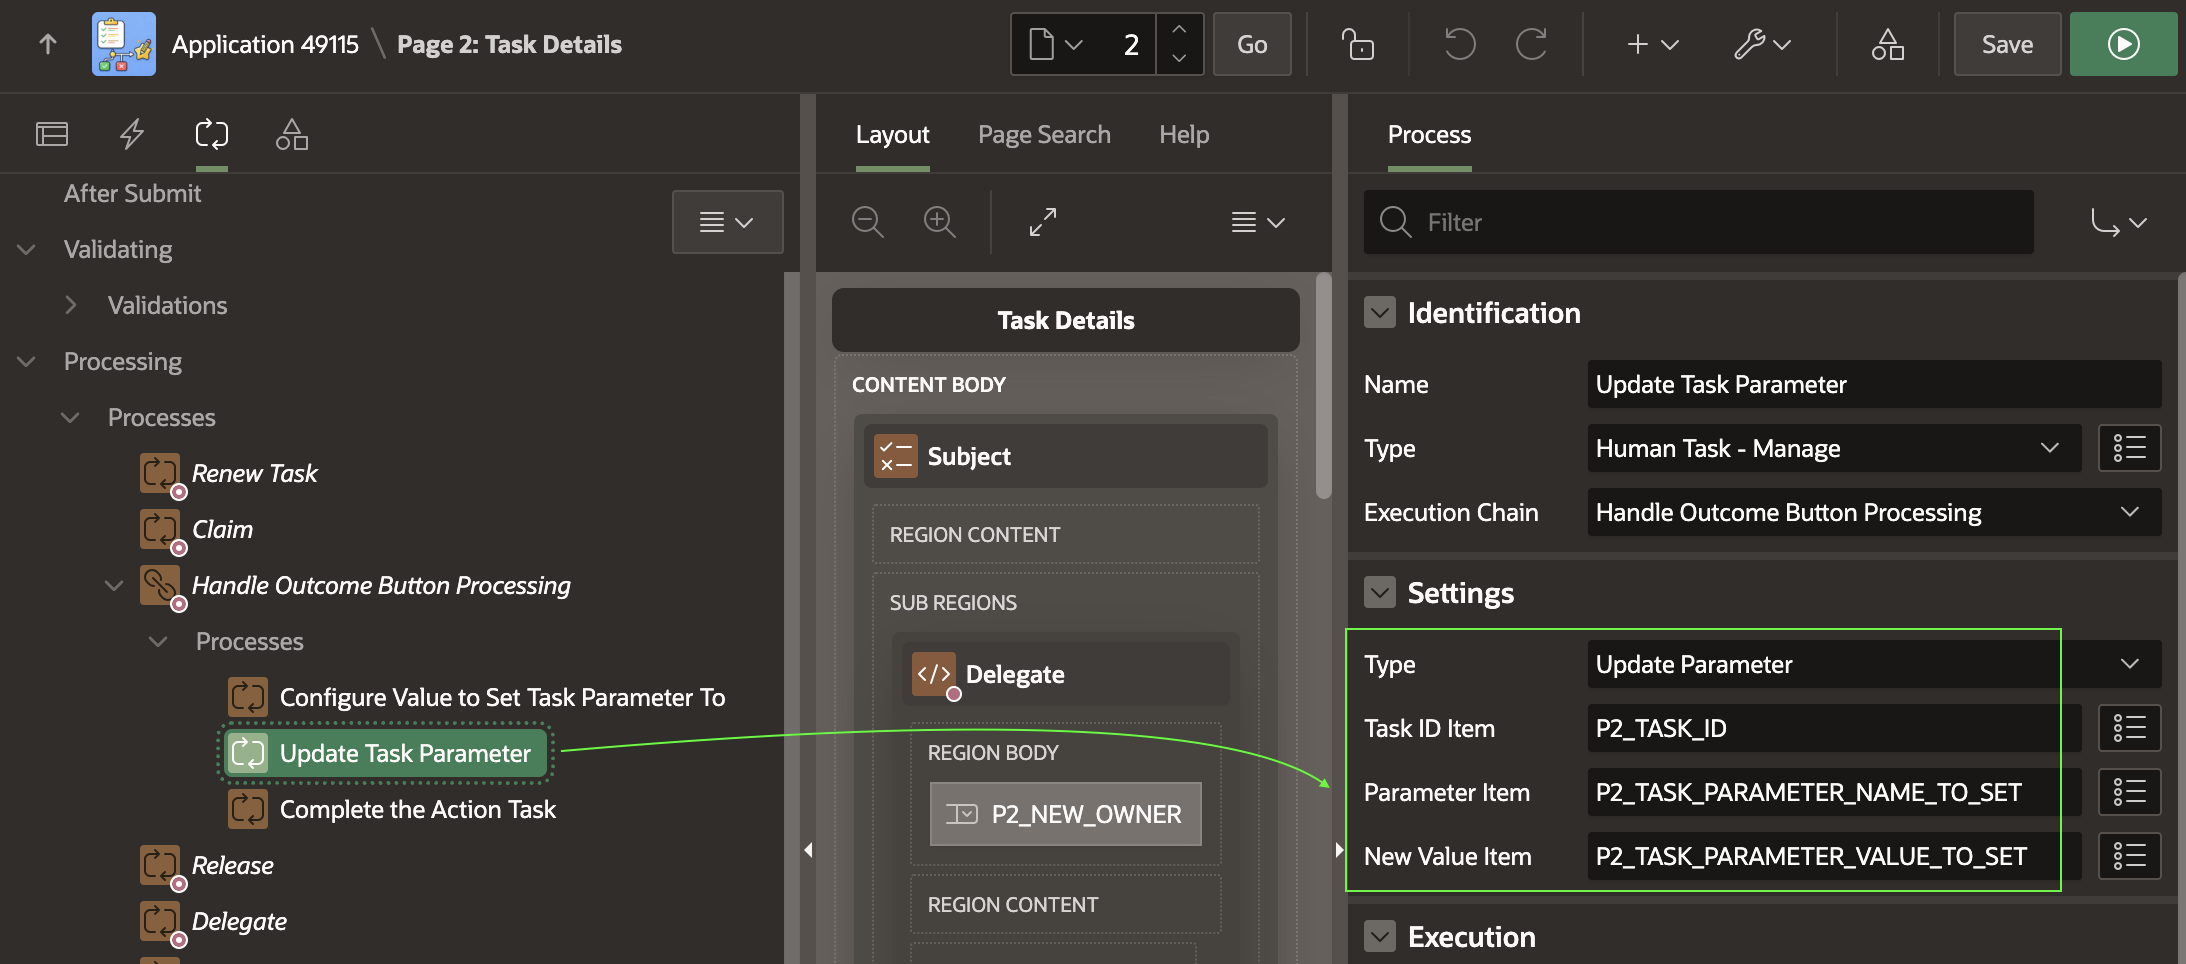
The second Update Task Parameter child process in the chain uses the declarative Human Task ‑ Manage page process, with type set to Update Parameter. It updates the parameter whose name is in P2_TASK_PARAMETER_NAME_TO_SET and whose value is in P2_TASK_PARAMETER_VALUE_TO_SET on the task instance whose ID comes from P2_TASK_ID.
Configuring the Update Task Parameter Page Process
Since the static value OUTCOME is in the name page item, and the dynamically assigned task parameter value is in the value page item, this configuration results in setting the OUTCOME updatable task parameter to either X, Y, or Z as determined by the first step in the execution chain above.
The final Complete the Action Task child process in the chain uses the Human Task ‑ Manage page process with type Complete (without Outcome) to complete the action task.
Switching Paths Based on Custom Outcome
In the workflow, you’ll find two different Switch activities.
One shows how you can reference the value of the task parameter directly using apex_human_task.get_task_parameter_value(:CUSTOM_TASK_ID,'OUTCOME')
I’ve used a “True/False” type switch using the boolean expression:
nvl(apex_human_task.get_task_parameter_value(
:CUSTOM_TASK_ID,'OUTCOME'),'@') = 'X'
The different True and False branches from the switch change course depending on whether the user provided an X outcome, or did not provide an X outcome.
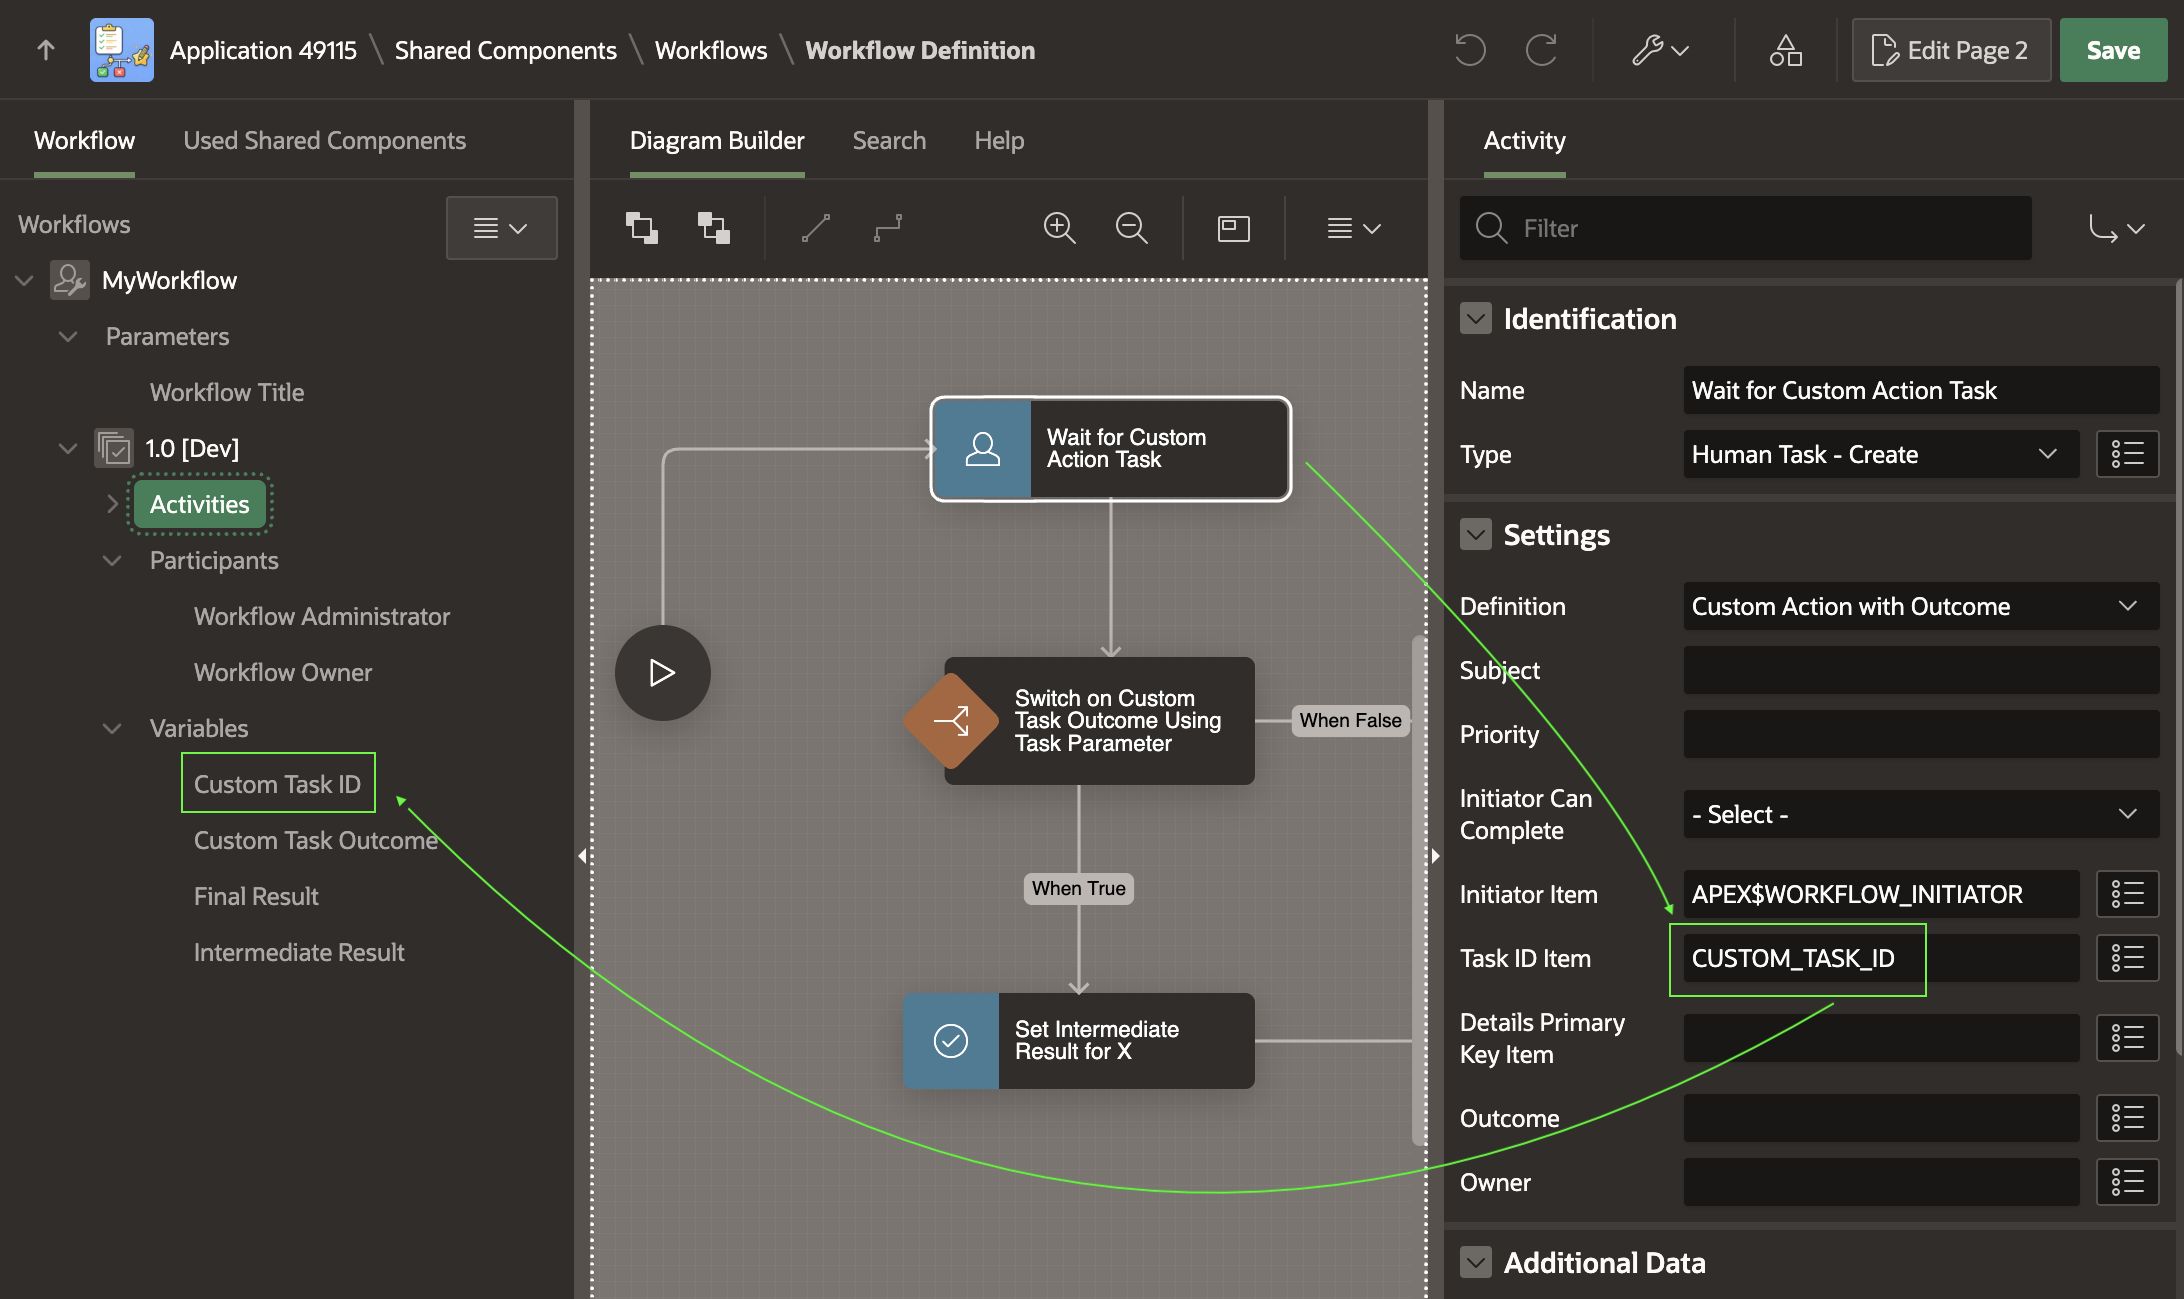
Here, the CUSTOM_TASK_ID is a workflow version variable I added and then used as the Human Task ‑ Create activity’s Task ID Item as shown below. This makes it store the task instance ID into the CUSTOM_TASK_ID variable when the task owner completes the task.
Configuring the Human Task – Create Activity to Store Task ID in a Variable
A second switch activity shows how you can switch on a workflow variable value if you first add an Execute Code activity to the workflow that assigns the workflow variable to the value of the OUTCOME task parameter.
Giving the Sample a Spin
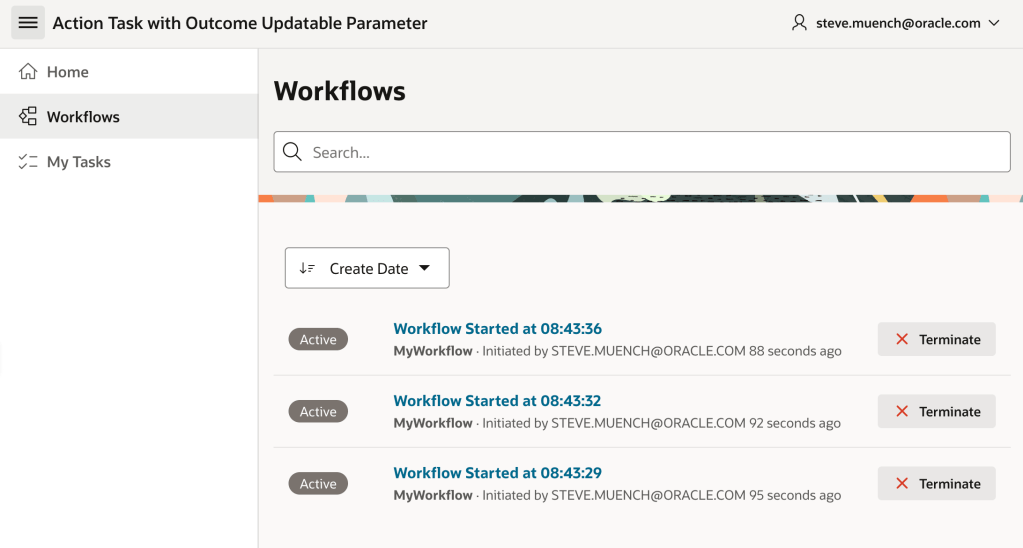
Try running the sample and creating three workflows by clicking three times on the (Start Workflow) button. Since the app configures the workflow title to include the current time, try waiting at least one second between button clicks so your three workflows have distinguishable titles.
In the Workflows page, you can see the three workflow instances you created.
Reviewing the Three Workflows You Created in the Workflows Console Page
Next, use the My Tasks page to respond to each of the action tasks assigned to you. In one each, try clicking the (X), (Y), and (Z) button.
Using the Task Details Page to Indicate Different Custom Outcomes for Each Assigned Task
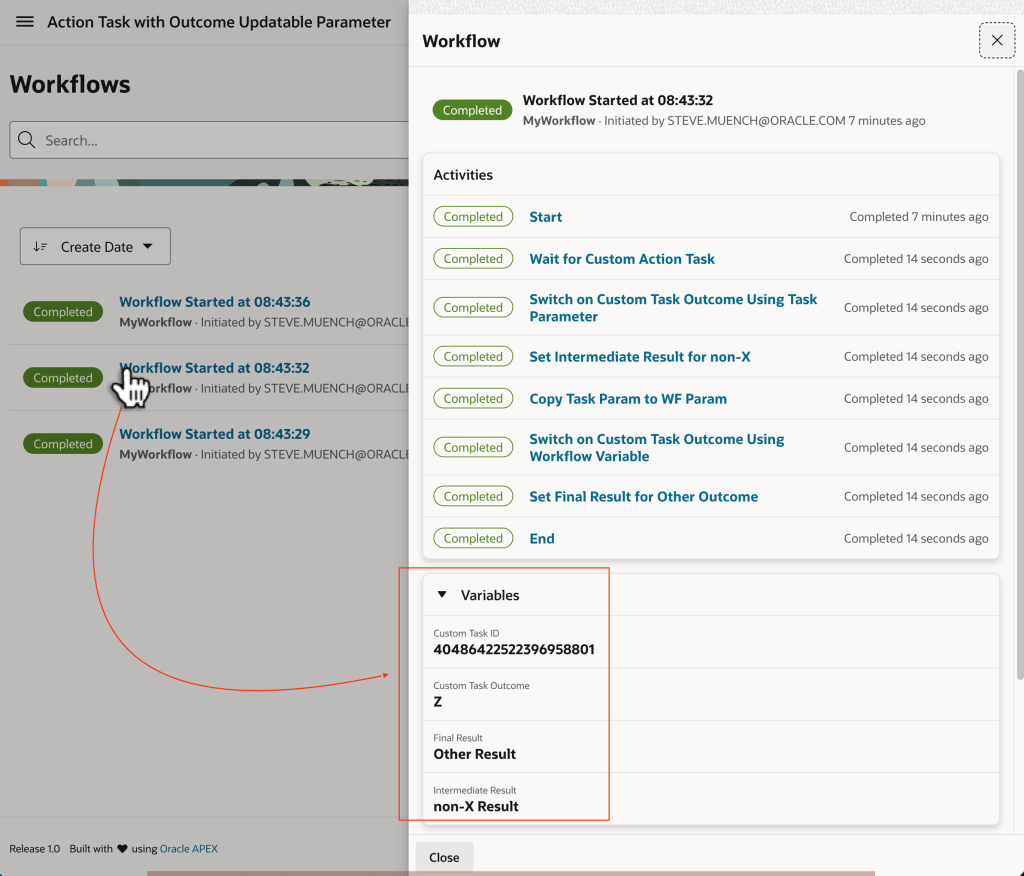
Finally, use the Workflows console to inspect the details of each workflow instance. Study the workflow variable values to see how the different switch activities reacted to the custom outcome. For example, in the workflow instance where you indicated a custom Z outcome, the variables shown below are the result of the path the workflow took for that outcome.
Studying the Variable Values to See How Workflow Reacts to Different Outcomes
In the latest Google Chrome release (143.0.7499.41) a new Split View feature is handy for Oracle APEX developers. It lets you run APEX Builder and your runtime app side-by-side in the same tab. Here’s how to use it.
NOTE: To see a larger version of any image, right-click on it an open it in a new tab at full size.
Split View: Builder + App
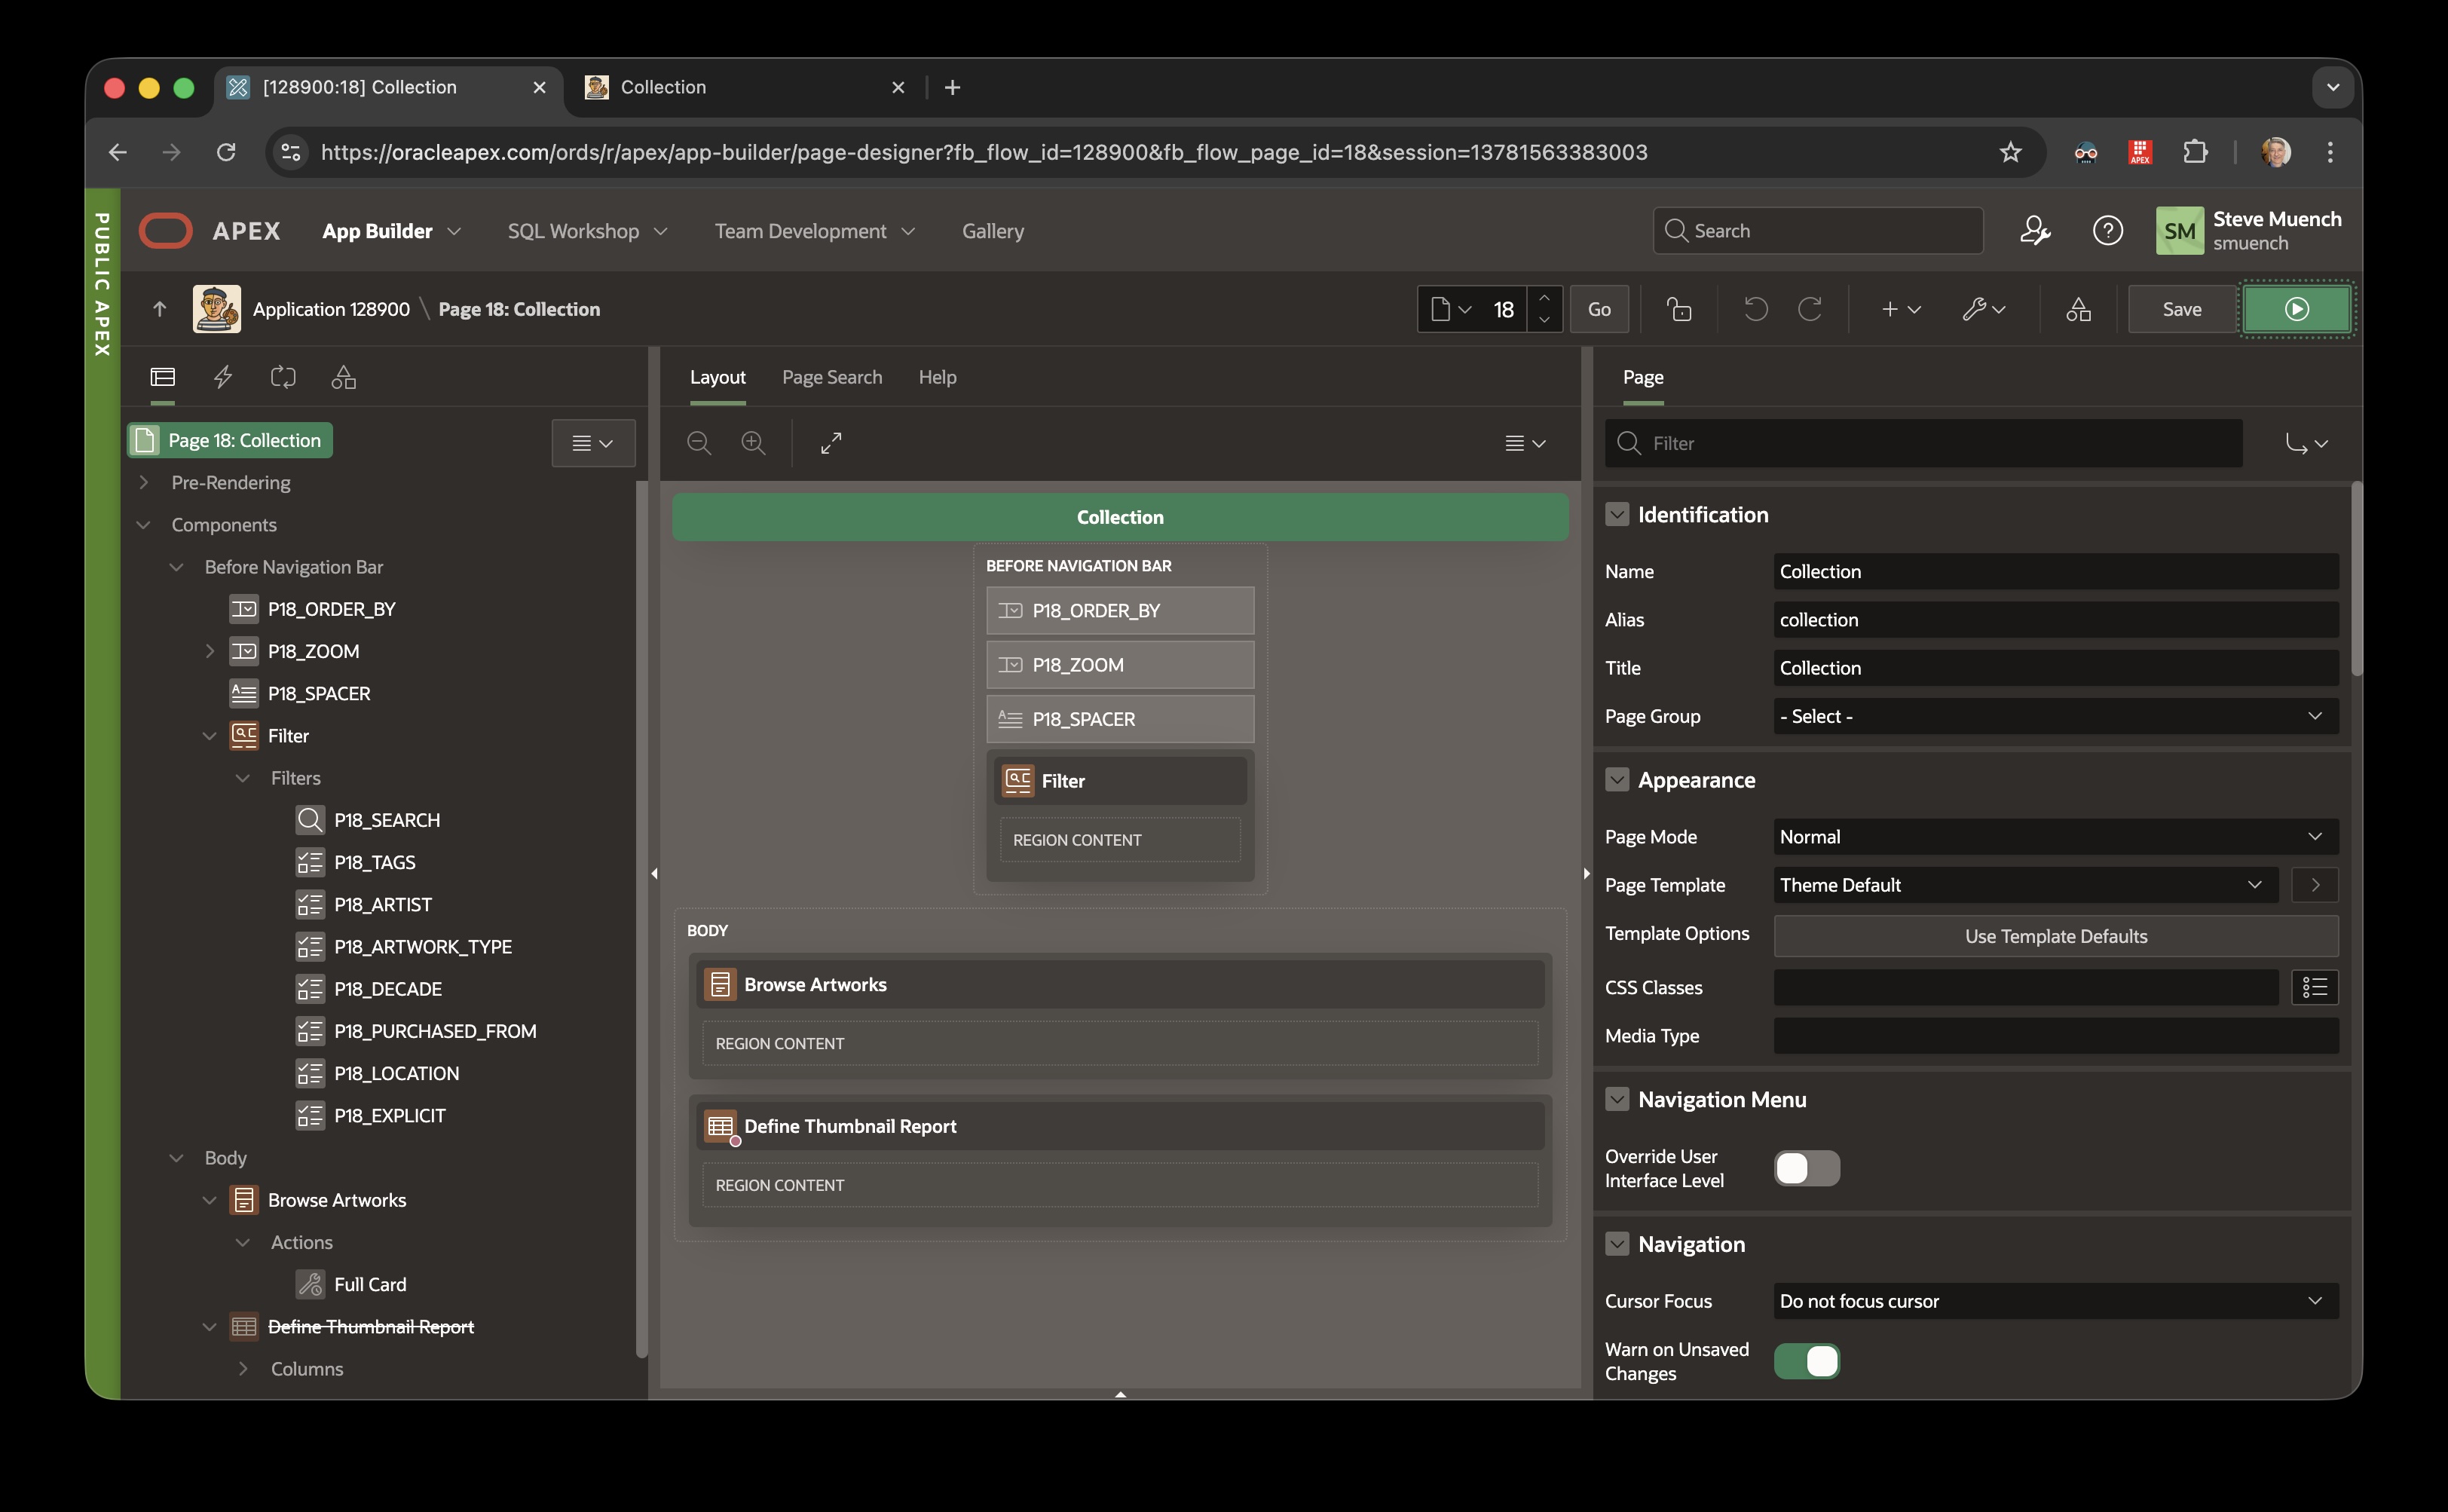
Start by running your application to open it in a second tab…
APEX Builder in Separate Browser Tab from Running Application
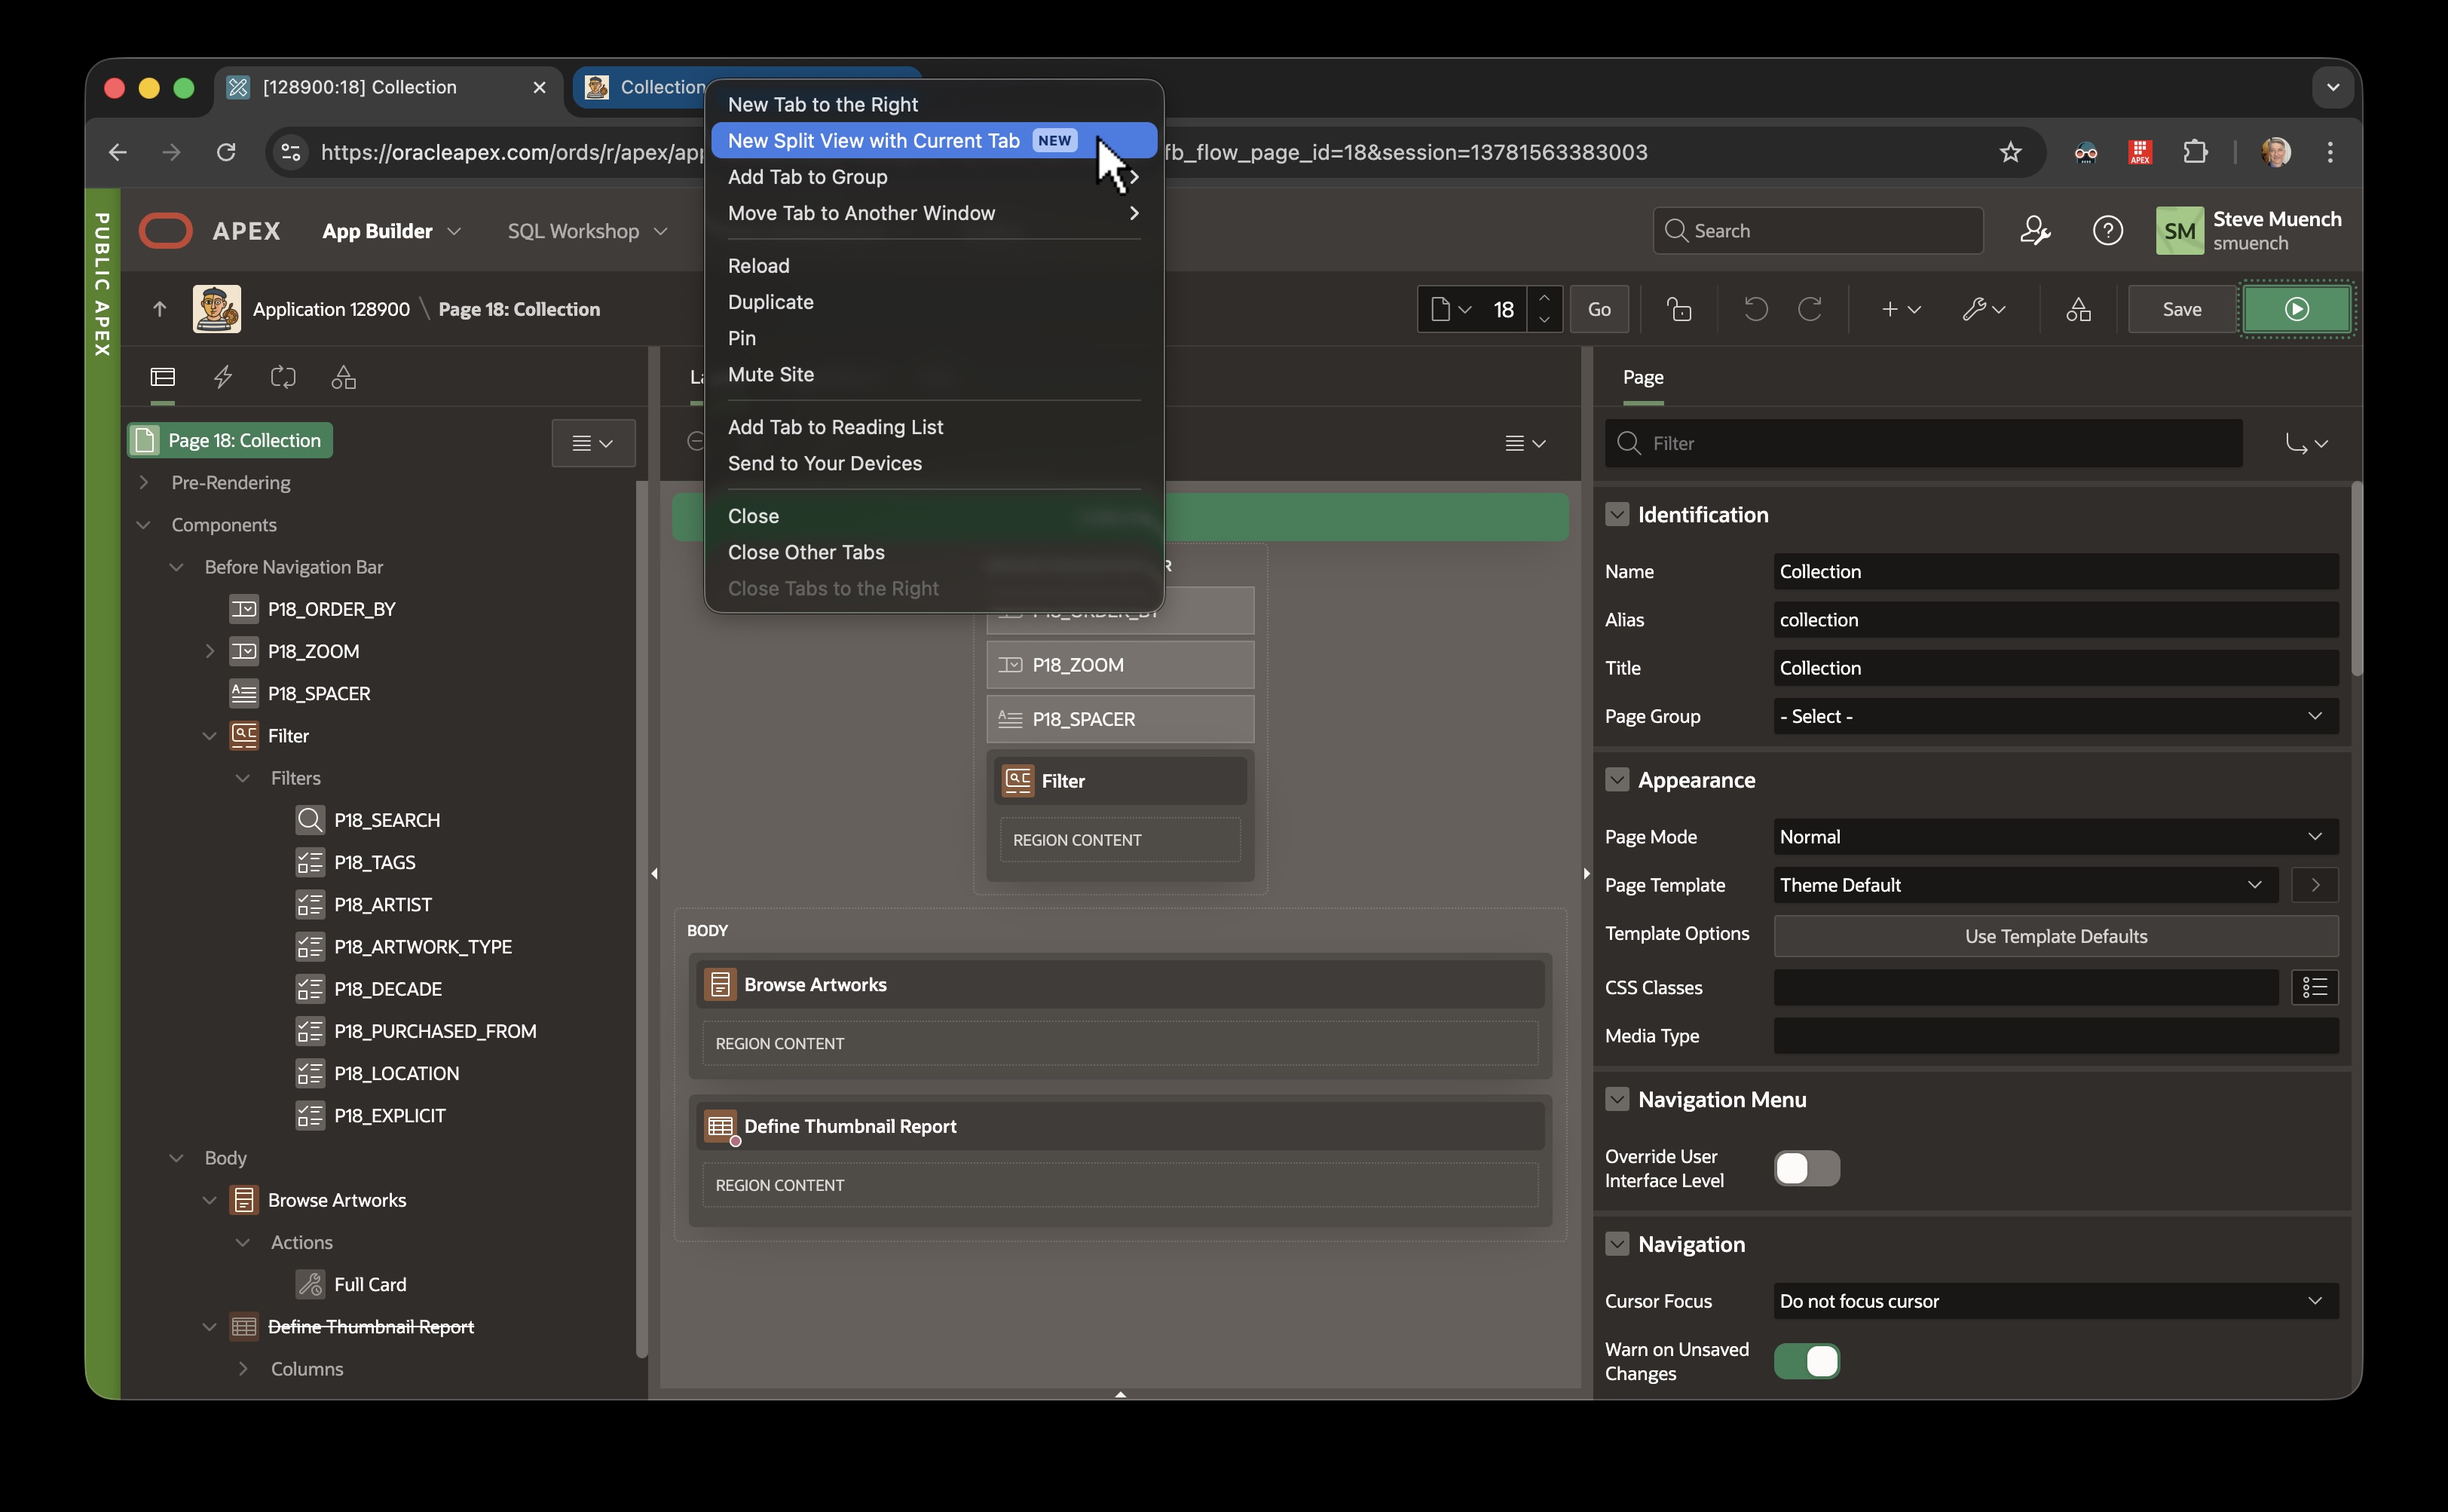
With the Builder tab active, hover over the tab of your running application and right-click on it. Choose the New Split View with Current Tab option as shown below…
Right-Clicking on Running App Tab to Create New Split View with Builder & Running App
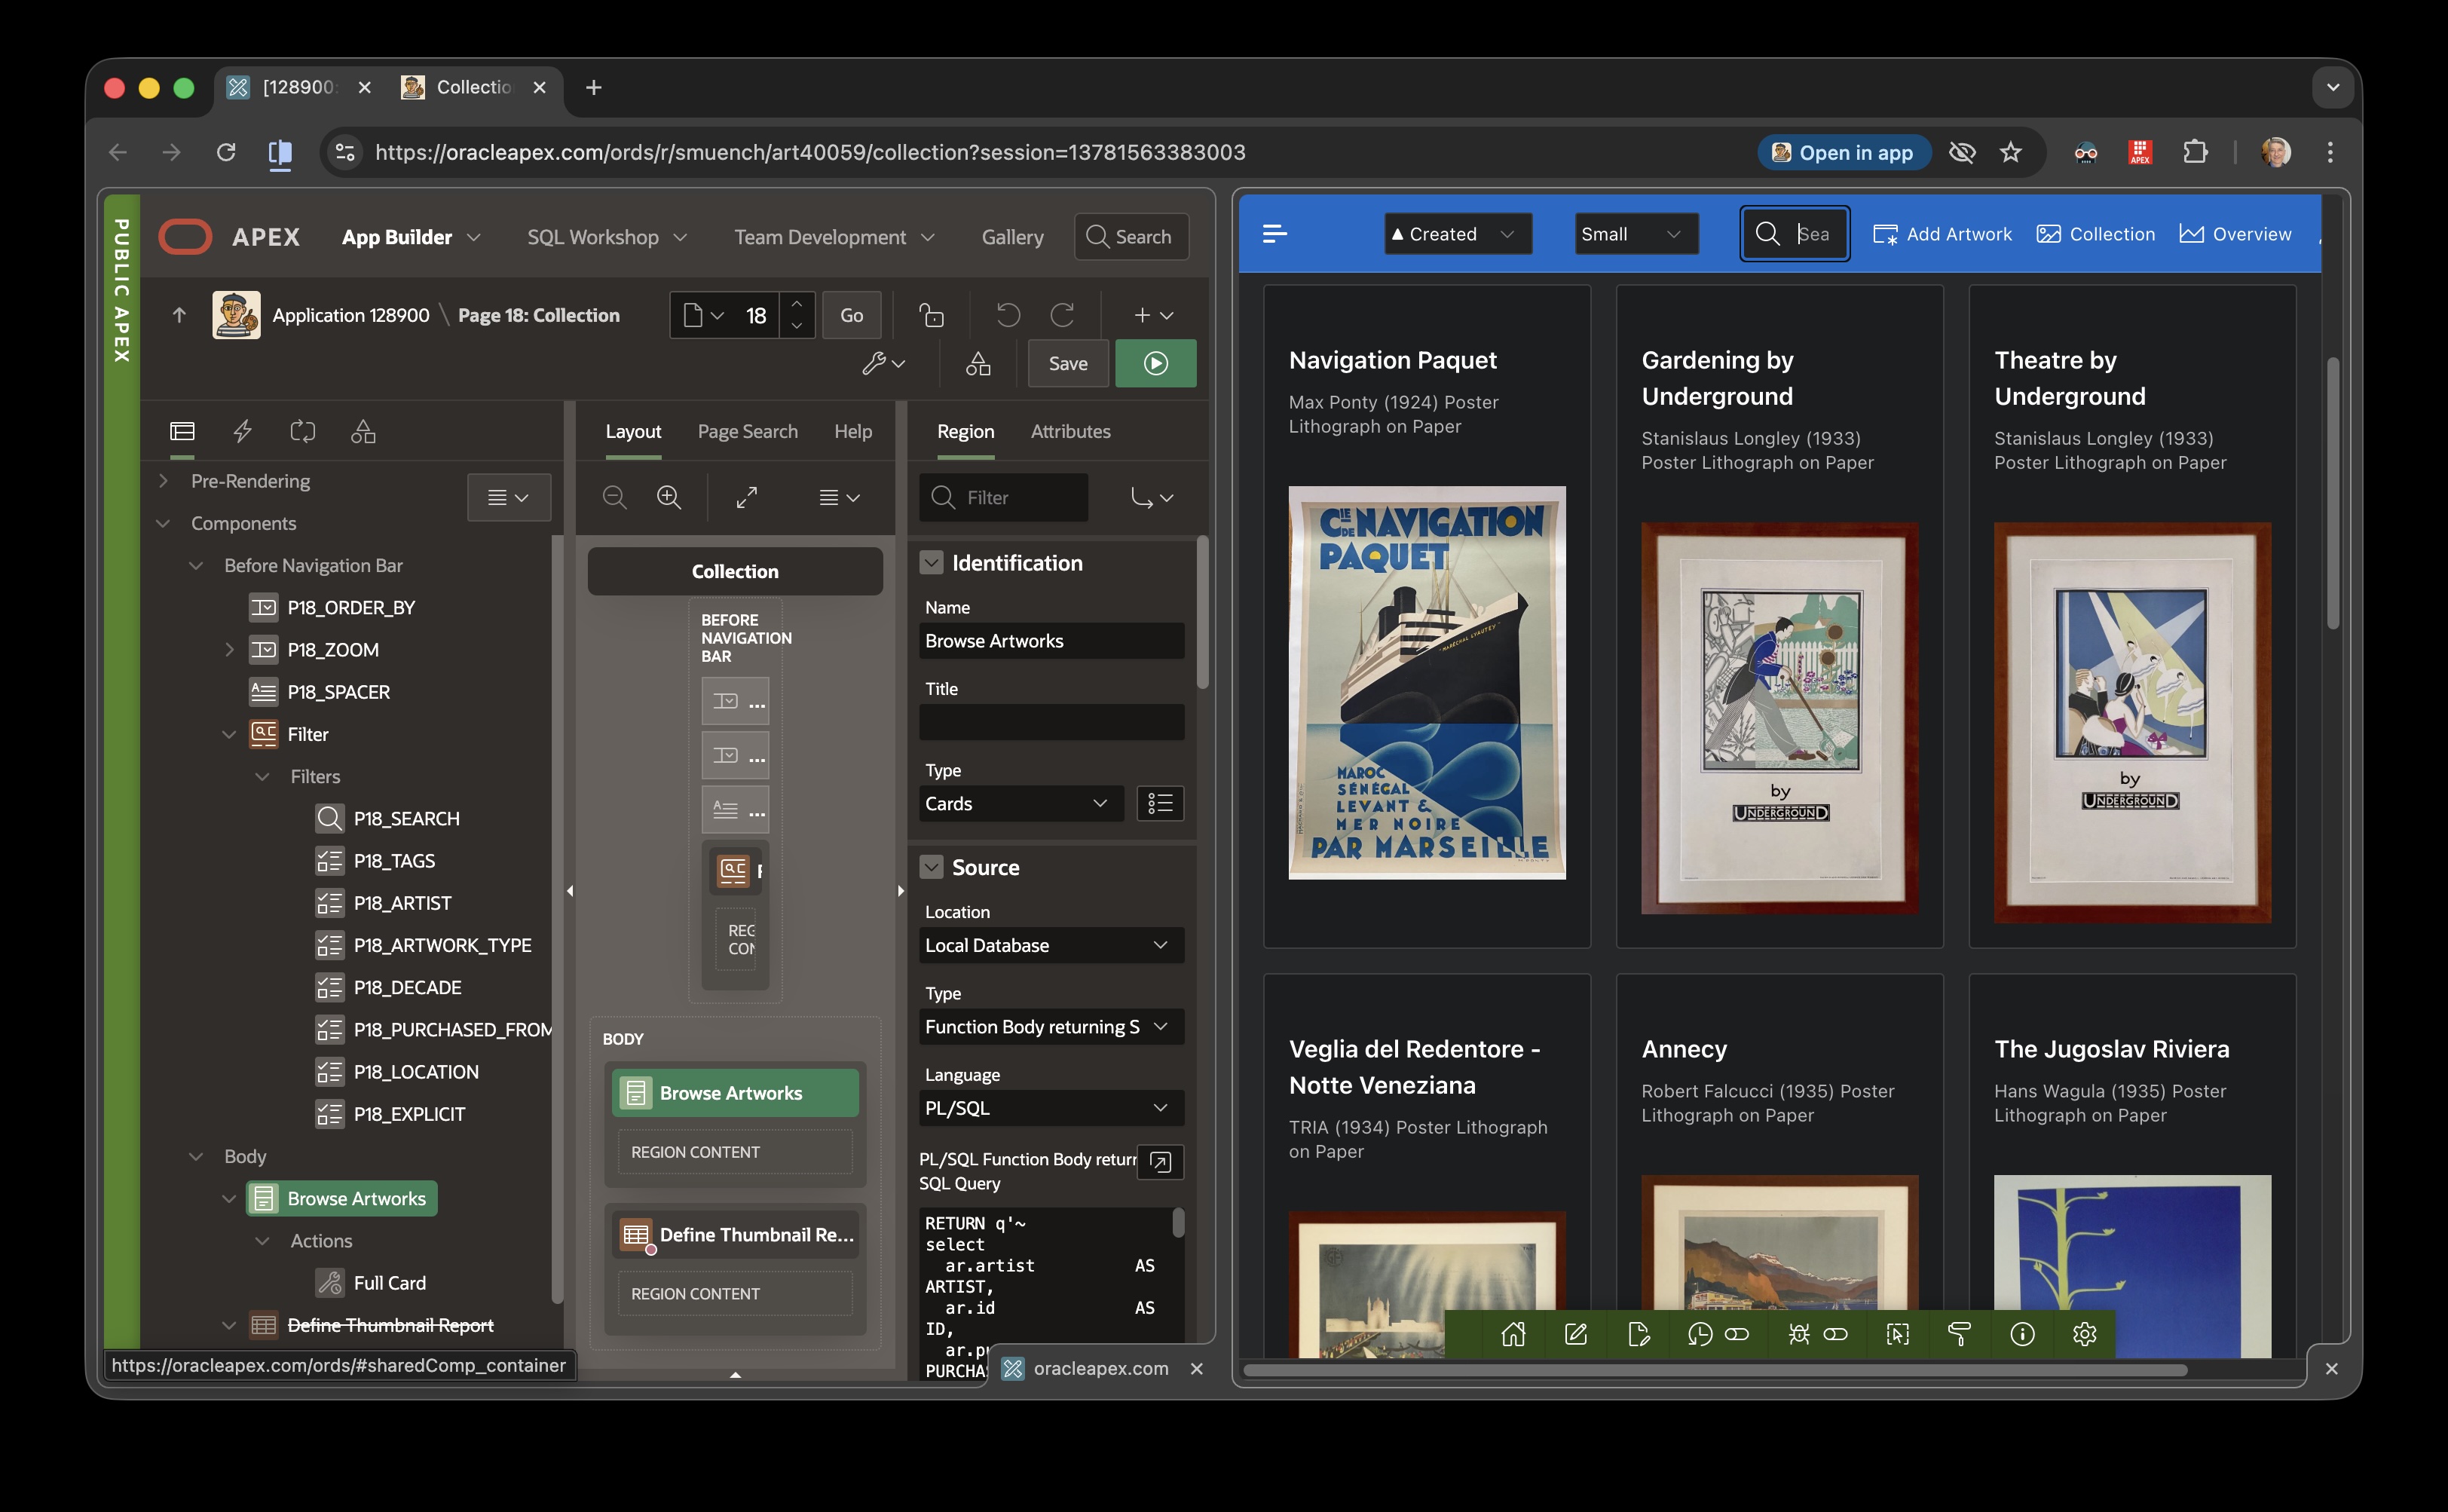
You now have a single tab, with the Builder on the left and your running app on the right. Both remain fully interactive…
Oracle APEX Builder on the Left and Running App on the Right in the Same Tab
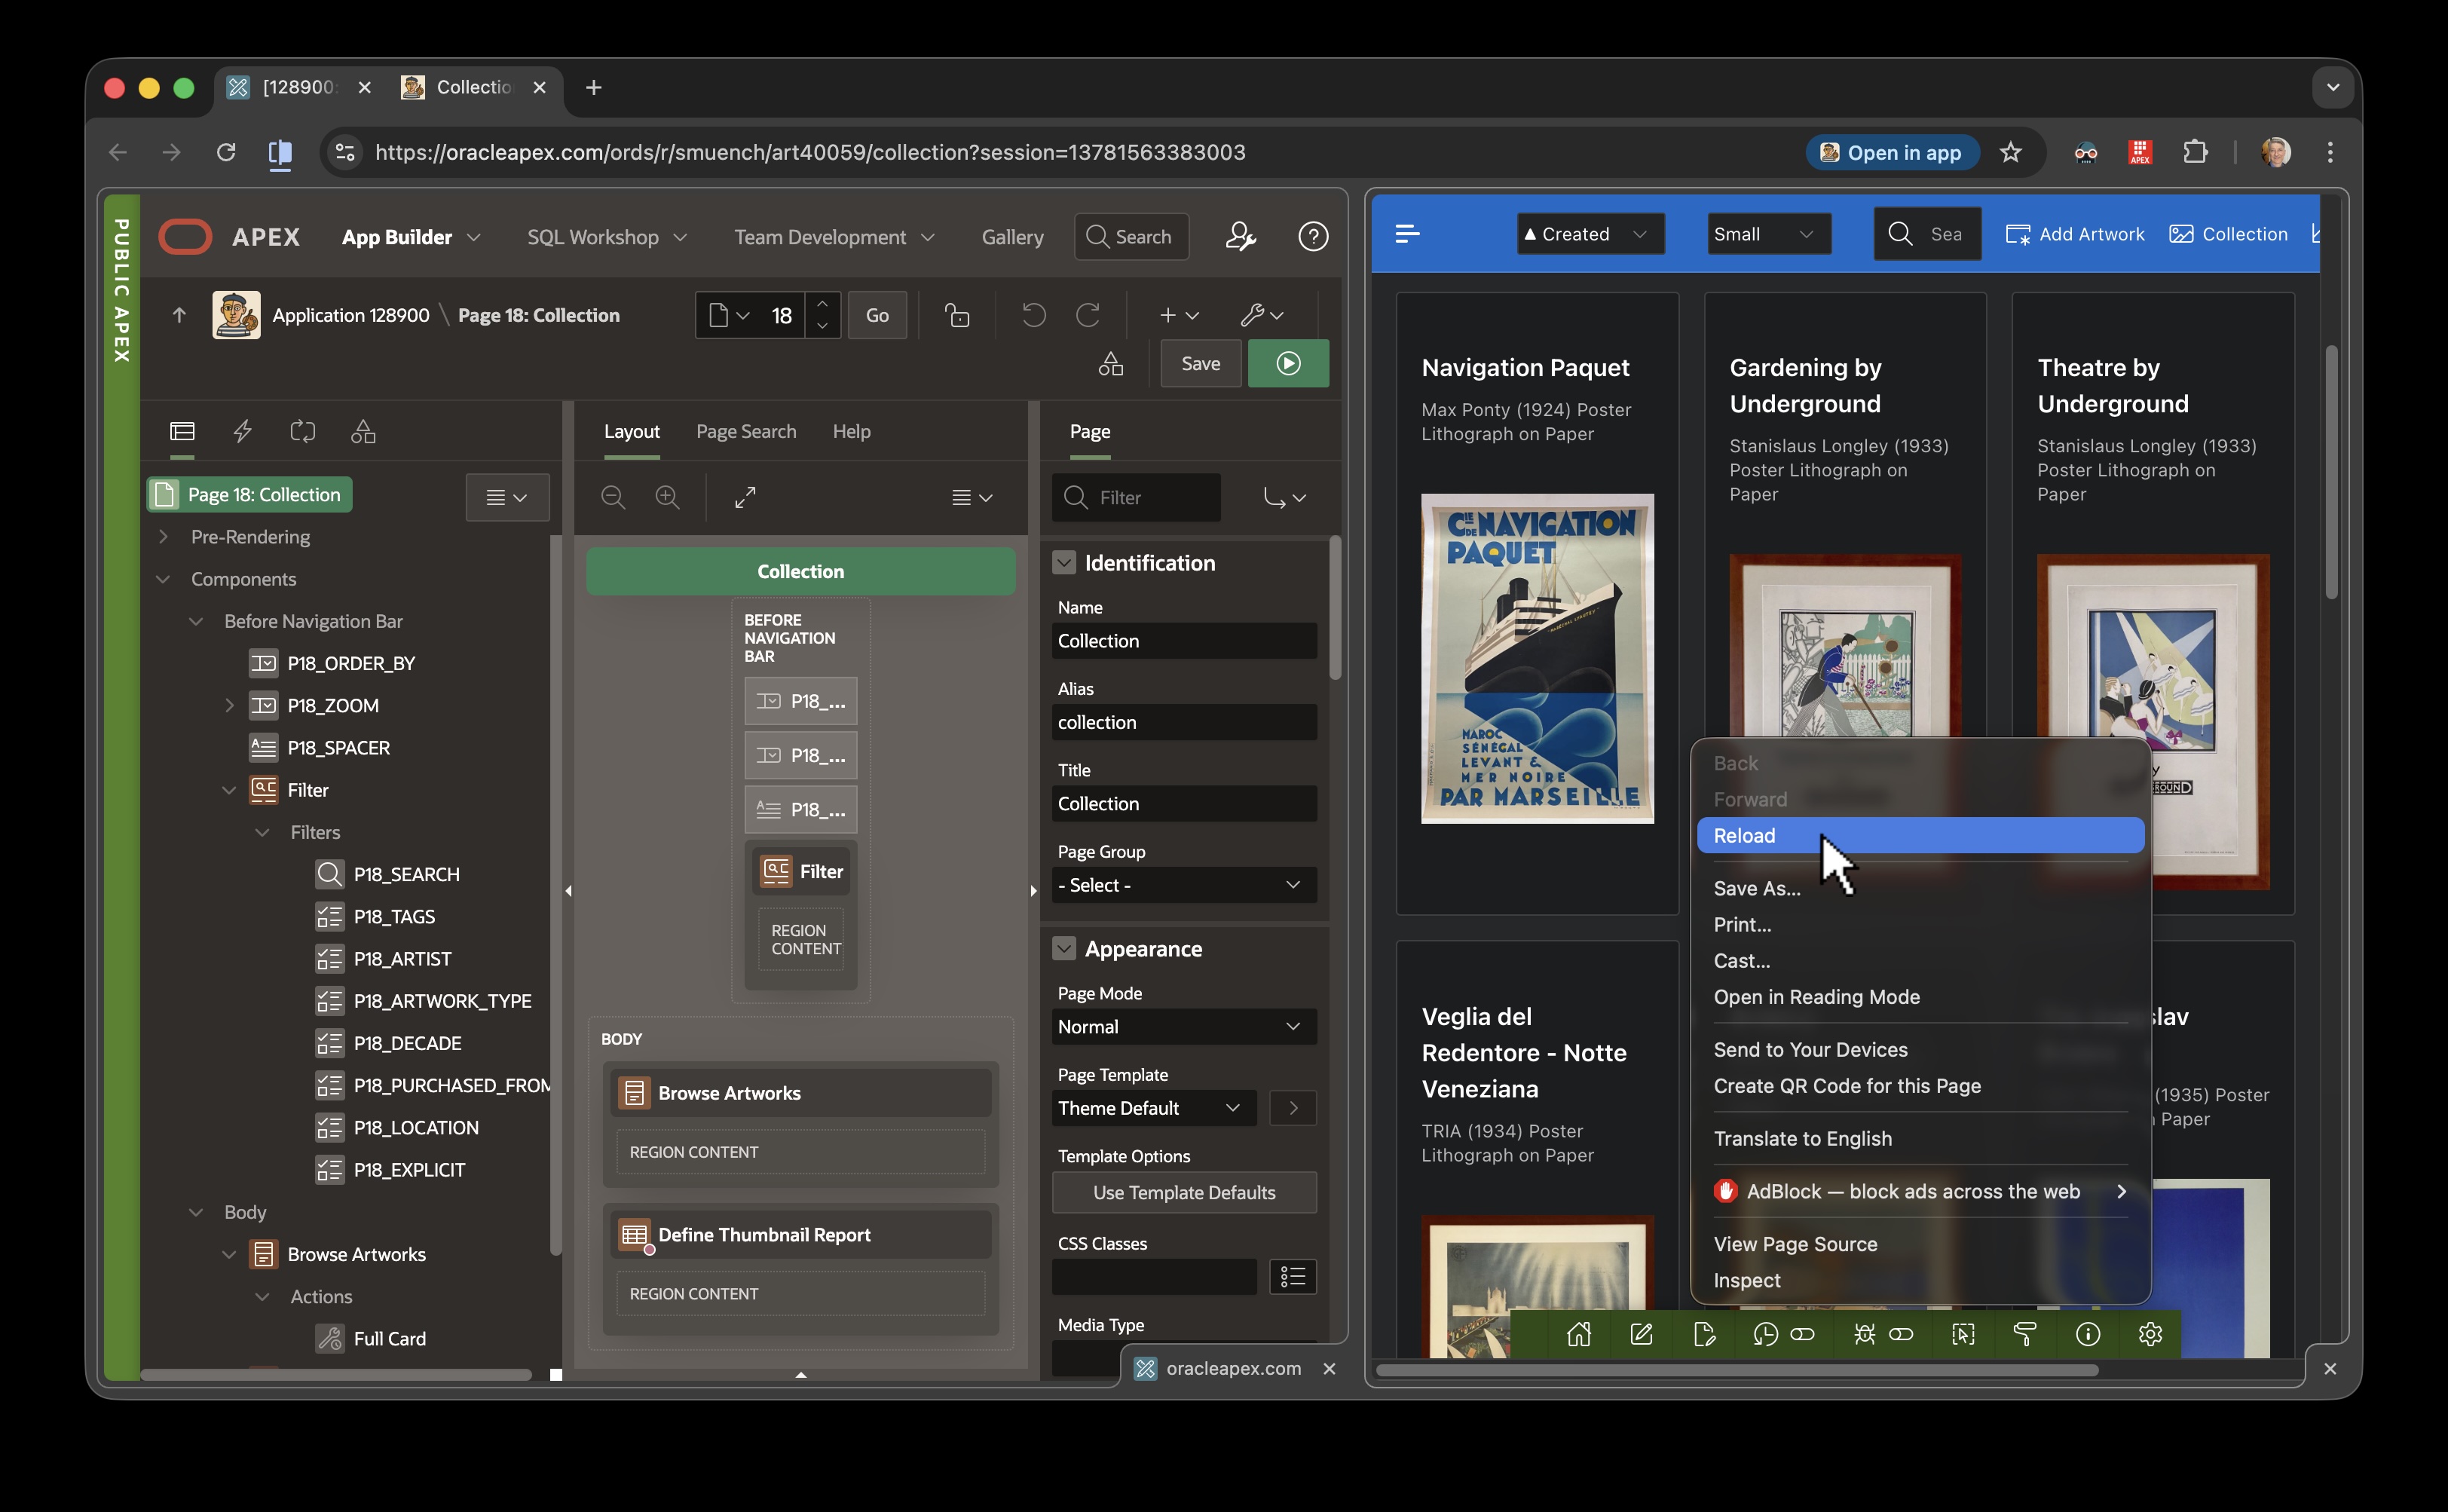
If you ever need to just reload your application view, just right click anywhere on the page and choose the Reload option.
Reloading Only One of the Views When Necessary Using the Context Menu
You can use the new Arrange Split View toolbar icon as shown below to reverse the views, separate them, or close one of them…
Rearranging, Separating, or Closing Views in a Split View Tab
As shown below, you can hover over the splitter margin and drag it to resize the left and right views…
Dragging the Splitter to Adjust Left and Right View Width
That’s all there is to it!
Page Designer + Object Browser
Of course, the side-by-side tabs can also be two separate areas of the APEX Builder itself. For example, I find myself now working frequently with a Page Designer and Object Browser side by side. This lets me reference and evolve application logic in PL/SQL packages, and schema objects in database tables, views, and columns while I work on various pages in my app.
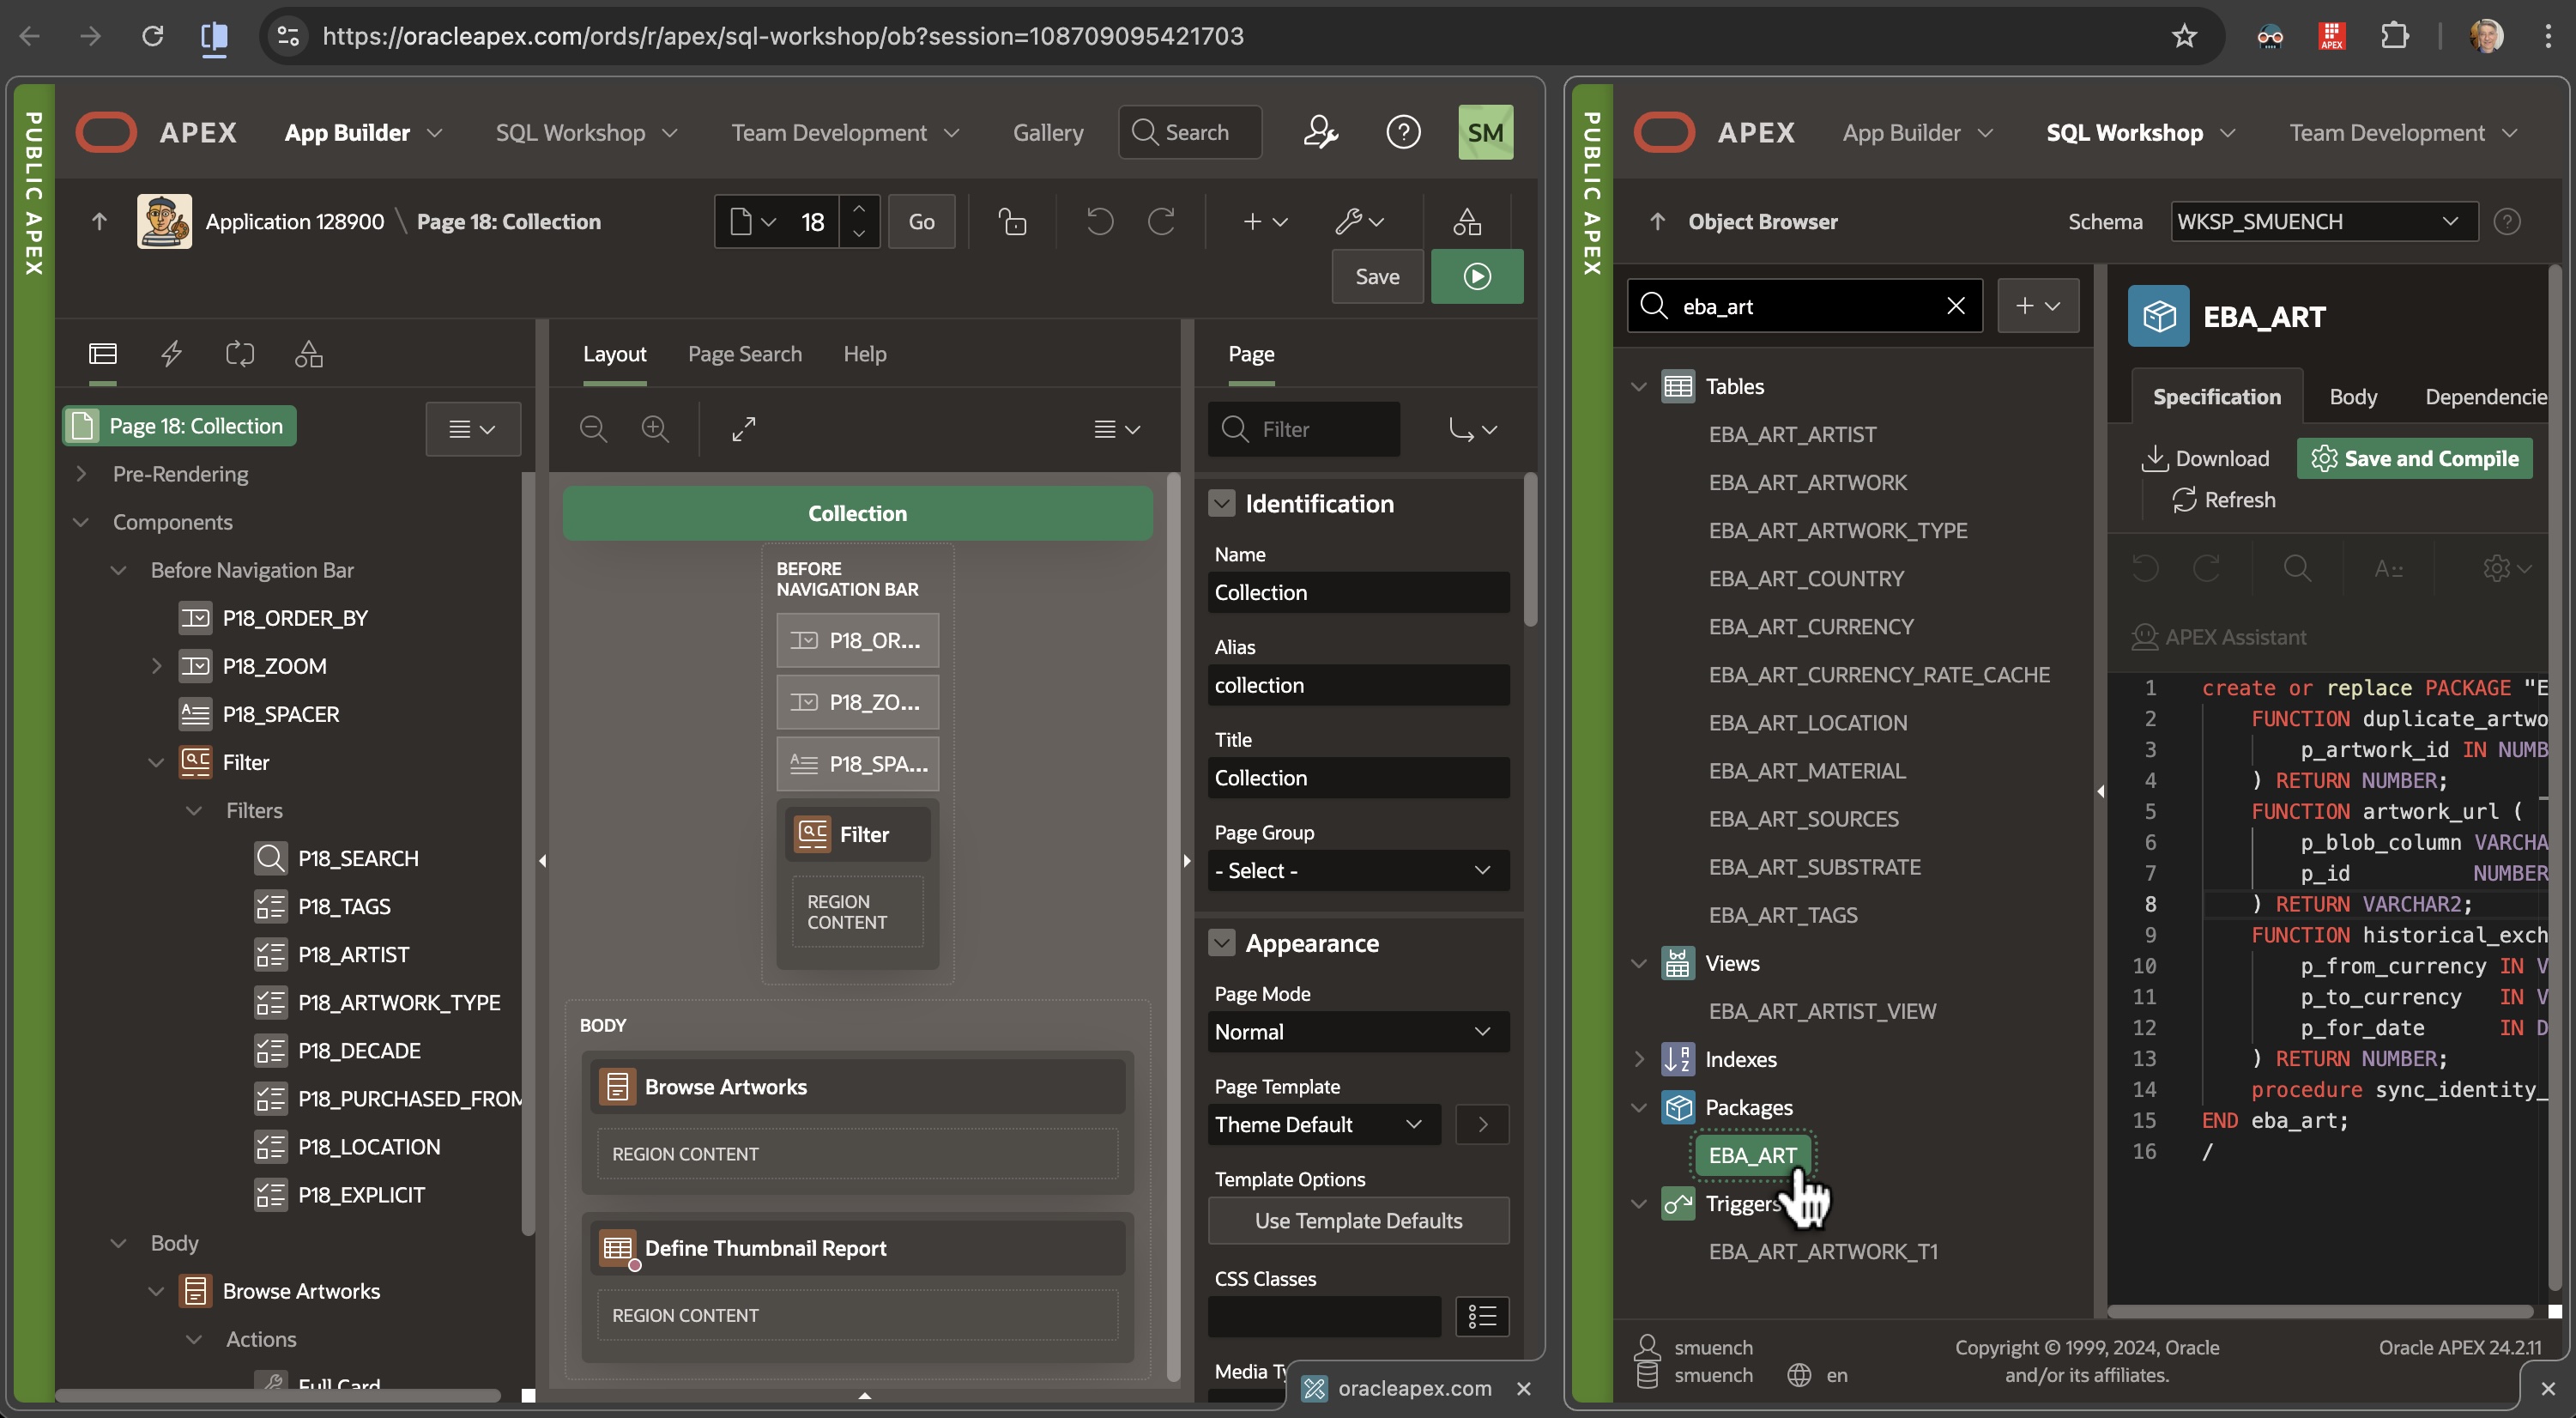
To setup this arrangement, start with the Page Designer open, and right-click on the SQL Workshop > Object Browser menu option to choose the Open Link in Split View option as shown below.
Opening Object Browser in a Split View with Page Designer
The Object Browser appears in the split view. You can keep its navigation pane collapsed to gain more screen space, or as shown below, click on the sidebar arrow to pop it open…
Clicking on the Collapsed Object Browser Navigator to Open It
This lets you choose a different package, table, view or other schema object for reference while working on a page.
Using the Object Browser Navigation Panel to Select a Schema Object
In APEX on Autonomous Database, use declarative, server-side geocoding to find coordinates for an address. Then you can see it on a map, measure its distance from another point, find it within a radius, and process it with other spatial data features.
Use an AI Configuration to create a smart web service with natural language. It taps into a large-language model’s knowledge to return a structured result.
To celebrate Joel Kallman Day 2025, we study an app that combines the two. It lets a user enter an address, then in the background finds its coordinates and whether it represents a well-known point of interest. Download the sample app at the end to try it yourself on your Autonomous Database or Oracle APEX Service.
Trying the App
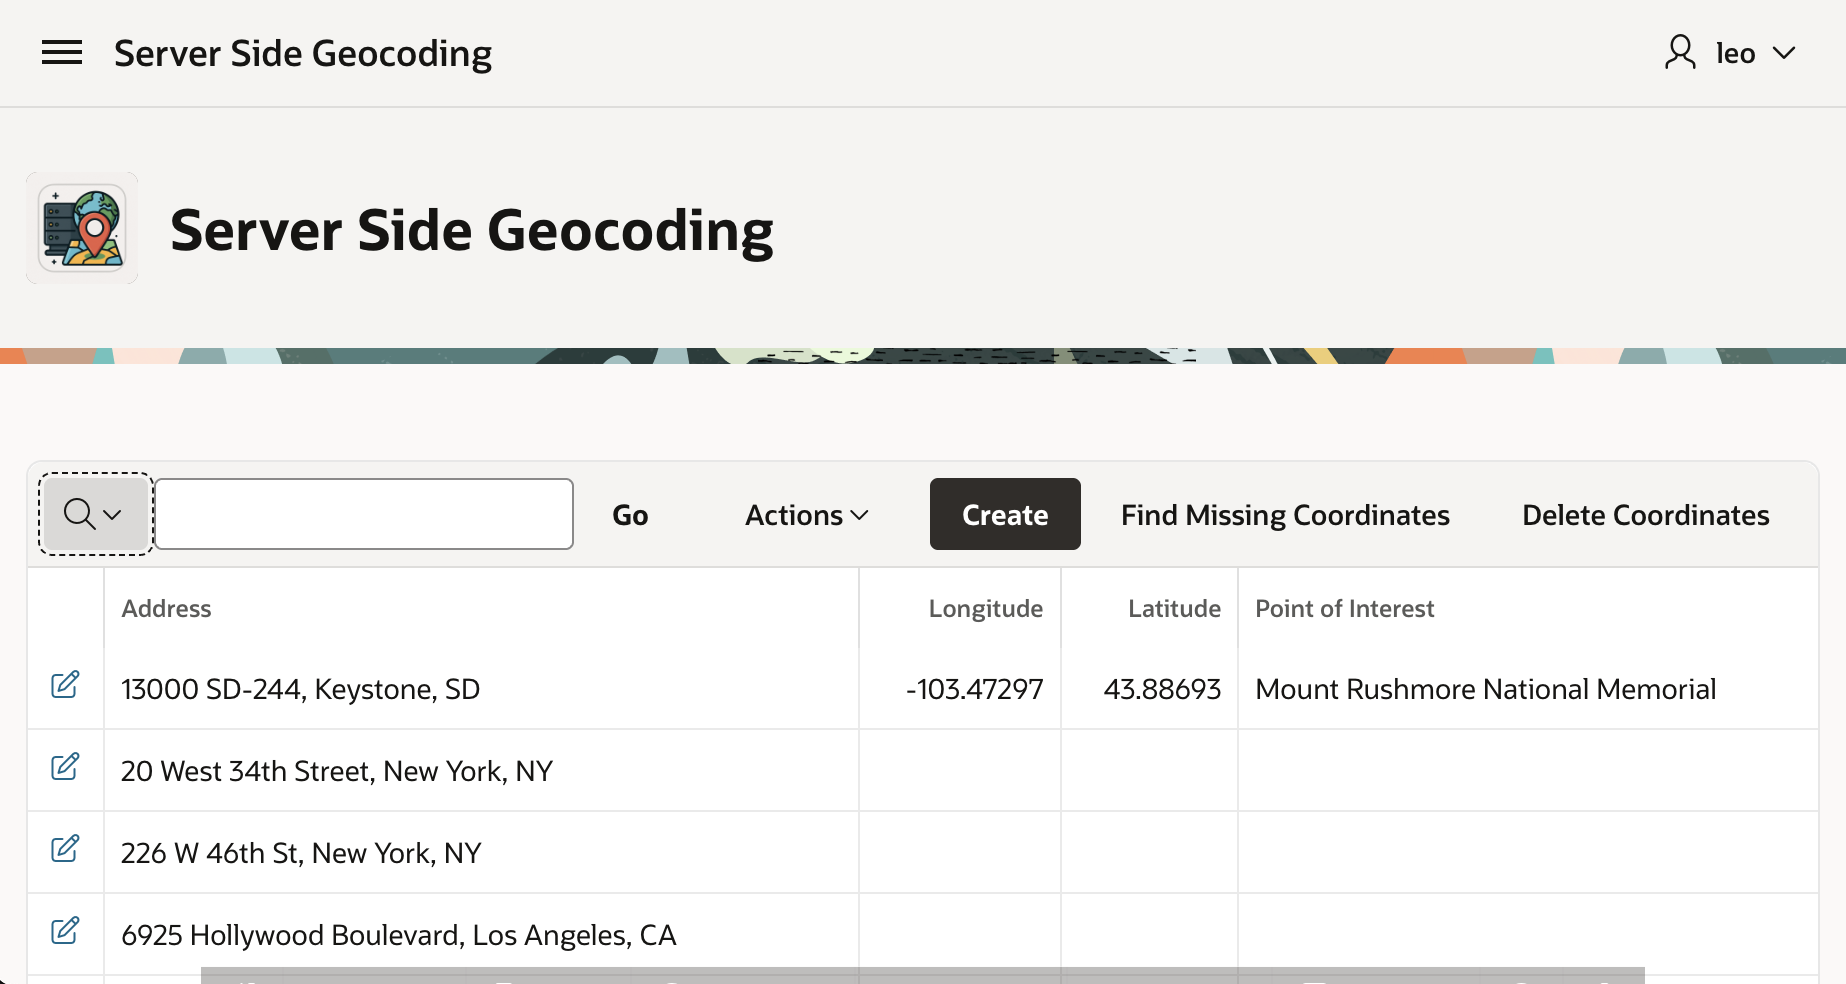
For example, we can enter this South Dakota address and click (Create <GeoJSON>).
Entering an Address to Geocode Server-side in Keystone, South Dakota (USA)
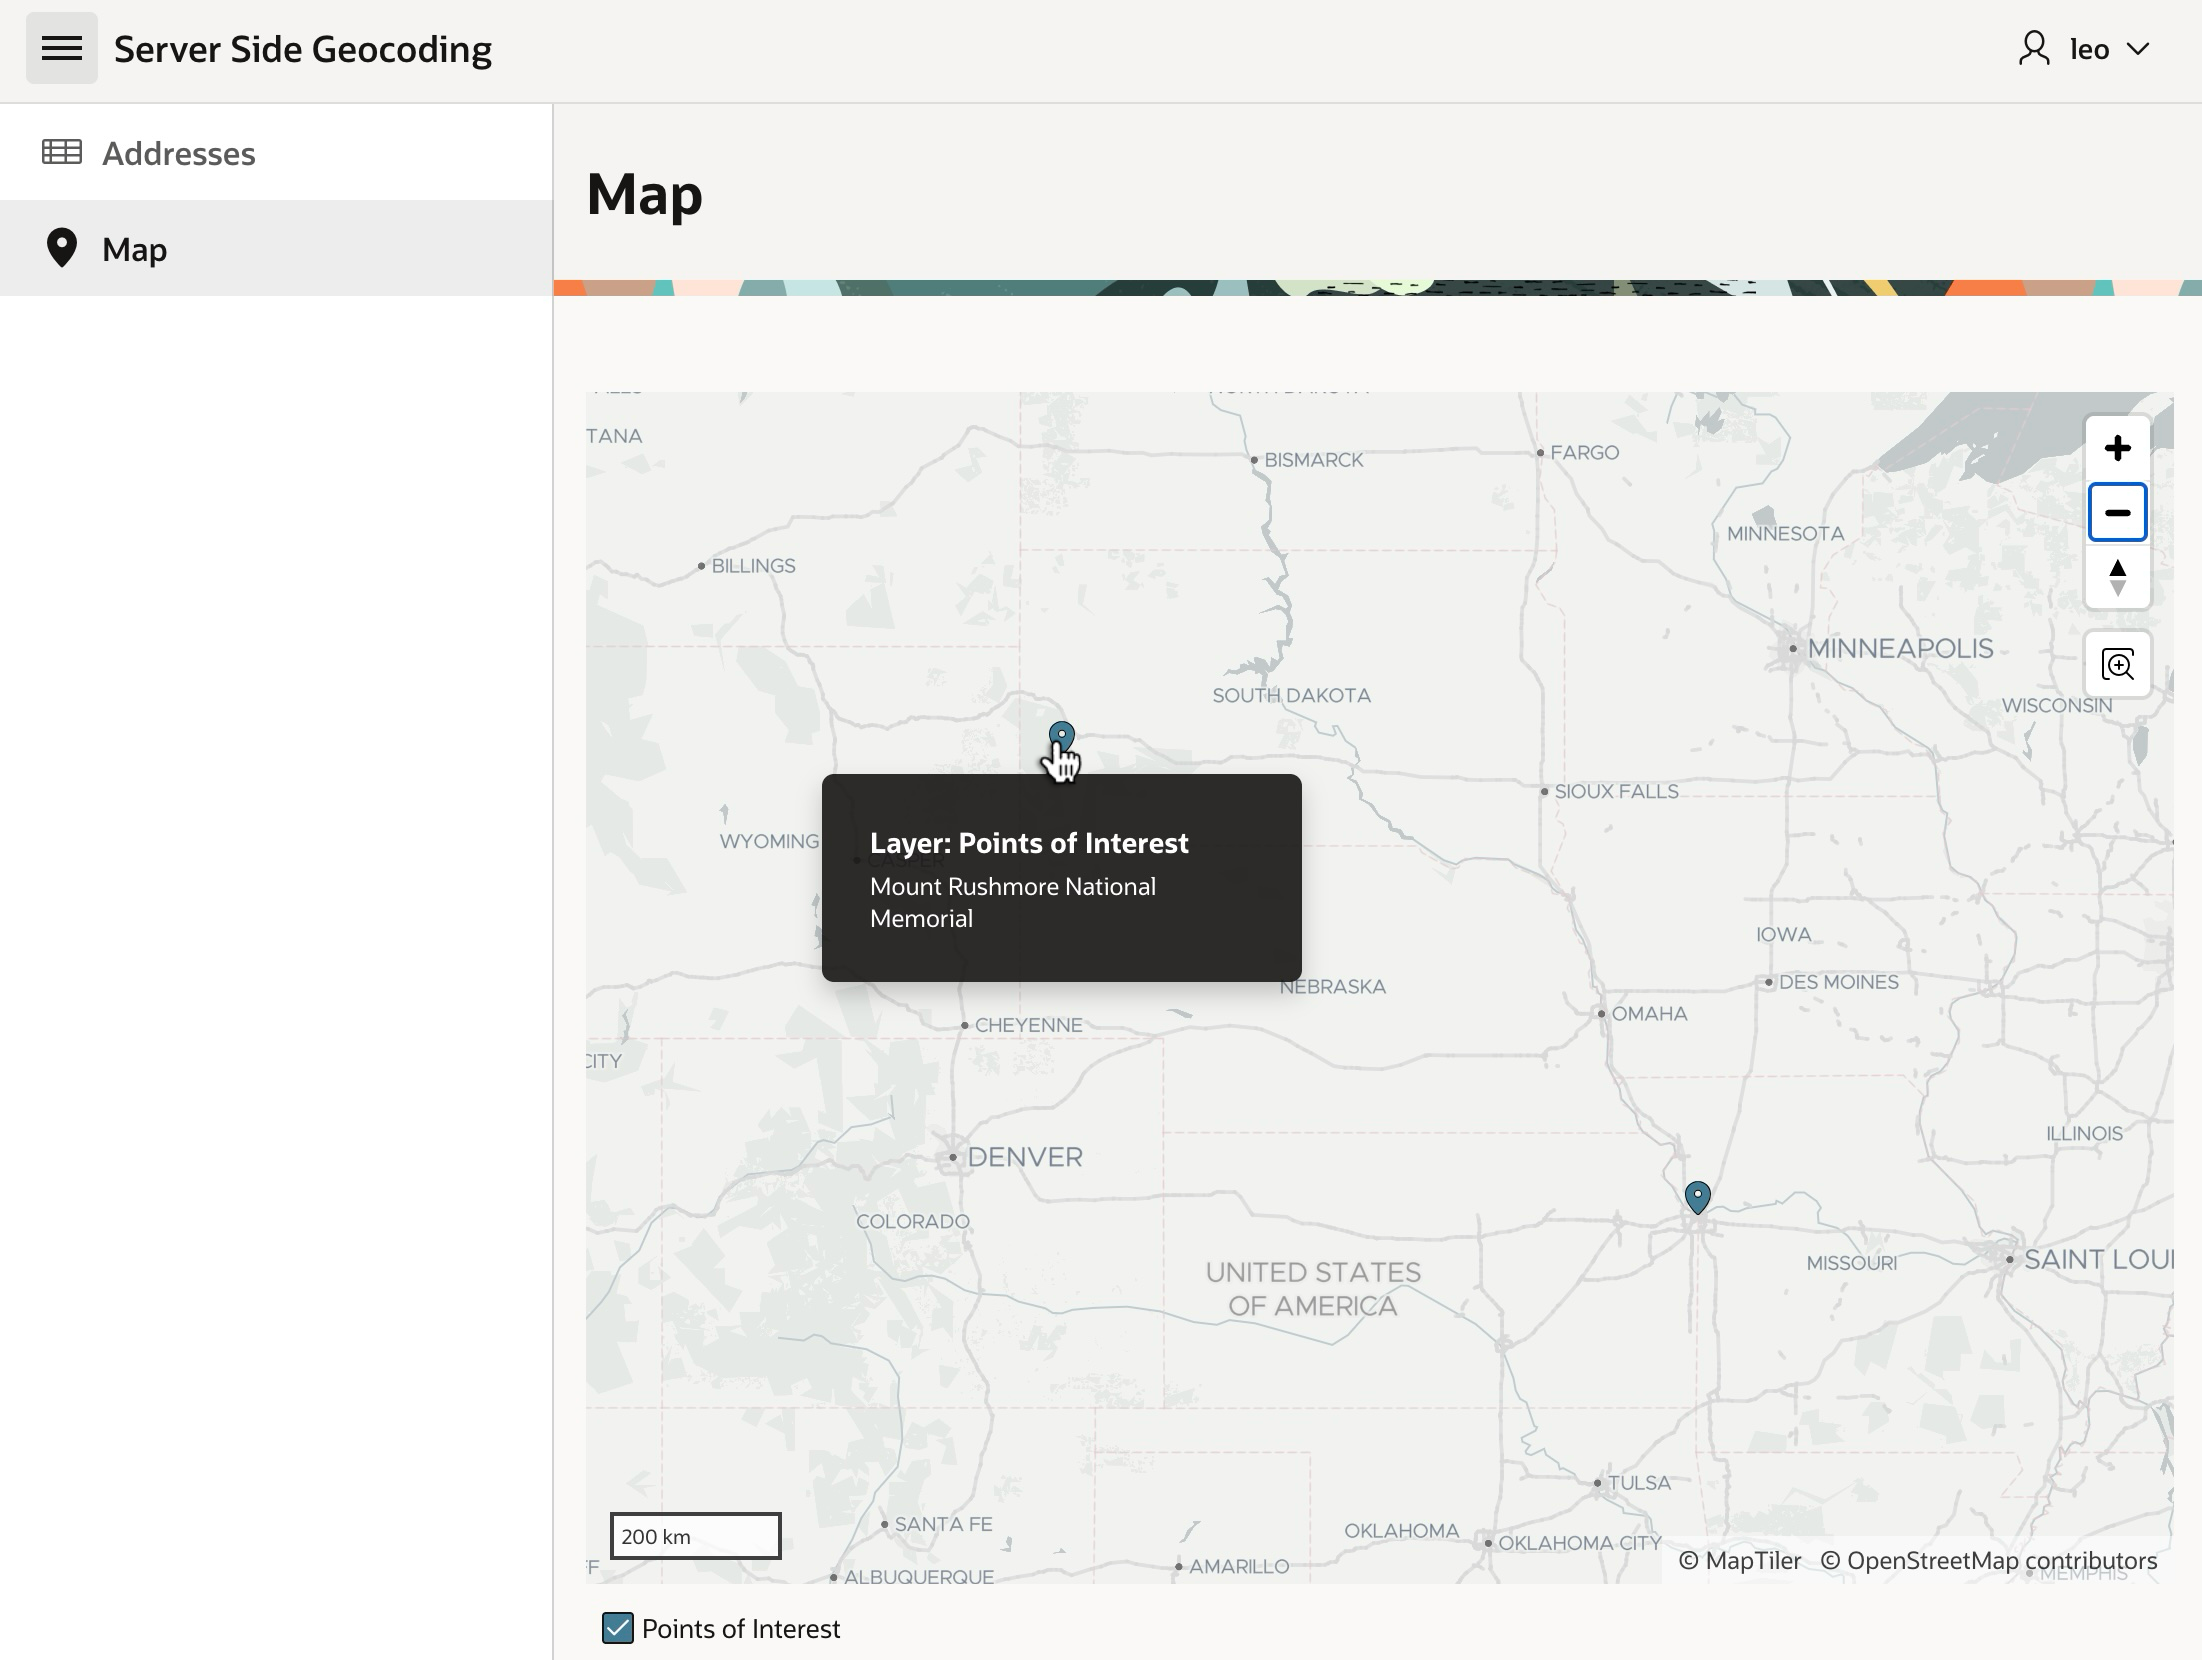
After a few seconds, if we refresh the Interactive Report by clicking the (Go) button, we see that in the background it found the coordinates and determined this is the address of Mount Rushmore National Memorial.
New Address Geocoded in the Background, with Point of Interest Identified, Shows After RefreshMount Rushmore National Monument in Keystone, South Dakota (USA)
Server-Side Geocoding
Your apps can use client-side geocoding in any browser. However, server-side geocoding depends on APIs exclusive to Autonomous Database. So, you need to develop and run your APEX app in ADB or APEX Service to use it. Declarative Server Side Geocoding is available as a page process, a workflow activity, or an automation action. You provide an address as a single string, or as a structured set of different address element fields. You have two options for the resulting geocoded info. It can populate a page item you configure with a small GeoJSON document containing longitude and latitude. For more detailed results, configure the name of a collection to populate instead.
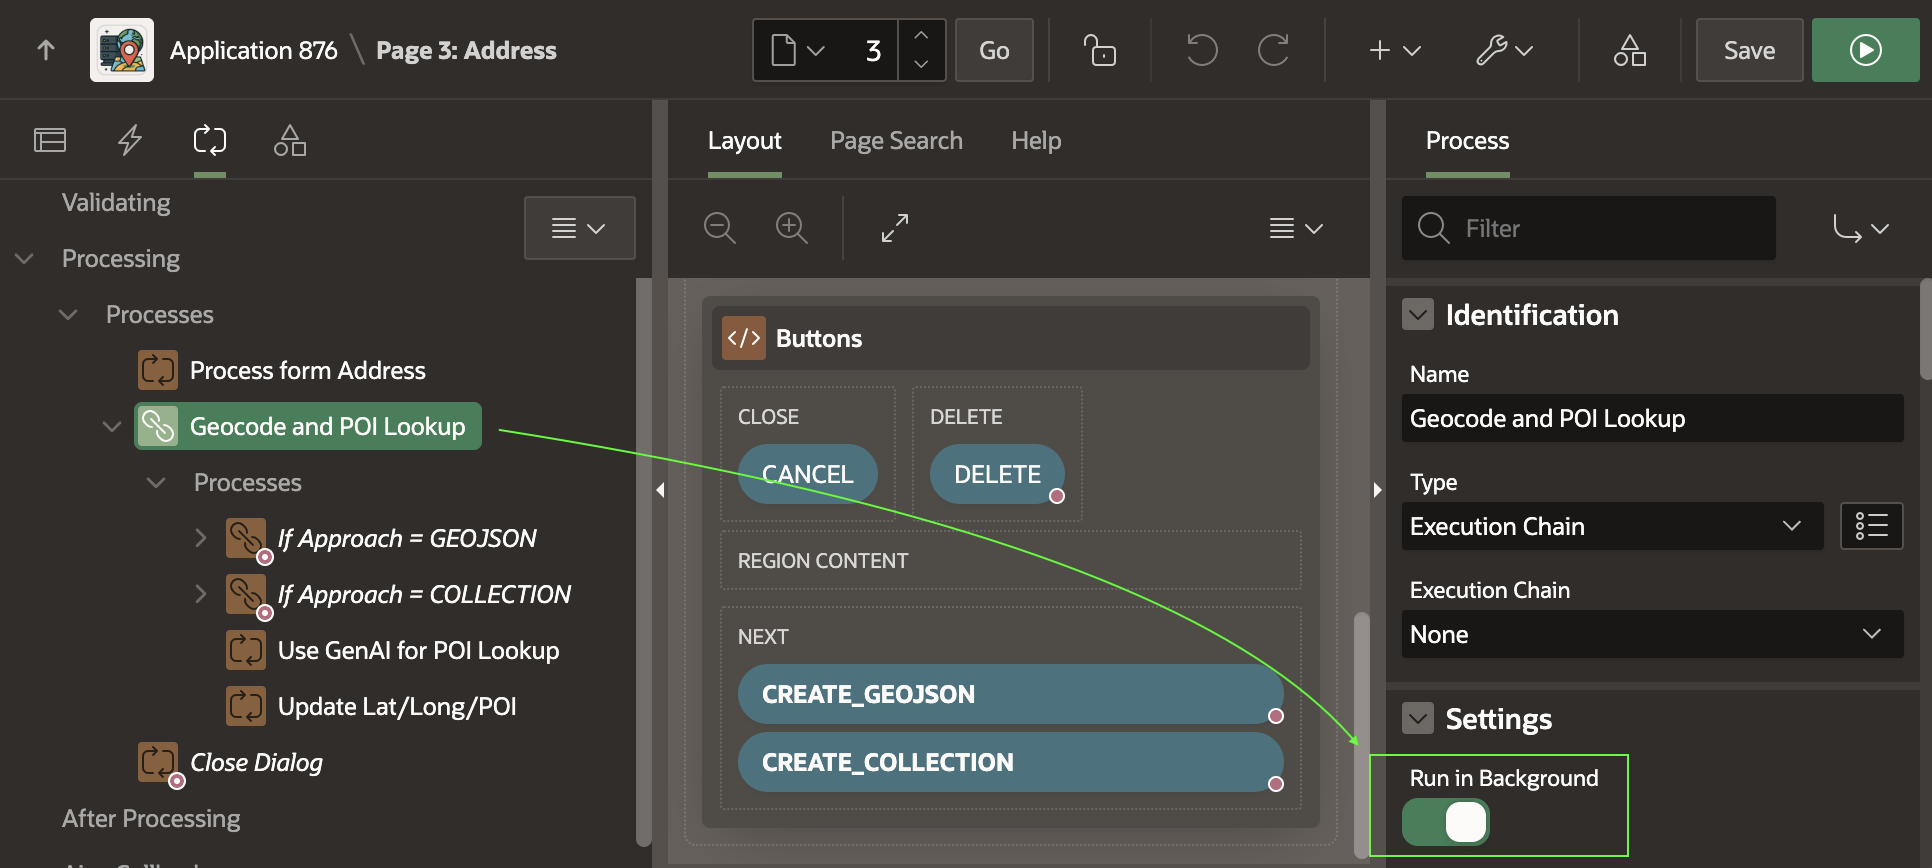
The (Create <GeoJSON>) button submits the form, triggering processing that saves the form data, then runs the Geocode and POI Lookup execution chain shown below. Notice that it’s set to Run in Background.
Geocode and POI Lookup Execution Chain Runs in the Background
If the CREATE_GEOJSON button submits the form, the execution chain below runs. As shown below, its first child process uses a Server Side Geocoding process type to find the coordinates. It configures its unstructured Address Item to come from P3_ADDRESS and its GeoJSON Coordinate Item to be returned into the hidden P3_GEOJSON page item.
Server-side Geocoding Can Accept an Address and Return a GeoJSON Point
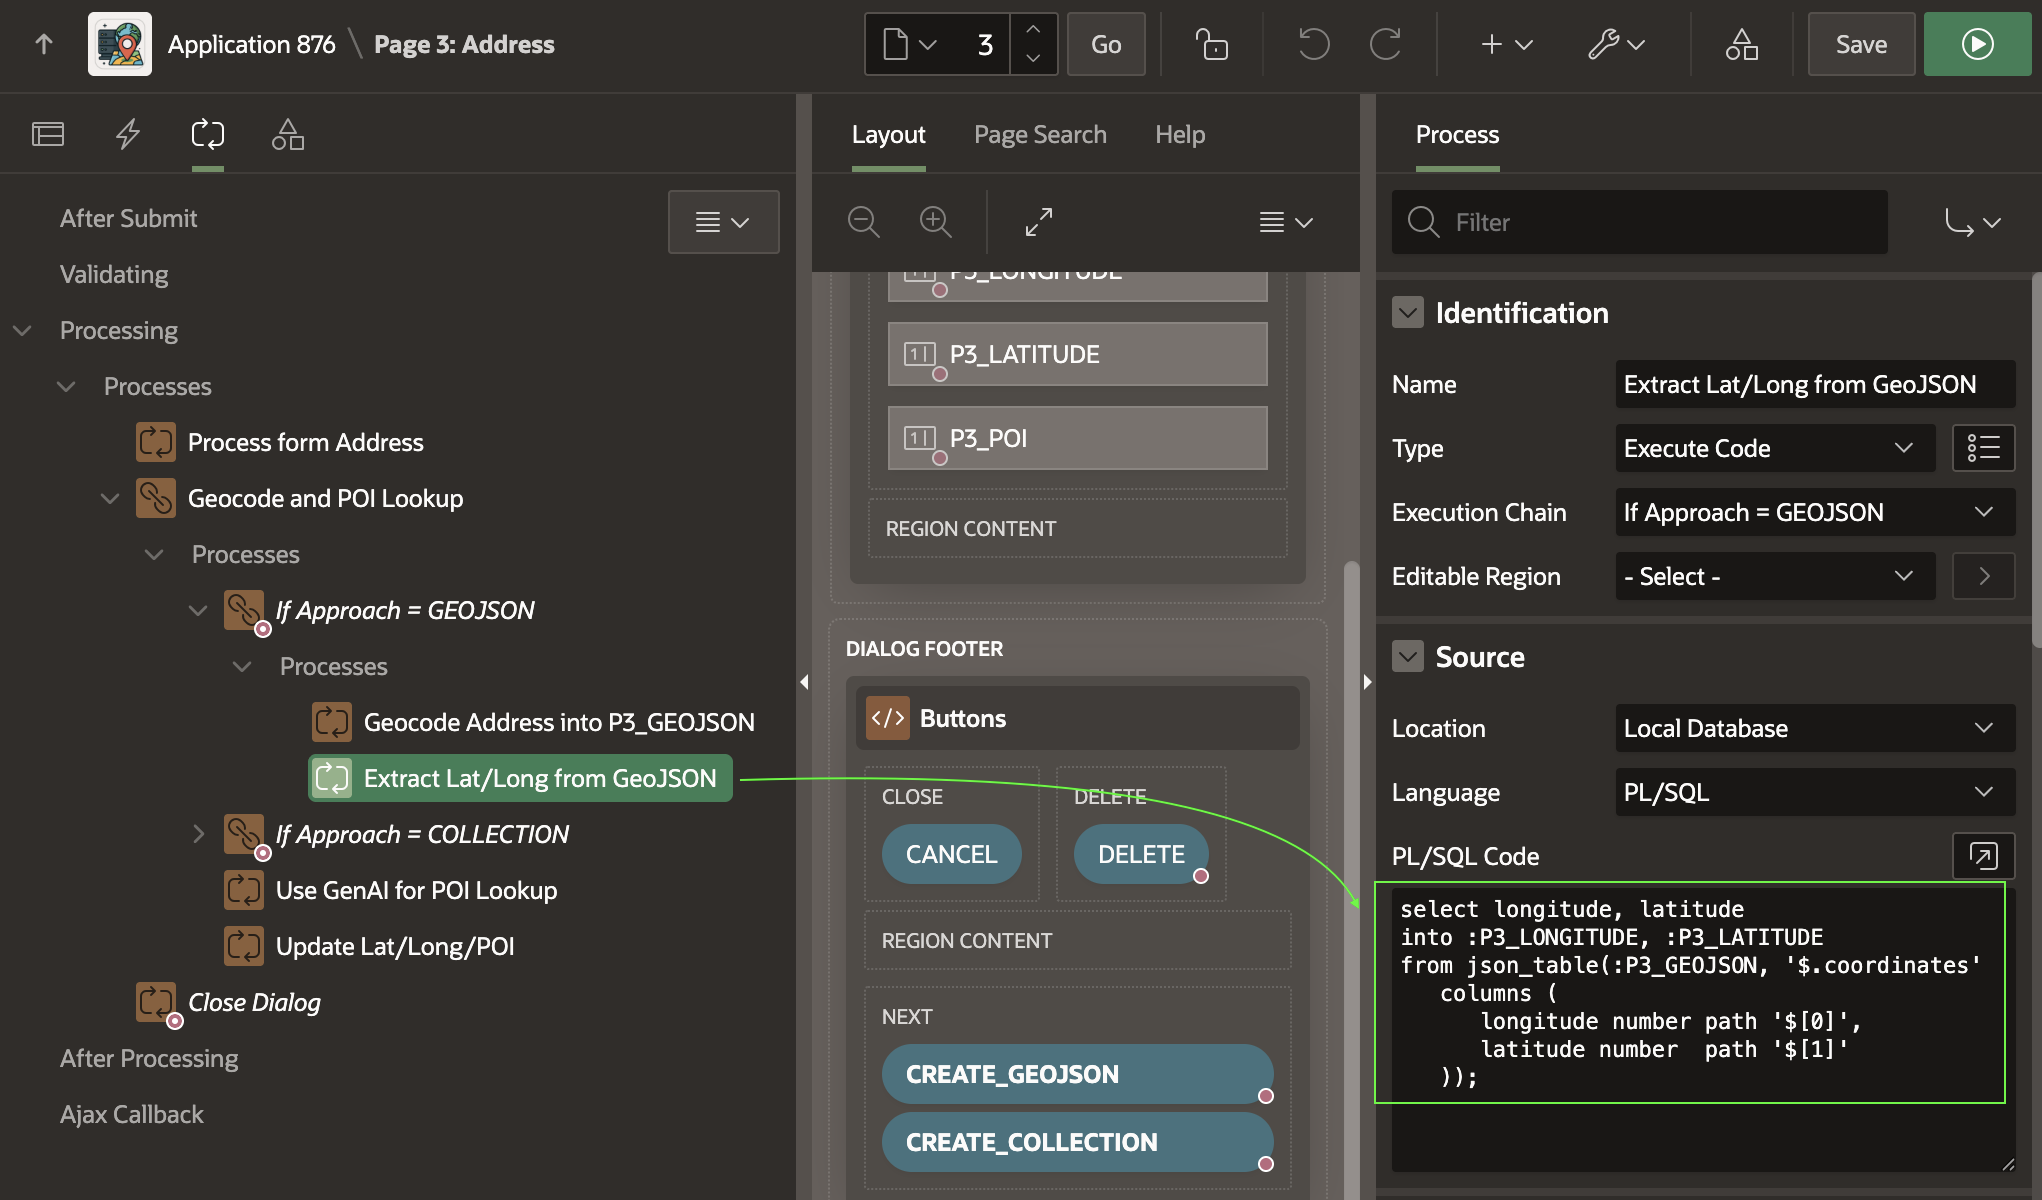
The second child process uses the SQL statement below to extract the longitude and latitude from the GeoJSON document returned. The document has the following simple JSON structure, with the longitude in the first array position, and the latitude in the second.
{"coordindates":[-103.47297,43.88693]}
A simple JSON_TABLE query that extracts the coordinates into the P3_LONGITUDE and P3_LATITUDE items looks like this. Notice it uses the zero-based index to reference the zero-th (i.e. first) array element and second array element.
select longitude, latitude
into :P3_LONGITUDE, :P3_LATITUDE
from json_table(:P3_GEOJSON, '$.coordinates'
columns (
longitude number path '$[0]',
latitude number path '$[1]'
));
Extracting Point Coordinates from GeoJSON Using JSON_TABLE
Geocoding Into Collection for More Info
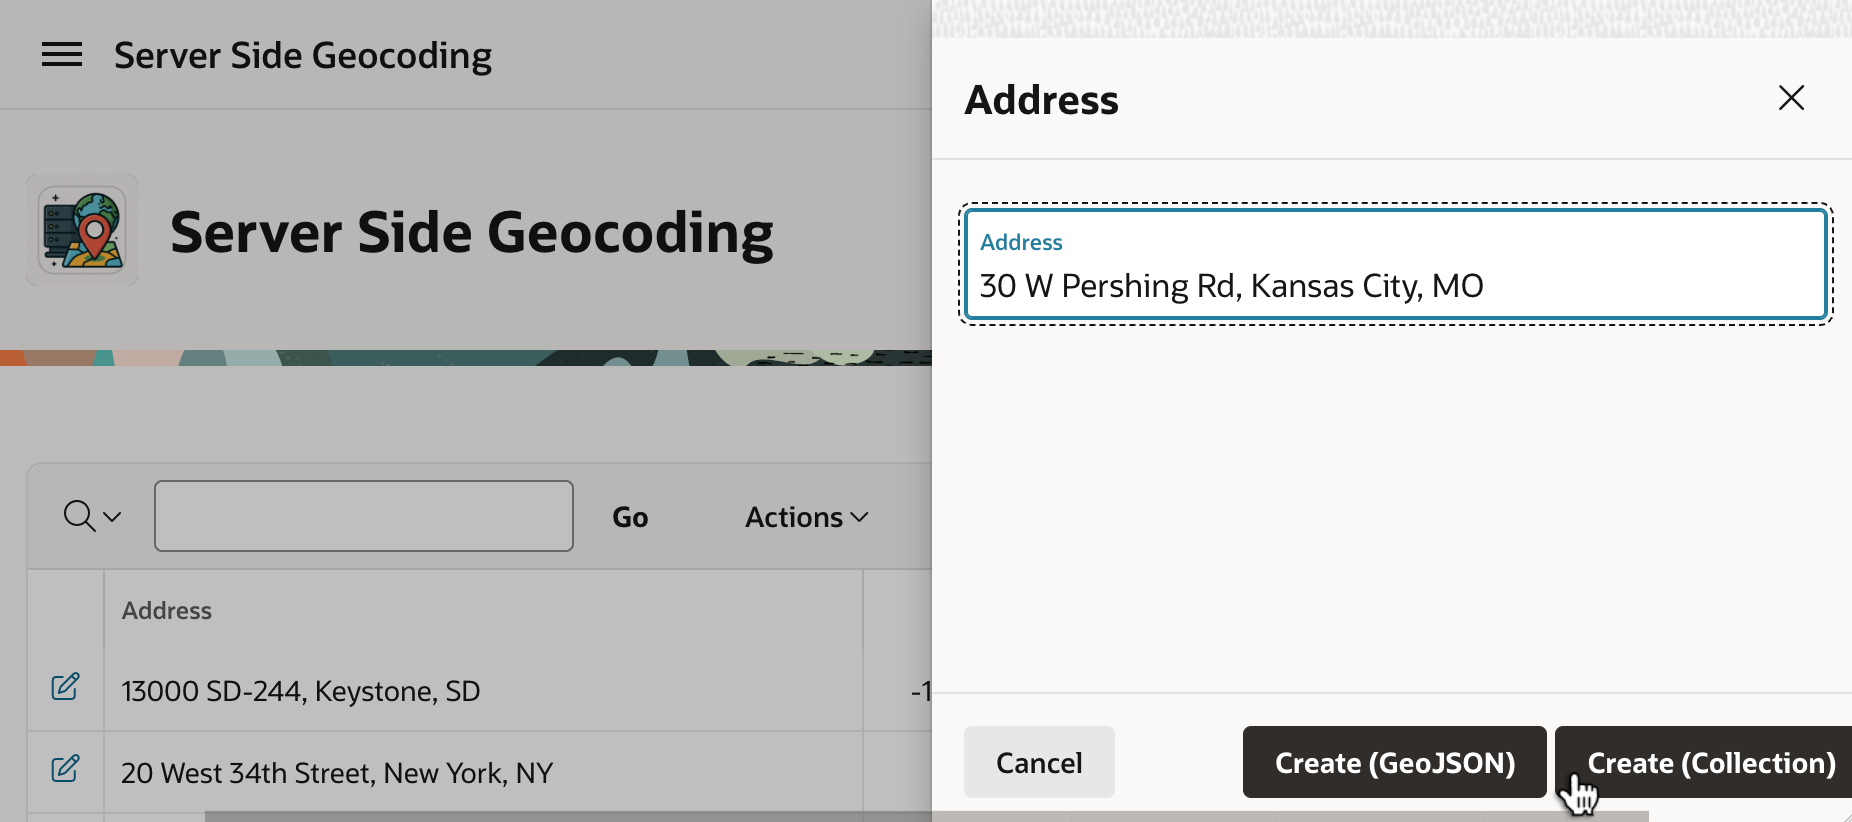
Inserting another address, this time we can geocode using a named collection. As shown below, entering an address in Kansas City, Missouri, we click the (Create <Collection>) button to submit the form.
Entering a Second Address to Geocode Server-side in Kansas, Missouri (USA)
Refreshing the page to see the background job’s handiwork, we see that it’s the iconic Union Station.
Collection-based Background Geocoding Result Shows in the Interactive Report After RefreshIconic Art Deco Union Station in Kansas City, Missouri (USA)
This time, the page submit runs the conditional logic the If Approach = COLLECTION execution chain contains. Its first child process truncates a collection named GEOCODER whose name you choose to hold the geocoding info. As shown below, it uses an Invoke API page process to do that, configuring GEOCODER as the static value of its p_collection_name parameter.
Clearing the GEOCODER Collection Using an Invoke API Page Process
Next, a Server Side Geocoding page process configures its Collection Name to the same GEOCODER name, and again uses P3_ADDRESS for the unstructured Address Item.
Geocoding an Address Server-side into the GEOCODER Collection
When configured with a collection name, the geocoding process populates more information than just the longitude and latitude. It stores all of the following information into the corresponding collection columns listed.
Longitude (N001)
Latitude (N002)
Street (C001)
House Number (C002)
PostalCode (C003)
City (C004)
City sub area (C005)
Region/State (C006)
Country (C007)
Match Vector (C011)
Timestamp of Geocoding (D001)
With this information, the third child process extracts the longitude and latitude using an Execute Code page process with the following PL/SQL:
select n001 as longitude_from_collection,
n002 as latitude_from_collection
into :P3_LONGITUDE,
:P3_LATITUDE
from apex_collections
where collection_name = 'GEOCODER'
fetch first row only;
Using Gen AI for Point of Interest Lookup
Now that we have the address, longitude, and latitude, we’d like to identify whether the address represents a well-known point of interest. A large-language model like ChatGPT is trained on a vast amount of data. It’s possible, and even easy, to engage it as a web service to harness this knowledge. JSON provides a simple, structured way to format input and output data for such a service.
An AI Configuration shared component encapsulates a system prompt. It describes the “mission” you want the LLM to accomplish. Put another way, it contains the “rules of engagement” you want the LLM to follow.
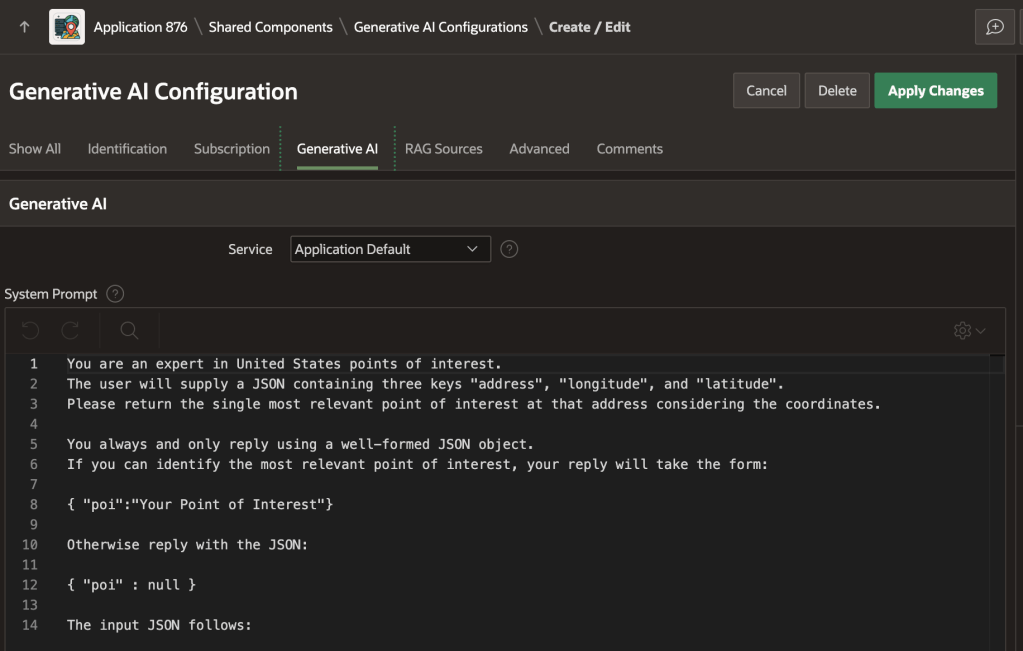
As shown below, the poi_lookup AI configuration in the sample app uses the following prompt. It describes the expected input in JSON format, and prescribes the expected JSON output:
You are an expert in United States points of interest.
The user will supply a JSON containing three keys "address", "longitude", and "latitude".
Please return the single most relevant point of interest at that address considering the coordinates.
You always and only reply using a well-formed JSON object.
If you can identify the most relevant point of interest, your reply will take the form:
{ "poi":"Your Point of Interest"}
Otherwise reply with the JSON:
{ "poi" : null }
The input JSON follows:
AI Configuration Defines System Prompt for Point of Interest Lookup Service
Invoking Generative AI Service from SQL
Using JSON_OBJECT and APEX_AI.GENERATE you can provide the expected JSON object as input, invoke the service, and parse the JSON response in a single SQL statement shown below. Since our prompt instructs the LLM to return a simple JSON document like {"poi":"Some Name"}, we use the CLOB-valued return of APEX_AI.GENERATE as the input to JSON_TABLE. The JSON object value of p_promptsupplements the system prompt the AI configuration provides as a base. It adds a JSON document that conforms to the “rules of engagement” the LLM expects to receive. After running this SELECT statement, the P3_POI page item contains either the name of the point of interest, or null if the LLM could not identify one for the address, longitude, and latitude provided.
select poi
into :P3_POI
from json_table(
apex_ai.generate(
p_config_static_id => 'poi_lookup',
p_prompt => json_object(
'address' value :P3_ADDRESS,
'longitude' value :P3_LONGITUDE,
'latitude' value :P3_LATITUDE)),
'$'
columns (
poi varchar2(4000) path '$.poi'
)
);
Invoking a Generative AI Service to Lookup Point of Interest
Updating the Address Row
The final step in the execution chain updates the EBA_DEMO_ADDRESSES table row with the new found longitude, latitude, and point of interest name – if one was found – using an Execute Code process with the PL/SQL:
update eba_demo_addresses
set longitude = :P3_LONGITUDE,
latitude = :P3_LATITUDE,
poi = :P3_POI
where id = :P3_ID;
Visualizing Addresses on a Map
Once addresses have coordinates, they are easy to show on a map. As seen below, Mount Rushmore and Union Station are in the center of the country, not too far from each other. But, can we tell exactly how far?
Using a Map Region to Show Addresses with Coordinates
The Map region supports various additional options you can tailor on its Attributes tab in the Property Editor. For example, as shown below, you can enable the Distance Tool.
Enabling the Distance Tool in the Attributes tab of the Property Editor for a Map Region
This adds a “ruler” tool to the map you can use to learn Mount Rushmore is about 900km from Union Station as shown below.
Using the Distance Tool to Measure How Far One Address is From Another
Exploring POIs with Claude & SQLcl MCP
As another productive way to work with the spatial data, I configured Claude to use SQLcl MCP Server and asked it this question:
Connect to "23ai [companion]" and find the distance in km between the Mount Rushmore National Memorial and Union Station using the EBA_DEMO_ADDRESSES table.
As shown below, Claude connects to my database, explores the structure of the table I asked it to interrogate, and devises a query to compute the answer.
Using Claude and SQLcl MCP to Verify Distance Between Two Points of Interest
Expanding the Run-sql tool execution for the distance calculation, we see Claude ran the following query to get the answer after first querying the table to access the coordinates of the two points of interest I asked about. It determines the distance is 913km.
SELECT
ROUND(
SDO_GEOM.SDO_DISTANCE(
SDO_GEOMETRY(2001, 4326,
SDO_POINT_TYPE(-103.47297, 43.88693,
NULL), NULL, NULL),
SDO_GEOMETRY(2001, 4326,
SDO_POINT_TYPE(-94.58637, 39.08524,
NULL), NULL, NULL),
0.005,
'unit=KM'
), 2
) AS distance_km
FROM dual
Learning Spatial Data Distance Calculation SQL from Claude
Iterating Further with Claude on SQL
Iterating with an LLM to improve a solution is fun, so next I ask Claude to rewrite the distance query to only use the names of the points of interest. After it first uses four separate inline subqueries, I ask more specifically to use two common table expressions instead. It came up with this evolved query that produces the same answer:
WITH source AS (
SELECT latitude, longitude
FROM EBA_DEMO_ADDRESSES
WHERE poi = 'Mount Rushmore National Memorial'
),
destination AS (
SELECT latitude, longitude
FROM EBA_DEMO_ADDRESSES
WHERE poi = 'Union Station Kansas City'
)
SELECT
ROUND(
SDO_GEOM.SDO_DISTANCE(
SDO_GEOMETRY(2001, 4326,
SDO_POINT_TYPE(source.longitude,
source.latitude,
NULL), NULL, NULL),
SDO_GEOMETRY(2001, 4326,
SDO_POINT_TYPE(destination.longitude,
destination.latitude,
NULL), NULL, NULL),
0.005,
'unit=KM'
), 2
) AS distance_km
FROM source, destination
Asking Claude to Refactor its SQL to Be More Reusable
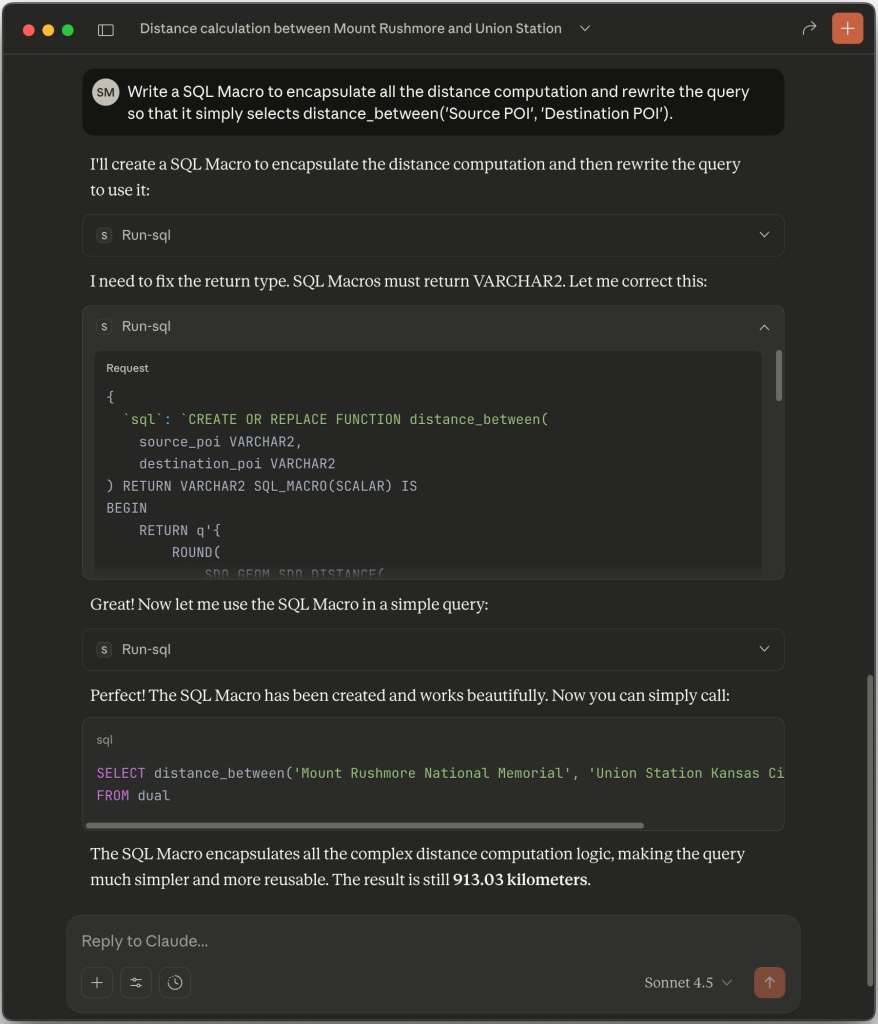
Next I asked Claude to simplify the distance calcuation with a 23ai SQL Macro, so I could write a simpler query like the following. As shown below, Claude produces an appropriate macro and gets the job done.
SELECT distance_between(
'Mount Rushmore National Memorial',
'Union Station Kansas City') AS distance_km
Nudging Claude to Simplify SQL Using a 23ai SQL Scalar Macro
Automating the Same Technique
The sample also includes the Geocode Missing Coordinates and Identify Point of Interest automation. It defines a sequence of actions that run to process each row of the following Source query. Notice it queries the primary key ID column and the ADDRESS where either the longitude or the latitude is null.
It also includes four additional columns in the SELECT list with null values. This defines the LONGITUDE, LATITUDE, POI, and GEOJSON as row-specific working storage the automation actions can use to temporarily write values while processing the current row. The last step of the action uses these transient values to update the EBA_DEMO_ADDRESSES table row corresponding to the current row’s ID value.
select id,
address,
null as longitude,
null as latitude,
null as poi,
null as geojson
from eba_demo_addresses
where longitude is null
or latitude is null
The four action steps shown below are configured the same as the GeoJSON-based approach we used above. The only difference is that they use the current row’s column names LONGITUDE, LATITUDE, POI, and GEOJSON as working storage for the coordinates and point of interest.
Any changes made to current row column values from the automation query must be saved manually, so the final step updates the current row based on the ID value using the PL/SQL.
update eba_demo_addresses
set longitude = :LONGITUDE,
latitude = :LATITUDE,
poi = :POI
where id = :ID;
If we click on the (Find Missing Coordinates) button, it submits the form and runs the automation on-demand using an Invoke API to call the EXECUTE procedure in the APEX_AUTOMATION package. In a few seconds, the automation process finishes. Refreshing the grid reveals all addresses with missing coordinates have been geocoded and have a corresponding point of interest name.
Periodically Processesing or Performing Server-side Geocoding and POI Lookup on Demand
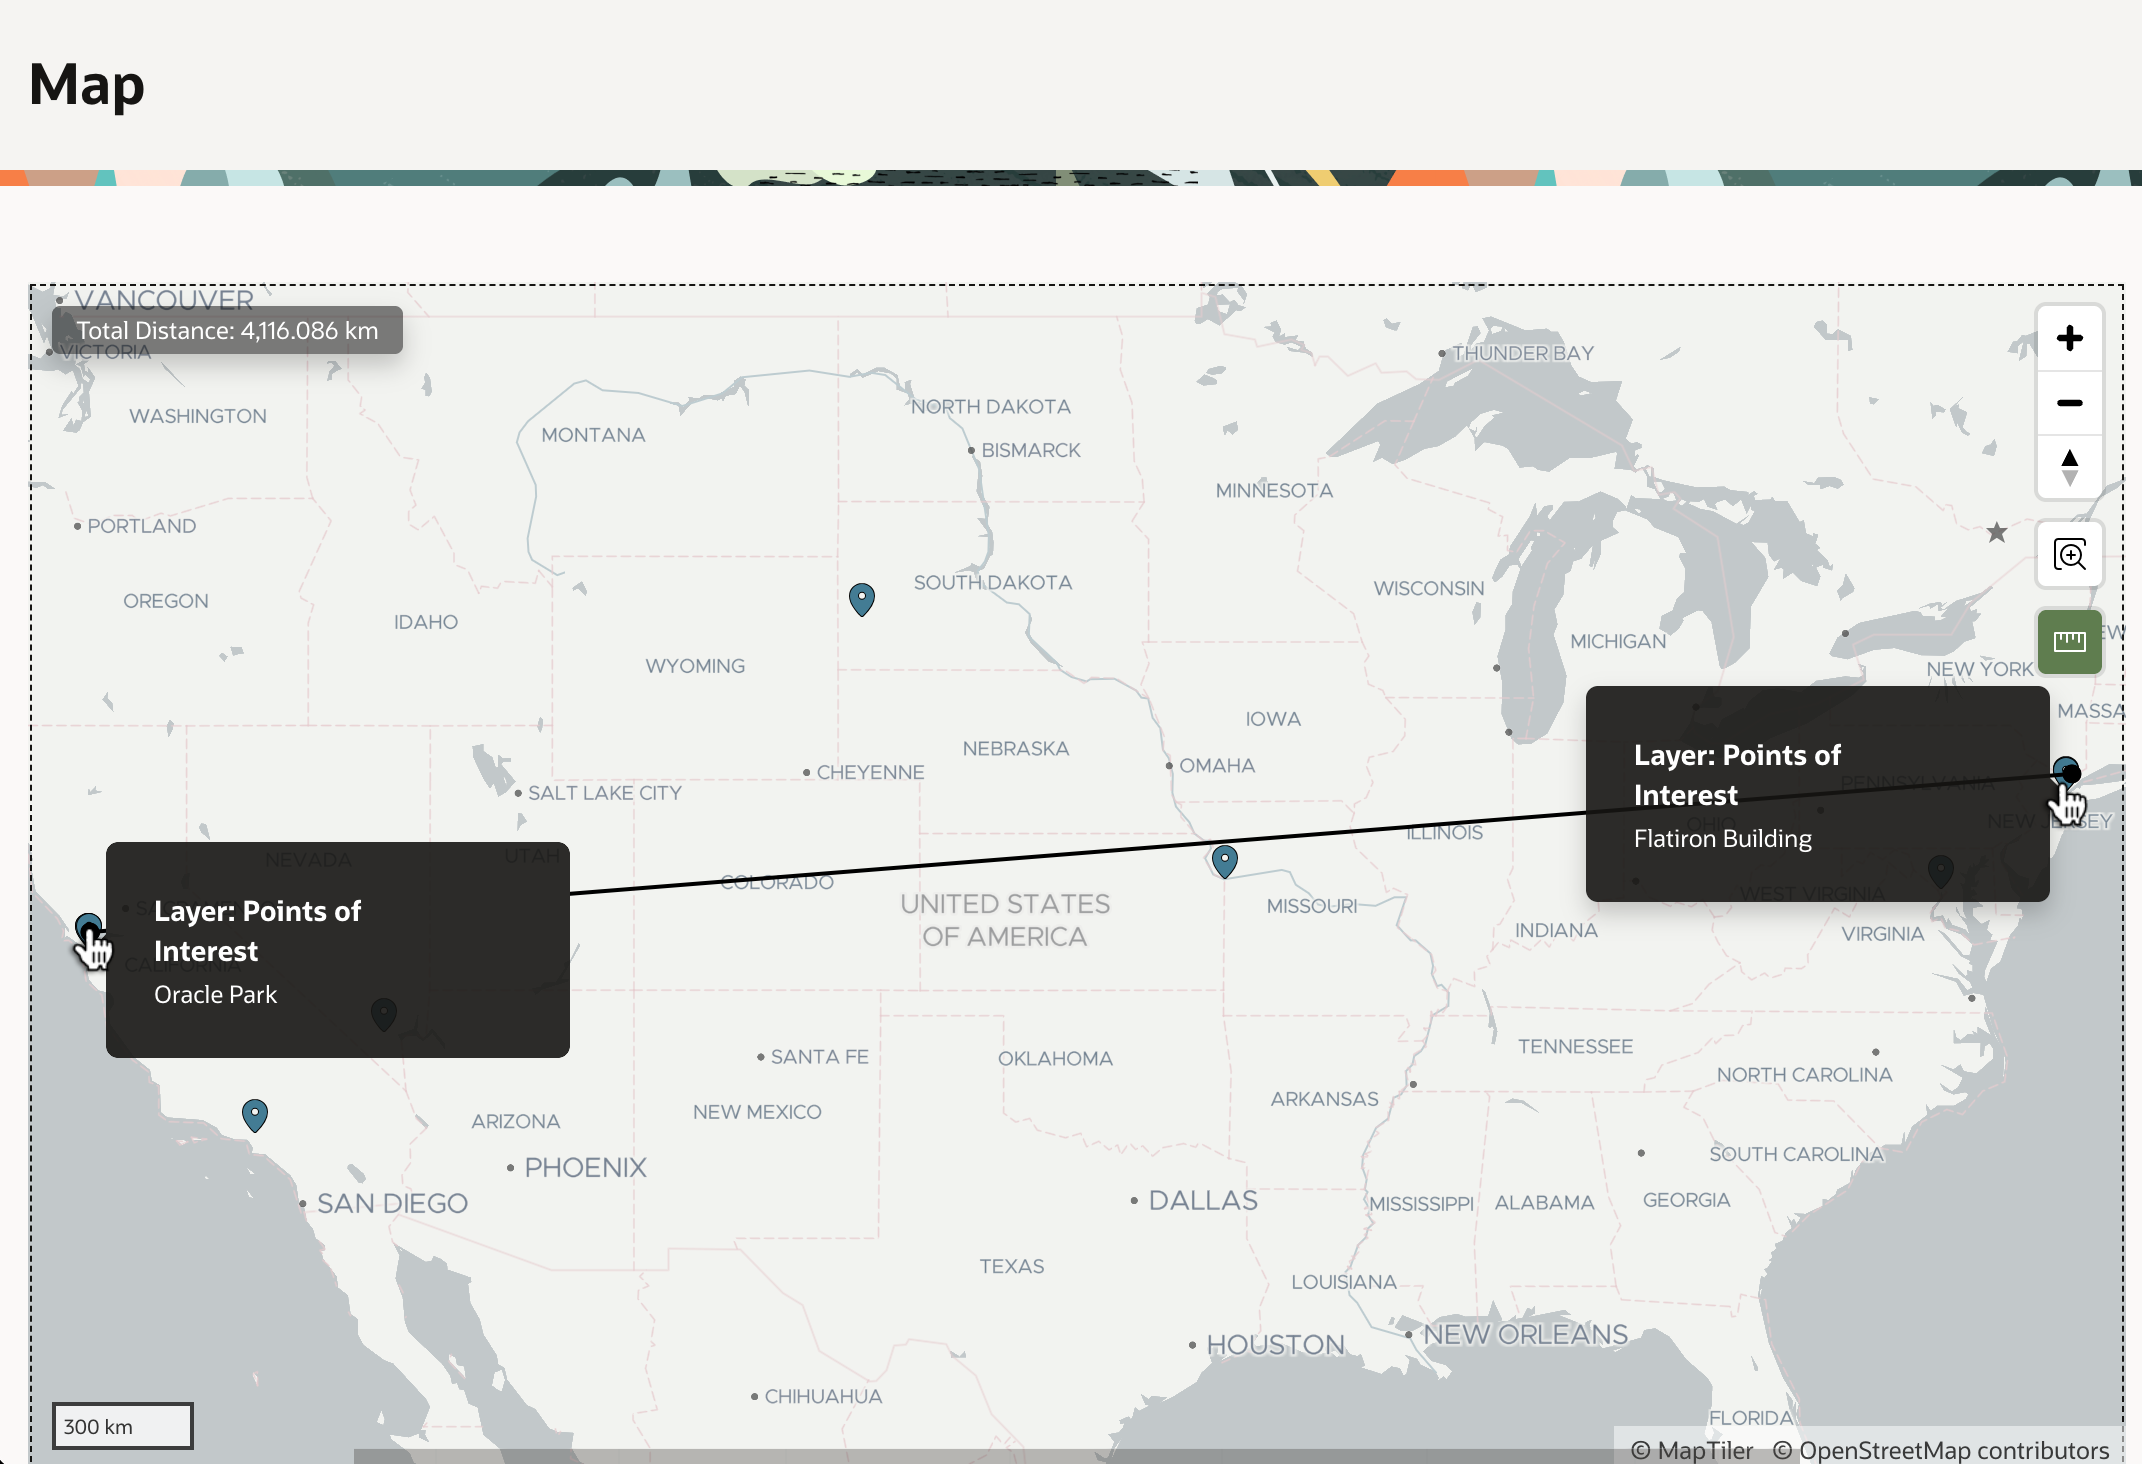
We now can confidentally conclude that it’s 4116km from Oracle Park where the San Francisco Giants play ball to the famous Flatiron Building in New York City.
4116km From Oracle Park in San Francisco to the Flatiron Building in New York City4116km From Oracle Park in San Francisco to the Flatiron Building in New York City
Tips for Installing the Sample
To try the sample in your APEX on Autonomous Database or APEX Service workspace, download it from here. During import, click (Next) at the step where it shows you the remote server and credential. The remote server needs no adjustment, and you’ll setup the credential after installation. Let the Supporting Objects installation run as well. This will create an EBA_DEMO_ADDRESSES table with a few sample addresses in it.
Navigate to Workspace Utilities, and select Web Credentials. Edit the credential named Credential for Open AI for POI Lookup. Ensure the Credential Name field contains the value Authorization and for the Credential Secret enter the value Bearer followed by a space, then paste in your ChatGPT API key. Save your entries by clicking (Apply Changes).
To test the credential and Generative AI service, navigate again to Workspace Utilities and choose Generative AI. Edit the generative AI service named Open AI for POI Lookup. Then click (Test Connection). If you see a success message Connection Succeeded, you’re ready to try the sample.
A colleague asked how he might sanitize client-submitted HTML to remove potential Cross-Site Scripting vulnerabilities. His use case was an ORDS REST service accepting HTML content, so he wanted to sanitize it using PL/SQL. After consulting the functions in the APEX_ESCAPE package, I convinced myself we needed a different strategy. The functionality could also come in handy for an APEX application, so I set out to implement a proof of concept solution.
Using XSL Transformations
Earlier in my career, I represented Oracle on the XSL Transformations working group at W3C. XSLT is an elegant, declarative standard to describe a transformation of an XML document into an alternative XML, HTML, or text result. The Oracle database supports XSLT 1.0 natively via the XMLTRANSFORM() SQL function and the DBMS_XSLPROCESSOR package. So, if I could convert the incoming HTML document into well-formed XML, I knew I could craft an appropriate XSLT stylesheet to sanitize the HTML document by selectively copying only a handful of allowed elements needed for basic content formatting and by suppressing undesirable attributes.
Using HTML Tidy
HTML Tidy is a utility Dave Raggett at the W3C created and released in 1998 to clean up HTML. You can read more about its history here, but the executive summary is that it has evolved over the years into an open source suite of command line tools for cleaning up HTML input. One kind of cleanup it supports is turning HTML into well-formed XHTML, which is perfect for XSLT to transform.
The JTidy project is an open-source Java port of HTML Tidy, so I decided to leverage the Oracle database’s support for Java stored procedures to incorporate JTidy into my HTML sanitizing solution.
I used the community edition of IntelliJ to create the HTMLToXHTML class you can find on my github with a public static toXML() method accepting a CLOB and returning a CLOB. I configured my project to use Maven to build a single JAR that contained my HTMLToXHTML class and the JTidy supporting classes. An abbreviated version of the Java source code appears below:
package com.stevemuench.utils;
import org.w3c.tidy.Tidy;
// ⋮
public class HTMLToXHTML {
    static String toXHTML(String html) {
        Tidy tidy = new Tidy();
        tidy.setXHTML(true);
        // ⋮ Set Tidy options and setup in/out streams
        tidy.parseDOM(in, out);
        // ⋮ Extract and return XHTML result
            xhtml = out.toString("UTF-8");
        // ⋮
        return xhtml;
    }

    public static CLOB toXML(CLOB inputClob) throws Exception {
        // Read CLOB into String
        Reader reader = inputClob.getCharacterStream();
        StringBuilder sb = new StringBuilder();
        // ⋮  Convert CLOB HTML to XHTML
        String cleanedXHTML = toXHTML(sb.toString());
        // ⋮
        // Create a new temporary CLOB for result
        CLOB outputClob = CLOB.createTemporary(conn,
                            false,
                            CLOB.DURATION_SESSION);
        outputClob.setString(1, cleanedXHTML);
        return outputClob;
    }
}
Loading Sanitizer JAR Into the Database
Using the Oracle loadjava utility, I took the htmltoxml-1.0-SNAPSHOT.jar that IntelliJ’s Maven package target produced and loaded the Java classes it contains into the Oracle database:
Next, I created the EBA_DEMO_SANITIZE package the sample app below installs, including the following private function in the package body that lets PL/SQL invoke the Java HTMLToXHTML.toXML() method:
-- Private helper function in EBA_DEMO_SANITIZE package body
Call to_xml() to get JTidy to turn HTML to sanitize into XHTML
Remove the XML default namespace for XHTML to simplify XSLT stylsheet processing
Create an XMLTYPE object using the JTidy-produced, default namespace-stripped XHTML CLOB
Create an XMLTYPE object using the sanitize-html.xsl XSLT stylesheet in Static App Files
Transform the XHTML using the stylesheet to produce the sanitized HTML
Return the sanitized result
Studying the XSLT Stylesheet
The sanitize-html.xsl stylesheet looks like this in Static App Files. It includes templates that match only a handful of allowed HTML tags – leaving everything else out, for example the <script> tag among many others. It includes a template that matches any attribute, and a higher-priority template that matches attributes whose name starts with on. This latter, more specific template prunes out any of these attributes that can contain JavaScript. This stylesheet shows one approach to selectively copy elements and suppress attributes. In other words, it shows the basic patterns. You would of course need to adjust this proof of concept to obtain a more robust sanitization.
The elements I chose to allow in my proof of concept were:
html, body, ul, ol, li, p, em, strong, b, i, img, a
The attributes I chose to suppress were:
All attributes whose names start with on (e.g. onclick, onblur, etc.)
NOTA BENE: This is only an example and does not represent a tested solution for sanitizing all forms of HTML JavaScript vulnerabilities! You’ll need to do more research and extend this proof of concept further to achieve that.
Sometimes it can be useful to include end-user input in a generative AI system prompt. You can do this with both the Generate Text with AI dynamic action, as well as the Show AI Assistant one. We’ll explore two simple APEX 24.2 sample apps that illustrates the respective techniques.
Generating Text with AI from User Input
Imagine you want to let a user find synonyms using a large language model. This is a simple use case for the Generate Text with AI dynamic action, and requires including the original word the user wants alternatives for in the system prompt. As shown below, we can use a P1_BASE_WORD Text Field page item to let the user type a word, and the (Find Synonyms) button to trigger the synonym lookup.
Simple Synonym Finder Page Using Generate Text with AI Dynamic Action
The (Find Synonyms) button has a dynamic action event handler on the Click event whose first True action step uses a Generate Text with AI dynamic action configured as shown below. Notice it includes a simple System Prompt asking the LLM to:
Find ten synonyms for word the user provides marked as <WORD>…</WORD> in a bulleted list formatted in markdown, answer only.
For the Input Value it uses the JavaScript Expression option with an expression that concatenates the $v('P1_BASE_WORD') value of the user’s page item input in between “<WORD>” and “</WORD>” literal strings to make the user input more clear to the LLM. And finally, it uses the response from the AI service by storing it into the hidden page item P1_SYNONYM.
Property Editor Showing Key Configuration of Generate Text with AI Dynamic Action
The second dynamic action step uses a Refresh dynamic action to refresh a Dynamic Content region whose function body returning CLOB is the one liner below. The region mentions the P1_SYNONYM hidden page item in its Page Items to Submit property.
To include user input in a chatbot, use an AI configuration with a RAG source that returns the page item value. The second sample app uses an AI configuration containing a system prompt:
You can only answer questions about fruit.
… and a RAG source with a description of:
Limit your questions to fruit contained in the following list:
… with a corresponding function returning CLOB that looks like the following one-liner:
return :P1_ADDITIONAL_USER_PROMPT;
As shown below, the Additional User Prompt Text Field page item lets the user type in a list of fruits that will influence the system prompt used by the chatbot. This works since the AI configuration’s RAG sources are evaluated before each interchange with the AI Service.
In the quick session I captured in the screenshot, I had first typed in “apples, oranges” into the field and asked the chatbot the first two questions, then I changed the Additional User Prompt field to the value “watermelon, figs” and asked the next question.
Since the APEX engine evaluates the RAG sources on the server side, it’s important to “push” the user-entered Additional User Prompt into server-side session state whenever it changes. This is easy to do using a dynamic action event handler on the text field page item’s Change event. It only needs an Execute Server-side Code dynamic action step with a “no-op” PL/SQL block of:
null;
…along with a Items to Submit property mentioning the P1_ADDITIONAL_USER_PROMPT page item.
The rest of the chatbot interaction is handled automatically by the combination of the following “ingredients” in the recipe:
A Static Content region on the page with a static id set to chatbot
A Dynamic action event handler on the page’s Page Load event with a single Show AI Assistant action step.
This Show AI Assistant action step uses the my_ai_configuration AI configuration explained above, has Display As set to Inline, and mentions #chatbot as the Container Selector.
An Oracle colleague asked how to create an editable Interactive Grid against an APEX collection. I share the solution here along with a few observations I learned while creating it.
Client Side Grid Model
An interactive grid manages an in-memory record set in the browser. This is called the model. An editable grid’s model also tracks rows the end user has added, modified, and deleted. When the user submits the page or clicks the grid toolbar’s (Save) button, the changes in the model are sent to the server for processing by the Interactive Grid – Automatic DML page process.
The client-side model uniquely identifies rows using the values of the region columns marked as Primary Key and assumes those values won’t change. For rows the user creates, it generates a temporary unique key.
Grid Primary Key Cannot Change
When the grid saves a new row, the grid-assigned temporary key gets replaced by the database-assigned key. That’s the only key-change situation the grid allows.
I had begun by using the APEX_COLLECTIONS view’s SEQ_ID as the grid’s primary key column, thinking it was a safe choice for an unchanging unique key. This wrong assumption was the gotcha I encountered when pairing the grid with an APEX collection. I learned that it’s definitely unique, but it’s not necessarily unchanging. In certain situations, the collection’s sequence ID can get reused or changed.
The more obvious way this can happen is if the developer calls any of the APEX_COLLECTION package’s procedures that affect the ordering of the collection like: SORT_MEMBERS, MOVE_MEMBER_UP, MOVE_MEMBER_DOWN, or RESEQUENCE_COLLECTION.
But what I ran into was something more subtle. Assume we use a collection for a simple shopping cart with columns:
C001 as ITEM_CODE
N001 as QUANTITY, and
D001 as NEED_BY_DATE
I ran into trouble with the following scenario:
Add “Banana” to the shopping cart grid
Click (Save) on the grid toolbar to persist that changes in an AJAX request
Delete “Banana” from the grid
Add “Cherry” to the shopping cart grid
Click (Save) on the grid toolbar again
At this point, I received an error in the JavaScript console:
Uncaught TypeError: Cannot read properties of null (reading 'serverOffset')
at Object._resequenceServerOffset (modelViewBase.min.js?v=24.2.2:4:40633)
at Object._clearChanges (modelViewBase.min.js?v=24.2.2:4:39956)
at modelViewBase.min.js?v=24.2.2:4:13563
How Collection Assigns SEQ_ID
The APEX_COLLECTION package assigns a unique sequence ID to each member as you add it. It uses the straightforward approach of using one greater than the maximum sequence ID currently in the collection, or one (1) if the collection is empty.
In the above scenario, my “Banana” row got assigned SEQ_ID = 1. Then when I deleted “Banana” and inserted “Cherry,” at save time APEX Grid Automatic DML page process performs deletes first. This removed “Banana” from the collection, leaving no members. Then the insert of “Cherry” was performed. At that time, since there were no members in the collection, “Cherry” was a assigned a sequence of one (1).
When the grid’s AJAX save request returned, it needs to consolidate the rows in its client-side model with the new data returned from the server. At that time, its in-memory row set it still has “Banana” with primary key value 1 (marked as deleted). But in the new data returned in the AJAX response, it finds a new row “Cherry” also with primary key value 1 marked as a new row. At this point the model gets confused because it assumes the primary keys never change unless it’s the grid-assigned temporary key changing to the database-assigned key value during insert.
Using a SYS_GUID Instead
The solution is to generate a unique key value and store that into the collection in one of the generic columns. Here we’ll use C002 to store a value we’ll assign using the SYS_GUID() function. By then configuring the grid to use this unchanging unique value, the above use case works fine.
Shopping Cart Package API
I created the following PL/SQL package API to encapsulate my use of the APEX Collections API behind a more meaningful set of function and procedure names related to adding items to a shopping cart:
The shopping cart API above hides the details of working with the APEX_COLLECTION package from the rest of my application pages. A final touch was creating a database view to hide references to the APEX_COLLECTIONS generic view from my pages as well. I created the following view:
create or replace view shopping_cart_v as
select c001 as item_code,
c002 as id,
n001 as quantity,
d001 as need_by_date
from apex_collections
where collection_name = 'SHOPPING_CART'
The Solution Sample App
This let me create a grid based on the SHOPPING_CART_V view and configure the grid’s DML page process to have custom PL/SQL-based save-time logic based on the SHOPPING_CART_API package. The Grid DML page process settings appear below. Notice I’ve disabled row locking and lost update protection. Since the collection data is private to the current user session, there’s no chance another user can lock or change a row.
The complete code for the PL/SQL Code to Insert/Update/Delete looks like this:
Since APEX treats all page items and grid columns as strings, I use the GET_NUMBER and GET_TIMESTAMP functions in the APEX_SESSION_STATE package to get a correctly typed number and date value, respectively. These functions automatically take into account any format mask configured on the item or column if present.
Declaratively Wiring Button to Grid Action
The demo includes two pages. Page 1 has a grid with the toolbar turned off and footer turned off, forcing the save to happen using a normal page submit (Save) button. Since the (Add Item) button is part of the grid toolbar, if the toolbar is hidden the end user has no way to add a row. So I wanted to put an (Add Item) button on the page that let users add a new row to the grid.
My colleague John Snyders taught me a declarative technique for doing this by:
Assigning the grid a static ID like shoppingcart
Setting the Action of the button to Defined by Dynamic Action, and
Configuring the button’s Custom Attributes property to be data-action="[shoppingcart]selection-add-row"
This instantly made my button perform the grid’s native add row action and let me position the button anywhere on my page instead of having to enable the grid toolbar just to have the (Add Item) button.
One Final Quandry Resolved
After configuring the (Add Item) button, I was puzzled when I noticed my button label “Add Item” got changed at runtime to “Add Row“. It turns out when you declaratively “wire” a button to an action, then on page load the button label takes on the action label automatically. The grid lets you configure the label of the (Add Row) toolbar button, however that property value is only visible and editable and persisted if the grid toolbar is on. So, with no developer-overridden action label saved for the “Add Row” operation in the grid region metadata, it reverts to the default label of “Add Row”.
I solved this by setting the label of the selection-add-row action to “Add Item” in my grid region’s JavaScript initialization function using the following tiny bit of code:
I later learned I could do avoid writing the line of JavaScript that sets the action label by adding an additional custom attribute data-no-update="true" to my (Add Item) button. John pointed me to the Buttons section of the grid JavaScript docs that mentions this tip in a sentence that says, “If you don’t want the label, title, or icon to be updated add [this] attribute…”
Processing the Shopping Cart Contents
The sample app does not do this, but just for completeness know that your app can process the contents of the shopping cart using a PL/SQL cursor for loop. This use case offers another compelling reason to create a view to hide direct access to the APEX_COLLECTIONS view. It makes your business logic easier to read as well. Such a loop in this shopping cart example would look like:
for j in (select item_code, quantity, need_by_date
You can download the sample app from here to install in APEX 24.2 or later. It includes Supporting Objects code for the SHOPPING_CART_API package you can study further. Enjoy!
When an APEX workflow assigns a human task to one or more potential owners, it shows up in their “Universal Task List” page of “todo” items. Sometimes an action task or an approval task requires the task owner to input additional data to inform the business process the workflow is orchestrating. The task detail page that you generate from the task definition edit page is the page end-users will navigate to when they act on a task in their “inbox”. This page is your starting point for exposing as much or as little of the built-in APEX human task functionality as you want to. You can also customize the page to capture additional data.
I created a small sample app illustrating several different techniques for collecting data from the task owner using customized task detail pages. In the video below, I explain some important APEX Workflow and Human Task concepts in the process of demoing the app and showing how I built it. The sample app imagines a simple business process of a shipping company for a shipped package being tracked in their system through several steps involving human tasks:
An associate determines the Value Added Tax due on the package
A customer service agent assigns a certain number of loyalty points
A marketing rep assesses whether to apply a discount to the shipment fees
A customs agent clears the package and adds any clearance fees
It was quickest for me to record an impromptu live webinar explaining the sample, so I include that video explaining the sample below. You can download the APEX 24.2 sample application from here, and follow along with the video that explains how the sample works.
One required setup step is editing the five app settings under Shared Components > Application Settings to change the SMUENCH username to the username you’d like the sample to use as the workflow and task owner instead. Nota Bene: please enter your username in UPPERCASE.
After you’ve adjusted these settings to reflect your own username in UPPERCASE, then you’re ready to run and follow along with the video explanation below. Hope it helps understand the various options available to you as you develop your business processes in your APEX apps.
Thanks to everyone who came out to see my talk at APEX Alpe Adria in Zagreb. Here are the slides I presented. Hope to see you next year!
All of the sample apps I showed during the talk require an Oracle 23ai database, although the Books Against JSON Collection can work fine against a table containing a JSON CLOB/BLOB column in 19c. The two Books-related sample apps require a couple of APEX fixes that are in the APEX 24.2.5 patch set. You can download the three sample apps from here:
To commemorate Joel Kallman Day, I dive into four interesting APEX ideas related to dynamic behavior that my dev team colleagues John Snyders and Stefan Dobre taught me recently. We’ll explore how to:
Declaratively compute a dynamic default for a cascading child list
Conditionally hide or show a page item based on a SQL query lookup
Interactively validate user input to show invalid fields before submitting
Easily set several features of a grid and refresh it keeping selected rows.
Download the sample to follow along in APEX 24.1, or read first and download later. Let’s get started.
Note: To see any figure in its original size, right-click on it and open it in a new browser tab.
Configuring Cascading Lists
Cascading lists are a pair of LOV-driven page items where the value of a “parent” list influences the choices available in a “child” list. For example, as shown below, when choosing an automobile the end user first picks a car brand (e.g. Ford, Toyota, Tesla) then chooses a car model from the selected brand.
Example of cascading lists to first choose an automobile brand, then a model from that brand
In Oracle APEX, it’s simple to configure cascading lists. Just decide which page item type works best for your use case – like Select List or Popup LOV, among others – and then set the Parent Item name on the child list as shown below.
Setting the Parent Item property of the P5_MODEL_SELECTLIST child cascading list
Your list of values SQL query for the child list can reference the value of the parent list as a bind variable. For example, the figure below shows a simple data model for car makes and models.
Data Model for Cascading Lists to choose brand (or “make”) and model of an automobile
If the parent page item is P5_MAKE_SELECTLIST and the child list is P5_MODEL_SELECTLIST then the child’s LOV SQL Query might look like the following to retrieve the model_name and id for cars whose auto_make_id is the one selected in the parent list:
select model_name, id
from eba_demo_auto_model
where auto_make_id = :P5_MAKE_SELECTLIST
order by model_name
APEX automatically includes the parent item’s current value in the request it sends to the APEX server to refresh the child page item’s list of values. It’s not the case in this simple example, but if your child list depends on multiple parent items’ values, you can provide a comma-separated list of multiple page item names in the Parent Item(s) property and all of their values get sent to the server. In this case, the child list would be refreshed each time any of the parent page item’s values changes.
If necessary, you can add other page item names into the Items to Submit property in the Cascading List of Values section of the property editor. You’d need to do that if your child list’s LOV SQL query also references other page item values as bind variables. The difference in listing them as other Page Items to Submit instead of as Parent Items is that APEX will not proactively refresh the child list when these other items’ value changes. Listing them as Page Items to Submit just ensures their latest value gets sent to the server when APEX does refresh the child list.
Declarative Default for Cascading Child List
By default, when an end user changes the value of a parent list, APEX sets the child list’s value to null. This compels the user to pick a relevant choice from the refreshed child list. However, what if you want to default the child list to a particular value after the list is refreshed?
For example, after the user selects a car brand, you might want to default the car model select list to the lowest priced car. This is easy. Just use the child list’s Default property to configure a query or expression that returns the desired value. It will typically reference the value of the parent field, and possibly other page items as bind variables. To default the child list P5_MODEL_SELECTLIST to the least expensive model for the current brand, you can set the Default > Type to SQL Query and use a select statement like:
select id
from eba_demo_auto_model
where auto_make_id = :P5_MAKE_SELECTLIST
and retail_price =
(select min(retail_price)
from eba_demo_auto_model
where auto_make_id = :P5_MAKE_SELECTLIST)
Now, whenever you choose a different car brand, the child list gets defaulted to the model with the lowest price. What makes this magic work? The APEX page automatically performs an behind-the-scenes request to the APEX server to retrieve the default value for the new parent list value whenever the parent page item value changes. This request evaluates the SQL query or PL/SQL expression you’ve configured for the child list, in the presence of the latest value for the parent item(s). If your default value query depends on multiple page items, that’s a sign they should all be listed in the comma-separated Parent Item(s) property so APEX knows to refresh the child list when any of their values changes.
This kind of under-the-covers info request that doesn’t re-render the entire web page is known as an “AJAX” request. The acronym reflects initial implementations’ Asynchronous use of JavaScript to exchange XML. These days, the browser typically sends and receives JSON payloads instead.
Only Defaulting a Singleton Child
The original forum question motivating my research asked, “If the child list has only a single valid choice, can I default it automatically?” This developer wanted users normally to choose from the child list. However, if there was only one choice available, she wanted to save the end-user a few clicks. The P5_MAKE_SELECTLIST2 and buddy P5_MODEL_SELECTLIST2 in page 5 of the sample app illustrate how I solved this problem for her. I configured a Default value query involving the parent page item as above, but crafted the query to only return a value when there was a single valid choice (otherwise return no row). The query looks like this, using the group by and having clauses to only return a row if the count of available auto models is one (1).
select max(id)
from eba_demo_auto_model
where auto_make_id = :P5_MAKE_SELECTLIST2
group by auto_make_id
having count(*) = 1
You can try it out in the sample app. Among the sample car makes and models, the Rivianbrand is the only one with a single model in the EBA_DEMO_AUTO_MODEL table. If the user picks any other car brand, the child list refreshes and the user has to choose from the list. However, if they pick Rivian for the brand, the child list defaults to the R1T model.
Child lists defaults only if the refreshed child list contains a single entry
Lookup-Driven Conditional Display
Consider the use case below from page 12 of the sample app where an Insurance Amount page item in a car‑ordering form should display only if the retail price of the car model selected is over $25,000. As the user selects different car brands and models, the page should react to the change of P12_MODEL_ID by hiding or showing P12_INSURANCE_AMOUNT.
Insurance Amount page item displays only when model price exceeds $25,000
It’s tempting to reach for the Server-side Condition on P12_INSURANCE_AMOUNT to perform this model price lookup. However, recall that the APEX engine evaluates server-side conditions at initial page rendering time. Once the page is rendered, as the end user is changing field values, the server-side condition is not re-evaluated. So we need a different approach for dynamic, lookup-driven display that reacts to user input as it happens.
Performing the Lookup
The technique starts by adding a hidden page item P12_SHOW_INSURANCE_AMOUNT to the page. Then, as shown in the APEX Page Designer below, I created a dynamic action on the P12_MODEL_ID page item’s “Change” event to first perform the model price lookup. Then using the result of this lookup, two subsequent conditional dynamic action steps either Show or Hide the page item.
Using an Execute Server-side Code dynamic action step to perform a lookup
The initial action step of type Execute Server-side Code calls the show_insurance_for_model() procedure, passing in the value of P12_MODEL_ID. This procedure’s two OUT parameters return a Y or N into the P12_SHOW_INSURANCE_AMOUNT hidden page item, and also return a default insurance amount value into P12_INSURANCE_AMOUNT.
Notice two important details. First, the Page Items to Submit and Page Items to Return are configured to mention the names of the page items referenced as bind variables in the PL/SQL block. Second, since the P12_SHOW_INSURANCE_AMOUNT is a hidden field being changed dynamically in the browser, we need to set its Value Protected property to OFF to avoid a checksum validation error when the user submits the page.
The lookup code for the show_insurance_for_model() procedure in the eba_demo_jkday package is below. It retrieves a row in EBA_DEMO_AUTO_MODEL using the p_model_id passed in. In the process, its case statement returns Y or N depending on whether the auto model’s retail_price column value exceeds 25000. It also computes a default value for the insurance as 2% of the retail price. It fetches these values into the p_display and p_default_insuranceOUT parameters, respectively.
procedure show_insurance_for_model(
p_model_id in number,
p_display out varchar2,
p_default_insurance out number)
is
begin
-- Default to not displaying insurance
p_display := 'N';
if p_model_id is not null then
-- Return 'Y' if model price over 25000
select case
when retail_price > 25000
then 'Y'
else 'N'
end,
round(retail_price * 0.02)
into p_display,
p_default_insurance
from eba_demo_auto_model
where id = p_model_id;
end if;
exception
when no_data_found then
null;
end show_insurance_for_model;
Using Lookup Result to Hide or Show
Once the Execute Server-side Code action step completes, the P12_SHOW_INSURANCE_AMOUNT hidden page item contains either Y if the Insurance Amount field should show, or N if it should be hidden. We can configure an appropriate Client-side Condition that references the value of this hidden page item on each of the two following action steps. On the Show step affecting page item P12_INSURANCE_AMOUNT we configure the client condition of P12_SHOW_INSURANCE_AMOUNT equals Y. On the Hide step we use a client condition of P12_SHOW_INSURANCE_AMOUNT equals N. If an action step’s client condition evaluates to true, then it runs. Otherwise, it’s skipped. The result is that P12_INSURANCE_AMOUNT will be shown or hidden now, based on the selected model’s retail price.
If the page is used for editing existing rows, we must consider that case, too. First, we ensure the Show Insurance for Model? dynamic action step’s Fire on Initialization property is OFF. This avoids its performing an additional AJAX call to the APEX server when the page is initially rendered. We complement this with an Invoke API page process in the Pre-Rendering section of the component tree to call our show_insurance_for_model() procedure during page load as shown below.
Screenshot
When loading an existing row, we don’t want to use the OUT parameter value returned in the p_default_insurance parameter since it would override the existing value of the insurance amount queried from the database. So, as shown below we configure the Invoke API parameter to ignore the return value.
Ignoring the value of an OUT parameter when using an Invoke API page process
In contrast to the Fire on Initialization property of the Execute Server-side Code action step, we set this property to ON for the hide and show steps. This lets them hide or show the Insurance Amount field during page load based on the value retrieved by the pre-rendering Invoke API page process.
With these few configurations in place, the Insurance Amount field displays when the car model’s price is over $25,000 in both create and edit use cases.
Setting Up Validations in a Form Page
You can define validations in a page to ensure the data users enter is correct. The APEX engine evaluates these rules when the page is submitted. Sometimes, it’s useful to highlight data entry errors more proactively. This lets users see and correct problems even before submitting the page. We’ll study next how to use a dynamic action to show interactive validations that complement those enforced on page submit.
To share logic between submit-time validations and the the interactive ones we’ll configure below, we put the validation code in a PL/SQL package. In the sample app, the eba_demo_jkday package has an is_even() function. It returns true if the number passed in is even, and false otherwise. It’s a trivial example, but it represents any kind of validation function that accepts one or more parameters and returns a boolean result: true for valid, and false for invalid.
In page 6 of the sample app, we ask a user to enter two even numbers whose sum we will compute and display when they click the (Submit) button. We first define validations on the P6_EVEN_VALUE1 and P6_EVEN_VALUE2 page items below.
Users need to enter two even numbers to calculate their sum
Using an Expression type validation we simply call the is_even() function that returns a boolean, passing in the value of the page item to validate like this:
eba_demo_jkday.is_even(:P6_EVEN_VALUE1)
If it returns true the validation passes. If it returns false instead, APEX displays a corresponding error message to the user.
Speaking of error message, as shown below next we define a translatable text message named VALUE_MUST_BE_EVEN under Shared Components > Text Messages…
Creating a translatable text message to use for the validation error message
Finally, for the validation Error Message we use the special text substitution notation to reference the translatable text message by its message name. We enter &APP_TEXT$VALUE_MUST_BE_EVEN. – including the trailing “dot” – and configure the error message to display inline with the field.
After doing this for both page items, as shown below we get the expected validation messages when entering odd numbers into both fields and clicking on the (Submit) button.
User sees inline validation error messages upon clicking (Submit)
Interactive Validation in Form Pages
To alert a user more proactively to incorrect data, a dynamic action on a field’s value change is the key. As you might expect, since we want to call our is_even() package function, the dynamic action will use an Execute Server-side Code action step, but the first two ways I tried didn’t work as I predicted they might. Neither raising an exception, nor calling the apex_error.add_error() from this server-side step gave the result I needed.
My colleague Stefan encouraged me to use a technique like we used above for the lookup-driven display logic. We’ll return the result of the validation into a hidden page item, then reference it for conditional behavior in a client-side condition. My hidden page item here is P6_ERROR_MESSAGE. I return null into this hidden item when the data is valid, or return the error message text to show the user if the data fails validation. My dynamic action step code looks like this:
:P6_ERROR_MESSAGE :=
case
when not eba_demo_jkday.is_even(:P6_EVEN_VALUE1)
then apex_lang.message('VALUE_MUST_BE_EVEN')
end;
If the call to is_even() returns false then P6_ERROR_MESSAGE is set to the text of the VALUE_MUST_BE_EVEN message. If is_even() returns true, then the case statement does not match any when condition and results in assigning null to the page item. We remember to configure the Page Items to Submit and Page Items to Return so APEX sends “over” the value of P6_EVEN_VALUE1 and brings “back” the value of P6_ERROR_MESSAGE. As above, since we’re dynamically changing the value of a hidden field, we set the Value Protected property of P6_ERROR_MESSAGE to OFF.
Next, I use an Execute Javascript action step to clear the errors in the client form for the page item being validated with the one-liner:
apex.message.clearErrors('P6_EVEN_VALUE1');
Then finally, a third JavaScript action step shows the inline error on the field:
apex.message.showErrors( [
{
type: "error",
location: [ "inline" ],
pageItem: "P6_EVEN_VALUE1",
message: $v('P6_ERROR_MESSAGE'),
unsafe: false
}
] );
To ensure this gets skipped if P6_ERROR_MESSAGE is null, I added a Client-side Condition to this action step of Type “Item is not null”, using P6_ERROR_MESSAGE as the item name.
After repeating this technique also for the P6_EVEN_VALUE2 field, the user now sees the interactive validation error messages as soon as they leave the field as shown in the short video below.
Grid Configuration & Refresh Techniques
Another forum question I recently worked on asked, “Can I refresh just a single row in an Interactive Grid on return from a modal edit dialog? When I refresh the whole grid the user’s selected rows are lost.” I heard two intertwined questions. The first was how to refresh just a single row in the grid. The second was how to preserve user row selection across a grid refresh. By consulting with my colleague John Snyders, I learned several new things about APEX grids while researching a solution. The sample app shows off all the tips he taught me:
Hiding the grid footer when not needed
Letting users select multiple rows in the grid
Keeping selected rows across page-by-page grid pagination
Automatically maintaining primary keys of selected rows in a hidden page item
Refreshing just a single edited row in the grid after closing a modal dialog
Restoring the selected rows after a grid refresh
John explained the minimal JavaScript code needed to enable these features. Four of them only require setting a property in the grid’s JavaScript Initialization Function:
footer: false – to hide the footer
selectionStateItem: "P2_SELECTED_EMPNOS" – to track selected primary keys
multiple: true – to enable multiple row selection, and
persistSelection: true – to keep selected rows across pagination
You can add one or more of these properties to a small initialization function like the one below, adding whichever ones you need separated by commas. You would define this on the Attributes tab of the interactive grid region. For example, to enable a selection state item in a grid with multi-row selection, the function would look like this:
function( config ) {
config.defaultGridViewOptions = {
selectionStateItem: "P2_SELECTED_EMPNO",
multiple: true
};
return config;
}
Refreshing a single row in the grid and restoring the selected rows after a refresh required a few more lines of code, but even a JavaScript novice like me could understand what it was doing. I’ll explain some of that code below.
Capturing Code in a Component
I wanted to capture John’s coaching in a component. After initially writing the helper code in a static application JavaScript file, I asked colleague Stefan Dobre to teach me how to turn my code into something easy to reuse. He gave me back a working dynamic action plug-in that showed me how a slightly modified version of my original JavaScript code could reference custom attribute values that the plug-in defined.
Even as a JavaScript newbie, I was able to evolve Stefan’s solid starting point to present exactly the custom attributes I wanted. I also happily included Stefan’s suggested code improvements. The simple plug-in exposes the features John taught me in a way that others can use declaratively.
I ended up with sample app’s Interactive Grid Utils plug-in. It supports the two Action values shown below: Set OptionsandRefresh. The Set Options action shows four declarative settings to configure the features mentioned above, without having to write the initialization function to enable them. You would typically use it as a step in a Page Load dynamic action.
Declarative properties developers can configure on the Interactive Grid Utils plug-in
The Refresh action presents a JavaScript expression to provide the primary key value of the grid record to refresh. If the record corresponding to the primary key exists in the grid, just that one row of the grid is refreshed. If a refreshed row was deleted, it gets removed from the grid. If the primary key value is null or cannot be found in the grid – as would happen after inserting a new row – then the whole grid is refreshed and the previously selected rows are restored after the refresh.
In either case, when using the plug-in you associate it with a particular Interactive Grid region by setting two properties in the dynamic action’s Affected Elements section in the property editor. Just set Selection Type to Region and Region to the desired Interactive Grid’s region name.
Binding Selected Primary Keys in a Query
The Employees (Multi-Select) page (4) in the sample has a grid of employees and uses the plug-in above in a Page Load dynamic action to configure P4_SELECTED_EMPNOS as the selection state item and to allow multiple selected rows. Using Command-click on Mac or Ctrl‑click on Windows, you can select multiple employees. As the user changes the grid selection, the P4_SELECTED_EMPNOS automatically reflects the colon-delimited primary keys of the selected grid rows. To avoid the automatic selection of the first row in the grid, I set the Select First Row property of the Employees grid in the page to OFF on theAttributes tab.
This automatically-maintained list of primary key values is useful to use as a bind variable in a query. For example, the Selected Grid Primary Keys in Words classic report region below the grid has the following select statement referencing :P4_SELECTED_EMPNOS Notice how it uses the apex_string.split() function in an EMPNO IN subselect to retrieve employees whose EMPNO appears among the colon-separated values.
select empno,
ename,
to_char(to_date(empno, 'J'), 'JSP') AS empno_in_words
from eba_demo_employees
where empno in (select column_value
from apex_string.split(
:P4_SELECTED_EMPNOS,':'))
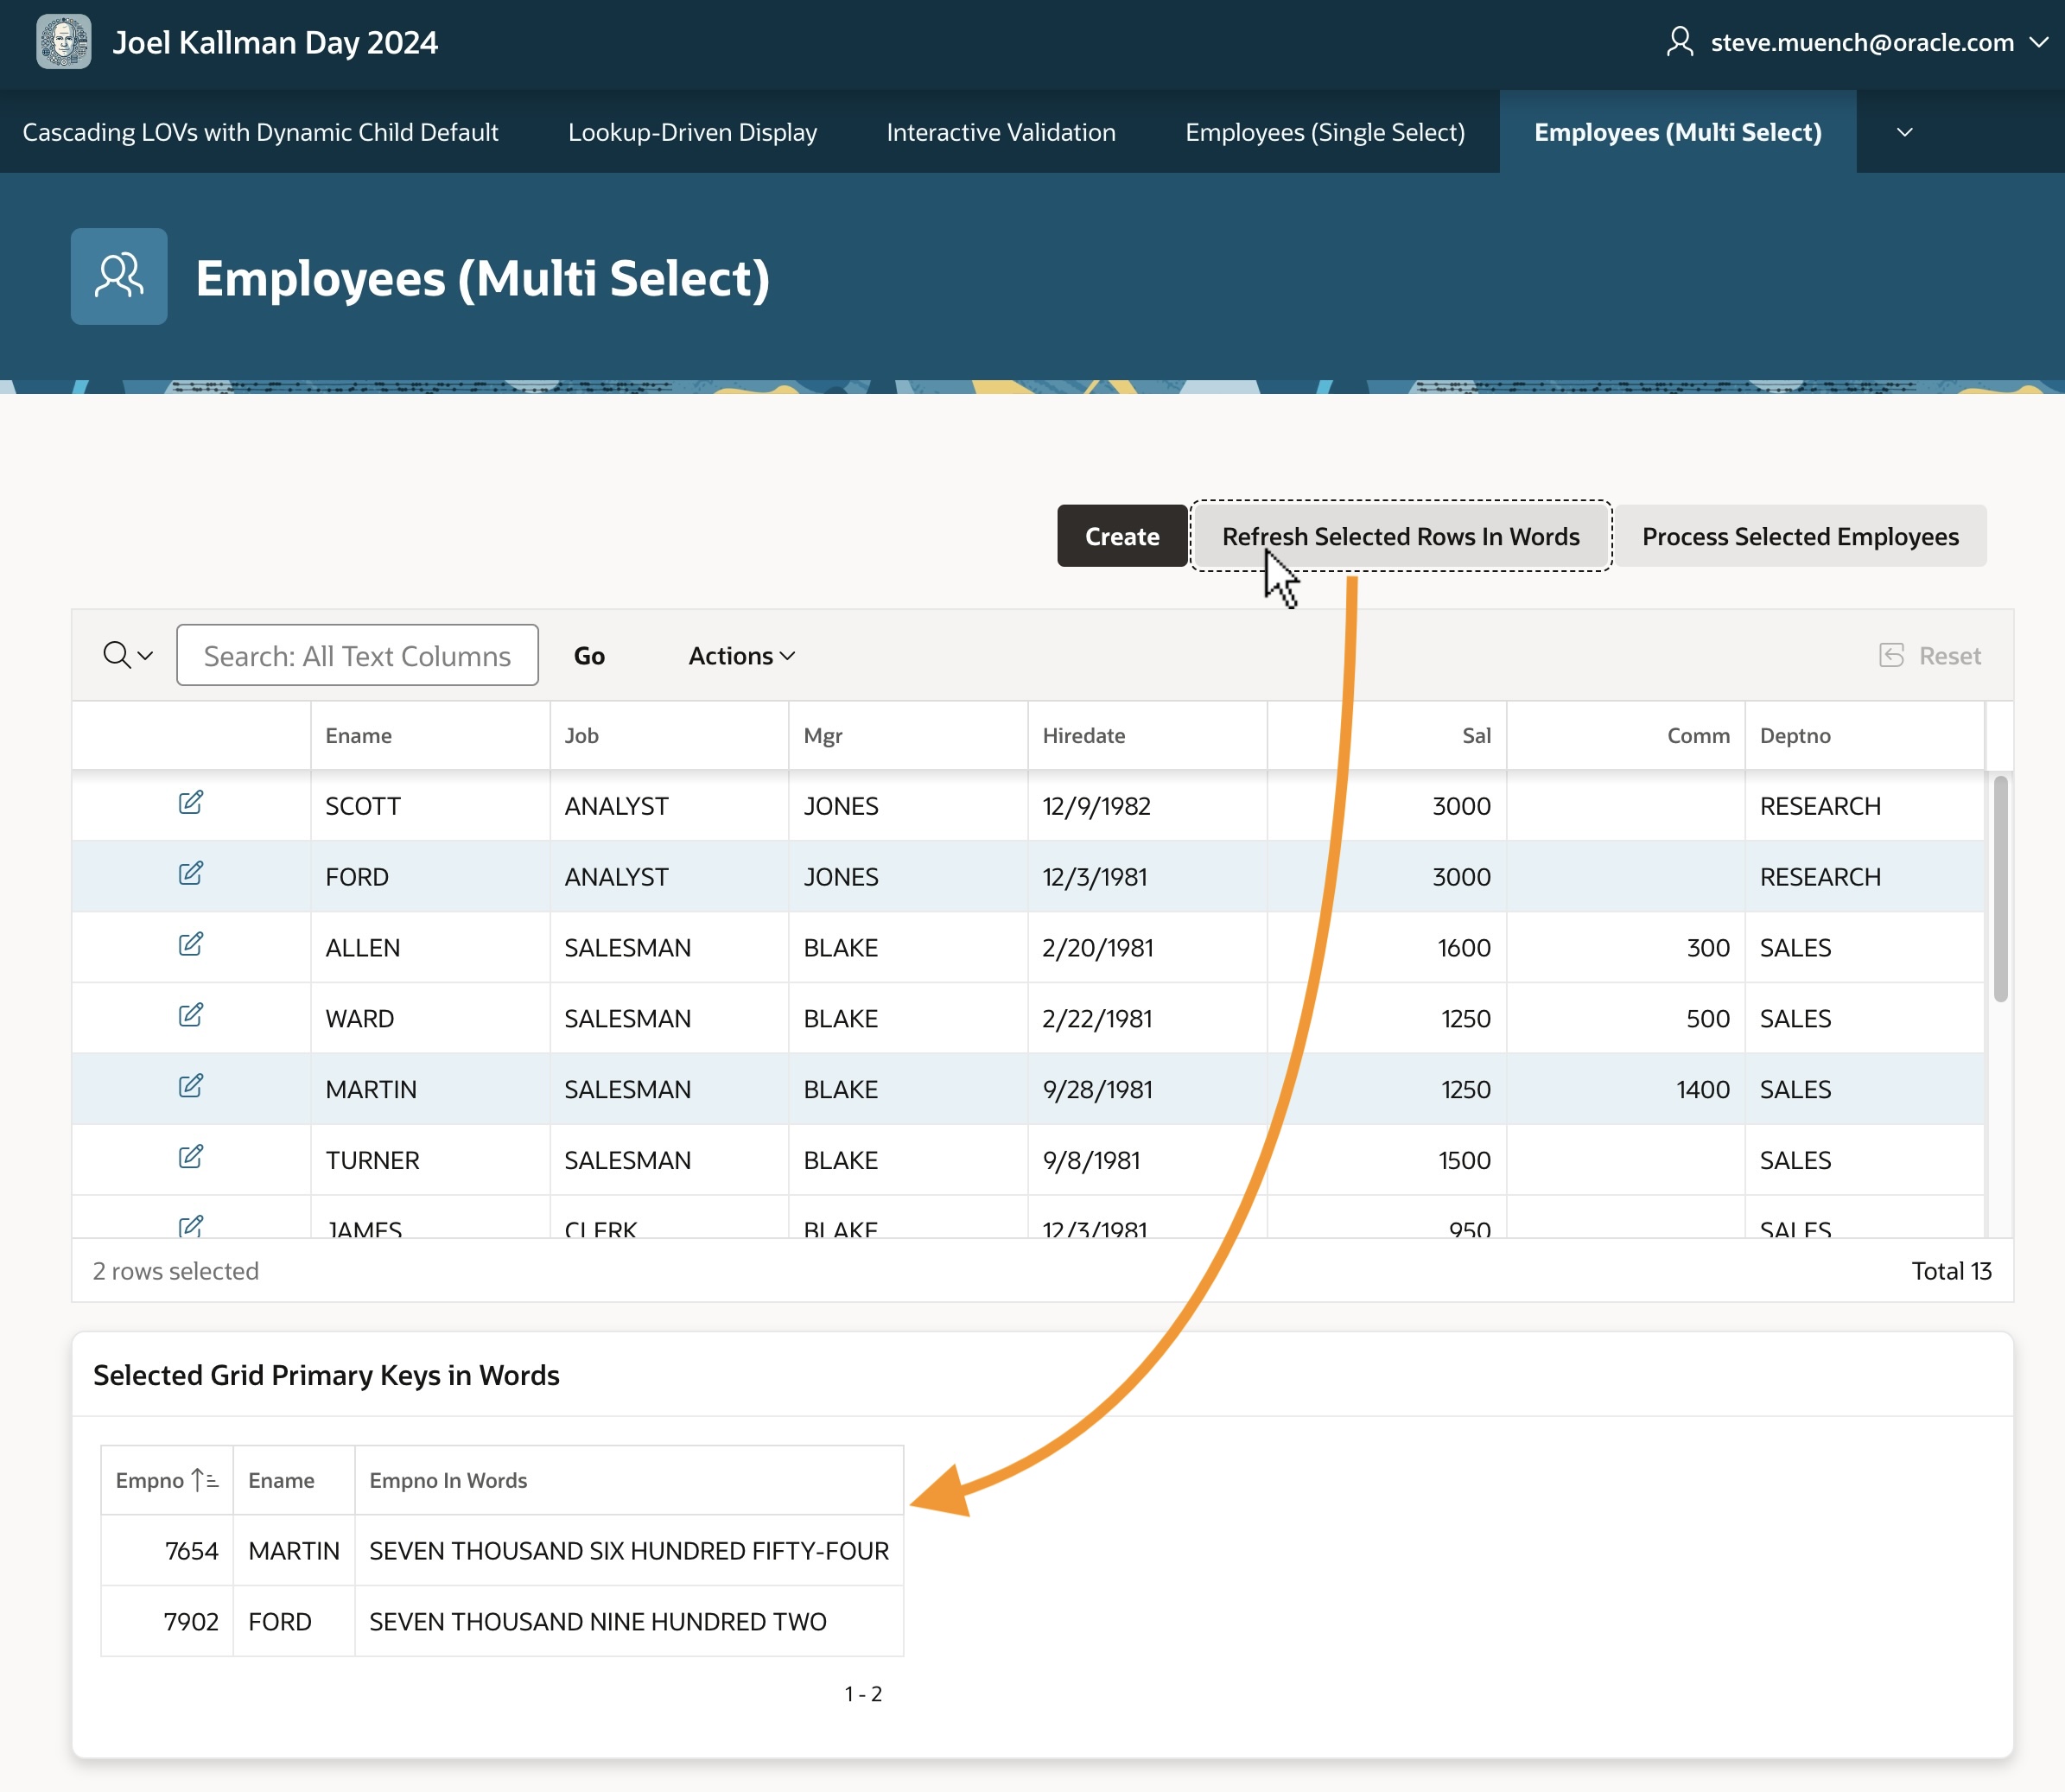
You can refresh the report based on this query to show information about the selected grid rows by clicking the (Refresh Selected Rows in Words) button. The screenshot below shows the result after selecting employees FORD and MARTIN and clicking that button.
Using grid selection primary keys page item in a query on the same page
Passing Selected Primary Keys as Parameter
The automatically-maintained list of primary key values is also useful to pass in a parameter to another page. Notice the (Process Selected Employees) button in the figure above. I configured it to submit the page so the P4_SELECTED_EMPNOS selection state item value becomes part of the APEX session state. Then I added the conditional branch shown below – with an appropriate When Button Pressed Server-side Condition – to pass the P4_SELECTED_EMPNOS parameter to page 10.
Notice in the Link Builder – Target dialog below that I’ve escaped the substitution string &P4_SELECTED_EMPNO. by surrounding it with backslashes. By using this escaped substitution \&P4_SELECTED_EMPNO.\ we signal the APEX engine to pass the value containing colons verbatim to the target page. Failing to remember this backslash escaping would result in passing just the first primary key value, since the APEX engine normally treats colons as value separators.
Escaping the value of P4_SELECTED_EMPNOS with backslashes since it can contain colons!
By properly backslash-escaping the substitution string in the link builder dialog, we ensure that when multiple rows are selected in the grid the corresponding colon-delimited list of primary keys is passed correctly to the target page as shown below.
Multiple colon-separated empno values arrive intact when backslash-escaping page item value
Surgically Refreshing an Edited Row
The same page in the sample uses the Interactive Grid Utils plug-in as a step in a“Dialog Closed” dynamic action. To handle the event correctly whether the dialog is opened by the (Create) button or by an edit link in the grid, I use the Selection Type of jQuery Selector and the body selector. The HTML body element represents the whole page content, so it naturally contains both the create button and the interactive grid region.
The Close Dialog page process in the modal employee form page (3) configures its Items to Return property as P3_EMPNO to return the primary key of the row that was just inserted, updated, or deleted. Accordingly, I configured the plug‑in to use its Refresh action and provided the JavaScript expression of this.data.P3_EMPNO to get the primary key of the row to refresh.
You can experiment that editing a row in the grid and saving the changes just refreshes the edited row, maintaining the row selection. If you delete an employee, it’s removed from the grid, and if you add a new employee the grid does a full refresh. In all of these cases the row selections are preserved.
Two other pages in the demo use the plug-in similarly, but with slightly different grid options. The Employees (Single Select) page (2) uses a single-select grid and hides the grid footer. The Employees (Page-by-Page, Multi Select) page (9) uses a page-by-page pagination on the grid, and uses the plug-in to keep the selected row across pages and allow multi-row selection.
Peeking at the Plug-in Definition
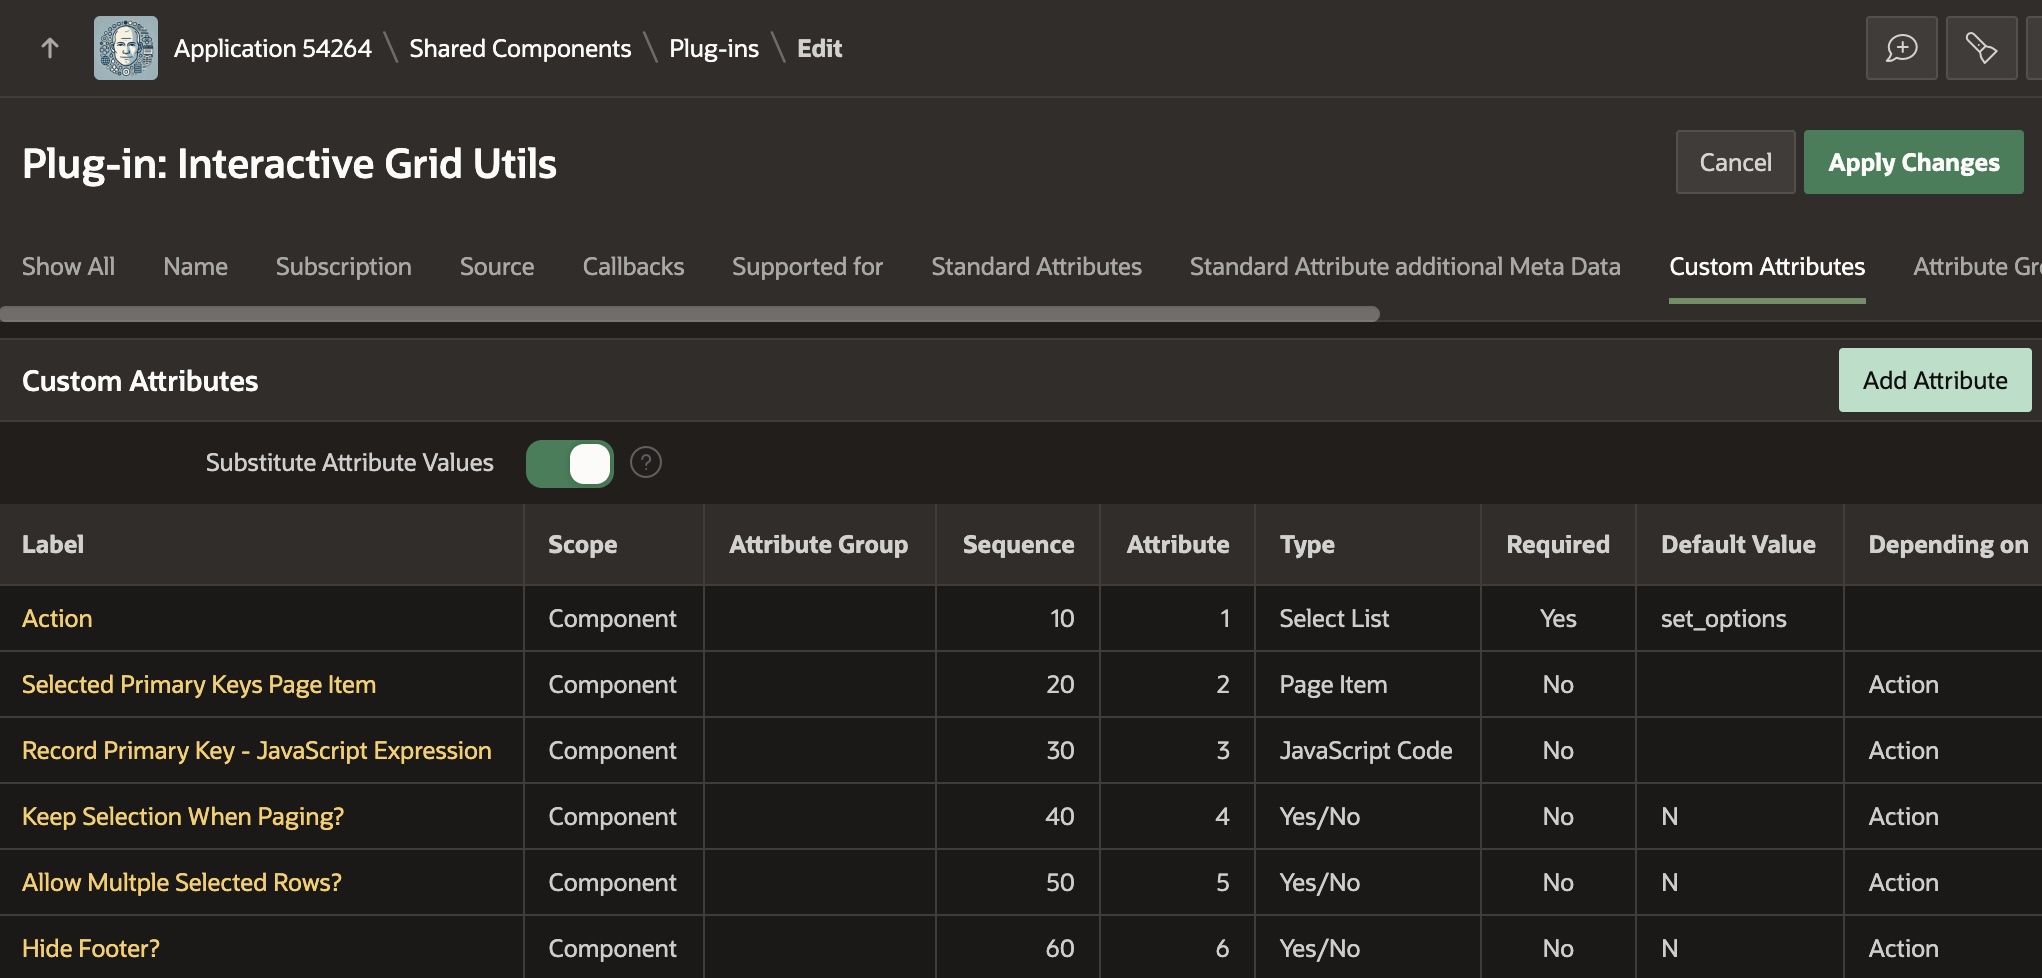
Taking a peek at the plug-in, we can see in the figure below that it defines custom attributes for the declarative settings developers can configure in the Page Designer property editor. There is an Action property, and then all of the others depend on the value of the Action property. This lets the property editor correctly display properties only when relevant. Notice that each custom property is assigned to an attribute number, from 1 to 6 in this case.
Defining custom attributes of the Interactive Grid Utils dynamic action plug-in
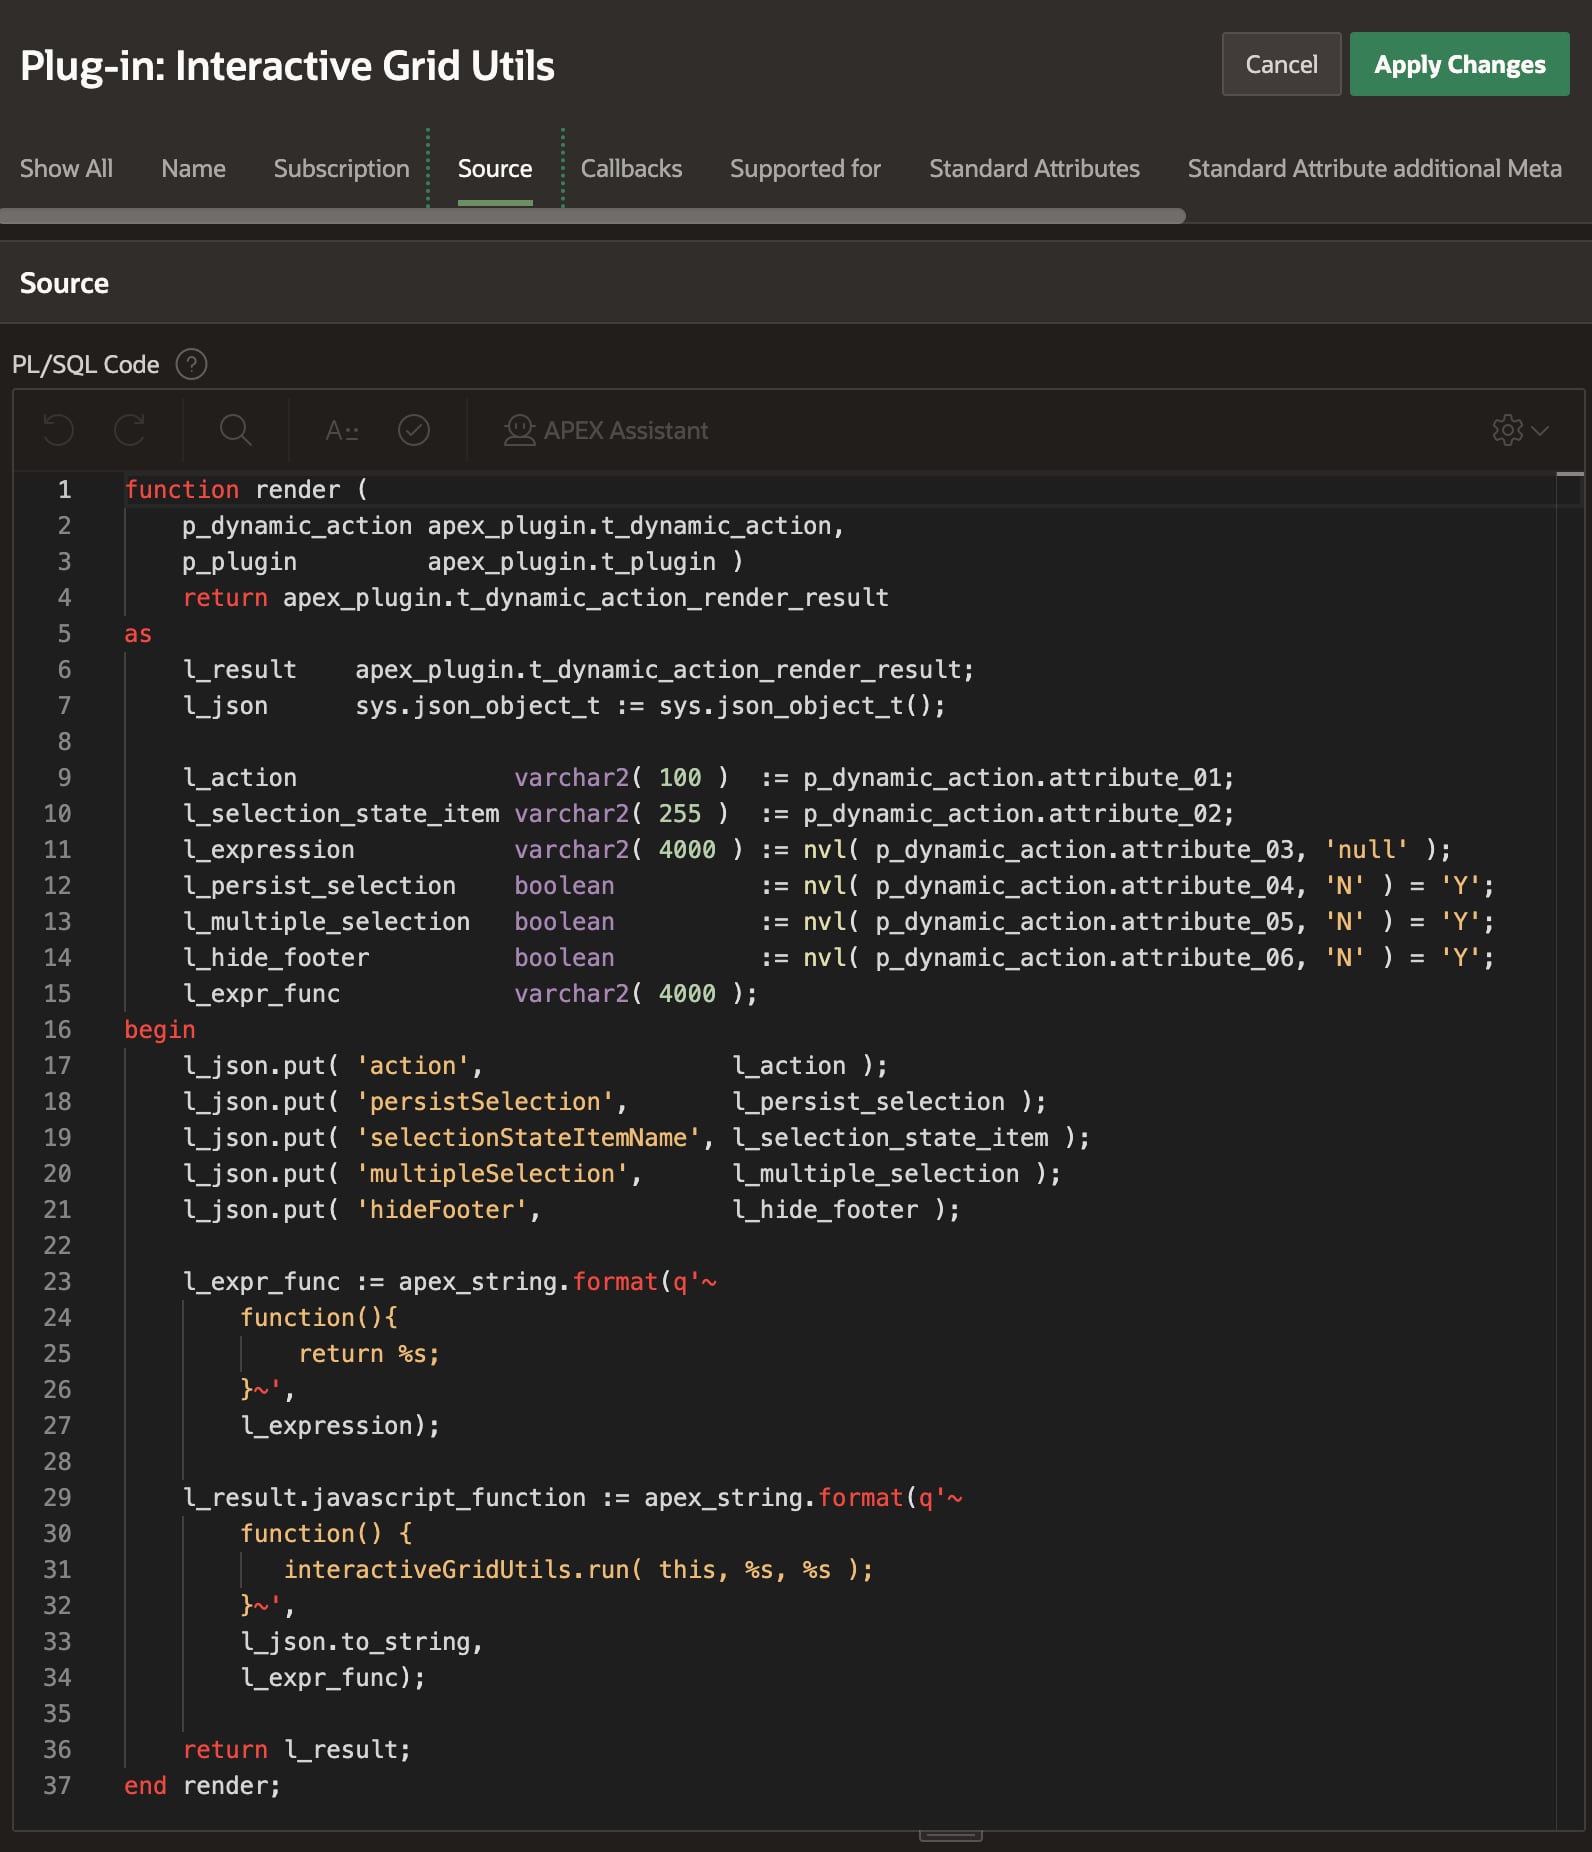
On the Source tab shown below, you can see the plug-in’s PL/SQL render() function. The APEX engine passes it key information at runtime in the p_dynamic_action argument. It returns the text of a JavaScript function that retrieves the values of the six custom attributes and passes them as the properties of a JSON object in the call to the interactiveGridUtils.run() function. The APEX engine includes the text of this function in the rendered page that uses the plug-in so the browser can execute it when appropriate.
The render() call returns text of function passing custom attributes to main JavaScript code
On the Files tab shown below, you can see the script.js file that contains the main JavaScript code for the plug-in. It defines the interactiveGridUtils object whose run() function is invoked in the rendering function above. Note the script.js is accompanied by a Reference value of #PLUGIN_FILES#script#MIN#.js This is the expression I copied and pasted into the JavaScript section on the File URLs to Load tab. This ensures the plug-in includes the code in the script.js file at runtime.
The script.js file containing the plug-in’s main JavaScript code lives in the Files tab
The JavaScript code in the script.js file has the following pseudo-code flow:
Retrieve the static id of the region from the Affected Elements
Lookup the grid region to work with using that static id.
Use region object to get grid’s jQuery view and model containing its data.
Assign custom attribute values passed in the data parameter to local variables
Depending on Action value, either set grid options, or perform a row refresh.
The row refresh logic uses model.getRecord() to get the row in the grid by primary key. If it exists, it calls model.fetchRecords() to refresh the row. Otherwise, if the row doesn’t exist or no primary key was provided, it calls the refreshAndRestoreSelection() function. That function gets the list of selected rows, configures a one-time gridpagechange event handler to restore the selected rows, and finally calls region.refresh() to refresh the region and trigger the gridpagechange event in the process.
Trying Out the Sample
I encourage you to download the sample and try it out in APEX 24.1. If you’re not yet using APEX 24.1, you can still explore the sample app in a free workspace at oracleapex.com It’s always running the latest APEX version to experiment with. That said, the techniques explained here are applicable to any recent version of APEX you might be using. I had fun learning these techniques. I hope at least one of them was new to you, too.
Thanks again to colleagues John Snyders and Stefan Dobre for the continued mentorship and words of wisdom. After three years on the APEX team I’m still learning from a firehose – many, many new things every day – and it’s an exciting, energizing feeling!
Watch this webinar to see the broad set of Oracle APEX features you can use to quickly deliver and maintain beautiful, functional solutions that add immediate business value. Enjoy end-to-end or expand the YouTube description for a detailed topic timeline to view just a segment. See below for a list of what you’ll learn…
Studying an app for a fictional medical clinic, you’ll see & learn about:
Productive Development
Using Generative AI help for SQL, PL/SQL, app creation, and more
Creating Gen AI chatbots and using AI services to save users time
Modeling data visually using the Quick SQL ER Diagram
Automating business processes with workflow and approvals
Laying out responsive web pages with minimal effort
Easy User Interfaces and Reporting
Visualizing business process status for end users in a diagram
Exploring data interactively with filters, aggregates, and charts
Saving reports and downloading/emailing/scheduling results
Generating pixel-perfect PDF reports from Word templates
Presenting data with Maps, Cards, Calendars, and Charts
Filtering data with Faceted Search and Smart Filters
Searching application-wide with unified results display
Reacting to end-user interactions with dynamic behavior
Incorporating community plug-ins like a Kanban Board
Handling parent/child lists, regions, and conditional display
Geocoding addresses
Creating reusable UI components with only HTML markup skills
Reusing repeating layouts consistently with configurable slots
Installing Progressive Web Apps that launch like native ones
Uploading images from a mobile device’s camera
Capturing GPS location of a mobile user
Simple Business Processes, App Logic, and Integration
Orchestrating app logic with workflows that react to data changes
Sending Emails and push notifications
Integrating data from MySQL, OData, Fusion Apps, and REST APIs
Synchronizing remote data periodically to a local cache
Querying based on spatial distances
Predicting outcomes from historical data with machine learning
Validating parent/child data using simple SQL checks
Using semantic similarity searching with 23ai vector search
Improving Gen AI results with Retrieval-Augmented Generation
Offloading longer-running processing to the background
Loading CSV, Excel, or JSON data in foreground or background
Enriching remote data with local joins and computations
Exposing application data as REST APIs using JSON Duality Views
Producing reusable REST API catalogs from OpenAPI documents
Hassle-free Dev Ops and Application Lifecycle
Tracking issues and tackling tickets in teams with working copies
Merging changes from a separate working copy back to main
Testing apps and deploying to test and prod environments
Valuing APEX scalability, extensibility, security, and governance