When working with parent/child data, an app often needs to validate an aggregate condition about all of the child rows related to a parent row. For example, say each teammate assigned to an action item can have a role of “Lead” or “Member”. Some typical parent/child validations for an action item’s team members might require the team to…
- have a Lead
- only have one Lead, and
- not contain any duplicate members.
Ideally, the app will refuse to save anything unless the pending changes to parent and child rows satisfy all 3 business rules. The app should show the user a message so they know what to fix before trying to save again.
Starting with APEX 23.1, aggregate validations are easy to implement using simple SQL statements. This article first explains how to do them, and then why a new feature in 23.1 makes them possible. It goes on to highlight a few other techniques I learned while building the sample app. At the end, I provide a download link to try it out for yourself.
Sample App Overview
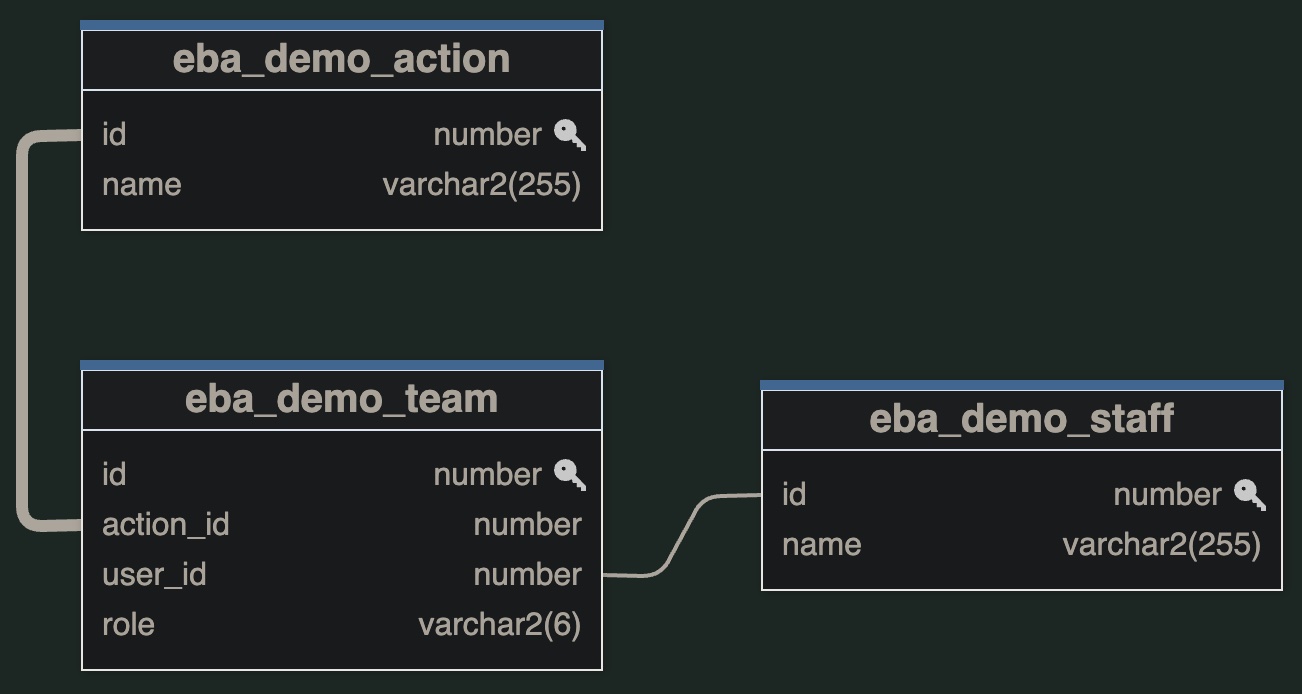
The sample app uses the three tables shown below. One stores the Action Items, another the Staff Members, and the third holds the action item team list relating an action to the staff members collaborating to complete it.
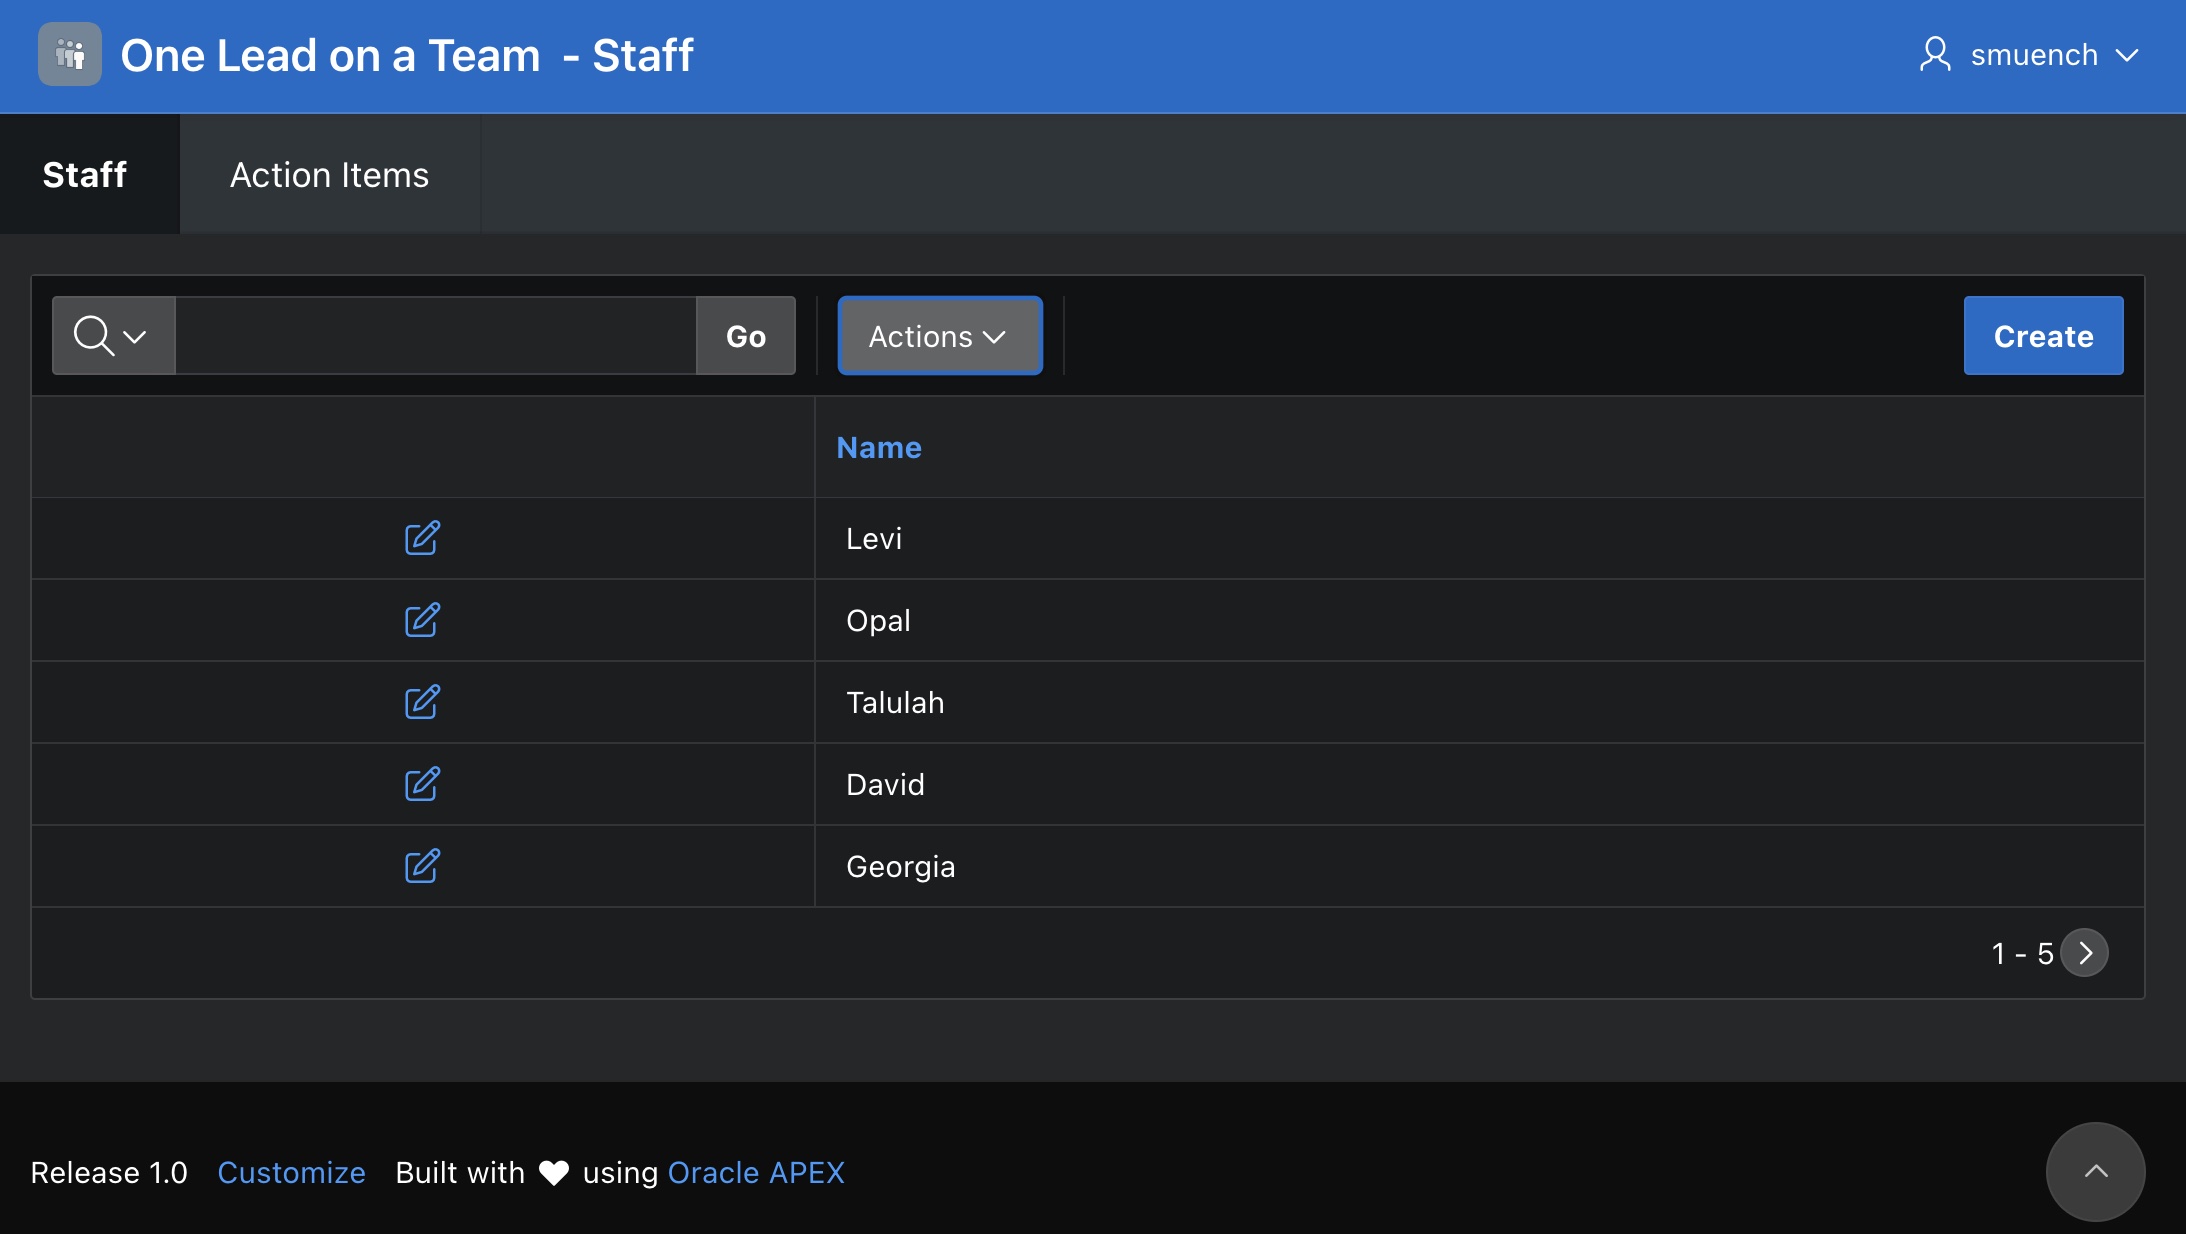
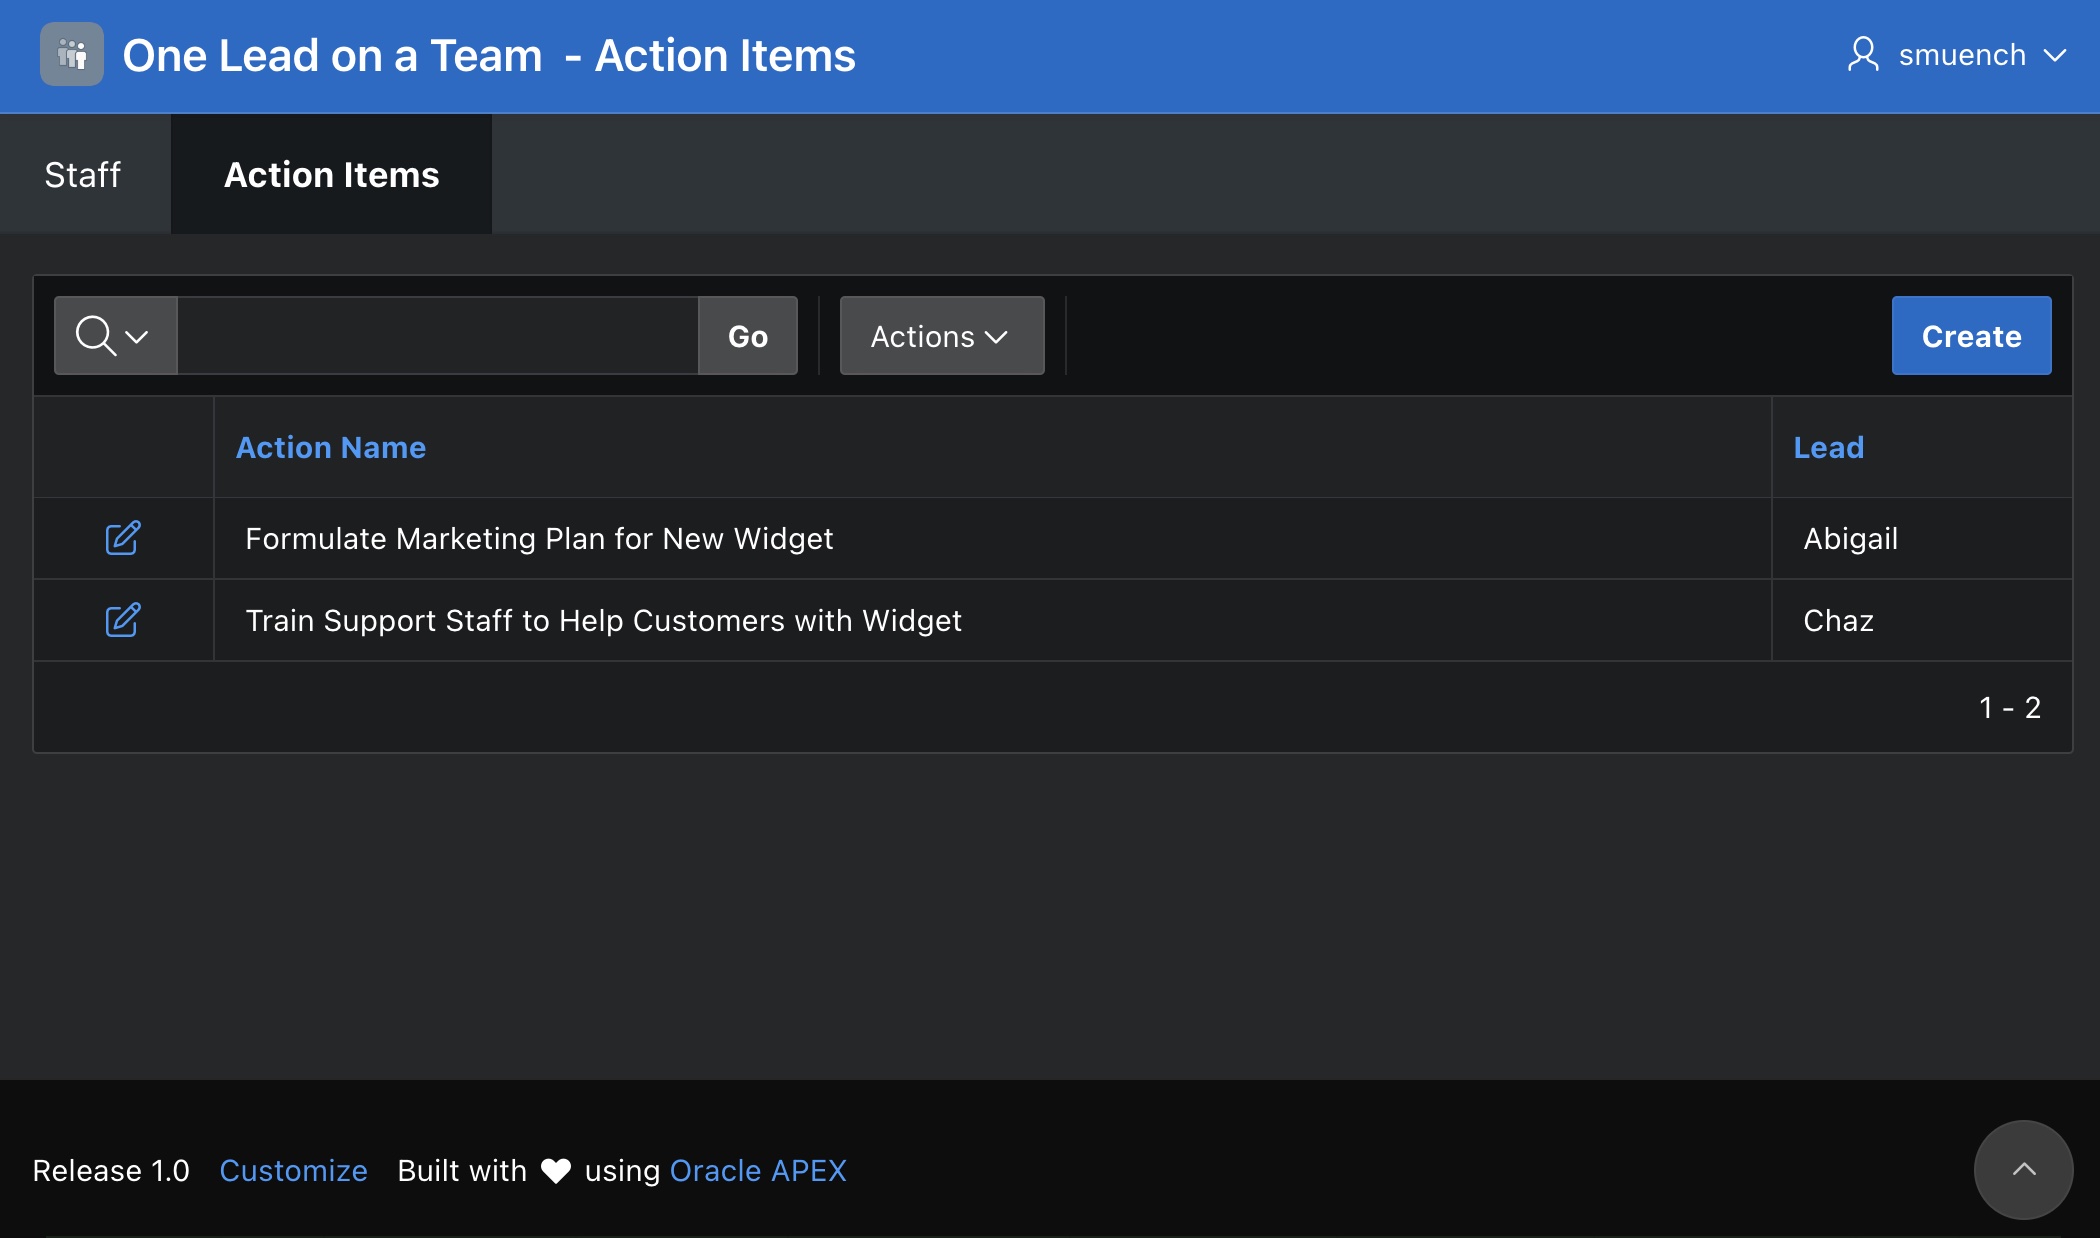
The sample includes a page to maintain Staff Members and, as shown below, another page to maintain Action Items.

You can see the page used to create, edit, or delete an Action Item below. It includes a “parent” Form region for the Action Item row and an editable Interactive Grid “child” region for the list of action team members.

Ensuring Child Rows Get a Parent Id
When building an editable page including parent and child data, I first ensure any child row gets its parent id foreign key set correctly. My preferred technique is adding an Execute Code page process after the Process form Action one that saves the parent row and before the Save Interactive Grid Data one that stores the grid’s child rows. This approach works for both create and edit use cases.
This new Execute Code page process assigns the parent foreign key column with the one line of PL/SQL below. The :ACTION_ID bind variable references the ACTION_ID foreign key column in each grid row being created or modified, and :P5_ID is the ID of the parent Action Item row being created or edited.
-- Assign the parent foreign key to the team row from the grid:ACTION_ID := :P5_ID;
As shown below, by setting the Editable Region property of the process to the Interactive Grid region Action Team, APEX runs it once for each created or modified child row in the grid region.

If an APEX page has multiple child grids on an edit page with their parent row — perhaps each one on a different tab — just repeat this technique for each grid involved. Sequence all the foreign key assignment processes after the parent row save process and before any of the child grids’ save processes.
Adding Aggregate Validations
Next we can add the aggregate validations as additional Invoke API page processes following the page processes that save the data. The Enforce Exactly One Lead process shown below invokes the one_lead_per_action_team procedure in the eba_demo_action_validation package, passing the value of the P5_ID page item for the p_action_id parameter.

The PL/SQL package containing the validation procedures has the specification shown below in the Object Browser.

eba_demo_action_validation package spec in the Object BrowserIn the package body, the code for one_lead_per_action_team is below. It first checks the Action Item parent row is valid by using a zero-or-one-row for loop based on the primary key value in the p_action_id parameter. This is important since one of the operations the page can perform is to delete the action item. We want our validation code to work correctly — by consciously doing nothing — in that situation. If the loop’s SELECT returns a row, then the code inside the loop runs once. It counts how many Team child rows for the current Action Item have the role = 'LEAD' using a simple select count(*). If the l_lead_count does not equal one, then the validation check fails. We use a case statement to conditionally display the appropriate error message depending on whether the lead count is less than one or greater than one. If the lead count equals one, then by not reporting any error it lets the transaction commit successfully.
-- Ensure the action has exactly one Leadprocedure one_lead_per_action_team( p_action_id in number)is l_lead_count number;begin -- Ensure the action id still exists since it might -- have been deleted. If it exists, perform the check -- on the children rows. for j in (select id from eba_demo_action where id = p_action_id) loop select count(*) into l_lead_count from eba_demo_team where action_id = p_action_id and role = 'LEAD'; if l_lead_count != 1 then error( case when l_lead_count < 1 then c_msg_team_must_have_lead else c_msg_team_max_one_lead end); end if; end loop;end;
The simple, package-private error() helper procedure is below. It calls the add_error() procedure in the apex_error package with a display location of On Error Page using the appropriate package constant. This causes the APEX engine to rollback the transaction and display the error message to the user. It uses the apex_lang.message() function to return the translated error message based on the message key passed in. The net result is that no changes submitted from this parent/child page get saved to the database when this aggregate validation error occurs.
-- Raise an error with indicated message keyprocedure error( p_message_key in varchar2)isbegin apex_error.add_error ( p_message => apex_lang.message(p_message_key), p_display_location => apex_error.c_on_error_page);end;
The no_duplicate_team_members procedure uses a similar technique, with a slightly different select statement. Its code is shown below. We count the number of team member rows, grouping by the user_id and only returning ones having a count greater than one. If at least one of such row is returned, then we have a duplicate team member name and we report the error as above using a different error message key constant.
-- Ensure the action has no duplicate team membersprocedure no_duplicate_team_members( p_action_id in number)isbegin -- Ensure the action id still exists since it might -- have been deleted. If it exists, perform the check -- on the children rows. for j in (select id from eba_demo_action where id = p_action_id) loop for k in (select user_id, count(*) from eba_demo_team where action_id = p_action_id group by user_id having count(*) > 1 fetch first row only) loop error(c_msg_team_no_duplicates); exit; end loop; end loop;end;
Using Translatable Error Messages
Since the application might need to be translated into multiple languages, it’s best practice to define the error messages as Text Messages in the Shared Components area of the APEX builder. The figure below shows the three text messages I defined to support the error messages my aggregate validation code may display to end users.

The eba_demo_action_validation package body defines the following three constants to hold the message keys:
-------------------------------------------------------------- Constants for error message keys------------------------------------------------------------c_msg_team_must_have_lead constant varchar2(25) := 'TEAM_MUST_HAVE_A_LEAD';c_msg_team_max_one_lead constant varchar2(25) := 'TEAM_MAX_ONE_LEAD';c_msg_team_no_duplicates constant varchar2(25) := 'TEAM_NO_DUPE_MEMBERS';
Hiding the Grid’s Toolbar Save Button
Since we want the aggregate validation to always take into account both parent and child data, we use the Action Item form region’s default CREATE and SAVE buttons that both submit the page. APEX automatically submits the data from all page regions when the user clicks one of these buttons. Accordingly, to avoid the user’s saving child grid row changes on their own, we hide the default (Save) button in the Interactive Grid’s toolbar. To perform this task, the figure below shows where to find the checkboxes on the Attributes tab of the property editor after selecting the Interactive Grid region. While I was there, to keep things simple, I turned off a number of the default toolbar controls.

Taking the Sample For a Spin
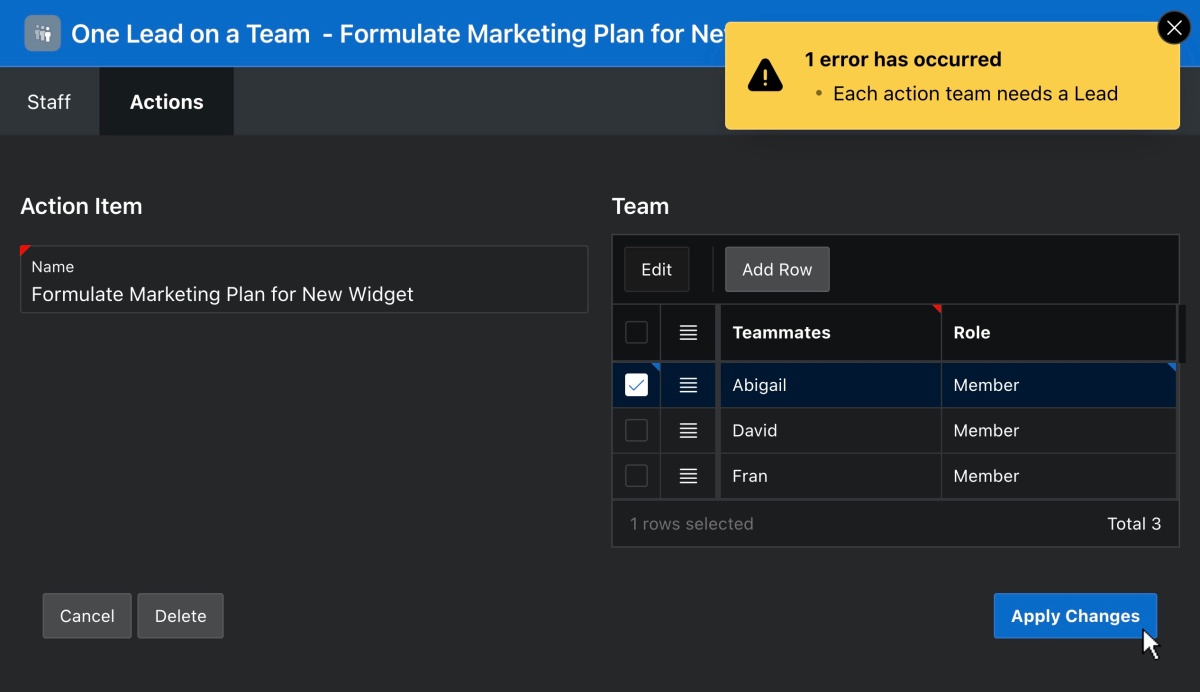
If the end user tries to create or edit an action item and save without having designated a team Lead, then she’ll see the error message below.

If she tries to create or edit an action item whose team contains more than one Lead, when she tries to save she’ll see this different error message:

Finally, if the user inadvertently adds the same staff member twice to the action item team, she’ll see the error message:

Using the SQL Commands page in the APEX builder, you can have a quick peek at the eba_demo_action and eba_demo_team tables before and after to convince yourself that no data has been inserted or updated when these parent/child validations fail.
What Changed in 23.1 to Make This Easy?
APEX 23.1 introduced a new Session State Commits setting in the Session Management section of the app definition’s Security tab. For new apps, it defaults to the value End of Request which defers the database transaction commit to the end of the current submit page request. The figure below shows where this setting lives in the APEX App Builder.
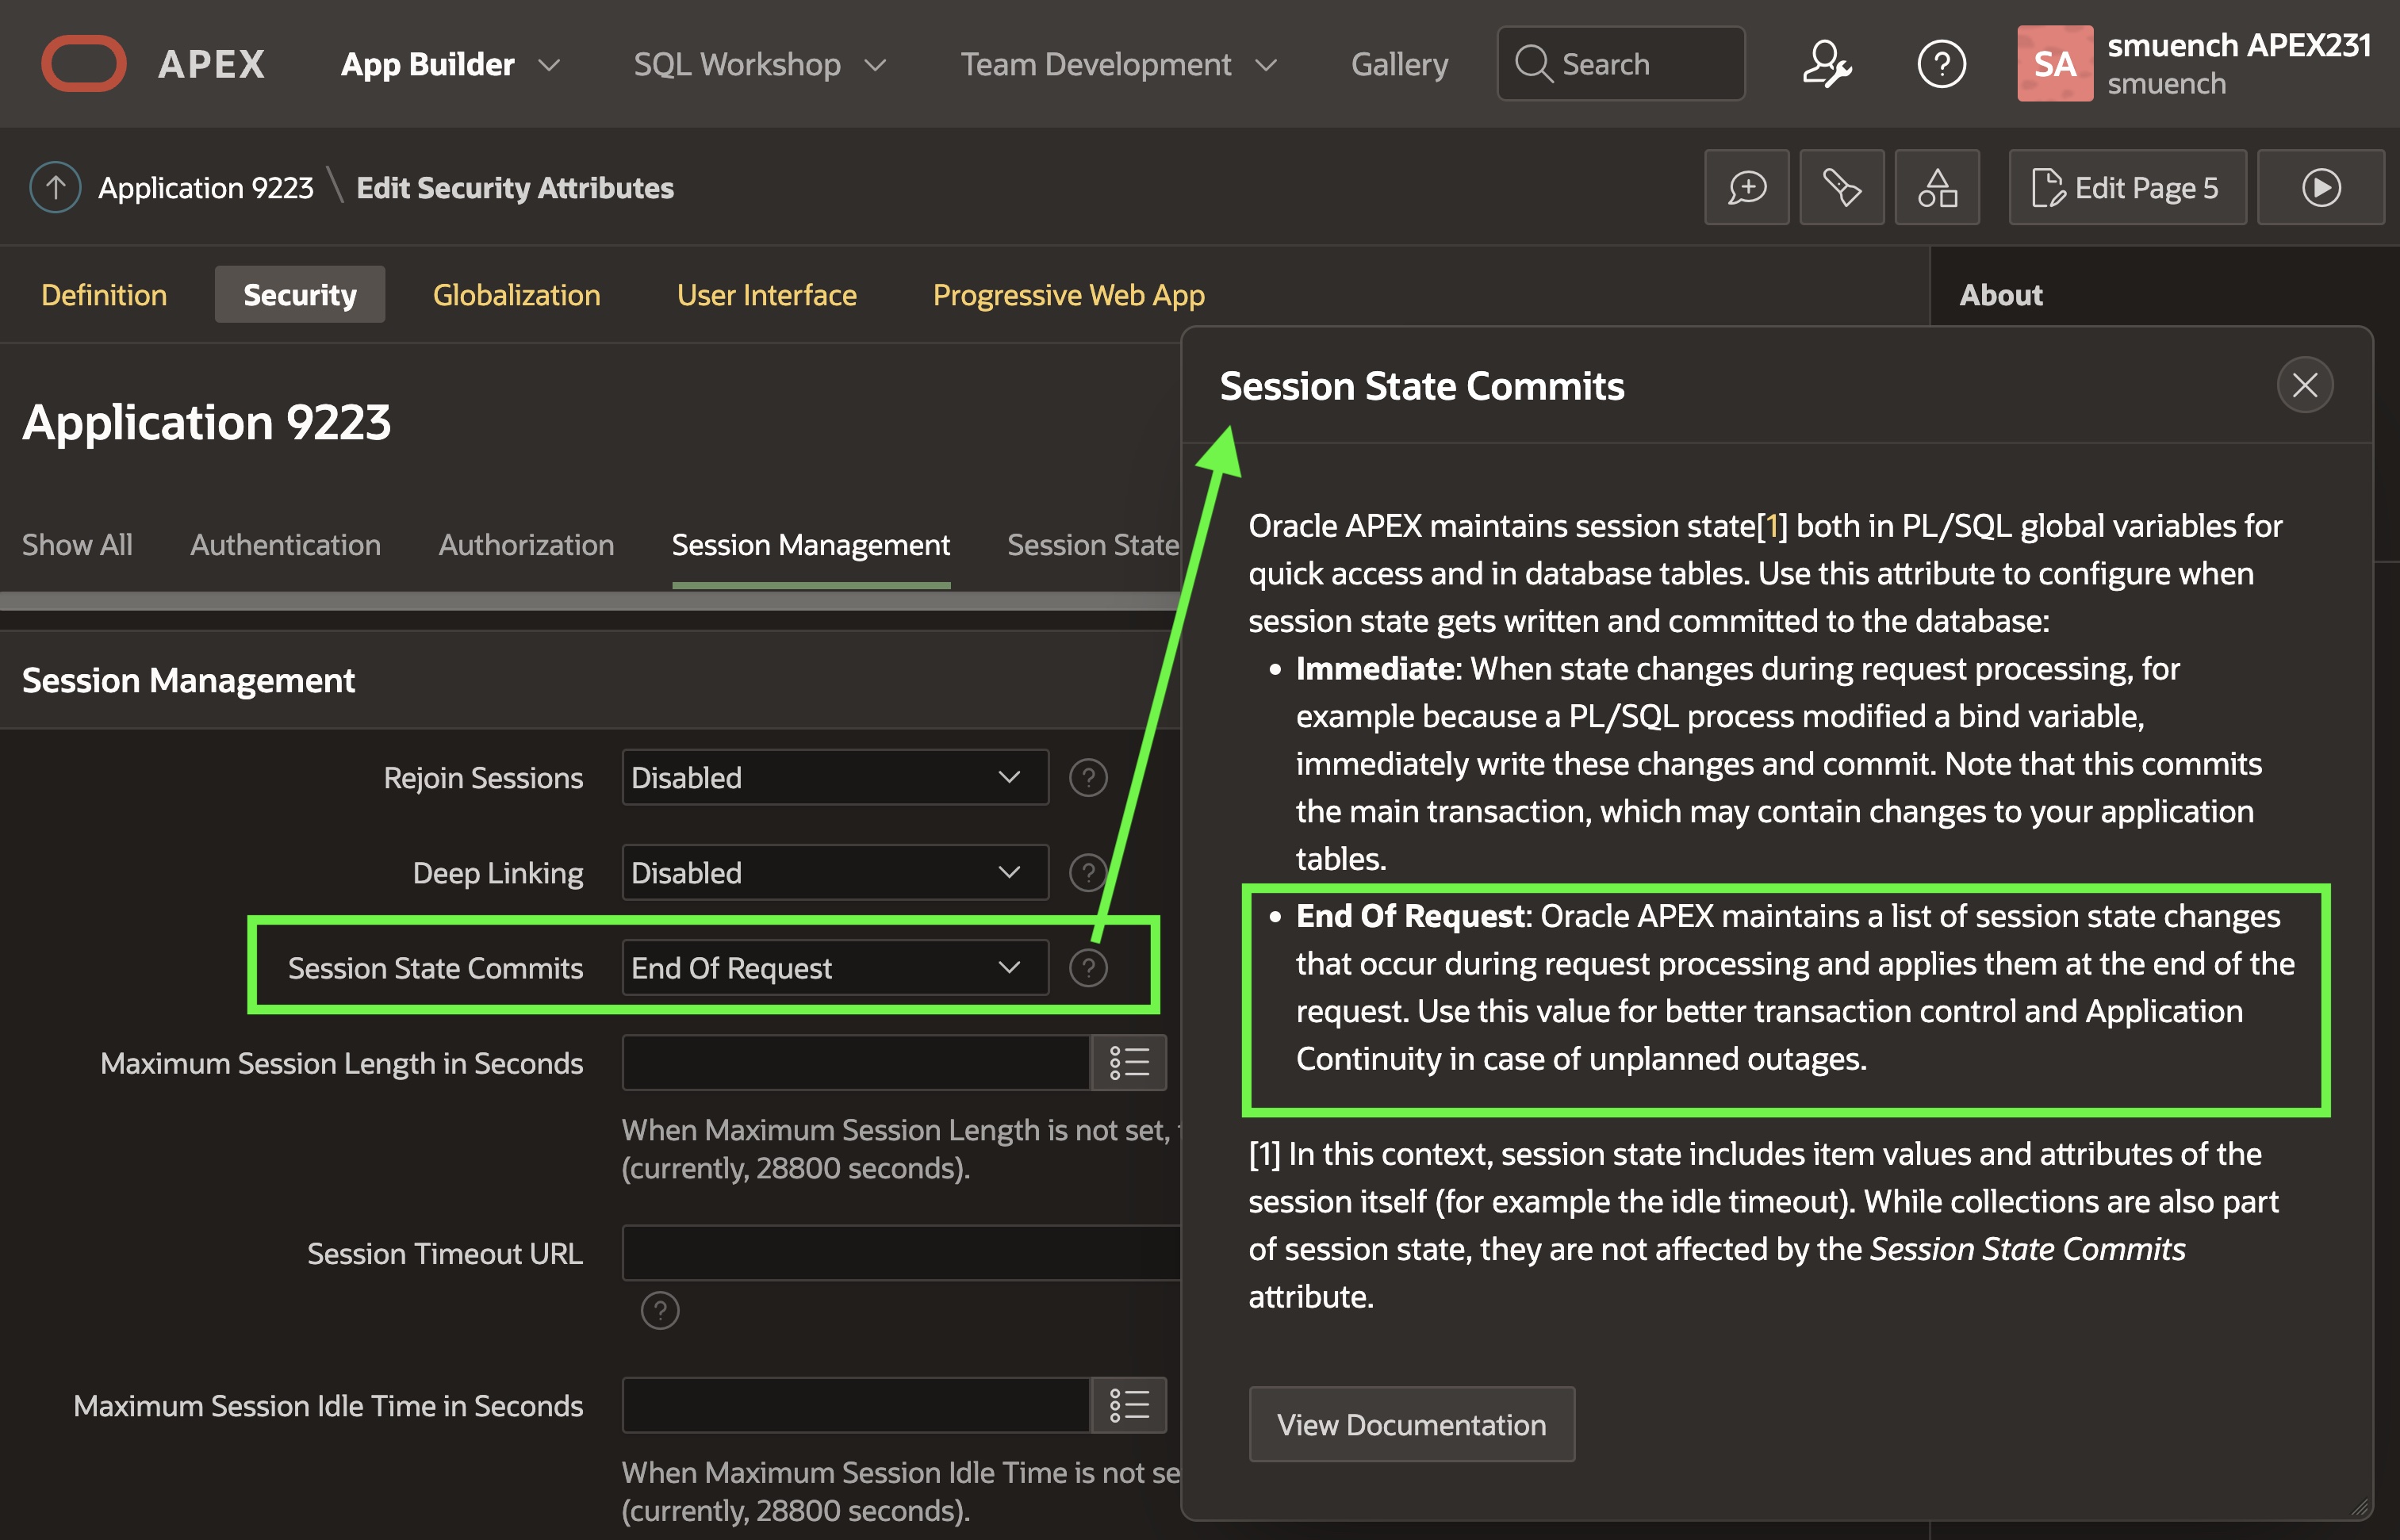
This one change, combined with the Oracle database’s read consistency model, lets aggregate validations be implemented so easily. They can use simple SQL select statements to reason over the pending parent and child row changes that APEX has made in the current database transaction. Importantly, they can do so before the transaction gets committed. This means they are still in time to “veto” the transaction by adding an error to the APEX error stack.
In the remaining sections, I highlight some additional techniques I learned while building this sample app that I found interesting. They are not directly related to parent/child validation, but they made me smile when I learned how to do them so I wanted to share the knowledge…
Dynamic Grid Cell Defaulting
The Action Item page can guide end users to follow the “One Lead on a Team” rule by using dynamic defaulting. When the first team member row is added to the grid, it should default to being a Lead. In constrast, the role should default to Member for other rows added. I wanted to learn how this could be done on the client side, so I asked my colleagues for advice.
John Snyders taught me about the Interactive Grid’s ability to associate a dynamic defaultValue function with a column using its Column Initialization JavaScript Function property. After selecting the ROLE grid column whose default value I wanted to be dynamic, the figure below shows where I needed to add my code in the Page Designer.

The few lines of JavaScript appear below. The initialization function receives an options object on which it sets the defaultGridColumnOptions property to configure a custom defaultValue function for the column. This one-line function calls getTotalRecords() on the interactive grid’s model object it receives and returns the literal string LEAD if the model’s row count is zero and MEMBER otherwise.
function( options ) { options.defaultGridColumnOptions = { // Setup a dynamic default value for the ROLE column // to return LEAD when there aren't any rows yet, and // MEMBER otherwise. defaultValue: function(model) { return model.getTotalRecords(true) == 0 ? "LEAD" : "MEMBER"; } }; return options;}
NOTE: If you use this technique in your own applications to return a default value for a number column or date column, remember to return the value as a String from this function.
Setting Width of the IR Columns
While fine-tuning the sample, I noticed the link column of the Interactive Reports pages for Staff and Action Items was extra wide and didn’t look so great. The Staff page initially appeared like this:
The Action Items page had three columns, but still the column widths looked less than ideal…

I learned how to set the width of the interactive report link column across all Interactive Reports in the application, and added the following snippet of CSS to a global app.css file in the Static Application Files area of Shared Components.
th#a-IRR-header--linkCol,td.a-IRR-linkCol{ width: 6em; text-align: center !important;}
Colleagues taught me it was best practice to reference the desired column width using em CSS units instead of pixels. So above I’m setting the link column to be 6 characters wide relative to the base font size of a letter M. That way, if the user zooms their browser — increasing the base font size — then the column always remains wide enough to show six of those larger-sized characters.
After creating the app.css file, I copied its path and pasted it into the CSS > File URLs section of the application definition’s User Interface tab as shown below. At runtime, APEX replaces #APP_FILES# with the URL to access the static app files content, and replaces the #MIN# as appropriate to use the more compact “minified” version of the CSS style sheet when not running in debug mode.

app.css file that “lives” in Static Application FilesTo set the width of the Lead column in the Action Items page, first I set the Static Id of the LEAD column to action-team-lead, then I added the following small amount of CSS to the page-level CSS > Inline property:
td[headers=action-team-lead], th#action-team-lead { width: 10em }
The result is that the link column is set across the app to 6 characters wide — affecting both the Staff and Actions Items page — and the Lead column is set to 10 characters wide. We can see below that the Staff page now looks more professional:

app.css stylingSimilarly, the Action Items page also looks more polished, with the same 6-character-wide link column, and a 10-character-wide Lead column. This leaves the most amount of horizontal space for the action item name:
Merging Seed Data from Static App JSON
The last interesting technique I used in the sample app is how I’m seeding the data for the 26 example Staff members. I’m aware of the APEX built-in Supporting Objects feature called Data Package. It lets developers choose a set of tables whose data they want to install when an APEX app is first imported into a target workspace. That feature is great, but I wanted to explore how to gain more control over seed data installation to more seamlessly handle the situation where new seed data rows could be added over time in later versions of the app.
First, I added a staff.json file with the following format into the Static Application Files area in Shared Components:
{ "staff": [ {"NAME": "Abigail"}, : etc. : {"NAME": "Zelda"} ]}
Then I added the following Supporting Objects installation script that uses a merge statement to insert any Staff names from the staff.json file that don’t yet exist into the eba_demo_staff table. Its using clause selects the contents of staff.json from the static application files view and uses json_table() to select the NAME column data out of that JSON file. With this technique, subsequent versions of the app could add new NAME entries to the staff.json file and they would be added to the eba_demo_staff table at application import time. If the seed data were more complicated and multi-columned, the merge statement could also use a when matched then clause — which wasn’t needed for this simple sample — to update the values of other seed data columns that might have changed since the last time they were inserted/updated.
merge into eba_demo_staff tgtusing ( with x as ( select aaf.blob_content from apex_application_files aaf, apex_applications aa where aa.application_id = coalesce( apex_application_install.get_application_id, to_number(v('APP_ID'))) and aaf.flow_id = aa.application_id and aaf.filename = 'staff.json' ) select y.name from x, json_table(x.blob_content, '$.staff[*]' columns ( name varchar2(255) path '$.NAME' )) y) srcon (tgt.name = src.name)when not matched then insert (name) values (src.name)
Trying the Sample App
You can download the sample app from here. Try creating a new action item and causing some of the validation messages to appear. Then try editing an existing action item and repeating the process to cause the aggregate validations to fail. Finally make sure you can delete an action item. I hope you find useful ways to incorporate this technique into the next APEX app you build.
Final Thoughts
Using appropriate SELECT statements and the technique outlined in this article, you can make quick work of other kinds of typical aggregate validation use cases like checking that the …
- sum of a child row column does not exceed a limit
- sum of percentages across child rows equals 100%
- count of child rows is within an expected range
The validations can get even more complex like ensuring the changes to the line items of an order don’t put the customer’s total monthly orders above their credit limit. Let your imagination be your guide!