Sometimes it can be useful to include end-user input in a generative AI system prompt. You can do this with both the Generate Text with AI dynamic action, as well as the Show AI Assistant one. We’ll explore two simple APEX 24.2 sample apps that illustrates the respective techniques.
Generating Text with AI from User Input
Imagine you want to let a user find synonyms using a large language model. This is a simple use case for the Generate Text with AI dynamic action, and requires including the original word the user wants alternatives for in the system prompt. As shown below, we can use a P1_BASE_WORD Text Field page item to let the user type a word, and the (Find Synonyms) button to trigger the synonym lookup.
Simple Synonym Finder Page Using Generate Text with AI Dynamic Action
The (Find Synonyms) button has a dynamic action event handler on the Click event whose first True action step uses a Generate Text with AI dynamic action configured as shown below. Notice it includes a simple System Prompt asking the LLM to:
Find ten synonyms for word the user provides marked as <WORD>…</WORD> in a bulleted list formatted in markdown, answer only.
For the Input Value it uses the JavaScript Expression option with an expression that concatenates the $v('P1_BASE_WORD') value of the user’s page item input in between “<WORD>” and “</WORD>” literal strings to make the user input more clear to the LLM. And finally, it uses the response from the AI service by storing it into the hidden page item P1_SYNONYM.
Property Editor Showing Key Configuration of Generate Text with AI Dynamic Action
The second dynamic action step uses a Refresh dynamic action to refresh a Dynamic Content region whose function body returning CLOB is the one liner below. The region mentions the P1_SYNONYM hidden page item in its Page Items to Submit property.
To include user input in a chatbot, use an AI configuration with a RAG source that returns the page item value. The second sample app uses an AI configuration containing a system prompt:
You can only answer questions about fruit.
… and a RAG source with a description of:
Limit your questions to fruit contained in the following list:
… with a corresponding function returning CLOB that looks like the following one-liner:
return :P1_ADDITIONAL_USER_PROMPT;
As shown below, the Additional User Prompt Text Field page item lets the user type in a list of fruits that will influence the system prompt used by the chatbot. This works since the AI configuration’s RAG sources are evaluated before each interchange with the AI Service.
In the quick session I captured in the screenshot, I had first typed in “apples, oranges” into the field and asked the chatbot the first two questions, then I changed the Additional User Prompt field to the value “watermelon, figs” and asked the next question.
Since the APEX engine evaluates the RAG sources on the server side, it’s important to “push” the user-entered Additional User Prompt into server-side session state whenever it changes. This is easy to do using a dynamic action event handler on the text field page item’s Change event. It only needs an Execute Server-side Code dynamic action step with a “no-op” PL/SQL block of:
null;
…along with a Items to Submit property mentioning the P1_ADDITIONAL_USER_PROMPT page item.
The rest of the chatbot interaction is handled automatically by the combination of the following “ingredients” in the recipe:
A Static Content region on the page with a static id set to chatbot
A Dynamic action event handler on the page’s Page Load event with a single Show AI Assistant action step.
This Show AI Assistant action step uses the my_ai_configuration AI configuration explained above, has Display As set to Inline, and mentions #chatbot as the Container Selector.
To commemorate Joel Kallman Day, I dive into four interesting APEX ideas related to dynamic behavior that my dev team colleagues John Snyders and Stefan Dobre taught me recently. We’ll explore how to:
Declaratively compute a dynamic default for a cascading child list
Conditionally hide or show a page item based on a SQL query lookup
Interactively validate user input to show invalid fields before submitting
Easily set several features of a grid and refresh it keeping selected rows.
Download the sample to follow along in APEX 24.1, or read first and download later. Let’s get started.
Note: To see any figure in its original size, right-click on it and open it in a new browser tab.
Configuring Cascading Lists
Cascading lists are a pair of LOV-driven page items where the value of a “parent” list influences the choices available in a “child” list. For example, as shown below, when choosing an automobile the end user first picks a car brand (e.g. Ford, Toyota, Tesla) then chooses a car model from the selected brand.
Example of cascading lists to first choose an automobile brand, then a model from that brand
In Oracle APEX, it’s simple to configure cascading lists. Just decide which page item type works best for your use case – like Select List or Popup LOV, among others – and then set the Parent Item name on the child list as shown below.
Setting the Parent Item property of the P5_MODEL_SELECTLIST child cascading list
Your list of values SQL query for the child list can reference the value of the parent list as a bind variable. For example, the figure below shows a simple data model for car makes and models.
Data Model for Cascading Lists to choose brand (or “make”) and model of an automobile
If the parent page item is P5_MAKE_SELECTLIST and the child list is P5_MODEL_SELECTLIST then the child’s LOV SQL Query might look like the following to retrieve the model_name and id for cars whose auto_make_id is the one selected in the parent list:
select model_name, id
from eba_demo_auto_model
where auto_make_id = :P5_MAKE_SELECTLIST
order by model_name
APEX automatically includes the parent item’s current value in the request it sends to the APEX server to refresh the child page item’s list of values. It’s not the case in this simple example, but if your child list depends on multiple parent items’ values, you can provide a comma-separated list of multiple page item names in the Parent Item(s) property and all of their values get sent to the server. In this case, the child list would be refreshed each time any of the parent page item’s values changes.
If necessary, you can add other page item names into the Items to Submit property in the Cascading List of Values section of the property editor. You’d need to do that if your child list’s LOV SQL query also references other page item values as bind variables. The difference in listing them as other Page Items to Submit instead of as Parent Items is that APEX will not proactively refresh the child list when these other items’ value changes. Listing them as Page Items to Submit just ensures their latest value gets sent to the server when APEX does refresh the child list.
Declarative Default for Cascading Child List
By default, when an end user changes the value of a parent list, APEX sets the child list’s value to null. This compels the user to pick a relevant choice from the refreshed child list. However, what if you want to default the child list to a particular value after the list is refreshed?
For example, after the user selects a car brand, you might want to default the car model select list to the lowest priced car. This is easy. Just use the child list’s Default property to configure a query or expression that returns the desired value. It will typically reference the value of the parent field, and possibly other page items as bind variables. To default the child list P5_MODEL_SELECTLIST to the least expensive model for the current brand, you can set the Default > Type to SQL Query and use a select statement like:
select id
from eba_demo_auto_model
where auto_make_id = :P5_MAKE_SELECTLIST
and retail_price =
(select min(retail_price)
from eba_demo_auto_model
where auto_make_id = :P5_MAKE_SELECTLIST)
Now, whenever you choose a different car brand, the child list gets defaulted to the model with the lowest price. What makes this magic work? The APEX page automatically performs an behind-the-scenes request to the APEX server to retrieve the default value for the new parent list value whenever the parent page item value changes. This request evaluates the SQL query or PL/SQL expression you’ve configured for the child list, in the presence of the latest value for the parent item(s). If your default value query depends on multiple page items, that’s a sign they should all be listed in the comma-separated Parent Item(s) property so APEX knows to refresh the child list when any of their values changes.
This kind of under-the-covers info request that doesn’t re-render the entire web page is known as an “AJAX” request. The acronym reflects initial implementations’ Asynchronous use of JavaScript to exchange XML. These days, the browser typically sends and receives JSON payloads instead.
Only Defaulting a Singleton Child
The original forum question motivating my research asked, “If the child list has only a single valid choice, can I default it automatically?” This developer wanted users normally to choose from the child list. However, if there was only one choice available, she wanted to save the end-user a few clicks. The P5_MAKE_SELECTLIST2 and buddy P5_MODEL_SELECTLIST2 in page 5 of the sample app illustrate how I solved this problem for her. I configured a Default value query involving the parent page item as above, but crafted the query to only return a value when there was a single valid choice (otherwise return no row). The query looks like this, using the group by and having clauses to only return a row if the count of available auto models is one (1).
select max(id)
from eba_demo_auto_model
where auto_make_id = :P5_MAKE_SELECTLIST2
group by auto_make_id
having count(*) = 1
You can try it out in the sample app. Among the sample car makes and models, the Rivianbrand is the only one with a single model in the EBA_DEMO_AUTO_MODEL table. If the user picks any other car brand, the child list refreshes and the user has to choose from the list. However, if they pick Rivian for the brand, the child list defaults to the R1T model.
Child lists defaults only if the refreshed child list contains a single entry
Lookup-Driven Conditional Display
Consider the use case below from page 12 of the sample app where an Insurance Amount page item in a car‑ordering form should display only if the retail price of the car model selected is over $25,000. As the user selects different car brands and models, the page should react to the change of P12_MODEL_ID by hiding or showing P12_INSURANCE_AMOUNT.
Insurance Amount page item displays only when model price exceeds $25,000
It’s tempting to reach for the Server-side Condition on P12_INSURANCE_AMOUNT to perform this model price lookup. However, recall that the APEX engine evaluates server-side conditions at initial page rendering time. Once the page is rendered, as the end user is changing field values, the server-side condition is not re-evaluated. So we need a different approach for dynamic, lookup-driven display that reacts to user input as it happens.
Performing the Lookup
The technique starts by adding a hidden page item P12_SHOW_INSURANCE_AMOUNT to the page. Then, as shown in the APEX Page Designer below, I created a dynamic action on the P12_MODEL_ID page item’s “Change” event to first perform the model price lookup. Then using the result of this lookup, two subsequent conditional dynamic action steps either Show or Hide the page item.
Using an Execute Server-side Code dynamic action step to perform a lookup
The initial action step of type Execute Server-side Code calls the show_insurance_for_model() procedure, passing in the value of P12_MODEL_ID. This procedure’s two OUT parameters return a Y or N into the P12_SHOW_INSURANCE_AMOUNT hidden page item, and also return a default insurance amount value into P12_INSURANCE_AMOUNT.
Notice two important details. First, the Page Items to Submit and Page Items to Return are configured to mention the names of the page items referenced as bind variables in the PL/SQL block. Second, since the P12_SHOW_INSURANCE_AMOUNT is a hidden field being changed dynamically in the browser, we need to set its Value Protected property to OFF to avoid a checksum validation error when the user submits the page.
The lookup code for the show_insurance_for_model() procedure in the eba_demo_jkday package is below. It retrieves a row in EBA_DEMO_AUTO_MODEL using the p_model_id passed in. In the process, its case statement returns Y or N depending on whether the auto model’s retail_price column value exceeds 25000. It also computes a default value for the insurance as 2% of the retail price. It fetches these values into the p_display and p_default_insuranceOUT parameters, respectively.
procedure show_insurance_for_model(
p_model_id in number,
p_display out varchar2,
p_default_insurance out number)
is
begin
-- Default to not displaying insurance
p_display := 'N';
if p_model_id is not null then
-- Return 'Y' if model price over 25000
select case
when retail_price > 25000
then 'Y'
else 'N'
end,
round(retail_price * 0.02)
into p_display,
p_default_insurance
from eba_demo_auto_model
where id = p_model_id;
end if;
exception
when no_data_found then
null;
end show_insurance_for_model;
Using Lookup Result to Hide or Show
Once the Execute Server-side Code action step completes, the P12_SHOW_INSURANCE_AMOUNT hidden page item contains either Y if the Insurance Amount field should show, or N if it should be hidden. We can configure an appropriate Client-side Condition that references the value of this hidden page item on each of the two following action steps. On the Show step affecting page item P12_INSURANCE_AMOUNT we configure the client condition of P12_SHOW_INSURANCE_AMOUNT equals Y. On the Hide step we use a client condition of P12_SHOW_INSURANCE_AMOUNT equals N. If an action step’s client condition evaluates to true, then it runs. Otherwise, it’s skipped. The result is that P12_INSURANCE_AMOUNT will be shown or hidden now, based on the selected model’s retail price.
If the page is used for editing existing rows, we must consider that case, too. First, we ensure the Show Insurance for Model? dynamic action step’s Fire on Initialization property is OFF. This avoids its performing an additional AJAX call to the APEX server when the page is initially rendered. We complement this with an Invoke API page process in the Pre-Rendering section of the component tree to call our show_insurance_for_model() procedure during page load as shown below.
Screenshot
When loading an existing row, we don’t want to use the OUT parameter value returned in the p_default_insurance parameter since it would override the existing value of the insurance amount queried from the database. So, as shown below we configure the Invoke API parameter to ignore the return value.
Ignoring the value of an OUT parameter when using an Invoke API page process
In contrast to the Fire on Initialization property of the Execute Server-side Code action step, we set this property to ON for the hide and show steps. This lets them hide or show the Insurance Amount field during page load based on the value retrieved by the pre-rendering Invoke API page process.
With these few configurations in place, the Insurance Amount field displays when the car model’s price is over $25,000 in both create and edit use cases.
Setting Up Validations in a Form Page
You can define validations in a page to ensure the data users enter is correct. The APEX engine evaluates these rules when the page is submitted. Sometimes, it’s useful to highlight data entry errors more proactively. This lets users see and correct problems even before submitting the page. We’ll study next how to use a dynamic action to show interactive validations that complement those enforced on page submit.
To share logic between submit-time validations and the the interactive ones we’ll configure below, we put the validation code in a PL/SQL package. In the sample app, the eba_demo_jkday package has an is_even() function. It returns true if the number passed in is even, and false otherwise. It’s a trivial example, but it represents any kind of validation function that accepts one or more parameters and returns a boolean result: true for valid, and false for invalid.
In page 6 of the sample app, we ask a user to enter two even numbers whose sum we will compute and display when they click the (Submit) button. We first define validations on the P6_EVEN_VALUE1 and P6_EVEN_VALUE2 page items below.
Users need to enter two even numbers to calculate their sum
Using an Expression type validation we simply call the is_even() function that returns a boolean, passing in the value of the page item to validate like this:
eba_demo_jkday.is_even(:P6_EVEN_VALUE1)
If it returns true the validation passes. If it returns false instead, APEX displays a corresponding error message to the user.
Speaking of error message, as shown below next we define a translatable text message named VALUE_MUST_BE_EVEN under Shared Components > Text Messages…
Creating a translatable text message to use for the validation error message
Finally, for the validation Error Message we use the special text substitution notation to reference the translatable text message by its message name. We enter &APP_TEXT$VALUE_MUST_BE_EVEN. – including the trailing “dot” – and configure the error message to display inline with the field.
After doing this for both page items, as shown below we get the expected validation messages when entering odd numbers into both fields and clicking on the (Submit) button.
User sees inline validation error messages upon clicking (Submit)
Interactive Validation in Form Pages
To alert a user more proactively to incorrect data, a dynamic action on a field’s value change is the key. As you might expect, since we want to call our is_even() package function, the dynamic action will use an Execute Server-side Code action step, but the first two ways I tried didn’t work as I predicted they might. Neither raising an exception, nor calling the apex_error.add_error() from this server-side step gave the result I needed.
My colleague Stefan encouraged me to use a technique like we used above for the lookup-driven display logic. We’ll return the result of the validation into a hidden page item, then reference it for conditional behavior in a client-side condition. My hidden page item here is P6_ERROR_MESSAGE. I return null into this hidden item when the data is valid, or return the error message text to show the user if the data fails validation. My dynamic action step code looks like this:
:P6_ERROR_MESSAGE :=
case
when not eba_demo_jkday.is_even(:P6_EVEN_VALUE1)
then apex_lang.message('VALUE_MUST_BE_EVEN')
end;
If the call to is_even() returns false then P6_ERROR_MESSAGE is set to the text of the VALUE_MUST_BE_EVEN message. If is_even() returns true, then the case statement does not match any when condition and results in assigning null to the page item. We remember to configure the Page Items to Submit and Page Items to Return so APEX sends “over” the value of P6_EVEN_VALUE1 and brings “back” the value of P6_ERROR_MESSAGE. As above, since we’re dynamically changing the value of a hidden field, we set the Value Protected property of P6_ERROR_MESSAGE to OFF.
Next, I use an Execute Javascript action step to clear the errors in the client form for the page item being validated with the one-liner:
apex.message.clearErrors('P6_EVEN_VALUE1');
Then finally, a third JavaScript action step shows the inline error on the field:
apex.message.showErrors( [
{
type: "error",
location: [ "inline" ],
pageItem: "P6_EVEN_VALUE1",
message: $v('P6_ERROR_MESSAGE'),
unsafe: false
}
] );
To ensure this gets skipped if P6_ERROR_MESSAGE is null, I added a Client-side Condition to this action step of Type “Item is not null”, using P6_ERROR_MESSAGE as the item name.
After repeating this technique also for the P6_EVEN_VALUE2 field, the user now sees the interactive validation error messages as soon as they leave the field as shown in the short video below.
Grid Configuration & Refresh Techniques
Another forum question I recently worked on asked, “Can I refresh just a single row in an Interactive Grid on return from a modal edit dialog? When I refresh the whole grid the user’s selected rows are lost.” I heard two intertwined questions. The first was how to refresh just a single row in the grid. The second was how to preserve user row selection across a grid refresh. By consulting with my colleague John Snyders, I learned several new things about APEX grids while researching a solution. The sample app shows off all the tips he taught me:
Hiding the grid footer when not needed
Letting users select multiple rows in the grid
Keeping selected rows across page-by-page grid pagination
Automatically maintaining primary keys of selected rows in a hidden page item
Refreshing just a single edited row in the grid after closing a modal dialog
Restoring the selected rows after a grid refresh
John explained the minimal JavaScript code needed to enable these features. Four of them only require setting a property in the grid’s JavaScript Initialization Function:
footer: false – to hide the footer
selectionStateItem: "P2_SELECTED_EMPNOS" – to track selected primary keys
multiple: true – to enable multiple row selection, and
persistSelection: true – to keep selected rows across pagination
You can add one or more of these properties to a small initialization function like the one below, adding whichever ones you need separated by commas. You would define this on the Attributes tab of the interactive grid region. For example, to enable a selection state item in a grid with multi-row selection, the function would look like this:
function( config ) {
config.defaultGridViewOptions = {
selectionStateItem: "P2_SELECTED_EMPNO",
multiple: true
};
return config;
}
Refreshing a single row in the grid and restoring the selected rows after a refresh required a few more lines of code, but even a JavaScript novice like me could understand what it was doing. I’ll explain some of that code below.
Capturing Code in a Component
I wanted to capture John’s coaching in a component. After initially writing the helper code in a static application JavaScript file, I asked colleague Stefan Dobre to teach me how to turn my code into something easy to reuse. He gave me back a working dynamic action plug-in that showed me how a slightly modified version of my original JavaScript code could reference custom attribute values that the plug-in defined.
Even as a JavaScript newbie, I was able to evolve Stefan’s solid starting point to present exactly the custom attributes I wanted. I also happily included Stefan’s suggested code improvements. The simple plug-in exposes the features John taught me in a way that others can use declaratively.
I ended up with sample app’s Interactive Grid Utils plug-in. It supports the two Action values shown below: Set OptionsandRefresh. The Set Options action shows four declarative settings to configure the features mentioned above, without having to write the initialization function to enable them. You would typically use it as a step in a Page Load dynamic action.
Declarative properties developers can configure on the Interactive Grid Utils plug-in
The Refresh action presents a JavaScript expression to provide the primary key value of the grid record to refresh. If the record corresponding to the primary key exists in the grid, just that one row of the grid is refreshed. If a refreshed row was deleted, it gets removed from the grid. If the primary key value is null or cannot be found in the grid – as would happen after inserting a new row – then the whole grid is refreshed and the previously selected rows are restored after the refresh.
In either case, when using the plug-in you associate it with a particular Interactive Grid region by setting two properties in the dynamic action’s Affected Elements section in the property editor. Just set Selection Type to Region and Region to the desired Interactive Grid’s region name.
Binding Selected Primary Keys in a Query
The Employees (Multi-Select) page (4) in the sample has a grid of employees and uses the plug-in above in a Page Load dynamic action to configure P4_SELECTED_EMPNOS as the selection state item and to allow multiple selected rows. Using Command-click on Mac or Ctrl‑click on Windows, you can select multiple employees. As the user changes the grid selection, the P4_SELECTED_EMPNOS automatically reflects the colon-delimited primary keys of the selected grid rows. To avoid the automatic selection of the first row in the grid, I set the Select First Row property of the Employees grid in the page to OFF on theAttributes tab.
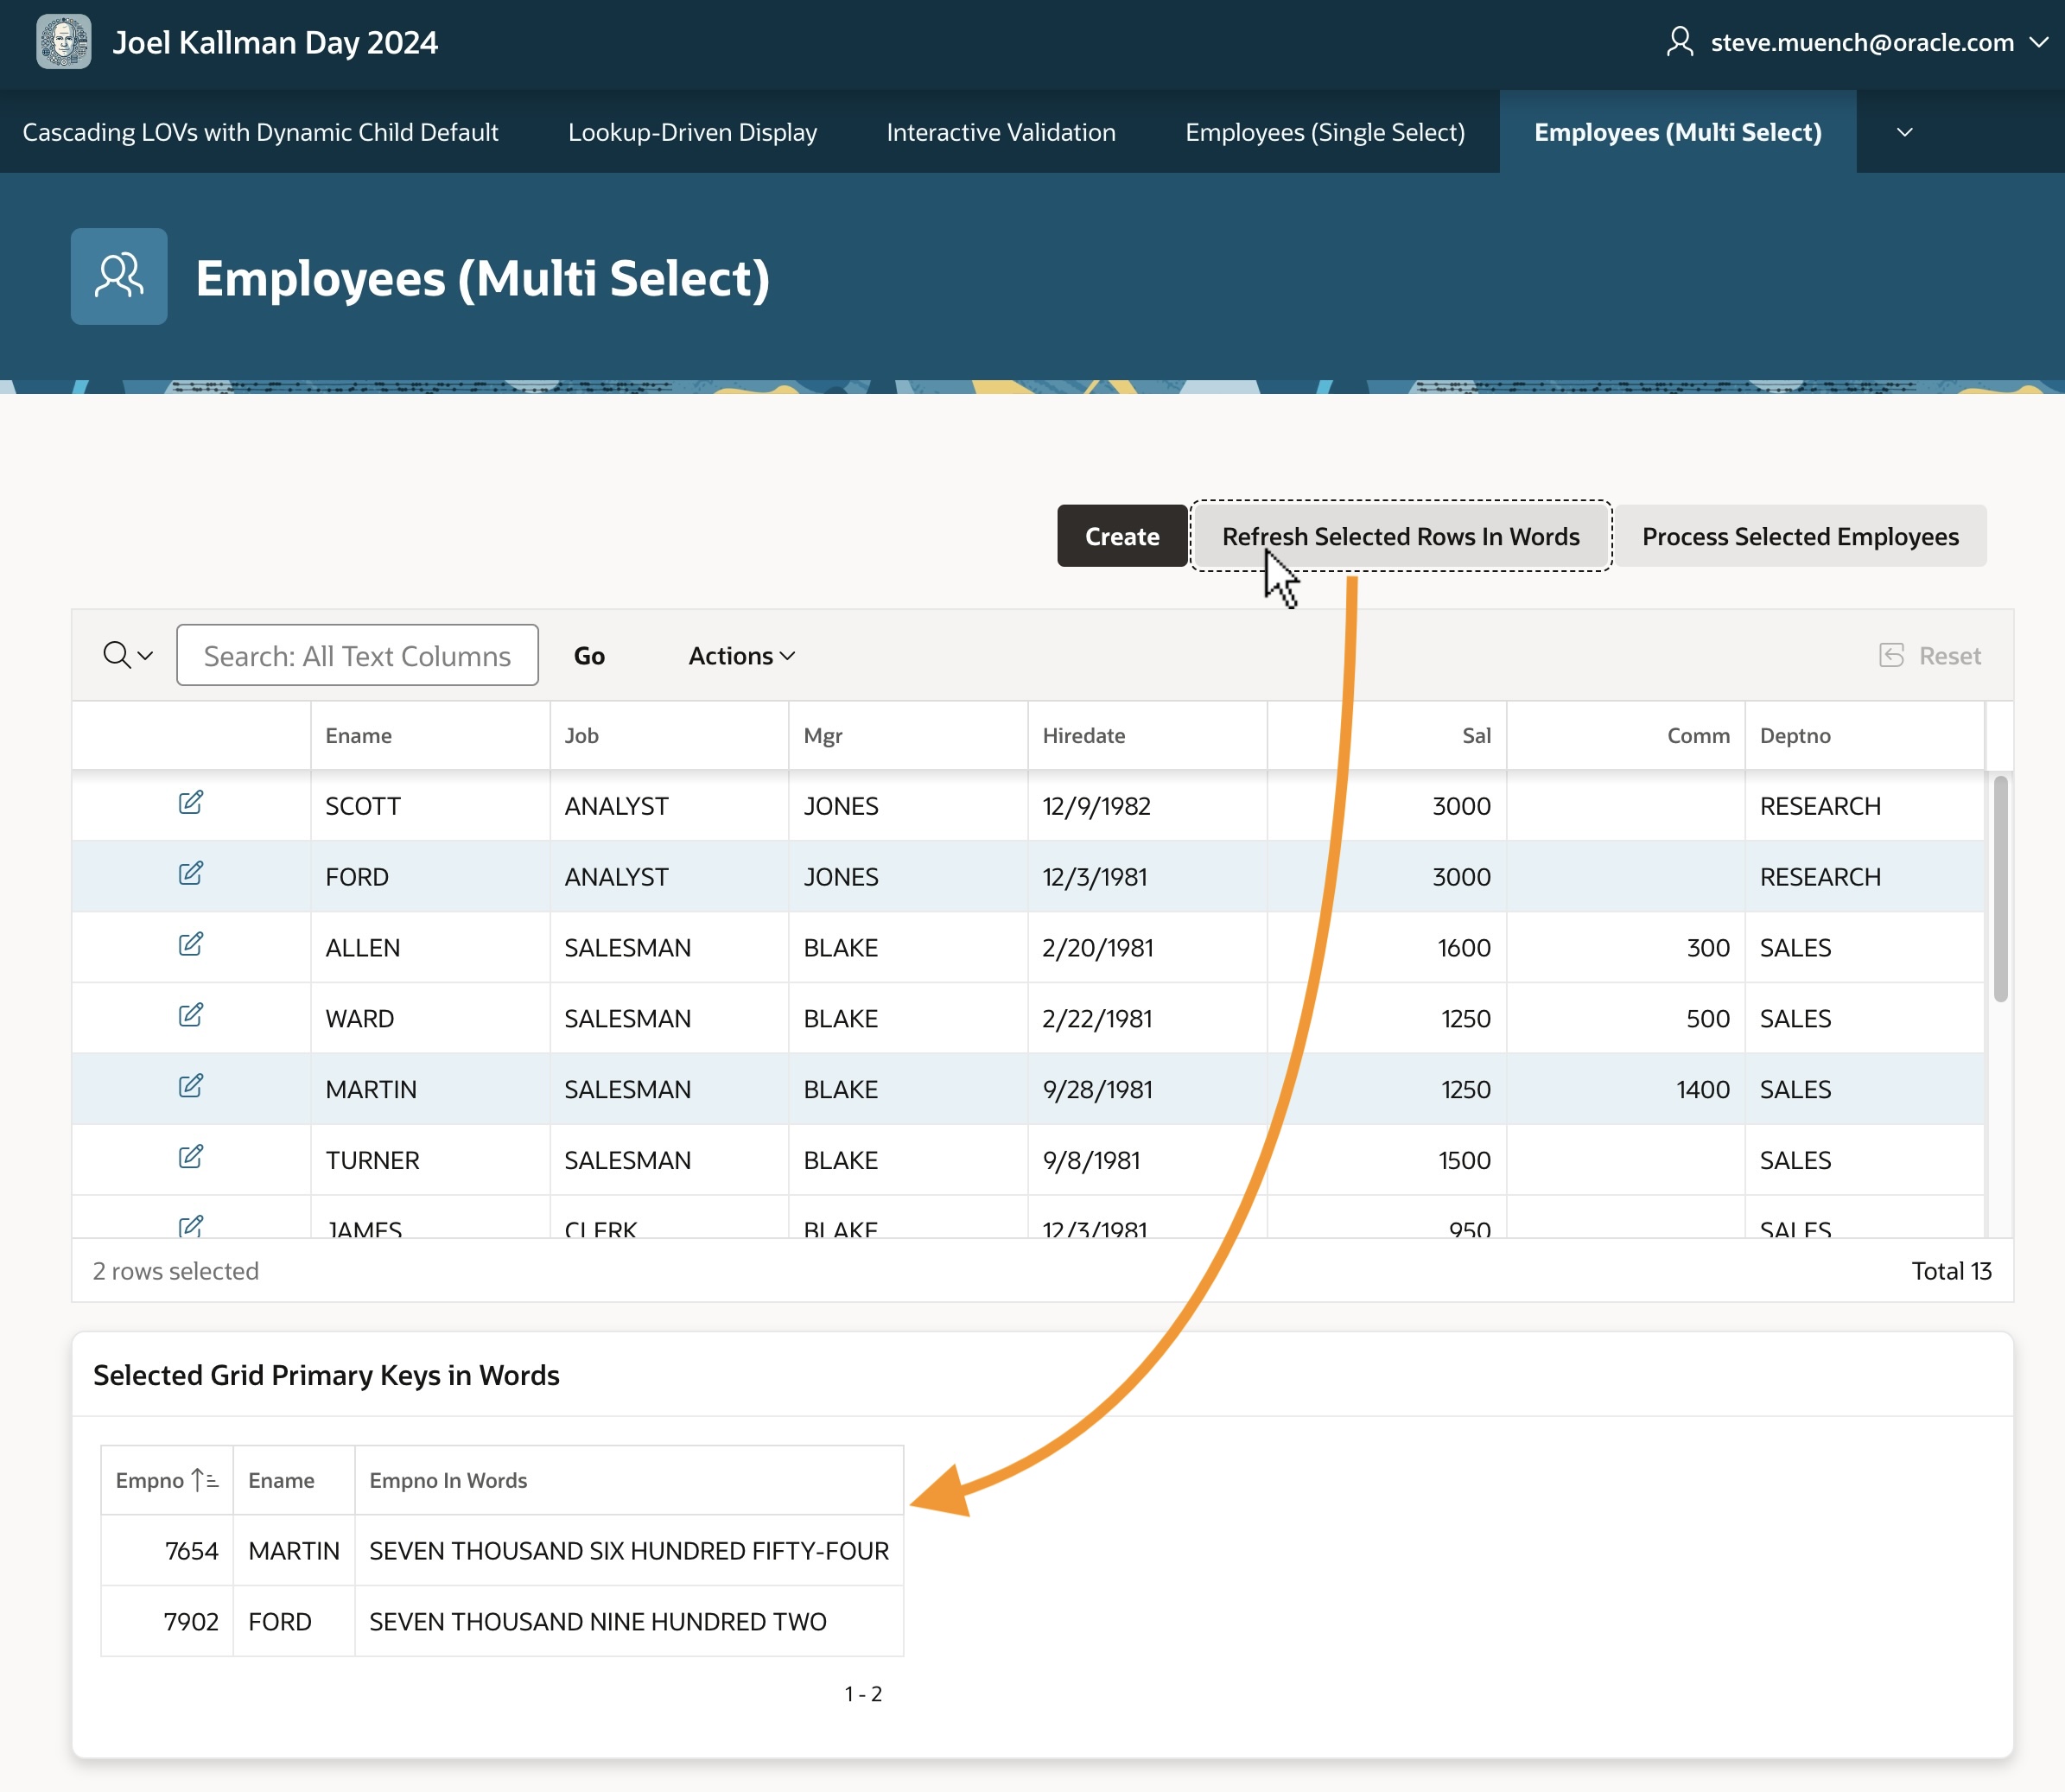
This automatically-maintained list of primary key values is useful to use as a bind variable in a query. For example, the Selected Grid Primary Keys in Words classic report region below the grid has the following select statement referencing :P4_SELECTED_EMPNOS Notice how it uses the apex_string.split() function in an EMPNO IN subselect to retrieve employees whose EMPNO appears among the colon-separated values.
select empno,
ename,
to_char(to_date(empno, 'J'), 'JSP') AS empno_in_words
from eba_demo_employees
where empno in (select column_value
from apex_string.split(
:P4_SELECTED_EMPNOS,':'))
You can refresh the report based on this query to show information about the selected grid rows by clicking the (Refresh Selected Rows in Words) button. The screenshot below shows the result after selecting employees FORD and MARTIN and clicking that button.
Using grid selection primary keys page item in a query on the same page
Passing Selected Primary Keys as Parameter
The automatically-maintained list of primary key values is also useful to pass in a parameter to another page. Notice the (Process Selected Employees) button in the figure above. I configured it to submit the page so the P4_SELECTED_EMPNOS selection state item value becomes part of the APEX session state. Then I added the conditional branch shown below – with an appropriate When Button Pressed Server-side Condition – to pass the P4_SELECTED_EMPNOS parameter to page 10.
Notice in the Link Builder – Target dialog below that I’ve escaped the substitution string &P4_SELECTED_EMPNO. by surrounding it with backslashes. By using this escaped substitution \&P4_SELECTED_EMPNO.\ we signal the APEX engine to pass the value containing colons verbatim to the target page. Failing to remember this backslash escaping would result in passing just the first primary key value, since the APEX engine normally treats colons as value separators.
Escaping the value of P4_SELECTED_EMPNOS with backslashes since it can contain colons!
By properly backslash-escaping the substitution string in the link builder dialog, we ensure that when multiple rows are selected in the grid the corresponding colon-delimited list of primary keys is passed correctly to the target page as shown below.
Multiple colon-separated empno values arrive intact when backslash-escaping page item value
Surgically Refreshing an Edited Row
The same page in the sample uses the Interactive Grid Utils plug-in as a step in a“Dialog Closed” dynamic action. To handle the event correctly whether the dialog is opened by the (Create) button or by an edit link in the grid, I use the Selection Type of jQuery Selector and the body selector. The HTML body element represents the whole page content, so it naturally contains both the create button and the interactive grid region.
The Close Dialog page process in the modal employee form page (3) configures its Items to Return property as P3_EMPNO to return the primary key of the row that was just inserted, updated, or deleted. Accordingly, I configured the plug‑in to use its Refresh action and provided the JavaScript expression of this.data.P3_EMPNO to get the primary key of the row to refresh.
You can experiment that editing a row in the grid and saving the changes just refreshes the edited row, maintaining the row selection. If you delete an employee, it’s removed from the grid, and if you add a new employee the grid does a full refresh. In all of these cases the row selections are preserved.
Two other pages in the demo use the plug-in similarly, but with slightly different grid options. The Employees (Single Select) page (2) uses a single-select grid and hides the grid footer. The Employees (Page-by-Page, Multi Select) page (9) uses a page-by-page pagination on the grid, and uses the plug-in to keep the selected row across pages and allow multi-row selection.
Peeking at the Plug-in Definition
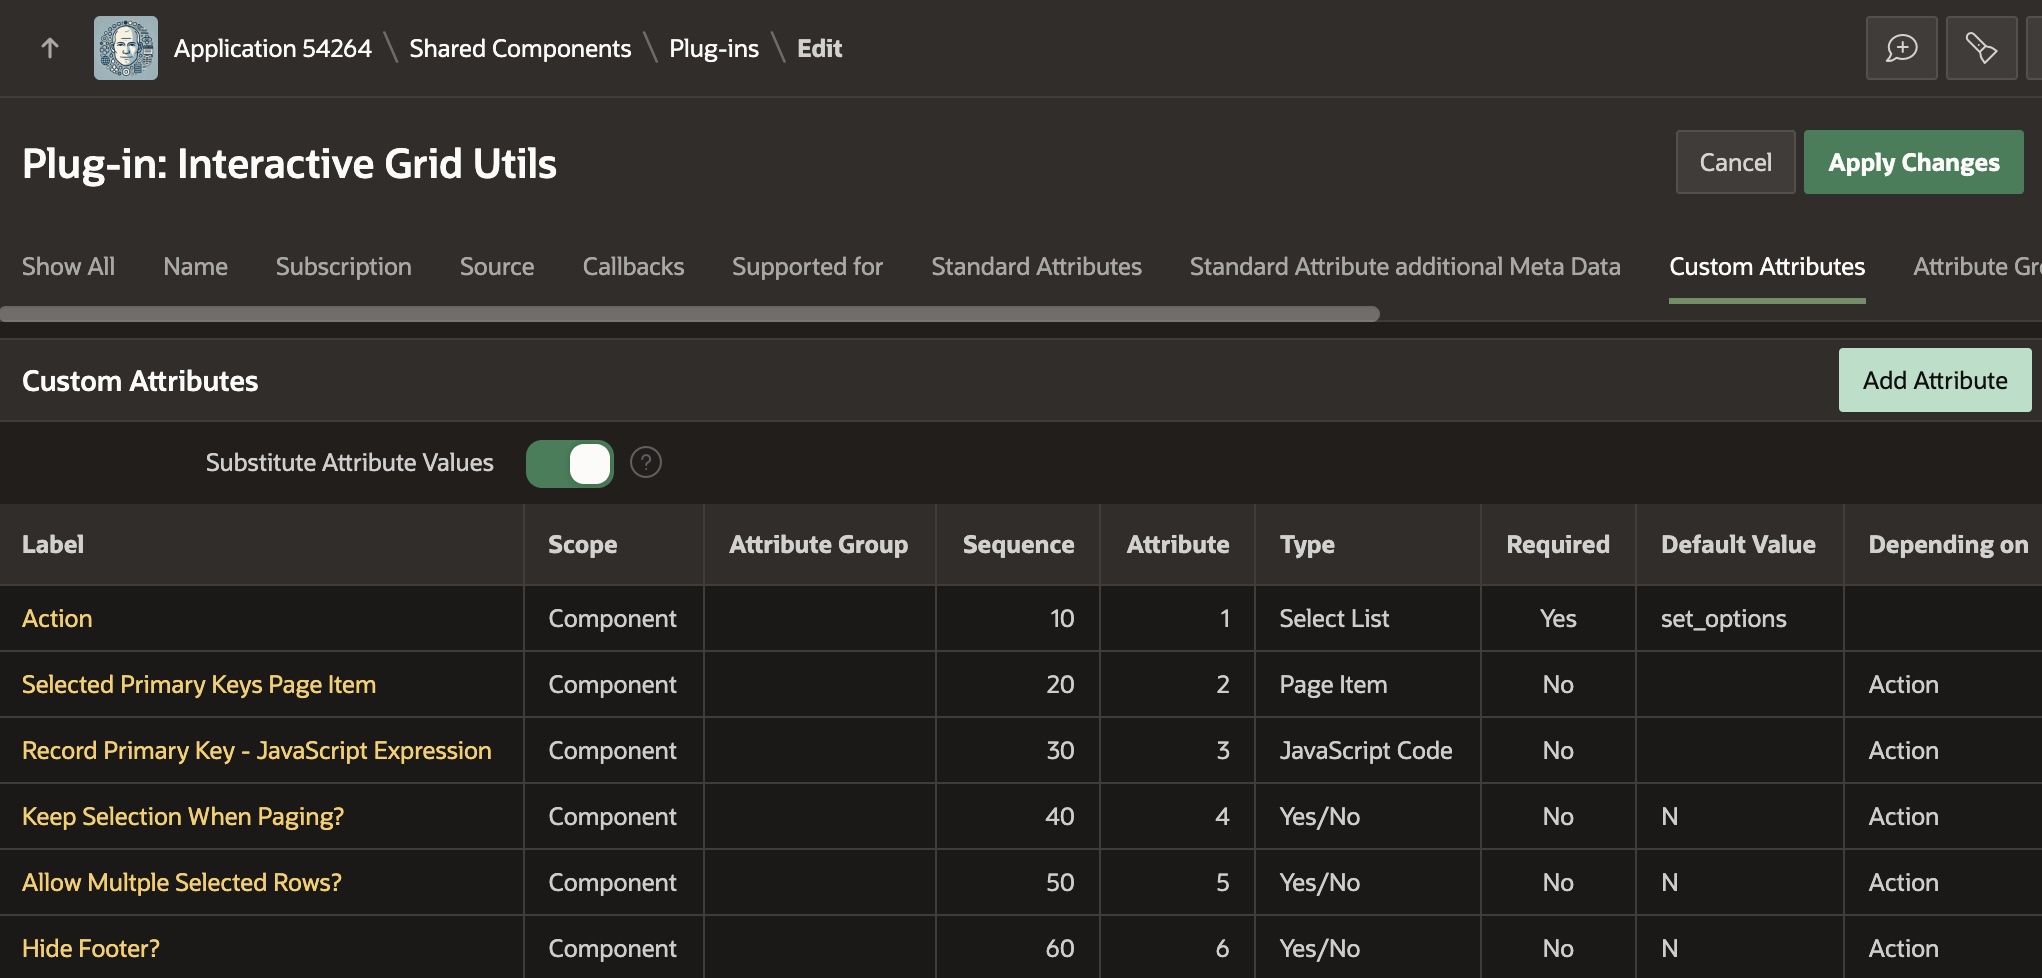
Taking a peek at the plug-in, we can see in the figure below that it defines custom attributes for the declarative settings developers can configure in the Page Designer property editor. There is an Action property, and then all of the others depend on the value of the Action property. This lets the property editor correctly display properties only when relevant. Notice that each custom property is assigned to an attribute number, from 1 to 6 in this case.
Defining custom attributes of the Interactive Grid Utils dynamic action plug-in
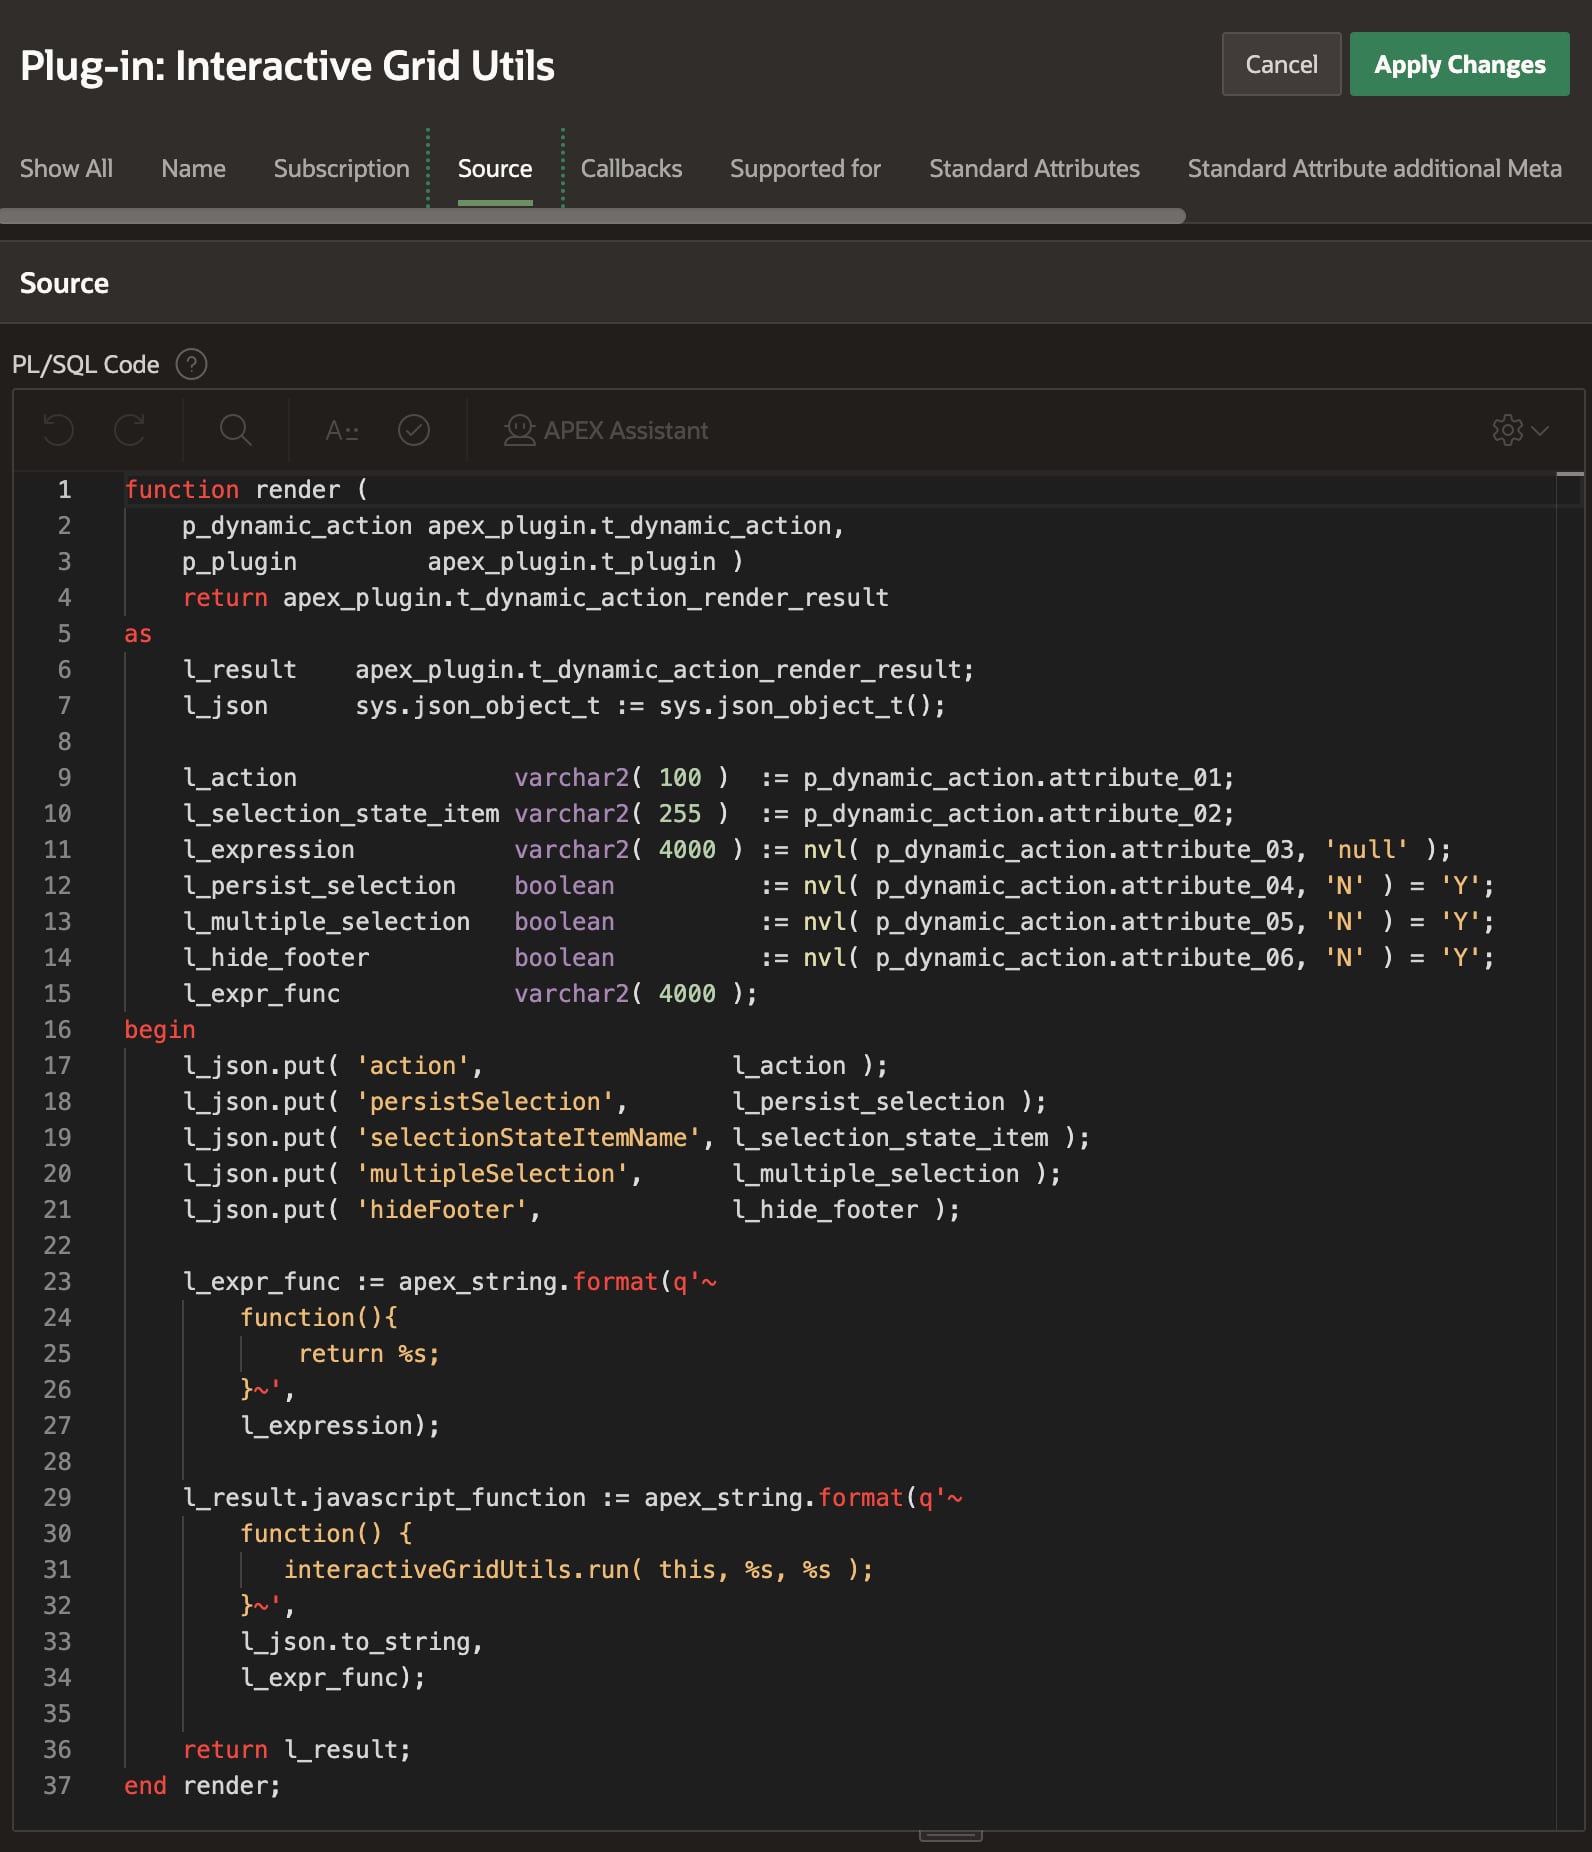
On the Source tab shown below, you can see the plug-in’s PL/SQL render() function. The APEX engine passes it key information at runtime in the p_dynamic_action argument. It returns the text of a JavaScript function that retrieves the values of the six custom attributes and passes them as the properties of a JSON object in the call to the interactiveGridUtils.run() function. The APEX engine includes the text of this function in the rendered page that uses the plug-in so the browser can execute it when appropriate.
The render() call returns text of function passing custom attributes to main JavaScript code
On the Files tab shown below, you can see the script.js file that contains the main JavaScript code for the plug-in. It defines the interactiveGridUtils object whose run() function is invoked in the rendering function above. Note the script.js is accompanied by a Reference value of #PLUGIN_FILES#script#MIN#.js This is the expression I copied and pasted into the JavaScript section on the File URLs to Load tab. This ensures the plug-in includes the code in the script.js file at runtime.
The script.js file containing the plug-in’s main JavaScript code lives in the Files tab
The JavaScript code in the script.js file has the following pseudo-code flow:
Retrieve the static id of the region from the Affected Elements
Lookup the grid region to work with using that static id.
Use region object to get grid’s jQuery view and model containing its data.
Assign custom attribute values passed in the data parameter to local variables
Depending on Action value, either set grid options, or perform a row refresh.
The row refresh logic uses model.getRecord() to get the row in the grid by primary key. If it exists, it calls model.fetchRecords() to refresh the row. Otherwise, if the row doesn’t exist or no primary key was provided, it calls the refreshAndRestoreSelection() function. That function gets the list of selected rows, configures a one-time gridpagechange event handler to restore the selected rows, and finally calls region.refresh() to refresh the region and trigger the gridpagechange event in the process.
Trying Out the Sample
I encourage you to download the sample and try it out in APEX 24.1. If you’re not yet using APEX 24.1, you can still explore the sample app in a free workspace at oracleapex.com It’s always running the latest APEX version to experiment with. That said, the techniques explained here are applicable to any recent version of APEX you might be using. I had fun learning these techniques. I hope at least one of them was new to you, too.
Thanks again to colleagues John Snyders and Stefan Dobre for the continued mentorship and words of wisdom. After three years on the APEX team I’m still learning from a firehose – many, many new things every day – and it’s an exciting, energizing feeling!
I’ve frequently found it useful to share one region’s data in another. For example, as a user narrows her results with a faceted search or smart filter, a chart, map or dynamic content region shows the same results in a different way. My colleague Carsten explains the technique in his Add a Chart to your Faceted Search Page blog post, and it has come in handy for me many times. But after the fifth pipelined table function and object types I authored to enable the data sharing, I set out to automate the process to save myself time in the future. As an APEX developer, the ability to create development productivity apps for yourself is a cool super power!
The Region Data Sharing Helper app featured in this article lets you pick a region from any app in your workspace and easily download scripts to share that region’s results in another region in the same application. After first explaining how to use the app, I highlight some interesting details of its implementation.
Overview
The app lets you select regions for which to generate data sharing artifacts. Since data sharing requires both data and a unique region identifier, the app only shows regions with a static id having a source location of Local Database, REST Enabled SQL, or REST Source. After adding a region to the selected list for artifact generation, if needed you can adjust the columns to include and the base name. Then, you can download the generated artifacts for that region. By incorporating the SQL scripts into your APEX app, you can configure additional regions in the same app to use the original one’s data using the SELECT statement provided in the accompanying README file.
The app maintains the list of selected regions to remember the subset of columns you configure and the base name of the generated artifacts you prefer for each region. If you later update one of the original regions in the App Builder in a way that affects its columns, just click the (Regenerate) button to refresh its datasource info and download the artifacts again.
Choosing a Region
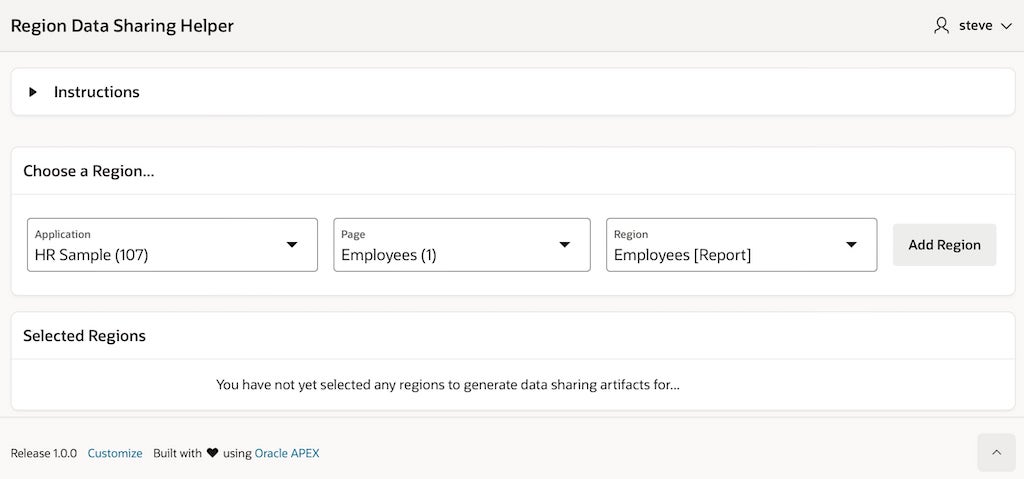
As shown in the figure below, choose a region whose data you want to share with other regions in the same app. Click (Add Region) to add it to the list of selected regions below.
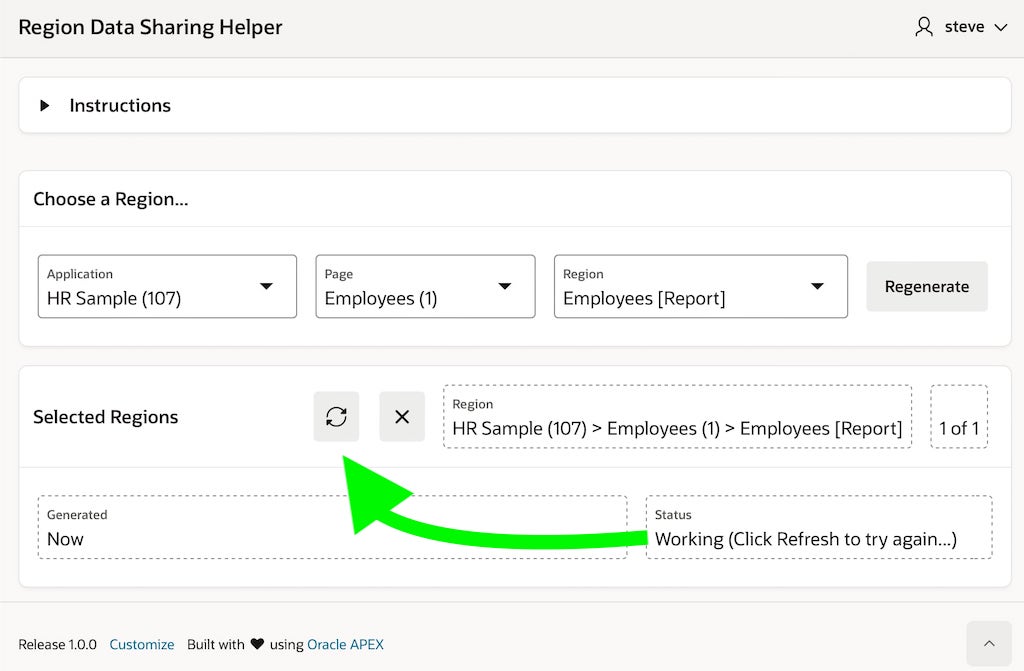
Region Data Sharing Helper app showing Employees region in HR Sample app
Sometimes the selected region is immediately ready for artifact generation, but other times it may take a few seconds to show a status of Ready. If you see a status of Working, as shown below, wait 10 seconds and click the refresh icon to see if it’s ready yet.
Click (Refresh) after 10 seconds if status shows as Working
Once the status of a selected region is Ready, you can adjust the base name and included columns and save any changes. If you’ve modified the original region in your app in a way that affects its data source columns, click Regenerate to refresh the set of available columns to choose from.
Adjusting the included columns and base name as necessary
Once you’ve saved any changes, the download button will reappear. Click it to get a zip file containing the generated SQL scripts and a README file explaining what they are and how to use them.
Clicking the download button to produce the data sharing artifacts
When you no longer anticipate needing to download data sharing artifacts for a selected region, you can remove it from the list of selected ones by clicking the Delete button. This simply removes it from the helper app’s list of selected regions. You can always add it again later as a selected region if the need arises.
Exploring the Downloaded Artifacts
After clicking the download button for the Employees region on page 1 of the HR Sample application shown above, since the Base Name was employees a zip file named employees-region-data-sharing-artifacts.zip is downloaded. Extracting the zip file reveals three generated files as shown below.
Mac finder showing the contents of the downloaded zip file
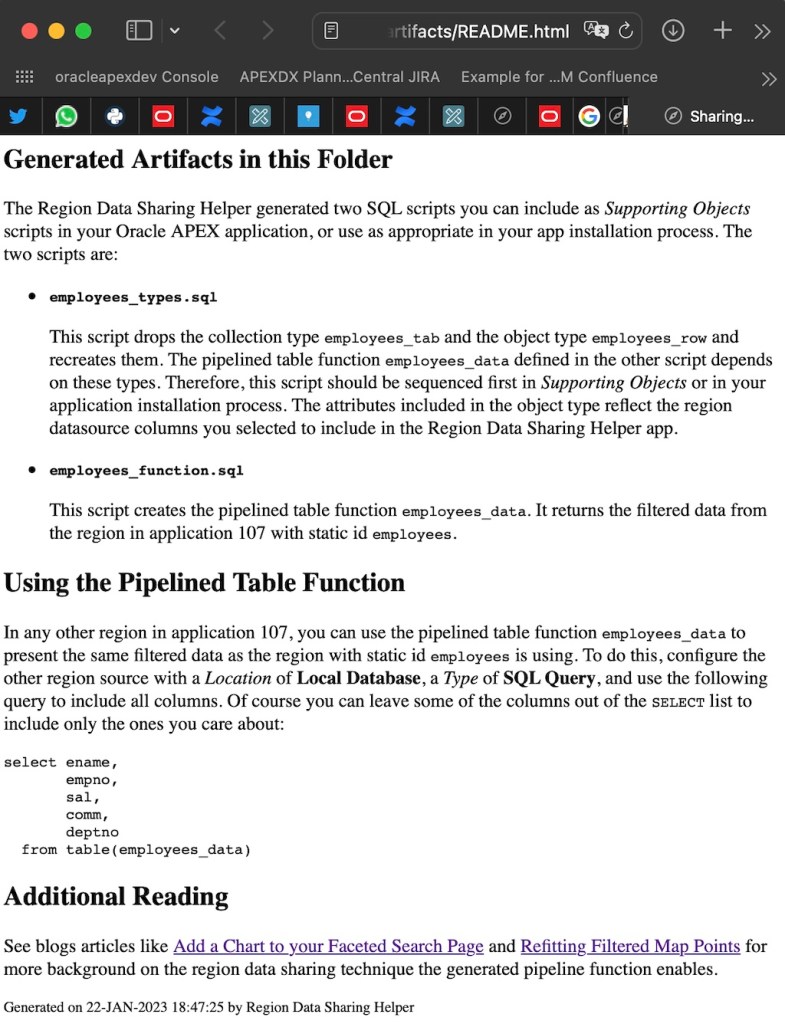
The README.html is the place to start, since it explains the other two files.
README.html file explains the generated artifacts and suggests SELECT statement to use
The employees_types.sql script defines the employees_row and employees_tab types used by the pipelined table function in the other file. The employees_function.sql defines the employees_data pipelined table function and depends on the types. You can include these scripts directly into your APEX application as Supporting Objects scripts, or add them to the set of your existing installation scripts. Due to the function’s dependency on the types, however, just ensure that the types script is sequenced before the function script.
For example, incorporating the generated SQL scripts into the HR Sample app above as supporting objects scripts would look like this:
Supporting Objects scripts after adding the two data sharing SQL files
Using Pipelined Table Function in a Region
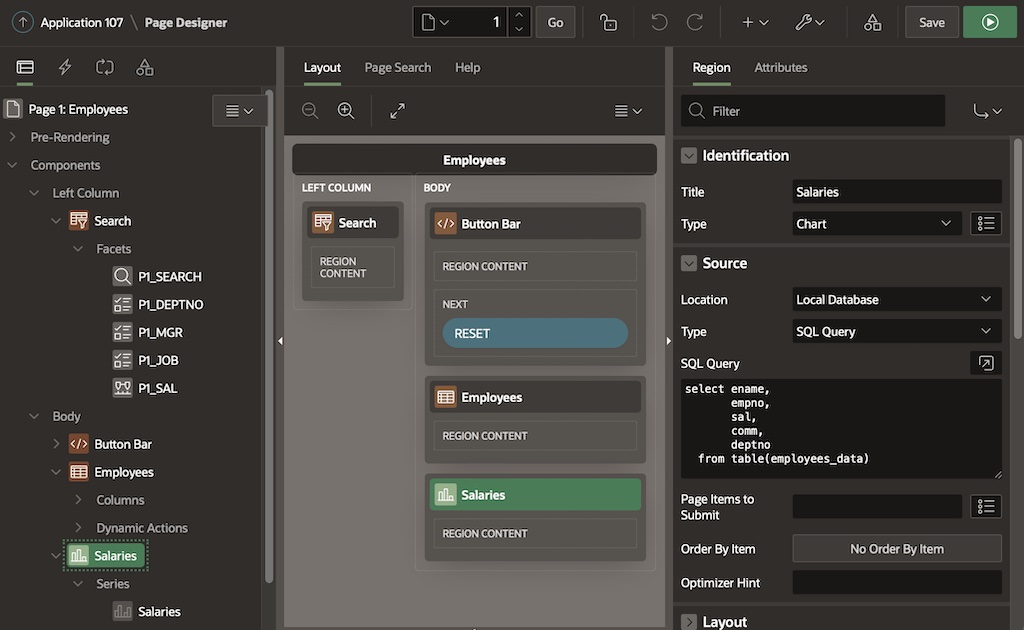
The README file contains a suggested SELECT statement to use as the source of the region where you want to reuse the original region’s data. After running the types SQL script then running the function SQL script, you can try the suggested statement in another region in the same HR Sample application. In the example below, I’ve used it as the source of a chart region on the same page as the original faceted search region.
Using the SELECT statement suggested in the README file in another region in the same app
The query I’ve used appears below, and of course I could leave out columns that are not necessary in the new region. For simplicity, I used the statement verbatim as I found it in the README file:
select ename,
empno,
sal,
comm,
deptno
from table(employees_data)
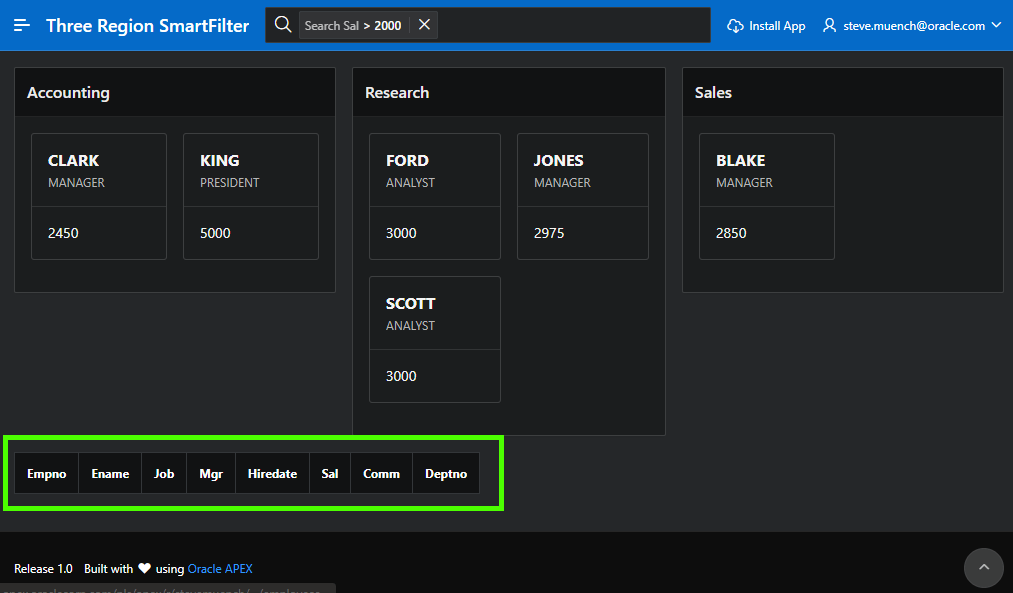
After also configuring a dynamic action on the After Refresh event of the Employees region to declaratively refresh the Salaries chart region, we immediately see the data sharing working in action, reflecting the filtering the current user performs in the original region, too.
HR Sample app showing generated data-sharing artifacts in use to reflect filtered data in a chart
The rest of the article explains some interesting details of the Region Data Sharing Helper app implementation. If you’re primarily interested in trying out the functionality, you’ll find the download link at the end.
Cascading Select Lists for App, Page, Region
An extremely handy consequence of Oracle APEX’s model-driven architecture is that all application metadata is queryable using SQL. By using the APEX dictionary views, it’s incredibly easy to create new APEX applications that introspect application definitions and provide new value. In the case of the Region Data Sharing Helper app, I needed three select lists to let the user choose the application, page, and region for artifact generation. The query for the P1_APPLICATION select list page item appears below. It uses appropriate where clauses to avoid showing itself in the list and to only show applications that have at least one region with a non-null static id configured and a local database, remote database, or REST service data source.
select a.application_name||' ('||a.application_id||')' as name,
a.application_id
from apex_applications a
where a.application_id != :APP_ID
and exists (select null
from apex_application_page_regions r
where r.application_id = a.application_id
and r.static_id is not null
and r.location in ('Local Database',
'Remote Database',
'Web Source'))
order by a.application_name
The query for the P1_PAGE select list page item is similar, retrieving only those pages in the selected application having some qualifying region. Notice how the value of P1_APPLICATION is referenced as a bind variable in the WHERE clause:
select page_name||' ('||page_id||')' as name, page_id
from apex_application_pages p
where p.application_id = :P1_APPLICATION
and p.page_function not in ('Global Page','Login')
and exists (select null
from apex_application_page_regions r
where r.application_id = p.application_id
and r.page_id = p.page_id
and r.static_id is not null
and r.location in ('Local Database',
'Remote Database',
'Web Source'))
order by p.page_id
By simply mentioning P1_APPLICATION in the Parent Items(s) property of the P1_PAGE select list, the APEX engine automatically handles the cascading behavior. When the user changes the value of P1_APPLICATION, the value of P1_PAGE is reset to null, or its default value if it defines one. It also implicitly submits the value of any parent items to the server when the select list’s query needs refreshing on parent value change. To save the user a click, I’ve defined the default value for P1_PAGE using a SQL query to retrieve the id of the first page in the available list of pages.
The P1_REGION select list page item uses a similar query against the apex_application_page_regions view, listing P1_PAGE as its parent item and providing an appropriate query for the item’s default value to automatically choose the first region in the list whenever the list gets reset by the cascading select list interaction.
Adding Chosen Region to Selected List
When you choose a region and click the (Add Region) button to add it to the list selected for artifact generation, the Add Region to Selected List page process runs. It uses the built-in Invoke API action to call the add_region_to_selected_list() function in the eba_demo_region_data_sharing package. If it’s the first time this combination of app id, page id, and region static id has been added, it inserts a new row in the eba_demo_reg_data_requests table to remember the user’s selection. Then it proceeds to describe the “shape” of the region’s data source: the names and data types of its columns. That info will be recorded in the xml_describe column in this row by a background job. I reveal next why a background job was required…
Describing a Region’s Data Source Profile
No dictionary view provides the names and data types of a region’s datasource in a way that works for all kinds of data-backed regions, so I had to think outside the box. I applied a meta-flavored twist on Carsten’s data-sharing strategy and created a pipelined table function get_region_source_columns() to programmatically fetch the region datasource column metadata I needed using the following approach:
Use apex_region.open_context() on the region in question
Retrieve the column count using apex_exec.get_column_count()
Loop through the columns to discover the name and data type of each
For each one, call pipe row to deliver a row of region column metadata
The complication I encountered was that apex_region.open_context() only works on regions in the current application. However, when the Region Data Sharing Helper app is running, it is the current app in the APEX session. I needed a way to momentarily change the current application to the one containing the region to describe.
I first tried using an APEX automation to run the region describe process in the background. I hoped a call to apex_session.create_session() inside the job could establish the appropriate “current app” context before using apex_region.open_context() to describe the region. However, I discovered the APEX engine already establishes the APEX session for the background automation job, and my attempt to change it to another app id didn’t produce the desired effect.
Carsten suggested trying a one-time DBMS Scheduler job where my code would be the first to establish an APEX session without bumping into the built-in session initialization. Of course, his idea worked great! Things went swimmingly from there. The code I use inside add_region_to_selected_list() to run the DBMS Scheduler one-time background job looks like this:
-- Submit one-time dbms_scheduler job to process the
-- request to describe the region in some app in the
The PL/SQL block submitted to the scheduler comes from the c_gen_xml_job_plsql string constant whose value appears below, after substituting the #ID# token with the primary key of the row in eba_demo_reg_data_requests representing the region that needs describing:
When the background job runs describe_region(12345), that procedure retrieves the application id, page id, and region id from the eba_demo_reg_data_requests table using the id provided, calls create_apex_session_with_nls() to establish the right application context, then calls the xml_for_sql() function in my eba_demo_transform_group package to retrieve an XML document that represents the query results from the following query against the region metadata pipelined table function:
select *
from eba_demo_region_data_sharing.get_region_source_columns(
:app_id,
:page_id,
:region_static_id)
It then updates the row in eba_reg_data_requests to assign this XML region column profile as the value of its xml_describe column. This XML document will have the following format:
<ROWSET>
<ROW>
<NAME>EMPNO</NAME>
<DDL_NAME>empno</DDL_NAME>
<DATA_TYPE>number</DATA_TYPE>
<DECLARED_SIZE/>
</ROW>
<ROW>
<NAME>ENAME</NAME>
<DDL_NAME>ename</DDL_NAME>
<DATA_TYPE>varchar2</DATA_TYPE>
<DECLARED_SIZE>50</DECLARED_SIZE>
</ROW>
<!-- etc. -->
</ROWSET>
If it’s the first time we’re describing this region, it also assigns a default value to the include_columns column to reflect that all columns are selected by default. The situation when it’s not the first time we’re performing the region describe has an interesting twist I explain later when we explore regenerating the artifacts for a region.
Forms with Previous/Next Navigation
The two user-editable fields in the eba_demo_reg_data_requests row are basename and include_columns . The former represents the base name that will be used to generate the name of the object type (basename_row), the collection type (basename_tab), and the pipelined table function (basename_data). The latter is a stored as a colon-separated list of included column positions, relative to the positional order they appear in the xml_describe data profile XML document. Since you can add multiple regions to the selected list, I wanted to let the user page forward and backward through those selected entries.
To implement that row navigation, I learned a new trick by reading an article by my colleage Jeff Kemp. It revealed a neat feature of the APEX Form region that supports easy paging through an ordered set of rows. You configure it with a combination of settings on the form region itself, as well as on its Form – Initialization process in the Pre-Rendering section of the page.
On the form region, you set the data source and make sure to impose a sort order. That’s important to establish a predictable next/previous ordering for the rows the user navigates. For example, in the helper app the form region’s source is the local table eba_demo_reg_data_requests with an Order By Clause of generate_requested_on desc . This ensures the user sees the requests in most recently generated order.
The other half of the setup involves the Form – Initialization process. As shown below, after creating three page items with in-memory-only storage to hold their values, you configure the Next Primary Key Item(s), Previous Primary Key Item(s), and Current Row/Total Item with the respective names of the page items.
Form Initialization process settings for next/previous navigation
Informed by the form region’s source and sort order, along with these navigation related settings, the APEX engine automatically computes the values of these page items when the page renders. I left the P1_REQUEST_COUNT visible on the form as a display only page item so the user can see she’s on region “3 of 5”. I made the other two page items hidden, but referenced their value as appropriate in the Handle Previous and Handle Next branches I configured in my After Processing section of my page’s Processing tab.
I chose to handle the navigation buttons with a Submit Page action combined with branches so the form’s Automatic Row Processing (DML) process would save any changes the user made on the current page before proceeding to the next or previous one. If the form had been read-only, or I didn’t want to save the changes on navigation, the values of P1_NEXT_REQUEST_ID and P1_PREVIOUS_REQUEST_ID could also be referenced as page number targets in buttons that redirect to another page in the current application. Lastly, I referenced these page item values again in the server-side conditions of the NEXT and PREVIOUS buttons so that they only display when relevant.
Using Transform Group to Generate Artifacts
The artifact generation and download is handled declaratively using a transform group, a capability I explain in more detail in a previous blog post. For generating the region data sharing artifacts to be downloaded in a single zip file, I added the following generate-data-sharing-artifacts.xml static application file. It includes a single data transform whose parameterized query retrieves the region’s column names and data types, filtered by the developer’s choice of columns to include in the generated artifacts. The SELECT statement uses the xmltable() function to query the region’s data profile stored in the xml_describe column. This offered me a chance to learn about the for ordinality clause to retrieve the sequential position of the <ROW> elements that xmltable() turns into relational rows. This made it easy to combine with the apex_string.split() function to retrieve only the columns whose sequential position appears in the colon-separated list of include_columns values.
The transform group includes three transformations that each use an appropriate XSLT stylesheet to transform the region data profile information into a SQL script defining the object types, a SQL script defining the pipelined table function, and a README.html file.
Replacing Strings in XSLT 1.0 Stylesheets
XSLT 2.0 has a replace() function that works like Oracle’s regexp_replace(), but the Oracle database’s native XSLT processor implements only the XSLT 1.0 feature set. Therefore, we need an alternative to perform string substitution in a stylesheet that generates an artifact by replacing tokens in a template.
For example, the generate-readme.xsl stylesheet in the helper app defines a variable named query-template with an example of the SQL query you’ll use to select data from the pipelined table function. This template contains a token #COLUMNS# that we’ll replace with the comma-separated list of selected column names. It also has #FUNCNAME# token we’ll replace with the name of the pipelined table function.
After first computing the value of the variable columns by using an <xsl:for-each> to loop over the names of the selected columns, the stylesheet performs the double token substitution while defining the example-query variable. If we were able to use XSLT 2.0, the example-query variable definition would look like this:
However, as mentioned above we need to limit our stylesheets to functionality available in XSLT 1.0 to use the native Oracle database XSLT processor. Instead, we use nested calls to a named template replace-string. Think of a named XSLT template like a function that accepts parameters as input and returns an output. So, the following example-query variable declaration calls the replace-string named template to replace the token #FUNCNAME# in the value of the stylesheet variable query-template with the value of the stylesheet variable named function-name:
<!-- Partial solution, replace first #FUNCNAME# token -->
But the result of the above would be the query template with only the #FUNCNAME# token replaced, leaving the #COLUMNS# token intact. XSLT variables are immutable: once assigned their value cannot be updated. So we are not allowed to create multiple, consecutive <xsl:variable> statements that update the value of the sameexample-query variable, replacing one token at a time. Instead, XSLT relies on nested calls to the replace-string function while performing the initial (and only allowed) assignment of the example-query variable. So after calling the replace-string template once to replace #FUNCNAME# with the value of $function-name, we use that result as the value of the input text parameter in a second, outer call to replace-string to swap #COLUMNS# with the value of $columns like this:
<!-- Final solution, replace #FUNCNAME#, then #COLUMNS# -->
The generate-types.xsl and generate-function.xsl stylesheets perform this same nested invocation of replace-string, but have more tokens to substitute. As expected, this results in more deeply-nested calls. However, the concept is the same as this two-token example from generate-readme.xsl.
Vertically Centering the Add Region Button
When a button appears in the same row of a form as other page items, by default its vertical alignment with respect to its “row mates” doesn’t look as eye-pleasing as it could.
A button’s default vertical alignment in a row with other page items
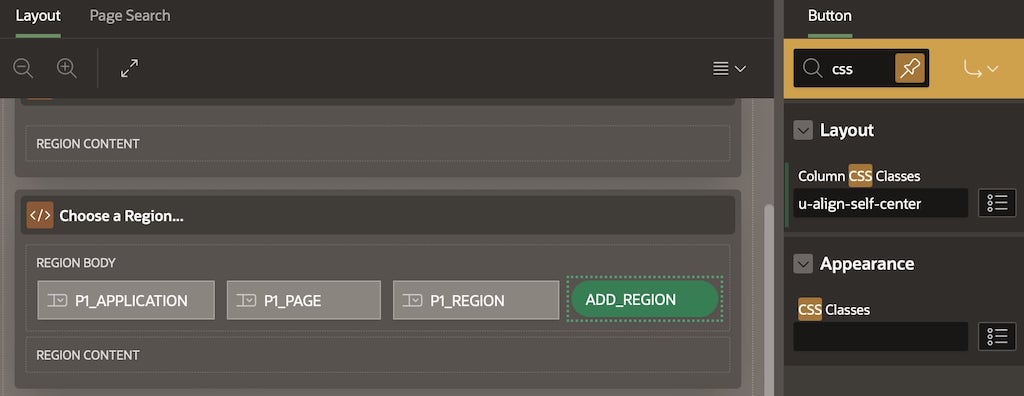
The trick to improve the button’s visual appeal, is to add the CSS class u-align-self-center to the Column CSS Classes property in the Page Designer like this:
Using u-align-self-center to vertically center button with page items in the same row
Show Buttons Based on Row Existence
I wanted the user to see an (Add Region) button if the region they choose is not yet in the selected list, and instead see a (Regenerate) button if the region is already in the list. And I wanted the correct button to show both when the page initially renders, as well as when the user changes the values of the select list interactively. I implemented this feature using a dynamic action with conditional hide and show action steps based on an existence check query.
As shown below, I started by using drag and drop in the Page Designer’s Layout editor to drag the (Regenerate) button into the same grid cell as the (Add Region) button. Since the user will see only one or the other at a time, they both can occupy that same grid cell just to the right of the P1_REGION select list.
Two buttons stacked in the same grid cell since the user will see only one or the other at runtime
Next, I added a dynamic action on the Change event of the P1_REGION page item. Recall that in the helper app, being in the selected list means that a row exists in the eba_demo_reg_data_requests table with the region’s unique combination of application id, page id, and region static id. The first action step in the dynamic action event handler uses Execute Server-side Code to run the following query that always returns a row with either ‘Y‘ or ‘N‘ into the hidden P1_REGION_IN_SELECTED_LIST page item. This provides the info about whether the region exists in the list or not.
with region_in_selected_list as (
select max(id) as id
from eba_demo_reg_data_requests
where app_id = :P1_APPLICATION
and page_id = :P1_PAGE
and region_static_id = :P1_REGION
)
select case
when x.id is null then 'N'
else 'Y' end
into :P1_REGION_IN_SELECTED_LIST
from region_in_selected_list x;
Then I followed that action step with four conditional steps that use a client-side condition based on the value Y or N to hide the button that needs hiding and show the button that needs showing. Notice how the new action step name can be very useful in making the steps self-documenting with a more descriptive label than the old “Hide” or “Show” that appeared before 22.2.
Dynamic action on P1_REGION change event to hide/show appropriate buttons
To finish the job, I set the Fire on Initialization switch to true for the four Hide/Show action steps, and provided the same existence SQL query as the default value of the P1_REGION_IN_SELECTED_LIST hidden page item. This ensured that the correct button shows both during the initial page render, as well as after the user interactively changes the region select list.
To Defer or Not to Defer (Rendering)
With the above configuration in place, the appropriate (Add Region) or (Regenerate) button was appearing conditionally as desired. However, I noticed that when the page first rendered I would momentarily see both buttons flash before the inappropriate one for the currently selected region would get hidden by my dynamic action. The solution to avoid the user’s seeing this “behind the scenes” page setup behavior is to enable the Deferred Page Rendering template option shown below. This setting allows you to decide when faster, incremental page rendering is more appropriate, or whether APEX should wait until page-load-time dynamic behavior is complete before revealing the final state of the page to the user.
Deferred Page Rendering option hides page-load-time hide and show activity
Preserving Column Selection on Regeneration
When you click the (Regenerate) button for a region you’ve already added to the selected list, the add_region_to_selected_list() function updates the existing eba_demo_reg_data_requests row to set READY = ‘N‘ and it runs the background job to call describe_region() again. The region might have changed the set of available columns since the previous time we described it, but the user may have carefully decided which of the previous region’s columns to include and exclude. So it’s important for usability to retain the included columns across the region data profile regeneration.
At the moment the describe_region() code has produced the fresh region data profile XML document and is about to update the existing row in eba_demo_reg_data_requests, we have the following “ingredients” available to work with:
The old xml_describe region profile XML document
The old include_columns value with a colon-separated list of index positions relative to the old region profile XML document
The new region profile XML document just produced
What we need to “bake” with these ingredients is a new list of included columns that retains any columns that were previously in the included list while ignoring any of those included columns that are no longer available to reference. Also worth considering is that the index positions of the previous column names might be different in the new region data profile XML document.
After initially writing the code using multiple loops in PL/SQL, I challenged myself to come up with a single SQL statement to accomplish the job. In words, what I needed the statement to do was, “select a colon-separated list of index positions relative to the new XML describe document where the column name is in the list of names whose whose index positions (relative to the old XML describe document) were in the colon-separated list currently stored in include_columns .” I adjusted the query to also handle the situations when the old XML document was null and when the list of include_columns was null. This let me use the same routine to calculate the default value for the include_columns list for both new and updated rows in eba_demo_reg_data_requests. The private get_default_included_columns() function in the eba_demo_region_data_sharing package has the SELECT statement I use to tackle the job.
select listagg(x.seq,':') within group (order by x.seq)
into l_ret
from xmltable('/ROWSET/ROW' passing p_new_xml_describe
columns
seq for ordinality,
name varchar2(128) path 'NAME') x
where p_old_xml_describe is null
or
x.name in (
select y.name
from xmltable('/ROWSET/ROW'
passing p_old_xml_describe
columns
seq for ordinality,
name varchar2(128) path 'NAME') y
where p_before_list is null
or y.seq in (
select to_number(column_value)
from apex_string.split(p_before_list,':')));
Conclusion
This was a fun learning project that taught me many new things about Oracle APEX in the process of building it. Always keep in mind that Oracle APEX is built with Oracle APEX, and that you, too, can use APEX to build yourself any kind of development productivity helper app you can imagine, not to mention plug-ins of all kinds to extend the core functionality of the platform. Thanks to colleagues Carsten, Jeff, and Vlad who offered me tips on aspects of this sample.
Getting the Sample Apps
You can download the Oracle APEX 22.2 export of the Region Data Sharing Helper app from here. In case you’re interested in the HR Sample app used to show off the generated artifacts in action, you can download that from here. The latter requires that you’ve first installed the EMP/DEPT sample dataset from the Gallery. Enjoy the simplified data sharing!
Using a public dataset of New York City high schools, I built a page that lets students or parents filter the list based on various criteria. As they narrow their options, a map region reflects where the remaining schools are located, and a stacked bar chart lets them compare the contenders on a few important metrics. While the map initially centered and zoomed itself to fit the unfiltered set of schools, to give users the sense of “homing in” on their perfect school I wanted to refit the map around the narrowed search results. To reflect the filtered results from the cards region in the map and chart, I used the region data sharing technique from my colleague Carsten’s article Add a Chart to your Faceted Search Page. Then I got a little help from my colleagues Christian Lara and Stefan Dobre to learn how to build my first simple “Center/Zoom Map Around Points” dynamic action plug-in to make it easy to build this feature into any map-based pages I build in the future. You can check out the sample using the link at the end of the article.
Refreshing the Map and Chart
The data source for the map is a query from a pipelined table function I created following Carsten’s technique. It retrieves the high school data using the same filters currently applied to the schools region in the page:
select school_name, latitude, longitude
from eba_demo_nyc_highschool_data(
p_page_id => :APP_PAGE_ID,
p_region_static_id => 'schools')
Similarly, the chart’s datasource is a query that selects a few different columns from the same pipelined table function:
select school_name, graduation_rate,
attendance_rate, college_career_rate
from eba_demo_nyc_highschool_data(
p_page_id => :APP_PAGE_ID,
p_region_static_id => 'schools')
When the cards region changes due to the user’s applying new filters, we want to refresh the map and chart regions. The lesson I learned while getting this to work was that rather than using the “After Refresh” event on the cards region, I needed to instead use that region’s “Page Change [Cards]” event to trigger the dynamic action refresh, using two dynamic action steps of type “Refresh”.
Centering & Zooming the Map After Refresh
Whenever the map region gets refreshed, my goal was to have it refocus the user’s attention by using the new set of filtered data points to center and zoom the map appropriately. After hunting for a built-in APEX map JavaScript API, or a built-in dynamic action, I realized the solution would take a bit more research. My teammate Christian Lara pointed me at the MapLibre Fit a map to a bounding box example, and gave me this snippet of JavaScript below to consider.
The first statement accesses the map’s (post-refresh) bounding box from its mapData.map.bbox member and defines a new bounds array that contains the two points representing that rectangle. The second line gets the MapLibre map object from the APEX map region on my page, and calls its fitBounds() method to perform the centering and zooming to the new dimensions. It uses 30 pixels of padding so points near the edge of the box stay visible.
// Define the bounds using refreshed map bounding box coordinates
With the code above in a dynamic action step triggered by the “After Refresh” event on the map region, the functionality I desired was working, but I wanted to learn how to encapsulate that little bit of code into a reusable dynamic action plug-in. I first watched Stefan Dobre’s The Ultimate Guide to APEX Plug-ins video from the APEX@Home 2020 conference, and then created a new dynamic action plugin named “Center & Zoom Map Around Points” in my application. Following best practice, I put the JavaScript code in a with a centerZoomMap.js file, and referenced its qualified name in the File URLs to Load section using the syntax PLUGIN_FILES#centerZoomMap#MIN#.js
I instinctively knew that to be reusable, the name of the map region’s static id would have to be a function parameter, so my first attempt at writing the contents of this centerZoomMap.js file looked like this:
// centerZoomMap.js -- First Attempt
function centerZoomMap(staticId) {
// Define bounds using refreshed map bounding box coordinates
let bbox = apex.region(staticId).mapData.map.bbox,
After that, I defined a custom attribute in the plug-in named “Map Region Static Id” as attribute slot number one. However, I admit to getting a bit confused on how to pass the value of the plug in’s dynamic attribute to the JavaScript function. After asking my colleague Stefan Dobre for a tip, he used the occasion as a teachable moment to show me about the two standard plug-in attributes:
For Region
Affected Element Required
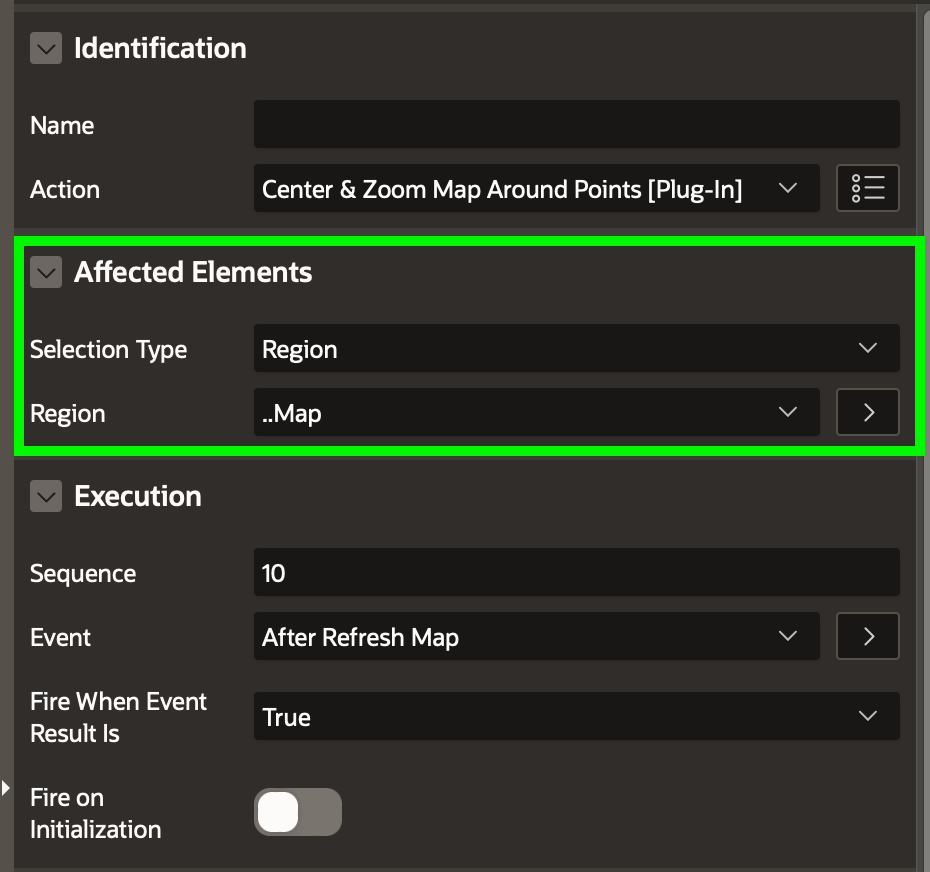
By leveraging these standard plug-in attributes, the developer using the plug-in gets a more native-feeling experience of picking the region to associate the plug-in with. It also allowed me to remove the custom attribute I had created in the plug in. The developer now configures the map she wants to center and zoom by simply picking the map region in the Affected Element section as shown below:
Configuring Affected Elements in the Properties editor to pick Map region to zoom and center
Stefan also took the opportunity to teach me a best practice of defining the centerZoomMap function as a property on the window to make its scope more clear when reading the code. So the final contents of centerZoomMap.js after consulting with Stefan looked like this:
// centerZoomMap.js - Final version
window.centerZoomMap = function() {
// Ensure dev-configured affected element has a static id
const id = this.affectedElements.attr( "id" );
if ( !id ) {
throw new Error( "Affected Region must have an ID" );
}
// Use static id to ensure dev chose a map region
const region = apex.region( id );
if( !region || region.type !== "SpatialMap" ) {
throw new Error( "Affected Region must be a Map" );
}
// Define bounds using refreshed map bounding box coordinates
The last piece of the simple dynamic action plug-in was writing the render function using the appropriate function specification that I copied from the online help to use as a guide. The only job it had to do was tell the APEX engine the name of my JavaScript function to invoke when the dynamic action gets used at runtime:
function render (
p_dynamic_action in apex_plugin.t_dynamic_action,
p_plugin in apex_plugin.t_plugin )
return apex_plugin.t_dynamic_action_render_result is
With the plug-in now defined, I went back to the Page Designer and removed the dynamic action step that was directly calling Christian’s snippet of JavaScript and replaced it by using the new “Center & Zoom Map Around Points” plugin we built. After picking the “Map” region from the Affected Elements section, it was ready to go.
Page Designer showing use of new plug-in to center & zoom the map after the map gets refreshed
Giving the Sample a Spin
To try out the sample, you can download the APEX 22.2 application from here. It gives the end user a nice school-searching experience like what you see in the screen recording below. Thanks again to Christian and Stefan for sharing their wisdom in getting to this end result.
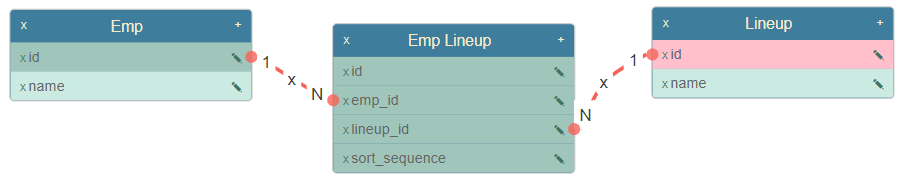
After publishing my last article about reordering cards using clicks, Peter Raganitsch suggested on Twitter that I try the same use case using drag and drop with the free FOS – Drag and Drop plugin. While exploring the idea, I expanded the use case to more closely resemble my conference organizer app where each yearly edition of a conference can have a different “lineup” of speakers. So I introduced a Lineup table into the sample app’s data model and document here how I created a page to reorder the employees in one or more lineups, including the ability to add unassigned employees to the current lineup or remove an employee from the lineup. The result is a UX pattern that may work well for other situations involving the data in an intersection table like EmpLineup below when the user needs to impose a preferred ordering on them. The expanded data model looks like this now:
Data Model for the Emp Lineup Reordering sample application
Choosing the Lineup to Work On
I started with a page containing a Cards Region named Employee Lineup based on the following query that joins the EmpLineup and Emp tables to present the names of the employees in a lineup:
select e.id, e.name
from eba_demo_dragdrop_emp_lineup lu
left join eba_demo_dragdrop_emp e on e.id = lu.emp_id
order by lu.sort_sequence nulls last, e.created
Then, to allow the user to choose which lineup she wants to work on, I added a select list P1_LINEUP page item to a static content region above the cards region, with the simple List of Values SQL query to show the available lineups:
select name, id
from eba_demo_dragdrop_lineup
order by name
With the “Lineup Chooser” select list in place, I updated the cards region’s SQL query to add a WHERE clause to filter the intersection table rows to only retrieve the ones related to the selected lineup, and ensured that the P1_LINEUP page item name was listed in the Page Items to Submit list for the region.
select e.id, e.name
from eba_demo_dragdrop_emp_lineup lu
left join eba_demo_dragdrop_emp e on e.id = lu.emp_id
where lu.lineup_id = :P1_LINEUP
order by lu.sort_sequence nulls last, e.created
To immediately see the list of employees in the newly selected lineup reflected below in the cards region, I added a dynamic action event handler named On Change Lineup to the P1_LINEUP page item to handle its Change event, and configured its first action step to use the built-in Refresh action to refresh the Employee Lineup region.
Since the end-user will be changing the value of the chooser, APEX’s default behavior is to warn them if they attempt to navigate away from the page with unsaved changes. In this case, since I know the value of P1_LINEUP is only used as a query filter, I set the page-level Warn on Unsaved Changes switch to “off” to avoid this warning.
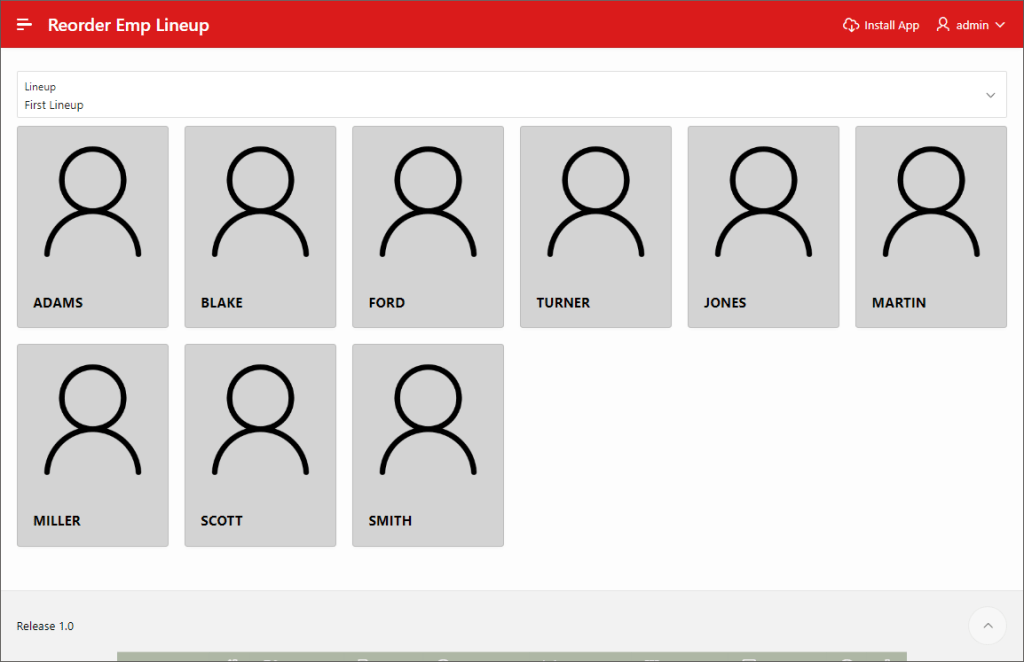
This gave me the following in-progress page letting the user choose which lineup to work on:
Cards region filtered by “Lineup Chooser” select list above
Adding Employees to the Lineup
To allow the user to add new employees to a lineup, I started by adding a button named ADD_TO_LINEUP to the page, and set its position to Before Navigation Bar. I’d used modal dialog pages many times before, but wanted to learn how to also use inline dialogs in APEX, and this use case seemed like a good one for an inline dialog. I wanted to quickly present a shuttle control in a modal dialog when the user clicks on the (Add to Lineup…) button, that shows employees that are not yet assigned to the current lineup and lets the end-user to pick one or more employees to add.
After not finding any obvious way to directly create an inline dialog in the APEX builder, my next intuition was that doing so must involve creating a region. But I also failed to find any “Inline Dialog” region type. At this point, I figured it must be a static content region with a particular template setting. Seeing a position heading in the rendering tree called Dialogs, Drawers, and Popups gave me a clue that the region position needed to be configured to fall in this category. So I added a static content region “Add Employees” to contain the shuttle page item, set its Position to Dialogs, Drawers, and Popups and set its Appearance > Template to Inline Dialog.
I added a page item P1_EMP_IDS_TO_ADD to this new static region and set the type to Shuttle. I set its Label to “Unassigned Employees”, and Template to Optional – Above to get what looked best to me from previous shuttle experiments I’d done. To have the shuttle show only employees who were not yet assigned to the current lineup, I configured the shuttle’s List of Values SQL query as follows and set the Display Extra Values to the off position:
select name,id
from eba_demo_dragdrop_emp
where id not in (
select emp_id
from eba_demo_dragdrop_emp_lineup
where lineup_id = :P1_LINEUP
)
order by name
To have the (Add to Lineup…) button created above open the inline dialog, I added a dynamic action event handler to its Click event, configured the first action step to clear the value of the P1_EMP_IDS_TO_ADD page item, a second action step to refresh the page item to update its list of available employees, and a third action step to show the inline dialog.
Initially tried to show the dialog using the Show dynamic action step to show the corresponding “Add Employees” region, but when that didn’t work, I looked again through the list of built-in actions available and tried the Open Region action instead which worked great.
Back in the “Add Employees” inline dialog’s static region, I added a button named CANCEL to the Close position of the region, and a dynamic action event handler for its Click event to perform the corresponding action step of Close Region.
To process the addition of any selected employees in the shuttle, I added a button named ADD to the Create position of the inline dialog region, and added a dynamic action event handler for its Click event having three action steps:
Execute Server-side Code
Close Region (Region: Add Employees)
Refresh (Region: Employee Lineup)
The PL/SQL code for the server-side code in step 1 looks like this, using the handy SPLIT_NUMBERS() function in the APEX_STRING package to parse the colon-separated list of employee ids from the shuttle that need to be inserted into the eba_demo_dragdrop_emp_lineup table as intersection rows. I also made sure that both P1_LINEUP and P1_EMP_IDS_TO_ADD were listed in the Items to Submit field.
insert into eba_demo_dragdrop_emp_lineup(lineup_id,emp_id)
select :P1_LINEUP,column_value
from apex_string.split_numbers(:P1_EMP_IDS_TO_ADD,':');
With these steps I now had a working add dialog to add one or more employees not currently in the lineup:
Inline dialog with shuttle to add unassigned employees to the current lineup
Deleting an Employee from the Lineup
I thought the easiest way for a user to remove an employee from a lineup would be to offer a little “x” icon on each card the user could click. A trick I learned while working on the last article came in handy again here. I decided to use a link with the new named action syntax in its href attribute to trigger a named action. This named action would store the value of the action parameter named id in a page item, and then trigger a custom dynamic action event handler to perform the server-side code to remove the employee from the lineup. This combination let me use a maximal amount of declarative APEX functionality.
I started by adding a hidden page item P1_EMP_ID_TO_REMOVE to the page. This will be used to store the id of the employee to remove from the lineup. Next I defined a custom dynamic action event named remove-emp-from-lineup-event with Selection Type of jQuery Selector and jQuery Selector of body. It contains two dynamic action steps:
Execute Server-side Code
Refresh (Region: Employee Lineup)
The PL/SQL block for the first action step contains just the delete statement below, with P1_EMP_ID_TO_REMOVE and P1_LINEUP both listed in the Items to Submit.
delete from eba_demo_dragdrop_emp_lineup
where emp_id = :P1_EMP_ID_TO_REMOVE
and lineup_id = :P1_LINEUP;
Next, I defined a named action remove-emp-from-lineup-action by adding the following block of JavaScript to the Execute When Page Loads section of the page:
apex.actions.add([
{
name: "remove-emp-from-lineup-action",
action: function( event, element, args)
{
// Store the value of the EMP id from the action args
apex.items.P1_EMP_ID_TO_REMOVE.value = args.id;
// Trigger custom event to perform the server-side call
To complete the job, I updated the HTML Expression for the card region’s Body section and changed it from:
<strong>&NAME.</strong>
To add the following <a> element before the <strong> element. Its class attribute references the name of the fa-remove icon I wanted to use, and its href attribute contains the special (new in 22.1) named action link syntax to trigger the action named remove-emp-from-lineup-action passing along a parameter named id with the value of the ID column in the current row (i.e. card):
These steps produced the clickable remove icon next to the employee name in the body of each card, and clicking the “x” on any card removes it from the lineup. Since I also wanted clicking on the main card area to open a normal modal dialog to review/edit the employee’s details, I changed from using the “Full Card” action type to instead use the “Media” card action for that. In this way, the end-user can perform multiple actions on each card in a non-intrusive way.
Clickable “remove” icon on every card triggers named action to do the work
Reordering Employees Using Drag and Drop
Saving the most interesting feature for last, I downloaded the FOS plug-ins from here. The download was a sample app illustrating the use of all the FOS plug-ins, but my interest for this article was just the FOS – Drag and Drop one. After importing the FOS sample application, I visited its Shared Components > Plug-ins page in the APEX builder and exported just the FOS – Drag and Drop plug-in to a SQL file whose name APEX automatically chose for me. Importing the plug-in into my own app involved simply clicking the (Import>) button from the Plug-ins shared component page and choosing the name of this SQL file and completing the wizard, as shown below:
Importing the FOS – Drag and Drop plug-in into my own application
I enabled the drag and drop functionality on my page by adding a new dynamic action named “On Page Load Setup Drag/Drop” to the Page Load section and setting the Action of its first action step to FOS – Drag and Drop [Plug-In]. This plugin configures the drag and drop event listeners without having to understand what that means or how it works. I appreciated this, since I’m not an accomplished JavaScript programmer myself.
In the Affected Elements section of this action step, I set the Selection Type to Region and chose “Employee Lineup” from the Region list. This tells the plug-in that you want to have the drag and drop effect be applied to the cards in this region. In the sample app that FOS provides, they show how drag and drop can be easily applied to lots of other situations in APEX as well.
I noticed that the Mode was already set to Sort, which is the behavior I wanted. To configure the business logic that will execute when one card it dropped in the place of another card, I set the Drop Action to Execute PL/SQL Code and entered the following one line of PL/SQL in the Execute PL/SQL Code field, remembering to list P1_LINEUP in the Page Items to Submit field below it:
The :DRAG_ID and :DROP_ID bind variables are automatically set by the plug-in and evaluate to the primary key of the dragged card and that of the card currently in the dropped position, respectively. This was almost too easy.
Running my page, I was able to drag an employee card and drop it, but I noticed that when I’d refresh the page the order of the employees had not actually changed. To debug the problem, I added in one line of code to my move_source_to_target() package procedure to log the values of the source and target employee ids:
apex_debug.info('lineup=%s,source=%s,target=%s',
p_lineup_id,
p_emp_source_id,
p_emp_target_id);
After enabling Debug mode for the page, this info() log message allowed me to understand that the drag and drop plug-in was passing values that were not my primary keys that I expected. This gave me a clue to check the “Employee Lineup” cards region to make sure I had correctly configured a column as the primary key, and in fact I had not done so yet. For the drag and drop to work as expected, I needed to select the cards region, activate its Attributes tab, and set the Primary Key Column 1 list to ID to let APEX know which column represented the primary key. After doing this small tweak, the drag and drop was working perfectly…
…until I tried changing the Lineup chooser select list to switch to working on a different lineup, or until I added some new employees to the current lineup, or until I removed an employee from the current lineup. After doing any of these actions that resulted in refreshing the cards region, the drag and drop behavior would cease to work.
Getting Drag and Drop to Work After Region Refresh
Googling around for a solution, I found an article that said I needed to re-execute the FOS – Drag and Drop [Plug-in] action step after the region refresh. It explained that the act of refreshing the region caused an AJAX request that resulted in changing the HTML elements in the cards region to which the drag and drop event listener was listening. This made sense, so I dutifully repeated the steps I did to originally configure the Page Load event action step above to “wire-up” the drag and drop event listener after each region refresh. I did that by adding an additional dynamic action step to each dynamic action step sequence where I was refreshing the cards region. However, to my chagrin, this additional effort did not remedy the problem.
Luckily, since I had met Peter Raganitsch in person at the APEX Alpe Adria conference back in April 2022 in Maribor, Slovenia, I felt comfortable contacting him by email. I let him know I was working on implementing his suggestion, but that I’d hit an issue I wasn’t sure how to debug. To my surprise and delight, he responded in short order with a solid tip that I probably would not have figured out on my own.
In his reply, he explained that I was doing the right thing to re-wire the drag and drop listener but that I needed to use that action step in a different dynamic action event handler responding to the Page Change [Cards] event instead of using the action step as part of the same action sequence that triggered the region refresh in the first place.
This has to do with timing of actions, meaning the “Refresh” of the Cards region wasn’t finished when you re-enabled Drag & Drop. Using the “Page Change [Cards]” event you make sure the Cards region is finished re-querying (or paginating). As DB and PL/SQL developers we often think about procedural and serial execution. In JavaScript that doesn’t always apply due to asynchronous operations. i.e. DA “Refresh” sends an asynchronous call to the DB and continues with the next action without waiting for the refresh result.
Peter Raganitsch
Enlightened by this new kernel of wisdom from Peter, I removed the three “re-wire the drag and drop” action steps I had added above. Then, on the Dynamic Actions tab, I added a new dynamic action event handler named “On Page Change Setup Drag/Drop Again”, set its When section’s Event to Page Change [Cards]. Repeating my steps done above, I set the Action of its first action step to FOS – Drag and Drop [Plug-In]. Again I set the Selection Type to Region and chose “Employee Lineup” from the Region list. Leaving the Mode set to Sort, I again set the Drop Action to Execute PL/SQL Code and configured the Execute PL/SQL Code to the same one-line of code as above, again remembering to list P1_LINEUP in the Page Items to Submit field below it.
After making that change, the drag and drop worked flawlessly, not only when the page renders originally, but also after adding new employees to a lineup, removing employees from a lineup, or switching to work on a different lineup. My final page looked like this:
Final lineup management page with add, remove, and drag/drop reordering functionality
Thanks again to Peter Raganitsch for the suggestion that resulted in my learning many new things about APEX and plug-ins. In addition, double thanks for the tip that helped me understand the right event handler to use to avoid timing problems due to JavaScript’s asynchronous nature when redefining event listeners after AJAX-driven page changes occur, like region refreshing.
If you’re interested in checking out the working sample, you can download it from here for use in APEX 22.1 or later.
Sometimes your data needs to be explicitly ordered rather than sorted by an intrinsic property like a name, salary, or hire date. In these cases we introduce an additional number column like SORT_SEQUENCE into the data model and sort on that manually-assigned position number. For a volunteer project I’m working on, I needed the ability to explicitly order the speakers at a conference, and easily adjust it as the organizer moves speakers around in the lineup. Before implementing the feature in my actual application, I built a simpler example based on employee names first to get the basic idea working. This article explains how I used a new feature of APEX 22.1 called Declarative Action URLs along with a dynamic action custom event to let users easily adjust the explicit ordering by clicking on a source card and a target card in a cards region.
Sorting Cards by Sequence in Related Table
To more closely mimic the data model of my actual conference management application, I have a simple employee table EBA_DEMO_REORDER_EMP with just an ID and NAME column and a separate table called EBA_DEMO_ORDER_EMP_LINEUP that contains an EMP_ID column referencing the ID primary key of the main table, along with the SORT_SEQUENCE number column. Out of a possibly larger set of employee names, a certain set get introduced into the “lineup” and then their explicit ordering is established as part of that lineup.
I started by building a cards region based on the following query, that joins the two tables and orders by the SORT_SEQUENCE column in the employee lineup table. I configured card title to use the NAME column and the badge to use the CARD_NUMBER.
select e.id,
       e.name,
       row_number() over (order by lu.sort_sequence nulls last,
                                   e.created)
       as card_number
from eba_demo_reorder_emp_lineup lu
left join eba_demo_reorder_emp e on e.id = lu.emp_id
order by lu.sort_sequence nulls last, e.created
This quickly produced the basic card layout for the lineup of employee names.
Cards region showing the explicitly ordered lineup of employee names
Getting the Reordering Working
The lineup in my actual application can include hundreds of names, so I decided to let the user click on the card of the employee that needed to move, then click on the card of the place they’d like to move that employee. Using these two clicks, the end-user identifies first a “source” employee and then chooses a “target” employee position.
Inspired by the “source” and “target” naming, I created two hidden page items, P1_EMP_ID_TO_MOVE and P1_EMP_TARGET_POSITION, each with its Maintain Session State property set to Per Request (Memory Only). My strategy was to populate the first page item with the employee ID value of the initial click, and set the value of the second page item with the ID of the second click.
I wrote the PL/SQL package procedure to accept the source and target employee ids and perform the automatic reassignment of the SORT_SEQUENCE values of the affected rows:
create or replace package eba_demo_reorder is
   procedure move_source_to_target(p_emp_source_id number,
                                   p_emp_target_id number);
end;
With this backend business logic in place, the two remaining tasks were:
Handle the card click to assign the hidden page item values, and
Invoke the above procedure once both source and target were defined, refresh the cards region, and clear out the hidden page items again.
I chose to tackle the second task first using a Dynamic Action custom event to maximize the amount of APEX’s declarative functionality I could take advantage of.
Using a Custom Event to Maximize Low-Code
Assuming the two hidden page items have the source and target employee ids populated, executing the server-side PL/SQL code, refreshing the cards region, and clearing out the hidden page items are all actions I can easily accomplish using dynamic action steps in response to a custom event. As shown below, I created a dynamic action event handler for a custom event with event name move-source-to-target-da. The Selection Type is jQuery Selector and I used the page’sbody as the jQuery Selector to be the anchor element for the event listener. I chose the page body at the recommendation of my colleagues John and Stefan who reminded me that refreshing the cards region would remove any event listeners on the cards themselves. The body targets the event listener on a element of the page that contains the cards region, but which is not itself getting refreshed.
Custom dynamic action event anchored to the page body.
The dynamic action steps include an Execute Server-side Code step to run this block of code to perform the reordering, making sure to include both P1_EMP_ID_TO_MOVE and P1_EMP_TARGET_POSITION in the page Items to Submit list:
That is followed by a Refresh step to refresh the cards region on the page, and finally a Clear step to clear the values of the two hidden page items.
Wiring a Full Card Click to a Named Action
To tackle the remaining task of handling the click on the card, I added a card action and set the action Type to be Full Card. Following a suggestion from my colleague John, I used the new Declarative URL action invocation syntax he describes more in depth in his blog article Exploring new APIs in APEX 22.1. To put it to use, for the link type I chose Redirect to URL and provided a special URL syntax that invokes a named action, passing along one or more parameters in the process:
#action$move-source-to-target?id=&ID.
A URL of this syntax lets a click on my card invoke an action named move-source-to-target, passing along a parameter named id whose value is provided by the ID column of the current employee card.
Defining the named action at the moment requires a bit of JavaScript code. I added the following to my page’s Execute when Page Loads code block. If the P1_EMP_ID_TO_MOVE item is blank, it sets its value to the value of the id argument passed in. If P1_EMP_ID_TO_MOVE is set but P1_EMP_TARGET_POSITION is blank, then it sets the target and triggers the custom event named move-source-to-target-da that we configured above to perform the server-side PL/SQL call, refresh the cards region, and clear out the two hidden page items again.
apex.actions.add([
{
   name: "move-source-to-target",
   action: function( event, element, args)
           {
              /* If both are blank, set emp to move */
              if (apex.items.P1_EMP_ID_TO_MOVE.value      === '' &&
                  apex.items.P1_EMP_TARGET_POSITION.value === '') {
                 apex.items.P1_EMP_ID_TO_MOVE.value = args.id;
              }
              // If emp to move is set and target blank, set target
              // and trigger the custom event to complete the job
              // using declarative DA action steps to invoke the
              // server-side PL/SQL package procedure to move the
              // source emp to the slot where the target is.
              else if (apex.items.P1_EMP_ID_TO_MOVE.value      !== '' &&
                       apex.items.P1_EMP_TARGET_POSITION.value === '') {
                 apex.items.P1_EMP_TARGET_POSITION.value = args.id;
                 // Trigger custom event to perform the server-side call
                 $("body").trigger("move-source-to-target-da");
              }
           }
}
] );
My colleague Stefan gave me the great idea to use a custom event for this and to trigger it programmatically from the named action code. This allowed me to benefit from the simple action URL-wiring syntax as well as from the simplicity of using declarative dynamic action steps to perform the rest of the functionality.
The result is the click-click card reordering you see in this short video:
A fellow Oracle employee wielding the power of APEX to solve an internal business problem for her team asked an interesting question on our internal discussion forum this week. Her app shows resources partitioned into three categories in side-by-side cards regions. She wanted to use a single SmartFilter region to filter the results showing up in these three regions, each based on the same underlying table with a slightly different WHERE clause.
Wherever possible, my brain tends to map questions onto the familiar EMP and DEPT tables to simmer a question down to its essence. So I imagined side-by-side cards regions with employees in three different departments as shown below.
Three EMP-based cards regions partitioned by department
Setting Up the Page
I started by setting up the three cards regions based on the EMP table, and including an appropriate DEPTNO=10 where clause in the “Accounting” region, DEPTNO=20 predicate in the “Research” region, and DEPTNO=30 in the “Sales” region. Then I added a SmartFilter region and positioned it in the Before Navigation Bar slot with the w100p class to make to stretch to 100% width and fill up the space left in the center of the navigation bar.
A Twist on The Gift That Keeps on Giving
By default, a SmartFilter region filters the results of only one other region on the page. However, my colleague Carsten’s article Add a Chart to your Faceted Search Page is the gift that keeps on giving, because it inspired me with the idea I used to achieve the result our fellow APEX user desired. Carsten explains therein how to use the open_query_context() function in the apex_region package in a pipelined table function that returns the results from another region’s data source, automatically taking into account the search filters currently applied by the end user in that region. The implementation uses functions in the apex_exec package to retrieve the data.
My twist on his idea was to create a pipelined table function get_region_results_pk_values()to return only the primary key values of a given region’s filtered results. Assuming a numeric primary key column, the get_region_results_pk_values() function can accept three parameters:
Page id
Static ID of a region on that page
Name of the primary key column whose value we should return
The function’s pipelined result rows will each contain a NUMBER column named ID containing the primary key values identifying the rows that the filtered region is returning. For our employee-based example here, it will return ID values representing the EMPNO values of the filtered region’s query results. With this function in place, we can update the WHERE clause of the three employees cards regions to reference get_region_results_pk_values() in an additional predicate like this:
“Accounting”
deptno=10 and empno in (select id from get_region_results_pk_values(:APP_PAGE_ID,'RESULTS','EMPNO'))
“Research”
deptno=20 and empno in (select id from get_region_results_pk_values(:APP_PAGE_ID,'RESULTS','EMPNO'))
“Sales”
deptno=30 and empno in (select id from get_region_results_pk_values(:APP_PAGE_ID,'RESULTS','EMPNO'))
Configuring the Filtered Region
To play the role of the SmartFilter region’s Filtered Region, we need an additional region based on the EMP table with no WHERE clause of its own. This is because using any of the Accounting, Research, or Sales cards regions would only filter the employee rows of one particular department and consequently its list of filtered EMPNO primary key values would not correspond to any employees in the other cards regions who, by design, belong to a different department.
So, I added an EmployeesResults classic report region based on the EMP table and configured this classic report region to be the SmartFilter region’s Filtered Region. I set the static ID of this region to RESULTS as referenced in the three WHERE clause function calls above.
A Chain Reaction of Filtering
When the end-user changes the filters on a SmartFilter, it automatically refreshes its filtered region. So in our example, the EmployeesResults classic report region will be refreshed. When this happens, we need the other three cards regions on the page to also get refreshed. Luckily, this is simple to achieve with a dynamic action event handler on the EmployeesResults region’s AfterRefresh event. I included three dynamic action steps in the TRUE branch of the event handler. Each one uses the built-in Refresh action to refresh one of the cards regions.
AfterRefresh dynamic action on filtered region refreshes employees cards regions
At this point, I had a working page with a SmartFilter at the top, whose search filters would restrict the rows in the filtered EmployeesResults region at the bottom, and whose filtered list of primary keys were correctly filtering the three separate Accounting, Research, and Sales cards regions as desired. However, seeing the classic report at the bottom was ruining the magic effect, so I sought out a way to hide it.
Classic report filtered region displays, ruining the magic
Hiding the Filtered Region
My first experiment was to set the Server-side Condition on the filtered EmployeesResults region to Never. This succeeded in hiding the classic report, but it also broke the chained filtering functionality being implemented by the dynamic action. I guess a region that’s not rendered on the server can’t be used to trigger events on the client, which I could understand.
For my second attempt, I went looking for properties of the classic report region that I could adjust to limit the data that it was retrieving. After all, I primarily cared about the filters applied to its data source, not seeing the results themselves in the classic report. These applied filters are important to correctly produce the filtered list of primary keys to filter the Accounting, Research, and Sales cards regions appropriately.
With the classic report EmployeesResults region selected, I studied the Attributes tab of the property palette and noticed a Number of Rows property which I tried setting to zero (0). I figured the classic report functionality related to pagination might be producing some content on the page, so I also set the Pagination > Type to the value No Pagination (Show All Rows). Since I knew that the SmartFilter region uses partial page refresh to update the filtered region, I kept the Partial Page Refresh switch in the ON position.
Setting the classic report to retrieve no rows & skip pagination, keeping partial page refresh
These changes got me very close to the desired result, but as shown below the column headings were still showing.
Almost There! The Filter chaining works, but the filtered region’s column headers still show
I managed to resolve this final issue by hiding the classic report’s column headings using the CSS property display:none. I accomplished this by adding a CSS class called hidden to the page-level CSS > Inline settings:
.hidden {
display: none;
}
After doing this, I configured the EmployeesResults classic report region’s Column CSS Classes to be the name of my hidden CSS class. After doing that, I had a working SmartFilter that was filtering the three separate cards regions, without showing the classic report region involved in triggering the chain reaction of filtering.
Filtering Code In the Demo
In practice, the APEX 21.2 demo app that you can download using the link below is based on an EMP-like table called EBA_DEMO_WORKLIST_EMP and the filtering code for the function is in a package named EBA_DEMO_WORKLIST whose specification looks like this. The package body looks very similar to Carsten’s blog article, but it’s simplified to only return the single primary key column of results in each row.
create or replace package eba_demo_worklist as
type eba_demo_worklist_pk_t_row is record (
id number
);
type eba_demo_worklist_pk_t_tab is table
of eba_demo_worklist_pk_t_row;
function get_region_results_pk_values(
p_page_id in number,
p_region_static_id in varchar2,
p_pk_column_name in varchar2 )
return eba_demo_worklist_pk_t_tab pipelined;
end;
You can download the demo app from here, and install it into an APEX 21.2 (or later).
The Oracle APEX interactive grid region is a richly functional component with a JavaScript API for all aspects of its multi-row user interface and client-side data model, but this article concerns something simpler. I was recently building an application with an interactive grid and wanted the change in one date field in the row to update the value of another date field in the same row. I knew it would be simple to achieve, but there was a little trick I needed to learn from a colleague to crack the nut.
Consider the interactive grid below that displays an Order Date, Ship Date, and Bill Date for some line items. Let’s investigate the two easiest ways I could find to set the Ship Date and the Bill Date to the value of the Order Date whenever the end-user changes the Order Date.
Interactive grid with three date fields per row
To react to the change in Order Date, I right-clicked on the ORDER_DATE grid column in the Page Designer and created a dynamic action event handler named “When Value Changed” keeping the default “Change” event.
Creating a dynamic action on the ORDER_DATE interactive grid column
Since I wanted to set the value of the Ship Date field to the value of the Order Date in the current row, the “Set Value” type of action step felt like a good choice. I wanted it to affect the Ship Date field, so I chose the SHIP_DATE column name in the Affected Elements section.I needed the ORDER_DATE column in the current row to provide the value to assign. My first instinct was to look for a Set Type of “Column”, but that wasn’t listed among the types available. The next most likely candidate for Set Type was “JavaScript Expression”, so I selected that and used the expression: $v('ORDER_DATE') Alas, after trying this expression, I wasn’t seeing the desired result. Luckily, my colleague Interactive Grid master John Snyders taught me the trick I needed to get things working.
In the JavaScript world of the grid, the ORDER_DATE is the name of the column. Here what I learned I needed to reference instead was the value of the “column item”, the name of the particular item in the current row of the ORDER_DATE column. John explained that by setting the Static ID of the ORDER_DATE column to some name other than ORDER_DATE, I could assign a meaningful name to the column item for this column. Just to make it really clear what I was doing, I set the Static ID for the ORDER_DATE column to be COLUMN_ITEM_FOR_ORDER_DATE. Then I updated my “When Value Changed” dynamic action event handler’s “Set Value” action step to reference $v('COLUMN_ITEM_FOR_ORDER_DATE') as shown below for the JavaScript expression providing the value to set.
After setting Static ID of the ORDER_DATE column, referenced it as column item in the “Set Value”
After doing that, the Ship Date in the current row suddenly started updating interactively as I had hoped whenever the Order Date got changed. This technique illustrates the way to implement the requirement on the client-side without incurring a round-trip to the server to perform the assignment.
To assign the Bill Date, I wanted to show off the other technique I experimented with. Building on the same dynamic action event handler, I added a second action step with action type “Execute Server-side Code”. For the PL/SQL code, as shown in the figure below, I simply used the page item names as bind variables and APEX automatically interprets them as the values in the current row:
:BILL_DATE := :ORDER_DATE;
As the name of the action type implies, this approach executes the PL/SQL on the server-side, so we need to remember to configure the Items to Submit to include the ORDER_DATE and the Items to Return to include the BILL_DATE as shown below.
Setting interactive grid column Bill Date to the value of Order Date using Server-side PL/SQL
In this second server-side approach, I was able to directly reference the name of the ORDER_DATE and BILL_DATE columns without involving the Static ID name. That additional trick was only required for use in the JavaScript expression shown earlier.
Of course, since the “Set Value” using the JavaScript Expression is performed completely on the client-side in end-user’s browser, it is faster than the Execute Server-side code technique that requires an additional HTTP round-trip to the server to perform the assignment. It’s good to understand both approaches and pick the one that meets your needs best in your own applications.
Oracle APEX lets application developers easily use any data they need. A region’s data can come from a local table or view, the rows returned by a SQL query, a REST service’s response payload, or rows from a table, view or query sent to a remote, REST-enabled SQL database. APEX also supports the conditional visibility of regions and page items using a declaratively-configured “server-side condition”. Let’s consider a use case that combines these features to show or hide a region based on whether it contains any data. In other words, if the region’s data source returns rows, then show it, otherwise hide it.
At first, the solution sounds simple. One of the Server-side Condition types is “Rows Returned”. This configures the region to be processed and displayed when at least one row is returned from the SQL Query that you type into the box below. This works great for regions based on local data that the user cannot filter further, but if the end-user can filter the data using interactive report/grid filtering, a faceted search, or smart filters, how can this “Rows returned” query correctly reflect the end-user’s active filters applied? What’s more, if the region uses a REST service or REST-enabled SQL data source, then what SQL Query do we type in here? The APEX engine executes the Server-side condition’s “Rows returned” query against the local database, so it won’t be useful to determine if the remote data source returns data. So we need another strategy when a region employs remote data or might be actively filtered by the end-user.
Server-side Condition “Rows returned” query is executed against the local database
I didn’t find any ready-made APEX API to inquire whether a region’s data source returned data, so I set out to write my own. Luckily, I had recently read my colleague Carsten’s great article Add a Chart to your Faceted Search Page. There he explains a technique to produce a chart of exactly the same filtered results as another report region on the page that has been filtered using a faceted search region. The crux of his clever plan involves using the open_query_context() function in the apex_region package to obtain a logical cursor over that region’s data, which can be used to process its data one row at a time. The cursor-like “query context” returned by this API hides the underlying details of how the data is retrieved, so it works the same way no matter how the region is configured to source its rows. It also conveniently encapsulates the current state of the user’s applied filters, if any.
In Carsten’s article, the chart needs all of the other region’s rows to visualize them graphically. However, for our purposes we can use a simplified version of his approach that just attempts to retrieve a single row to see whether or not the region has data or not. The has_data() function in the region_utils package below implements the idea. When someone calls has_data('CHART'), for example, passing in the static id of a region on the current page, the function…
looks up the region id using the region’s static id and the id of the current page
opens a query context “cursor” on the region’s data source indicating that it wants to retrieve at most one row (p_max_rows=>1),
tests whether the cursor has at least one result row by calling next_row(),
closes the context, and
returns the result of whether or not a first row was returned.
create or replace package region_utils is
  function has_data(p_region_static_id varchar2) return boolean;
end;
/
create or replace package body region_utils is
    function boolean_to_string(p_value boolean) return varchar2 is
    begin
        return case when p_value then 'TRUE' else 'FALSE' end;
    end;
    --
    function has_data(p_region_static_id varchar2) return boolean
    is
        l_context     apex_exec.t_context;
        l_region_id   apex_application_page_regions.region_id%type;
        l_return      boolean;
        l_page_id     number := v('APP_PAGE_ID');
        l_app_id      number := v('APP_ID');
    begin
        -- 1. Lookup region id using static id & page id
        select region_id
        into l_region_id
        from apex_application_page_regions
        where application_id = l_app_id
          and page_id        = l_page_id
          and static_id      = p_region_static_id;
        -- 2. Open "cursor" on region's data source (max 1 row!)
        l_context := apex_region.open_query_context(
                       p_page_id   => l_page_id,
                       p_region_id => l_region_id,
                       p_max_rows  => 1);
        -- 3. Test if there is a next (i.e. first) row.
        l_return  := apex_exec.next_row( p_context => l_context );
        -- 4. Close the context "cursor"
        apex_exec.close( l_context );
        apex_debug.info('--- region_utils.has_data(''%s'') = %s',
                        p_region_static_id,
                        boolean_to_string(l_return));
        -- 5. Return whether we got a row or not
        return l_return;
    exception when others then
        apex_exec.close( l_context );
        raise;
    end;
end;
/
With this package in place, we can configure a chart region having static id of CHART to have a Server-side Condition using the “Expression” type as shown below to include the single line of PL/SQL code that uses our new has_data() function:
Using new has_data() function in a PL/SQL Expression for Server-side Condition
This approach worked great for a page that did not need the chart region’s data to be refreshed based on actions the end-user takes while using the page. When I tried to employ it on a page with interactivity, there was a learning opportunity awaiting me.
Consider the example below where the user can choose a department from a select list and immediately see a pie chart of all of the employees salaries in that department. Here both the shared component LOV for department names and the employees chart region below are based on REST-enabled SQL using a remote database.
Refreshing the chart region when Department changes
What I discovered from trying the Server-side Condition mentioned above with this more dynamic example was that when the condition evaluates to false, the chart component was left out of the page completely (as expected, perhaps!) so in some cases it was not present in the browser HTML page for my dynamic action on the select list to interact with.
To get the more dynamic use case working how I wanted it, I abandoned the idea of using the Server-side Condition to hide the chart, and resorted instead to using dynamic actions to conditionally hide and show the chart region based on the result of calling region_utils.has_data('CHART'). I introduced a hidden page item P1_CHART_HAS_DATA and added an additional function to my region_utils package has_data_as_string() to return the result of the has_data() function as either the string TRUE or FALSE for easy storage in this new, hidden page item. Then I used a Client-side Condition on several dynamic action steps to test the value of this P1_CHART_HAS_DATA page item using the JavaScript expression:
$v('P1_CHART_HAS_DATA') === 'TRUE'
The figure below shows the four-step dynamic action event handler for the Change event on the P1_DEPTNO select list page item. The first step uses has_data_as_string('CHART') to set the value of the hidden P1_CHART_HAS_DATA page item, submitting the P1_DEPTNO page item value since the region’s query depends on it. Then the subsequent three steps use a Client-side Condition JavaScript expression to conditionally Refresh the chart region if it had any data to graph, conditionally Show the chart region if it had data, and conditionally Hide the chart region if it did not have data. In this last situation, the JavaScript expression tests if $v('P1_CHART_HAS_DATA') === 'FALSE' while the previous two steps tested for 'TRUE'.
Dynamic action event handler on the Change event of the P1_DEPTNO select list to set value of P1_CHART_HAS_DATA and conditionally refresh, show, or hide the chart
After making the Hide dynamic action step Fire on Initialization to initially hide the chart region when the P1_DEPTNO select list has its default null value, this combination achieved the result I was looking for.
You can download the example app, and during import you will need to configure its REST-enabled SQL endpoint named slc12kos to point to your own REST-enabled SQL endpoint that has the EMP and DEPT tables available.
One tip my colleague Carsten mentioned when I was asking him questions about this approach was that if the chart region’s data were coming from a REST service instead of a REST-enabled SQL source, that would give you some additional options to use APEX’s periodic REST synchronization feature or REST source caching to reduce the number of HTTP requests between the APEX engine and the remote data endpoint when rendering the chart region in this example.
The final source for the region_utils package looks like the code below. For more information on enabling REST-Enabled SQL in your ORDS listener, check out Tim Hall’s video on Setting up REST-Enabled SQL over on his Oracle-Base blog.
create or replace package region_utils is
  function has_data(p_region_static_id varchar2) return boolean;
  function has_data_as_string(p_region_static_id varchar2) return varchar2;
end;
/
create or replace package body region_utils is
    function boolean_to_string(p_value boolean) return varchar2 is
    begin
        return case when p_value then 'TRUE' else 'FALSE' end;
    end;
    --
    function has_data(p_region_static_id varchar2) return boolean
    is
        l_context     apex_exec.t_context;
        l_region_id   apex_application_page_regions.region_id%type;
        l_return      boolean;
        l_page_id     number := v('APP_PAGE_ID');
        l_app_id      number := v('APP_ID');
    begin
        -- 1. Lookup region id using static id & page id
        select region_id
        into l_region_id
        from apex_application_page_regions
        where application_id = l_app_id
          and page_id        = l_page_id
          and static_id      = p_region_static_id;
        -- 2. Open "cursor" on region's data source (max 1 row!)
        l_context := apex_region.open_query_context(
                       p_page_id   => l_page_id,
                       p_region_id => l_region_id,
                       p_max_rows  => 1);
        -- 3. Test if there is a next (i.e. first) row.
        l_return  := apex_exec.next_row( p_context => l_context );
        -- 4. Close the context "cursor"
        apex_exec.close( l_context );
        apex_debug.info('--- region_utils.has_data(''%s'') = %s',
                        p_region_static_id,
                        boolean_to_string(l_return));
        -- 5. Return whether we got a row or not
        return l_return;
    exception when others then
        apex_exec.close( l_context );
        raise;
    end;
    function has_data_as_string(p_region_static_id varchar2) return varchar2 is
    begin
        return boolean_to_string(has_data(p_region_static_id));
    end;
end;
/
Create a cards region with interactive card width selector, saving user’s preference across logins.
We miss you, Joel.
Everyone in the Oracle APEX community
Oracle APEX card regions let your users browse and act on a grid of tiles, each representing a row of data. The card region directly taps into your end user’s intuition of browsing their mobile phone’s photo library, especially when the cards feature an image, so it’s a compelling way to present data to users.
The card region’s grid style resizes automatically to the screen space available, but by default end users can’t influence the size of each tile in the grid. Read on to learn how to let your users adjust the card width interactively and remember their choice as a preference across logins. At the end, you’ll find a step-by-step video tutorial and downloadable sample application, but we’ll explore the key ideas behind the technique first.
Overview of Strategy
To implement the feature, you’ll add the following to your page with the card region:
A select-list page item showing list of available sizes (e.g. Small, Medium, Large)
Having corresponding values of the pixel widths 180px, 220px, 300px
Defaulted to the static value for the Medium size (220px)
Configured with Maintain Session State setting of Per User (Disk).
A dynamic action “trigger” for the select list’s Change event with actions:
Execute JavaScript to update the CSS variable controlling the card size
Execute Server-side Code to save the updated value to the APEX session state
What’s a CSS Variable?
A CSS variable is a custom property whose name is prefixed by a double-hyphen (e.g. --preferred-button-width). It can be associated with any element in a page, either explicitly or implicitly by being associated with a class applied to that element. Any CSS expression can reference the value of a variable by using the syntax var(--variable-name) . The usage can also provide a default value to use in case the variable reference has no value of its own by including a second argument like var(--variable-name, defaultValue) . So, a CSS class named myButton could set the width property to the value of the --preferred-button-width variable (providing a default of 80 pixels) like this:
.myButton {
width : var(--preferred-button-width,80px);
}
If the same variable exists on multiple elements in the page, the value of the most specific occurrence is used. To provide a global default value for a variable, you can set a value for it on the special :root pseudo-class. If no more specific element in the page provides a value, then the one from the root is used.
As we’ll see below, the Universal Theme style class that defines the card region’s grid layout uses a CSS variable to control the size of the cards in the grid. So setting the right variable to a user-chosen value on the appropriate scope for your needs is the crux of the solution. So let’s explore which variable to set and consider on what context makes sense to set it.
Which Variable Do We Need to Set?
While a page containing a grid region is displayed, using the Chrome developer tools to inspect one of the cards (and clicking to enable the CSS-grid related style properties) we can observe that the card items grid layout is setup by this CSS class:
At first glance, it’s admittedly cryptic, but let’s unpack what it says. This style property defines the grid-template-columns layout to be a repeating set of columns that auto-fill the horizontal space available with uniform-sized grid cells. The browser computes the width of each grid cell automatically so it falls in the range between the values passed to the minmax() function. The first argument, that is the minimum width value, is given by the value of the CSS variable named --a-cv-item-width (or a default to 320 pixels if the variable is not defined). The second argument providing the maximum card width is one fractional unit (1fr), which represents the width of one column in the layout taking into account a spacing between grid cells, too. In short, if we assign the user-preferred card width value to the CSS variable --a-cv-item-width then the grid will instantly react to layout the grid with cards having that width (or slightly bigger to make each grid cell uniformly sized).
On What Context Do We Set the CSS Variable?
We have at least two sensible choices for the context on which to set the card size CSS variable:
On the card region itself, after assigning it a static id in the App Builder, or
On the “global” root context
Choice 1 imposes the user-preferred card width on just the region on which it’s assigned, whereas choice 2 sets the user-preferred card width so that all card regions in the application will abide by it.
The code examples that follow assume you’ve created a page item named P3_CARD_SIZE on the page with the card region, and that the values for the P3_CARD_SIZE select list page item are one of 180px for Small, 220px for Medium, and 300px for Large.
JavaScript to Set the CSS Variable on a Region
After configuring a static id on your card region (e.g. BooksCardRegion), your dynamic action on the P3_CARD_SIZE page item’s Change event can use the following line of JavaScript to change the CSS variable --a-cv-item-width to the new value of the P3_CARD_SIZE page item:
Your dynamic action on the P3_CARD_SIZE page item’s Change event can use the following line of JavaScript to change the CSS variable --a-cv-item-width on the global “root” context to the new value of the P3_CARD_SIZE page item:
Pushing the Interactive Card Size Change Immediately to the Server
The change to the CSS variable is made in the browser when the dynamic action reacts to the user’s change of the select list page item, and immediately takes visual effect for the end user in their browser. However, to immediately force the value change to be saved in the APEX session, add an additional dynamic action step to Execute server-side Code and which specifies the P3_CARD_SIZE as one of the page items to send to the server. Since it doesn’t need to perform any other server-side logic beyond pushing the values, you can simply use the “do nothing” PL/SQL instruction NULL; to enter into the required PL/SQL script property. If the page item’s Maintain Session State setting is configured to “Per Session (Disk)” then the user’s preference will persist for the duration of the session. If instead it’s set to “Per User (Disk)“, the setting will survive across subsequent user logins.
Step by Step Tutorial Video
NOTE: The video illustrates setting the CSS variable on the :root context, while the downloadable example app illustrates setting the variable on the card region. See above for a consideration on which is appropriate for your use case .
Sample Application
You can download an Oracle APEX 21.1 example application (containing a supporting objects installation script for two sample tables PNL_THEROUX_BOOKS and PNL_PUBLISHERS) from here.